The range of a sentiment score is [-1. A score of 1 is the most positive, a score of -1 is the most negative, and a score of 0 is neutral.
Overview
- Intrigued by Apple’s iOS apps? Learn how to build Natural Language Processing (NLP) iOS apps in this article
- We’ll be using Apple’s Core ML 3 to build these NLP iOS apps
- This is a hands-on step by step tutorial with code
Introduction
I love working in the Natural Language Processing (NLP) space. The last couple of years have been a goldmine for me – the level and quality of developments have been breathtaking.
But this comes with its own share of challenges. One of the biggest obstacles is to convert NLP techniques into practical code. This is where my appreciation for Apple’s Natural Language Toolkit – the library that is built on top of Core ML 3, really grows.
It makes life for a developer, NLP engineer or data scientist remarkably easy! Core ML 3 empowers us to build impactful text-based intelligent iOS applications in a streamlined and easy-to-understand manner.
The process of starting out with Core ML 3 and building NLP iOS apps is as seamless as iOS itself!
Core ML 3 supports some of the most advanced and relevant Natural Language Processing techniques, like ELMo, BERT, ULMFit, GPT, Deep Speech, among others.

In this article, we will explore the nuts and bolts of the Natural Language Toolkit for iOS so that the next time you sit down to build NLP based apps for your favorite iOS device, you can do it in double-quick time!
Table of Contents
- Setting up the Natural Language Toolkit using Core ML 3
- Basic Text Processing: Tokenization, Lemmatization
- Language Identification
- Spell Checking and Correction
- Part Of Speech (POS) Tagging
- Identifying People, Organization, etc. from the text (Named Entity Recognition)
- Sentiment Analysis
- Word Embeddings
Setting up the Natural Language Toolkit using Core ML 3
If you already have Core ML 3 on your system, then you do not have to do any external installation for the Natural Language Toolkit. If you don’t, here’s a handy guide to guide you through the installation process:
Also, note that we will be using Swift to code in this article so if you are not familiar with it, here’s how you can started:
You can also enrol in this free curse to learn about Swift in a comprehensive and structured manner where we cover this project as well:
We will be working in an XCode Playground for this tutorial. Let’s see how can we open that.
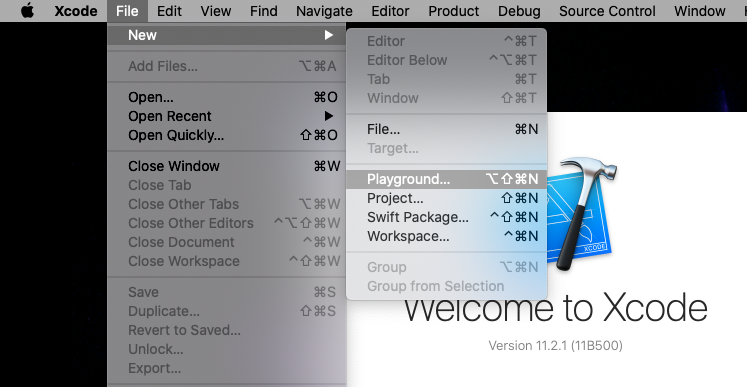
Open XCode and Select File->New->Playground:
In the next window, select a “Blank” under iOS:

You can give it any name you like. You will see the Playground window next:

Source: Learnappmaking.com
The Playground interface is quite simple:
- We write code in the central window area as marked in the above image
- The right pane shows the live results, as and when we type code
- The bottom pane is used to see the output or console when the program is executed
- We use the play button to run our code
Now that we have successfully created a new Playground for iOS, we are all set to try Natural Language Processing (NLP) for it!

Basic Text Processing: Tokenization and Lemmatization
Raw text is an example of unstructured data and that’s why we perform certain processing steps on it before performing any kind of analysis. Core ML’s Natural Language Toolkit supports most of the common text processing operations. We’ll learn learn about them in this section.
Tokenization
Tokenization means splitting our text into minimal meaningful units.
This is an important pre-processing step in NLP. Once we get a piece of text, we can break it into meaningful chunks, or units, that can be processed together.
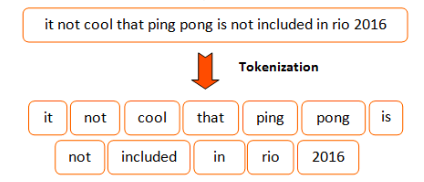
Chunks can be words, phrases, characters, etc. Their form depends on the kind of problem we are trying to solve. Here’s how you can do the same on iOS using Swift:
Here, we have just imported the NaturalLanguage library and created a new tokenizer using NLTokenizer. This tokenizer is then passed the text to be processed and we can then loop over the generated tokens and print them.
Keep in mind that the “unit” type is set to “.word” so we will get words as tokens in the output:

We can also pass other options to “unit”, including .word, .sentence, .paragraph and .document. You can try this out on your own end to see how it works.
Lemmatization
Lemmatization is the process of converting the words of a sentence to its dictionary form.
Let’s take an example. Given the words amusement, amusing, and amused, the lemma for each and all would be “amuse”.
This is a technique that is used a lot in text processing to normalize the text data because even though these words have different spellings and tenses, the meaning that they convey is the same.
Just like tokenization, lemmatization is also pretty straightforward in Swift:
We use NLTagger to tag each token with its lemma by choosing the .lemma as tagSchemes. We will see more of NLTagger when we deal with Named Entity Recognition (NER) and Part of Speech Tagging (PoS) later in the article.
Here’s the lemma or root word of the input text:

Notice how swimming, swam and swim all correspond to the same lemma “swim” which is indeed the root word according to the dictionary.
Now that we have learned how to do basic text processing using the Natural Language Toolkit, let’s see some interesting use cases of NLP that you can use for your iPhone or iOS apps.
Language Identification in iOS
One of the most useful features of the Natural Language Toolkit is that we can detect the language of any given text.
We use NLLanguageRecognizer from the Natural Language Toolkit to detect languages in a piece of text.
There are multiple options available for doing this:
- We can find the dominant language from a text that’s multilingual using the dominant language property
- We can also get a confidence score of each language that the model thinks is present in the text. This is very useful when we have text in similar languages using language hypothesis
Here is how in Swift, you can identify the language of a text in just a few lines of code:
This is what Swift tells us on running the above code:

Notice that in the first case, it says that the dominant language is “en” or English even though some Japanese characters are also present. This is because the number of English words is more than the Japanese ones.
In the second output, you will see that the probability of “ar” or Arabic is 99.9%. This is correct but notice that it also gives a low probability to “ur” or Urdu which is a very similar language. This is quite fascinating if you’re interested in how languages work (I am!).
Spell Checking and Correction
Spell Checking and Correction is another very important and popular application of NLP that has real-world value for any text-based apps that you might build.
The biggest example of this is Google search itself; it tries to correct our spelling to make sure we get the right results for your query.
It’s fairly easy to implement Spell Checking and Correction in Swift using the Natural Language Toolkit:
So far, we had only used the NaturalLanguage library but now we are importing the UIKit library as well. That’s because a major component of the spell checker that is UITextChecker() is present in the UIKit itself.
The rangeOfMisspelledWord() function extracts the range of index in which the word with the wrong spelling lies in the given text.
Once that is done, we use the guesses() function that basically gives us a couple of options of the rightly spelled words that are mostly similar to the wrong word.
If you run the above code on the given piece of text, you will get the wrongly spelled words and the possible correct spellings for them:
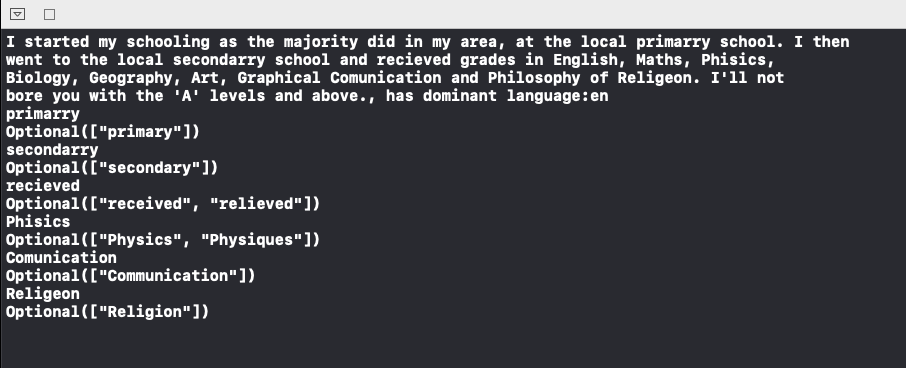
Notice that for each wrongly spelled word like “primarry” or “recieved”, our code tries to predict the nearest correct words. Love that!
Part Of Speech (POS) Tagging
Every word in a sentence is associated with a Part Of Speech (POS) tag – nouns, verbs, adjectives, adverbs, etc.
The POS tags define the usage and function of a word in the sentence.
We can simply use the same NLTagger that we saw earlier to find POS tags for our text. The only difference is that now our scheme will be .lexicalClass instead of the .lemma that we used earlier for Lemmatization:
Here is the output of the NLTagger for the above text:

POS tags are widely used for text analytics as they encompass additional information of the text data at hand.
Identifying People, Organization, etc. from the Text (Named Entity Recognition)
Our text app can be more intelligent if we are able to identify named entities in natural language.
For example, consider a messaging app that can look for names of people and places in text in order to display related information, like contact information or directions.
The example Swift code below shows how to use NLTagger to loop over a given text and identify any named person, place, or organization:
Notice that we are using the same NLTagger that we used for both Lemmatization and POS Tagging. But this time, the tagging scheme is .nameType that is used for NER.
Let’s take an input text:
Apple is looking at buying U.K. startup for $1 billion.
Here is how Swift identifies the correct Named Entities for this text:
Apple: OrganizationName
U.K.: PlaceName
Let’s go through another interesting and useful application of NLP in Swift – Sentiment Analysis!
Performing Sentiment Analysis on iOS
Sentiment Analysis is when we try to predict the sentiment of a given piece of text: is it positive, negative or neutral?
This is one of the most popular and widely used idea in the NLP space. From understanding people’s views using eCommerce reviews to gauging the political mood using tweets, sentiment analysis is ubiquitous. It’s one of the first topics we learn when we delve into NLP.
Let’s take an example to understand how to do sentiment analysis for iOS apps. We want to build a small program that outputs a smiley based on the sentiment of the input text.

First, we will be using the same NLTagger that we have already been using for POS and NER but this time the scheme will be .sentimentScore:
let tagger = NLTagger(tagSchemes: [.sentimentScore])
The rest of the steps are similar to what we have already been doing – process the input text using the tagger and then fetch the tags:
let sentiment = tagger.tag(at: input.startIndex, unit: .paragraph, scheme: .sentimentScore).0
Note that here we are using .paragraph as the unit as we want the sentiment score for the entire piece of text. This is very different from when we were tagging POS and NER and that’s simply because there we needed tags at the individual word level.
Once we get our sentiment score, we can just write an if-else condition to print the appropriate smiley based on the sentiment score.
Here’s the entire code to perform sentiment analysis:
The above text is negative so when we run this program in XCode, we will get the sad smiley in the output:

Note that the sentiment score is less than 0 because it’s a negative sentiment.
One of the most interesting things about this sentiment analysis feature is that it supports 7 languages already:
- English
- Spanish
- French
- Italian
- German
- Portuguese
- Simplified Chinese
We can build smart applications that are able to understand a user’s emotion in multiple languages right out of the box! I encourage you to play around with this code, change the input text, and see how the model performs. Let me know in the comments section below.
Word Embeddings
Word Embeddings have transformed the way we build NLP systems. From Word2Vec to GloVe, we now have embeddings from large transformer models like BERT, RoBERTa, etc.
The Natural Language Toolkit comes with useful embeddings of its own: OS Embeddings.
These embeddings are available for 7 languages and are optimized for all Apple platforms, including iOS, macOS, watchOS and so on.
Let’s start with a basic example around embeddings. We want to build a basic program that can fetch other words which are semantically “near” to the given word.
Let’s say we type “king”. Off the top of my head, we would want words like “prince”, “crown”, “throne”, etc. right?

We can use NLEmbedding from the Natural Language Toolkit to get the OS Embeddings for a particular word. We use the neighbours() function that takes as input the word to search for and the number of related words we want.
The code is pretty straightforward:
On executing the above code with “cheese” as the input word, this is what I get:

We get different cheese types, such as “mozzarella”, “cheddar”, etc. in the output. Makes sense, right?
Apart from finding similar words, word embeddings in the Natural Language Toolkit support many other useful functions:
- Given two words, the distance (or similarity) between them based on their embeddings
- Given an embedding vector, find the words that are nearest to it
Although OS Embeddings seem really useful, there are many embeddings like GloVe, Word2Vec, BERT, FastText, etc. that work really well for certain cases and that’s what Apple has realized. That’s why we can actually import these embeddings and use them for our iPhone or iOS app:

In fact, we can even train our own custom embeddings using CreateML which is a tool that we will cover in the next article. You can read more about embeddings in the NLEmbeddings documentation.
End Notes
How fun was that? This article combined my love for NLP with the seamless coding experience of Swift. It was a joy to work on and bring this to the community.
I would again encourage you to play around with the code and try this out yourself. Another aspect we can work on is building Computer Vision-based iOS apps using Core ML 3 but I’ll leave that for a future article. I look forward to hearing your thoughts and experiences with building iOS apps in the comments section below.
Note: You can download all the code used in this blog on my GitHub.
If you’re new to Natural Language Processing and want to get your feet wet, here’s the perfect course to start:
Sanad is a Senior AI Scientist at Analytics Vidhya, turning cutting-edge AI research into real-world Agentic AI products. With an MS in Artificial Intelligence from the University of Edinburgh, he’s worked at top research labs tackling multilingual NLP and NLP for low-resource Indian languages. Passionate about all things AI, he loves bridging the gap between deep research and practical, impactful products.


Hi, Fascinating. But a majority of databases used in the scripts available are for English/French/German. Hardly any for low resource languages such as Indic. Any solutions to that ? I have hunted for NLP databases in Indic which can be deployed for ML but have come a cropper.
Hey Raymond, Check out this interesting project: https://github.com/goru001/inltk Apart from that, you can also see StanfordNLP (supports 53 human languages!): https://www.analyticsvidhya.com/blog/2019/02/stanfordnlp-nlp-library-python/ Hope this helps! :)