Image Classification Using CNN (Convolutional Neural Networks)
Introduction
Convolutional neural networks (CNN) – the concept behind recent breakthroughs and developments in deep learning.
Computer vision is a very popular field in data science, and CNNs have broken the mold and ascended the throne to become the state-of-the-art computer vision technique. Among the different types of neural networks (others include recurrent neural networks (RNN), long short-term memory (LSTM), artificial neural networks (ANN), etc.), CNNs are easily the most popular. These convolutional neural network models are ubiquitous in the image data space. They work phenomenally well on computer vision tasks like image classification, object detection, image recognition, etc. They have hence been widely used in artificial intelligence modeling, especially to create image classifiers. This article will introduce you to the concept of image classification using CNN and show you how they work on various datasets.
Learning Objectives
- We will learn to build image classification CNN using python on each of the MNSIT, CIFAR-10, and ImageNet datasets.
- We will learn how CNNs work for the image classification task.
Note: I will be using TensorFlow’s Keras library to demonstrate image classification using CNNs in this article. Keras API is an excellent framework to learn when you’re starting out in deep learning.
Table of contents
- Introduction
- What is CNN?
- Using CNNs to Classify Hand-written Digits on MNIST Dataset
- Steps to Build an Image Classification Model using CNN
- Full Code for the CNN Model
- Identifying Images From the CIFAR-10 Dataset Using CNNs
- Categorizing the Images of ImageNet Using CNNs
- Conclusion
- Frequently Asked Questions
What is CNN?
Firstly, let’s understand the basics of Convolutional Neural Networks (CNN).
If you’re new to the world of neural networks, CNNs, and image classification, I recommend going through these excellent in-depth tutorials:
- Introduction to Neural Networks (Free Course!)
- Demystifying the Mathematics behind Convolutional Neural Networks (CNNs)
- Build your First Image Classification Model in just 10 Minutes
You can learn all about Convolutional Neural Networks(CNN) in this free course: Convolutional Neural Networks (CNN) from Scratch
And if you’re looking to learn computer vision and deep learning in-depth, you should check out our popular courses:
There are various datasets that you can leverage for applying convolutional neural networks. Here are three popular datasets:
- MNIST
- CIFAR-10
- ImageNet
We will now see how to classify images using CNN on each of these datasets.
Using CNNs to Classify Hand-written Digits on MNIST Dataset

MNIST (Modified National Institute of Standards and Technology) is a well-known dataset used in Computer Vision that was built by Yann Le Cun et al. It is composed of images that are handwritten digits (0-9), split into a training set of 50,000 images and a test set of 10,000, where each image is 28 x 28 pixels in width and height.
This dataset is often used for practicing any algorithm made for image classification, as the dataset is fairly easy to conquer. Hence, I recommend that this should be your first dataset if you are just foraying in the field.
MNIST comes with Keras by default, and you can simply load the train and test files using a few lines of code:
from keras.datasets import mnist

# loading the dataset
(X_train, y_train), (X_test, y_test) = mnist.load_data()
# let's print the shape of the dataset
print("X_train shape", X_train.shape)
print("y_train shape", y_train.shape)
print("X_test shape", X_test.shape)
print("y_test shape", y_test.shape)Here is the shape of X (features) and y (target) for the training and validation data:
X_train shape (60000, 28, 28)
y_train shape (60000,)
X_test shape (10000, 28, 28)
y_test shape (10000,)
Steps to Build an Image Classification Model using CNN
Before we train a CNN model, let’s build a basic, Fully Connected Neural Network for the dataset. The basic steps to build an image classification model using a neural network are:
- Flatten the input image dimensions to 1D (width pixels x height pixels)
- Normalize the image pixel values (divide by 255)
- One-Hot Encode the categorical column
- Build a model architecture (Sequential) with Dense layers(Fully connected layers)
- Train the model and make predictions
Here’s how you can build a neural network model for MNIST. I have used relu and softmax as the activation function and adam optimizer, with accuracy being the evaluation metrics. The code contains all the steps from data loading to preprocessing to fitting the model. I have commented on the relevant parts of the code for better understanding:
# keras imports for the dataset and building our neural network
from keras.datasets import mnist
from keras.models import Sequential
from keras.layers import Dense, Dropout, Conv2D, MaxPool2D
from keras.utils import np_utils


# Flattening the images from the 28x28 pixels to 1D 787 pixels
X_train = X_train.reshape(60000, 784)
X_test = X_test.reshape(10000, 784)
X_train = X_train.astype('float32')
X_test = X_test.astype('float32')

# normalizing the data to help with the training
X_train /= 255
X_test /= 255

# one-hot encoding using keras' numpy-related utilities
n_classes = 10
print("Shape before one-hot encoding: ", y_train.shape)
Y_train = np_utils.to_categorical(y_train, n_classes)
Y_test = np_utils.to_categorical(y_test, n_classes)
print("Shape after one-hot encoding: ", Y_train.shape)

# building a linear stack of layers with the sequential model
model = Sequential()
# hidden layer
model.add(Dense(100, input_shape=(784,), activation='relu'))
# output layer
model.add(Dense(10, activation='softmax'))

# looking at the model summary
model.summary()
# compiling the sequential model
model.compile(loss='categorical_crossentropy', metrics=['accuracy'], optimizer='adam')
# training the model for 10 epochs
model.fit(X_train, Y_train, batch_size=128, epochs=10, validation_data=(X_test, Y_test))
After running the above code, you’d realized that we are getting a good validation accuracy of around 97% easily.
Let’s modify the above code to build a CNN model.
One major advantage of using ConvNets over NNs is that you do not need to flatten the input images to 1D as they are capable of working with image data in 2D. This helps in retaining the “spatial” properties of images.
Full Code for the CNN Model
# keras imports for the dataset and building our neural network
from keras.datasets import mnist
from keras.models import Sequential
from keras.layers import Dense, Dropout, Conv2D, MaxPool2D, Flatten
from keras.utils import np_utils
# to calculate accuracy
from sklearn.metrics import accuracy_score
# loading the dataset
(X_train, y_train), (X_test, y_test) = mnist.load_data()
# building the input vector from the 28x28 pixels
X_train = X_train.reshape(X_train.shape[0], 28, 28, 1)
X_test = X_test.reshape(X_test.shape[0], 28, 28, 1)
X_train = X_train.astype('float32')
X_test = X_test.astype('float32')
# normalizing the data to help with the training
X_train /= 255
X_test /= 255
# one-hot encoding using keras' numpy-related utilities
n_classes = 10
print("Shape before one-hot encoding: ", y_train.shape)
Y_train = np_utils.to_categorical(y_train, n_classes)
Y_test = np_utils.to_categorical(y_test, n_classes)
print("Shape after one-hot encoding: ", Y_train.shape)
# building a linear stack of layers with the sequential model
model = Sequential()
# convolutional layer
model.add(Conv2D(25, kernel_size=(3,3), strides=(1,1), padding='valid', activation='relu', input_shape=(28,28,1)))
model.add(MaxPool2D(pool_size=(1,1)))
# flatten output of conv
model.add(Flatten())
# hidden layer
model.add(Dense(100, activation='relu'))
# output layer
model.add(Dense(10, activation='softmax'))
# compiling the sequential model
model.compile(loss='categorical_crossentropy', metrics=['accuracy'], optimizer='adam')
# training the model for 10 epochs
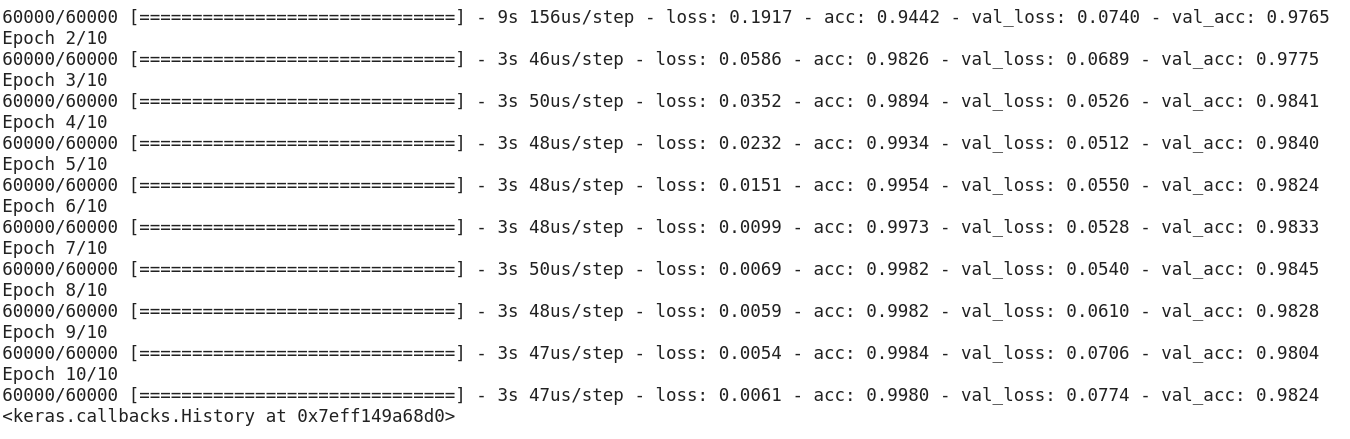
model.fit(X_train, Y_train, batch_size=128, epochs=10, validation_data=(X_test, Y_test))
In the above code, I have added the Conv2D layer and max pooling layers, which are essential components of a CNN model.
Even though our max validation accuracy by using a simple neural network model was around 97%, the CNN model is able to get 98%+ with just a single convolution layer!
You can go ahead and add more Conv2D layers and also play around with the hyperparameters of the CNN model.
Identifying Images From the CIFAR-10 Dataset Using CNNs
MNIST is a beginner-friendly dataset in computer vision. It’s easy to score 90%+ on validation by using a CNN model. But what if you are beyond beginner and need something challenging to put your concepts to use?
That’s where the CIFAR-10 dataset comes into the picture!

Defining Dataset
Here’s how the developers behind CIFAR (Canadian Institute For Advanced Research) describe the dataset:
The CIFAR-10 dataset consists of 60,000 32 x 32 colour images in 10 classes, with 6,000 images per class. There are 50,000 training images and 10,000 test images.
The important points that distinguish this dataset from MNIST are:
- Images are colored in CIFAR-10 as compared to the black-and-white texture of MNIST
- Each image is 32 x 32 pixel
- 50,000 training images and 10,000 testing images
Now, these images are taken in varying lighting conditions and at different angles, and since these are colored images, you will see that there are many variations in the color itself of similar objects (for example, the color of ocean water). If you use the simple CNN architecture that we saw in the MNIST example above, you will get a low validation accuracy of around 60%.
That’s a key reason why I recommend CIFAR-10 as a good dataset to practice your hyperparameter tuning skills for CNNs. The good thing is that just like MNIST, CIFAR-10 is also easily available in Keras.
Loading the Dataset
You can simply load the dataset using the following code:
from keras.datasets import cifar10
# loading the dataset
(X_train, y_train), (X_test, y_test) = cifar10.load_data()
Here’s how you can build a decent (around 78-80% on validation) CNN model for CIFAR-10. Notice how the shape values have been updated from (28, 28, 1) to (32, 32, 3) according to the size of the images:
# keras imports for the dataset and building our neural network
from keras.datasets import cifar10
from keras.models import Sequential
from keras.layers import Dense, Dropout, Conv2D, MaxPool2D, Flatten
from keras.utils import np_utils

# loading the dataset
(X_train, y_train), (X_test, y_test) = cifar10.load_data()

# # building the input vector from the 32x32 pixels
X_train = X_train.reshape(X_train.shape[0], 32, 32, 3)
X_test = X_test.reshape(X_test.shape[0], 32, 32, 3)
X_train = X_train.astype('float32')
X_test = X_test.astype('float32')

# normalizing the data to help with the training
X_train /= 255
X_test /= 255

# one-hot encoding using keras' numpy-related utilities
n_classes = 10
print("Shape before one-hot encoding: ", y_train.shape)
Y_train = np_utils.to_categorical(y_train, n_classes)
Y_test = np_utils.to_categorical(y_test, n_classes)
print("Shape after one-hot encoding: ", Y_train.shape)

# building a linear stack of layers with the sequential model
model = Sequential()

# convolutional layer
model.add(Conv2D(50, kernel_size=(3,3), strides=(1,1), padding='same', activation='relu', input_shape=(32, 32, 3)))

# convolutional layer
model.add(Conv2D(75, kernel_size=(3,3), strides=(1,1), padding='same', activation='relu'))
model.add(MaxPool2D(pool_size=(2,2)))
model.add(Dropout(0.25))

model.add(Conv2D(125, kernel_size=(3,3), strides=(1,1), padding='same', activation='relu'))
model.add(MaxPool2D(pool_size=(2,2)))
model.add(Dropout(0.25))

# flatten output of conv
model.add(Flatten())

# hidden layer
model.add(Dense(500, activation='relu'))
model.add(Dropout(0.4))
model.add(Dense(250, activation='relu'))
model.add(Dropout(0.3))
# output layer
model.add(Dense(10, activation='softmax'))

# compiling the sequential model
model.compile(loss='categorical_crossentropy', metrics=['accuracy'], optimizer='adam')

# training the model for 10 epochs
model.fit(X_train, Y_train, batch_size=128, epochs=10, validation_data=(X_test, Y_test))
Here’s what I changed in the model:
- Increased the number of Conv2D layers to build a deeper model
- Added Max pooling layer
- Increased number of filters to learn more features
- Added Dropout for regularization(reduces overfitting)
- Added more Dense layers
Training and validation accuracy across epochs:

You can easily eclipse this performance by tuning the above model. Once you have mastered CIFAR-10, there’s also CIFAR-100 available in Keras that you can use for further practice. Since it has 100 classes, it won’t be an easy task to achieve!
Categorizing the Images of ImageNet Using CNNs
Now that you have mastered MNIST and CIFAR-10, let’s take this problem a notch higher. Here, we will take a look at the famous ImageNet dataset.
ImageNet is the main database behind the ImageNet Large Scale Recognition Challenge (ILSVRC). This is like the Olympics of Computer Vision. This is the competition that made CNNs popular for the first time, and every year, the best research teams across industries and academia compete with their best algorithms on computer vision tasks.
About the ImageNet Dataset
The ImageNet dataset has more than 14 million images, hand-labeled across 20,000 categories.
Also, unlike the MNIST and CIFAR-10 datasets that we have already discussed, the images in ImageNet are of decent resolution (224 x 224), and that’s what poses a challenge for us: 14 million images, each 224 by 224 pixels. Processing a dataset of this size requires a great amount of computing power in terms of CPU, GPU, and RAM.
The downside – is that it might be too much for an everyday laptop. So what’s the alternative solution? How can an enthusiast work with the ImageNet dataset? That’s where Fast.ai‘s Imagenette dataset comes in.
Fast.ai‘s Imagenette Dataset
Imagenette is a dataset that’s extracted from the large ImageNet collection of images. The reason behind releasing Imagenette is that researchers and students can practice on ImageNet-level images without needing that many computing resources.
In the words of Jeremy Howard himself:
“I (Jeremy Howard, that is) mainly made Imagenette because I wanted a small vision dataset I could use to quickly see if my algorithm ideas might have a chance of working. They normally don’t, but testing them on Imagenet takes a really long time for me to find that out, especially because I’m interested in algorithms that perform particularly well at the end of training.But I think this can be a useful dataset for others as well.”
And that’s what we will also use for practicing!
Steps for Image Classification Using CNN on the ImageNet Dataset
Step 1: Download the Imagenette dataset
Here’s how you can fetch the dataset (commands for your terminal):
$ wget https://s3.amazonaws.com/fast-ai-imageclas/imagenette2.tgz
$ tar -xf imagenette2.tgz
Once you have downloaded the dataset, you will notice that it has two folders – “train” and “val”. These contain the training and validation set, respectively. Inside each folder, there are separate folders for each class. Here’s the mapping of the classes:
imagenette_map = {
    "n01440764" : "tench",
    "n02102040" : "springer",
    "n02979186" : "casette_player",
    "n03000684" : "chain_saw",
    "n03028079" : "church",
    "n03394916" : "French_horn",
    "n03417042" : "garbage_truck",
    "n03425413" : "gas_pump",
    "n03445777" : "golf_ball",
    "n03888257" : "parachute"
}
These classes have the same ID in the original ImageNet dataset. Each of the classes has approximately 1000 images, so overall, it’s a balanced dataset.

Step 2: Load images using ImageDataGenerator
Keras has this useful functionality for loading large images (like we have here) without maxing out the RAM, by doing it in small batches. ImageDataGenerator, in combination with fit_generator provides this functionality. ImageDataGenerator is a class in the Keras library in Python that is used to preprocess and image data augmentation:
from keras.preprocessing.image import ImageDataGenerator

# create a new generator
imagegen = ImageDataGenerator()
# load train data
train = imagegen.flow_from_directory("imagenette2/train/", class_mode="categorical", shuffle=False, batch_size=128, target_size=(224, 224))
# load val data
val = imagegen.flow_from_directory("imagenette2/val/", class_mode="categorical", shuffle=False, batch_size=128, target_size=(224, 224))
The ImageDataGenerator itself inferences the class labels and the number of classes from the folder names.

Step 3: Build a basic CNN model for image classification
Let’s build a basic CNN model for our Imagenette dataset (for the purpose of image classification):
from keras.models import Sequential
from keras.layers import Conv2D, MaxPool2D, Flatten, Dense, InputLayer, BatchNormalization, Dropout

# build a sequential model
model = Sequential()
model.add(InputLayer(input_shape=(224, 224, 3)))

# 1st conv block
model.add(Conv2D(25, (5, 5), activation='relu', strides=(1, 1), padding='same'))
model.add(MaxPool2D(pool_size=(2, 2), padding='same'))
# 2nd conv block
model.add(Conv2D(50, (5, 5), activation='relu', strides=(2, 2), padding='same'))
model.add(MaxPool2D(pool_size=(2, 2), padding='same'))
model.add(BatchNormalization())
# 3rd conv block
model.add(Conv2D(70, (3, 3), activation='relu', strides=(2, 2), padding='same'))
model.add(MaxPool2D(pool_size=(2, 2), padding='valid'))
model.add(BatchNormalization())
# ANN block
model.add(Flatten())
model.add(Dense(units=100, activation='relu'))
model.add(Dense(units=100, activation='relu'))
model.add(Dropout(0.25))
# output layer
model.add(Dense(units=10, activation='softmax'))

# compile model
model.compile(loss='categorical_crossentropy', optimizer="adam", metrics=['accuracy'])
# fit on data for 30 epochs
model.fit_generator(train, epochs=30, validation_data=val)
When we compare the validation accuracy of the above model, you’ll realize that even though it is a more deep architecture than what we have utilized so far, we are only able to get a validation accuracy of around 40-50%.

There can be many reasons for this, such as our model is not complex enough to learn the underlying patterns of images, or maybe the training data is too small to accurately generalize across classes.
Step up – transfer learning.
Step 4: Use transfer learning (VGG16) to improve accuracy
VGG16 is a CNN architecture that was the first runner-up in the 2014 ImageNet Challenge. It’s designed by the Visual Graphics Group at Oxford and has 16 layers in total, with 13 convolutional layers themselves. We will load the pre-trained weights of this model so that we can utilize the useful features this model has learned for our task.
1. Downloading weights of VGG16
from keras.applications import VGG16

# include top should be False to remove the softmax layer
pretrained_model = VGG16(include_top=False, weights='imagenet')
pretrained_model.summary()
Here’s the architecture of the model:

2. Generate features from VGG16
Let’s extract useful features that VGG16 already knows from our dataset’s images:
from keras.utils import to_categorical
# extract train and val features
vgg_features_train = pretrained_model.predict(train)
vgg_features_val = pretrained_model.predict(val)
# OHE target column
train_target = to_categorical(train.labels)
val_target = to_categorical(val.labels)Once the above features are ready, we can just use them for training a basic, Fully Connected Neural Network in Keras:
model2 = Sequential()
model2.add(Flatten(input_shape=(7,7,512)))
model2.add(Dense(100, activation='relu'))
model2.add(Dropout(0.5))
model2.add(BatchNormalization())
model2.add(Dense(10, activation='softmax'))
# compile the model
model2.compile(optimizer='adam', metrics=['accuracy'], loss='categorical_crossentropy')
model2.summary()
# train model using features generated from VGG16 model
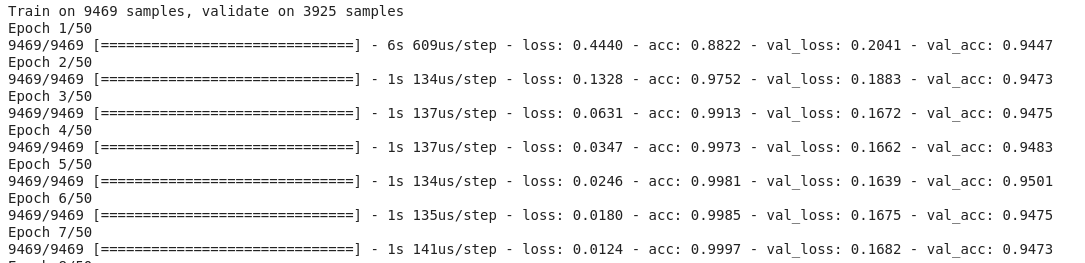
model2.fit(vgg_features_train, train_target, epochs=50, batch_size=128, validation_data=(vgg_features_val, val_target))
Notice how quickly your model starts converging. In just 10 epochs, you have a 94%+ validation accuracy. Isn’t that amazing?
In case you have mastered the Imagenette dataset, fastai has also released two variants that include classes you’ll find difficult to classify:
- Imagewoof: 10 classes of dog breeds – a larger batch size and a more difficult problem to classify.
- Image网 (“wang”): A combination of Imagenette and Imagewoof and a couple of tricks that make it a harder problem.
Conclusion
In this article, I have tried to compile the different ways in which CNNs are used for image classification. Hope it gave you an insight into how you can build different models on different datasets from scratch. It also explained how transfer learning is used to improve the accuracy of the task.
Apart from the datasets we’ve discussed above, you can also use the below datasets for building computer vision algorithms. In fact, consider this a challenge. Try image classification using CNN on these datasets.
- Fashion MNIST – MNIST-like dataset of clothes and apparel. Instead of digits, the images show a type of apparel (T-shirt, trousers, bag, etc.)
- Caltech 101 – Another challenging dataset that I found for image classification
I also suggest that before going for transfer learning, try improving your base CNN models. You can learn from the architectures of VGG16, ZFNet, etc., for some clues on hyperparameter tuning, and you can use the same ImageDataGenerator to augment your images and increase the size of the dataset.
Key Takeaways
- CNNs work well on computer vision tasks like image classification, object detection, image recognition, and more.
- We’ve looked into building image classification CNN using python on the MNSIT, CIFAR-10, and ImageNet datasets.
Frequently Asked Questions
A. A feature map is a set of filtered and transformed inputs that are learned by ConvNet’s convolutional layer. A feature map can be thought of as an abstract representation of an input image, where each unit or neuron in the map corresponds to a specific feature detected in the image, such as an edge, corner, or texture pattern.
A. There are many CNN algorithms for many different tasks, such as object detection, object recognition, image segmentation, etc. However, some of the most commonly used CNN architectures that have been proven to have high accuracy on various computer vision tasks include VGGNet, ResNet (Residual Network), InceptionNet, DenseNet(example of a deep neural network), and YOLO.
A. Convolutional Neural Networks (CNNs) are a type of Deep Learning algorithm that is primarily used for image classification and object recognition tasks. Here are some key differences between CNNs and other machine-learning algorithms:
1. Unlike machine learning algorithms, CNNs can learn relevant features automatically as part of the training process.
2. CNNs have a unique layered architecture consisting of convolutional, pooling, and fully connected layers, which are designed to automatically learn the features and hierarchies of the input data, while Ohter ML algorithms have different architecture.
3. CNNs can be computationally expensive due to their large number of parameters and complex architecture. Other algorithms, such as decision trees and random forests, are typically faster and more computationally efficient.
A computer science graduate, I have previously worked as a Research Assistant at the University of Southern California(USC-ICT) where I employed NLP and ML to make better virtual STEM mentors. My research interests include using AI and its allied fields of NLP and Computer Vision for tackling real-world problems.


please could anyone tell me how to extract the learned features and transfer them to other algorithm of CNN ,whenever i run the CNN model for 10 times accurarcy increases,after reopening the file. again i have run it 10 times to get better accurarcy. now i want to extract whatever CNN algorithm has learned and transfer it to other algoritm.
Hello, first of all thank you very much for the tutorial. So I have tried the "Classify Hand-written Digits on MNIST Dataset" using CNN model. It worked, but the accuracy is 0.11 even after 10 epochs. Could you please help me here, thank you!
Hello, first of all thank you very much for the tutorial. I have tried the "Classify Hand-written Digits on MNIST Dataset" using CNN model, it worked! However, the accuracy is 0.11 even after 10 epochs. I just copy pasted your code, what is the problem? I had this warning "tensorflow/core/platform/cpu_feature_guard.cc:145] This TensorFlow binary is optimized with Intel(R) MKL-DNN to use the following CPU instructions in performance critical operations: SSE4.1 SSE4.2 AVX AVX2 FMA To enable them in non-MKL-DNN operations, rebuild TensorFlow with the appropriate compiler flags. tensorflow/core/common_runtime/process_util.cc:115] Creating new thread pool with default inter op setting: 8. Tune using inter_op_parallelism_threads for best performance." Is this the problem?
Dear Sir, I need an image dataset of both hands for rheumatoid arthritis detection. Plz do the need full things