“Memory Error” – that all too familiar dreaded message in Jupyter notebooks when we try to execute a machine learning or deep learning algorithm on a large dataset. Most of us do not have access to unlimited computational power on our machines. And let’s face it, it costs an arm and a leg to get a decent GPU from existing cloud providers. So how do we build large deep learning models without burning a hole in our pockets? Step up – Google Colab!
It’s an incredible online browser-based platform that allows us to train our models on machines for free! Sounds too good to be true, but thanks to Google, we can now work with large datasets, build complex models, and even share our work seamlessly with others. That’s the power of Google Colab.
Table of contents
- What is Google Colab?
- Benefits of Google Colab
- Why Choose Google Colab?
- What is a Notebook in Google Colab?
- Google Colab Features
- GPUs and TPUs on Google Colab
- How to Use Google Colab?
- What Google Colab Offers You?
- Google Colab Runtimes – Choosing the GPU or TPU Option
- Using Terminal Commands on Google Colab
- Cloning Repositories in Google Colab
- Uploading Files and Datasets
- Saving Your Notebook
- Exporting Data/Files from Google Colab
- Sharing Your Notebook
- Recommendations
- Frequently Asked Questions
What is Google Colab?
Google Colaboratory is a free online cloud-based Jupyter notebook environment that allows us to train our machine learning and deep learning models on CPUs, GPUs, and TPUs.
Here’s what I truly love about Colab. It does not matter which computer you have, what it’s configuration is, and how ancient it might be. You can still use Google Colab Notebook! All you need is a Google account and a web browser. And here’s the cherry on top – you get access to GPUs like Tesla K80 and even a TPU, for free!
TPUs are much more expensive than a GPU, and you can use it for free on Colab. It’s worth repeating again and again – it’s an offering like no other.
Are you are still using that same old Jupyter notebook on your system for training models? Trust me, you’re going to love Google Colab.
Benefits of Google Colab
Here are some of the benefits of using Google Colab:
- Accessibility: Google Colab is accessible from any web browser, so you don’t need to install any software on your computer. You can access your notebooks from anywhere worldwide, as long as you have an internet connection.
- Power: Google Colab provides access to powerful computing resources, including GPUs and TPUs. This means you can train and run complex machine-learning models quickly and efficiently.
- Collaboration: Google Colab makes it easy to collaborate with others on projects. You can share your notebooks with others, and they can edit and run your code in real-time.
- Education: Google Colab Notebook is an excellent tool for learning about machine learning and data science. Many tutorials and resources are available online, and you can also create and share your notebooks.
Why Choose Google Colab?
Google Colab is a cloud-based machine learning platform that’s easy to use, affordable, and flexible.
- Easy to use: No setup required. Just create an account and start coding.
- Affordable: Free for most tasks. Paid plans are available for more demanding needs.
- Flexible: Train and run machine learning models, process data, create visualizations, and collaborate with others.
Google Colab is an excellent choice for students, data scientists, researchers, and anyone who wants to start with machine learning or data science.
What is a Notebook in Google Colab?
In Google Colab, a notebook is a web-based environment for creating and running code. Notebooks are similar to scripts or code files in other programming environments but offer some unique advantages. Notebooks allow you to write and execute code in a web browser, displaying the output in real time. This makes it easy to iterate on your code and visualize the results as you go. Colab notebooks also support markdown, allowing you to include formatted text, equations, and images alongside your code. You can also add comments and notes to your code, which makes it easier to understand and collaborate with others. Overall, notebooks are a powerful tool for data scientists and machine learning practitioners, providing a flexible and interactive environment for writing and testing code.
Google Colab Features
- Colab provides users free access to GPUs and TPUs, which can significantly speed up the training and inference of machine learning and deep learning models.
- Colab’s interface is web-based, so installing any software on your local machine is unnecessary. The interface is also intuitive and user-friendly, making it easy to get started with coding.
- Colab allows multiple users to work on the same notebook simultaneously, making collaborating with team members easy. Colab also integrates with other Google services, such as Google Drive and GitHub, making it easy to share your work.
- Colab notebooks support markdown, which allows you to include formatted text, equations, and images alongside your code. This makes it easier to document your work and communicate your ideas.
- Colab comes pre-installed with many popular libraries and tools for machine learning and deep learning, such as TensorFlow and PyTorch. This saves time and eliminates the need to manually install and configure these tools.
GPUs and TPUs on Google Colab
Ask anyone who uses Colab why they love it. The answer is unanimous – the availability of free GPUs and TPUs. Training models, especially deep learning ones, takes numerous hours on a CPU. We’ve all faced this issue on our local machines. GPUs and TPUs, on the other hand, can train these models in a matter of minutes or seconds.
If you still need a reason to work with GPUs, check out this excellent explanation by Faizan Shaikh.
It gives you a decent GPU for free, which you can continuously run for 12 hours. For most data science folks, this is sufficient to meet their computation needs. Especially if you are a beginner, then I would highly recommend you start using Google Colab.
Google Colab gives us three types of runtime for our notebooks:
- CPUs,
- GPUs, and
- TPUs
As I mentioned, Colab gives us 12 hours of continuous execution time. After that, the whole virtual machine is cleared and we have to start again. We can run multiple CPU, GPU, and TPU instances simultaneously, but our resources are shared between these instances.
Let’s take a look at the specifications of different runtimes offered by Google Colab:

It will cost you A LOT to buy a GPU or TPU from the market. Why not save that money and use Google Colab from the comfort of your own machine?
How to Use Google Colab?
You can go to Google Colab using this link. This is the screen you’ll get when you open Colab:

Click on the NEW NOTEBOOK button to create a new Colab notebook. Upload your local notebook to Colab by clicking the upload button:

You can also import your notebook from Google Drive or GitHub, but they require an authentication process.

You can rename your notebook by clicking on the notebook name and change it to anything you want. I usually name them according to the project I’m working on.
What Google Colab Offers You?
Google Colab is a free cloud-based platform that lets you write and execute Python code in your browser. It is especially well-suited for machine learning, data science, and education.
Here is some points of what Colab offers you:
- Free access to powerful computing resources: Colab gives you access to Google’s cloud computing platform, which means you can run your code on powerful GPUs and TPUs, even if you don’t have a powerful computer of your own.
- An easy-to-use interface: Colab’s interface is based on Jupyter notebooks, which are a popular way to write and share code. Colab notebooks allow you to combine code, text, images, and other rich media in a single document.
- A collaborative environment: Colab notebooks can be shared with other users, so you can collaborate on projects with others, regardless of their location.
Here are some specific examples of what you can do with Colab:
- Train and deploy machine learning models
- Analyze and visualize data
- Create and share interactive data stories
- Develop and test new software algorithms
- Teach and learn about machine learning and data science
If you are interested in machine learning, data science, or education, I encourage you to try out Google Colab. It is a free and powerful platform that can help you achieve your goals.
Google Colab Runtimes – Choosing the GPU or TPU Option
The ability to choose different types of runtimes is what makes Colab so popular and powerful. Here are the steps to change the runtime of your notebook:
Step 1: Click ‘Runtime’ on the top menu and select ‘Change Runtime Type’:

Step 2: Here you can change the runtime according to your need:

A wise man once said, “With great power comes great responsibility.” I implore you to shut down your notebook after you have completed your work so that others can use these resources because various users share them. You can terminate your notebook like this:

Using Terminal Commands on Google Colab
You can use the Colab cell for running terminal commands. Most of the popular libraries come installed by default on Colab. Yes, Python libraries like Pandas, NumPy, scikit-learn are all pre-installed.
If you want to run a different Python library, you can always install it inside your Colab notebook like this:
!pip install library_name
Pretty easy, right? Everything is similar to how it works in a regular terminal. We just you have to put an exclamation(!) before writing each command like:
!ls

or:

!pwd
Cloning Repositories in Google Colab
You can also clone a Git repo inside Google Colaboratory. Just go to your GitHub repository and copy the clone link of the repository:

Then, simply run:
!git clone https://github.com/analyticsvidhya/Complete-Guide-to-Parameter-Tuning-in-XGBoost-with-codes-in-Python.git

And there you go!
Uploading Files and Datasets
Here’s a must-know aspect for any data scientist. The ability to import your dataset into Colab is the first step in your data analysis journey.
The most basic approach is to upload your dataset to Colab directly:

You can use this approach if your dataset or file is very small because the upload speed in this method is quite low. Another approach that I recommend is to upload your dataset to Google Drive and mount your drive on Colab. You can do this in just one click of your mouse:
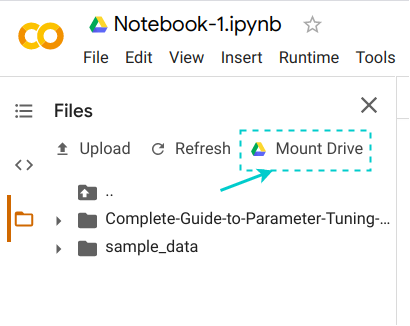
You can also upload your dataset to any other platform and access it using its link. I tend to go with the second approach more often than not (when feasible).
Saving Your Notebook
All the notebooks on Colab are stored on your Google Drive. The best thing about Colab is that your notebook is automatically saved after a certain time period and you don’t lose your progress.
If you want, you can export and save your notebook in both *.py and *.ipynb formats:

Not just that, you can also save a copy of your notebook directly on GitHub, or you can create a GitHub Gist:

I love the variety of options we get.
Exporting Data/Files from Google Colab
You can export your files directly to Google Drive, or you can export it to the VM instance and download it by yourself:

Exporting directly to the Drive is a better option when you have bigger files or more than one file. You’ll pick up these nuances as you work on bigger projects in Colab.
Sharing Your Notebook
Colab also gives us an easy way of sharing our work with others. This is one of the best things about Colab:

Just click the Share button, and it gives us the option of creating a shareable link that we can share through any platform. You can also invite others using their email IDs. It’s exactly the same as sharing a Google Doc or Google Sheet. The intricacies and simplicity of Google’s ecosystem are astounding!

Conclusion
Colab now also provides a paid platform called Google Colab Pro, priced at $9.99 a month. In this plan, you can get the Tesla T4 or Tesla P100 GPU, and an option of selecting an instance with a high RAM of around 27 GB. Also, your maximum computation time is doubled from 12 hours to 24 hours. How cool is that?
You can consider this plan if you need high computation power because it is still quite cheap when compared to other cloud GPU providers like AWS, Azure, and even GCP.
I am also working on another article where I’ll be giving you all the tips and tricks you need to know to master Colab. If you found this article informative, then please share it with your friends and comment below with your feedback or queries.
Recommendations
If you’re new to the world of Deep Learning, I have some excellent resources to help you get started in a comprehensive and structured manner:
- Fundamentals of Deep Learning
- Articles on Deep Learning
- Introduction to Neural Networks
- Computer Vision using Deep Learning
Frequently Asked Questions
Q1. Is Google Colab good for deep learning?
A. Google Colab is excellent for deep learning. It provides free access to GPUs, making it an ideal platform for training deep neural networks efficiently.
Q2. Can I use TensorFlow with Google Colab?
A. Yes, you can use TensorFlow with Google Colab Notebook. It offers TensorFlow support and is a popular choice for running TensorFlow-based deep learning projects.
Q3. Is Google Colab good for data science?
A. Google Colab is a valuable tool for data science. It offers a Python environment and access to powerful hardware for data analysis, making it a great choice for data science tasks.
Q4. Is Google Colab free for machine learning?
A. Yes, Google Colab is free for machine learning. While there is a paid version (Colab Pro), the free version provides substantial resources for most machine learning projects, including GPU support.
Q5. Can I use Google Colab on mobile?
Yes, you can use Google Colab on mobile. Google Colab has a mobile-friendly interface, so you can access and edit your notebooks from anywhere. However, some features, such as running code on GPUs, may not be available on mobile devices.
Q6. How do I use Google Colab on mobile?
To use Google Colab on mobile, simply open a web browser and go to colab.research.google.com: https://colab.research.google.com. You can then sign in with your Google account and start creating or editing notebooks.
Abhishek Sharma
08 Apr, 2024
He is a data science aficionado, who loves diving into data and generating insights from it. He is always ready for making machines to learn through code and writing technical blogs. His areas of interest include Machine Learning and Natural Language Processing still open for something new and exciting.


Very informative article. Thank You
You're Welcome!
Good introduction to collab. Also would like to know if I can use it with my company's email id since the gdrive storage is unlimited there ??
Thank you, Pankaj. First, GDrive storage and Disk storage of a Colaboratory notebook are two different things. It is possible to have unlimited GDrive storage but Colab storage is limited. Here, you can directly read and write the contents of GDrive through a colab notebook so it is similar to having a computer with an external hard disk of unlimited storage attached to it. Second, Google Colaboratory is available for G-Suite in G-Suite Marketplace. I hope I was able to solve your query.
Hi, Is it possible to link google co-lab's output to a MongoDB instance?
Yes, you can. For more information about using MongoDB in Python you can read this article: MongoDB in Python Tutorial for Beginners (using PyMongo)
Hi, it was a nice article. I would like to know if there is any tutorial for multiprocessing on GPU of google colab. I am having a hard time training a model, it's taking a lot of time.
Hi Abhijit. That entirely depends on the algorithm and the library you are using. Some algorithms and libraries can leverage the computing power of the GPU in a better way.
Brief and informative tutorial on Google Colab for beginners.
I am happy that you liked it.
hii very informative article . thanku . can you plz clear one thing : as mentioned Google Colab can continuously run for 12 hours it means that whatevr dataset i would be providing through drive i have to download again and again or start from the scratch to build my project again after every 12 hrs .
That's correct, Harnoor. You can only run a colab notebook continuously for 12 hours for FREE, that means your whole runtime will get reset after 12 hours which includes all the variables declared during the runtime and files present in the colab's disk. Note: You won't lose your files in the drive. There is a PRO membership too in which you can run the instance for 24 hours straight. You can check more about it here: Google Colab PRO
Excelent introductory article, Abhishek! Thank you, Claudio
I'm glad you liked it.
Is there any way where we can use Gdrive storage space as base for colab since colab's own storage is limited (100GB). I am downloading something larger than 200GB but colab's running out of storage but I have that kind of storage in Gdrive. I heard you can do that using Gdrive SDK. Can you help me by telling those steps?
You just have to mount the GDrive, then you'll be able to read and write files from it. You'll have to mention the target path for downloading any files into GDrive.
Can you post that github article link as well
Sure, This is the article. Complete Guide to Parameter Tuning in XGBoost with codes in Python
Thank you!
Hi. Is it possible to import a .ipynb from virtual env jupyter notebook? I am a newbie here.. Thank you in advance!
I have received an amazing information on google colab in this article...!
I found this very helpful for beginners on colab,Thank you so much.
Hello sir Just want to know that for training model we need to upload labelled image or simple images.
Amazing, well written article!
Excellent article for a beginner
amazing. i've learned a lot. thank you
Very clear explanation for a beginner to understand