I love the idea of smart cities. The thought of automated smart energy systems, electrical grids, one-touch access ports – it’s an enthralling concept! Honestly, it’s a dream for a data scientist and I’m delighted that a lot of cities around the world are moving towards becoming smarter.
One of the core components of a smart city is automated traffic management. And that got me thinking – could I use my data science chops to build a vehicle detection model that could play a part in smart traffic management?
Think about it – if you could integrate a vehicle detection system in a traffic light camera, you could easily track a number of useful things simultaneously:
And so on. The applications are endless!
Us humans can easily detect and recognize objects from complex scenes in a flash. Translating that thought process to a machine, however, requires us to learn the art of object detection using computer vision algorithms.
So in this article, we will be building an automatic vehicle detector and counter model. Here’s a taste of what you can expect:
Excited? Let’s turn on the ignition and take this for a spin!
Note: New to deep learning and computer vision? Here are two popular courses to kick start your deep learning journey:
Object detection is a fascinating field in computer vision. It goes to a whole new level when we’re dealing with video data. The complexity rises up a notch, but so do the rewards!
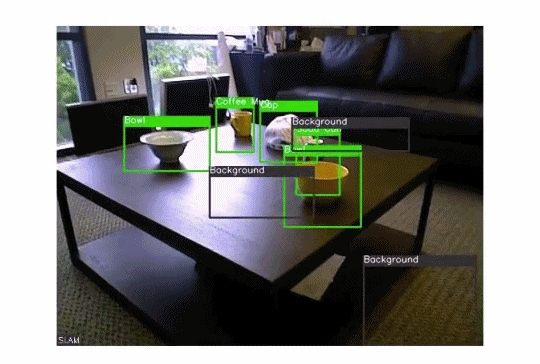
We can perform super useful high-value tasks such as surveillance, traffic management, fighting crime, etc. using object detection algorithms. Here’s a GIF demonstrating the idea:
 Source: giphy.com
There are a number of sub-tasks we can perform in object detection, such as counting the number of objects, finding the relative size of the objects, or finding the relative distance between the objects. All these sub-tasks are important as they contribute to solving some of the toughest real-world problems.
If you’re looking to learn about object detection from scratch, I recommend these tutorials:
Let’s look at some of the exciting real-world use cases of object detection.
Nowadays, video object detection is being deployed across a wide range of industries. The use cases range from video surveillance to sports broadcasting to robot navigation.
Here’s the good news – the possibilities are endless when it comes to future use cases for video object detection and tracking. Here I’ve listed down some of the interesting applications:
There are certain key concepts you should know before getting started with building a video detection system. Once you are familiar with these basic concepts, you would be able to build your own detection system for any use case of your choice.
So, how would you like to detect a moving object in a video?
Our objective is to capture the coordinates of the moving object and highlight that object in the video. Consider this frame from a video below:

We would want our model to detect the moving object in a video as illustrated in the image above. The moving car is detected and a bounding box is created surrounding the car.
There are multiple techniques to solve this problem. You can train a deep learning model for object detection or you can pick a pre-trained model and fine-tune it on your data. However, these are supervised learning approaches and they require labeled data to train the object detection model.
In this article, we will focus on the unsupervised way of object detection in videos, i.e., object detection without using any labeled data. We will use the technique of frame differencing. Let’s understand how it works!
A video is a set of frames stacked together in the right sequence. So, when we see an object moving in a video, it means that the object is at a different location at every consecutive frame.

If we assume that apart from that object nothing else moved in a pair of consecutive frames, then the pixel difference of the first frame from the second frame will highlight the pixels of the moving object. Now, we would have the pixels and the coordinates of the moving object. This is broadly how the frame differencing method works.
Let’s take an example. Consider the following two frames from a video:

Can you spot the difference between the two frames?
Yes – it is the position of the hand holding the pen that has changed from frame 1 to frame 2. The rest of the objects have not moved at all. So, as I mentioned earlier, to locate the moving object, we will perform frame differencing. The result will look like this:

You can see the highlighted or the white region where the hand was present initially. Apart from that, the notepad is also highlighted a bit along its edges. This could be due to the change in the illumination by the movement of the hand. It is advisable to get rid of unwanted detection of stationary objects. Therefore, we would need to perform certain image pre-processing steps on the frames.
In this method, the pixel values of a grayscale image are assigned one of the two values representing black and white colors based on a threshold. So, if the value of a pixel is greater than a threshold value, it is assigned one value, else it is assigned the other value.
In our case, we will apply image thresholding on the output image of the frame differencing in the previous step:

You can see that a major part of the unwanted highlighted area has gone. The highlighted edges of the notepad are not visible anymore. The resultant image can also be called as a binary image as there are only two colors in it. In the next step, we will see how to capture these highlighted regions.
The contours are used to identify the shape of an area in the image having the same color or intensity. Contours are like boundaries around regions of interest. So, if we apply contours on the image after the thresholding step, we would get the following result:

The white regions have been surrounded by grayish boundaries which are nothing but contours. We can easily get the coordinates of these contours. This means we can get the locations of the highlighted regions.
Note that there are multiple highlighted regions and each region is encircled by a contour. In our case, the contour having the maximum area is the desired region. Hence, it is better to have as few contours as possible.
In the image above, there are still some unnecessary fragments of the white region. There is still scope of improvement. The idea is to merge the nearby white regions to have fewer contours and for that, we can use another technique known as image dilation.
This is a convolution operation on an image wherein a kernel (a matrix) is passed over the entire image. Just to give you intuition, the image on the right is the dilated version of the image on the left:

So, let’s apply image dilation to our image and then we will again find the contours:

It turns out that a lot of the fragmented regions have fused into each other. Now we can again find the contours in this image:

Here, we have only four candidate contours from which we would select the one with the largest area. You can also plot these contours on the original frame to see how well the contours are surrounding the moving object:

We are all set to build our vehicle detection system! We will be using the computer vision library OpenCV (version – 4.0.0) a lot in this implementation. Let’s first import the required libraries and the modules.
Please download the frames of the original video from this link.
Keep the frames in a folder named “frames” inside your working directory. From that folder, we will import the frames and keep them in a list and then for data exploration let’s display two consecutive frames:
Python Code:
It is hard to find any difference in these two frames, isn’t it? As discussed earlier, taking the difference of the pixel values of two consecutive frames will help us observe the moving objects. So, let’s use the technique on the above two frames:
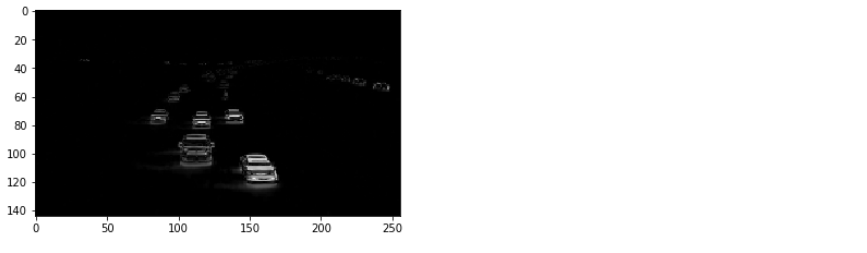
Now we can clearly see the moving objects in the 13th and 14th frames. Everything else that was not moving has been subtracted out.
Let’s see what happens after applying thresholding to the above image:

Now, the moving objects (vehicles) look more promising and most of the noise (undesired white regions) are gone. However, the highlighted regions are a bit fragmented. So, we can apply image dilation over this image:
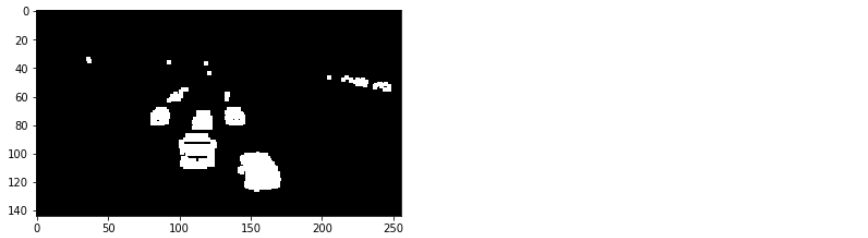
The moving objects have more solid highlighted regions. Hopefully, the number of contours for every object in the frame will not be more than three.
However, we are not going to use the entire frame to detect moving vehicles. We will first select a zone, and if a vehicle moves into that zone, then only it will be detected.
So, let me show you the zone that we will be working with:

The area below the horizontal line y = 80 is our vehicle detection zone. We will detect any movement that happens in this zone only. You can create your own detection zone if you want to play around with the concept.
Now let’s find the contours in the detection zone of the above frame:
# find contours
contours, hierarchy = cv2.findContours(thresh.copy(),cv2.RETR_TREE,cv2.CHAIN_APPROX_NONE)
The code above finds all the contours in the entire image and keeps them in the variable ‘contours’. Since we have to find only those contours that are present in the detection zone, we will apply a couple of checks on the discovered contours.
The first check is whether the top-left y-coordinate of the contour should be >= 80 (I am including one more check, x-coordinate <= 200). The other check is that the area of the contour should be >= 25. You can find the contour area with the help of the cv2.contourArea( ) function.
Next, let’s plot the contours along with the original frame:
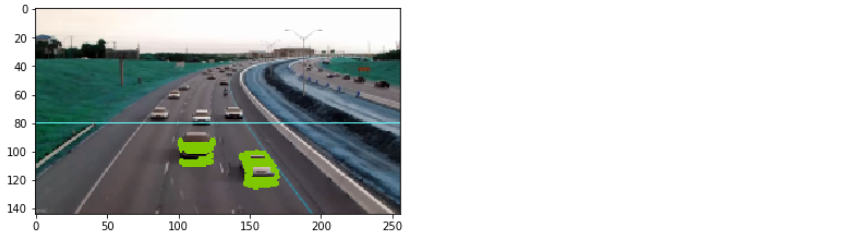
Cool! Contours of only those vehicles that are inside the detection zone are visible. This is how we will detect vehicles in all the frames.
It’s time to apply the same image transformations and pre-processing operations on all the frames and find the desired contours. Just to reiterate, we will follow the below steps:
Here, we have added contours for all the moving vehicles in all the frames. It’s time to stack up the frames and create a video:
# specify video name
pathOut = 'vehicle_detection_v3.mp4'

# specify frames per second
fps = 14.0
Next, we will read the final frames in a list:
frame_array = []
files = [f for f in os.listdir(pathIn) if isfile(join(pathIn, f))]
Finally, we will use the below code to make the object detection video:
Congratulations on building your own vehicle object detection!
In this tutorial, we learned how to use the frame differencing technique to perform moving object detection in videos. We also covered several concepts and topics around object detection and image processing. Then we went on to build our own moving object detection system using OpenCV.
I am sure that using the techniques and methods learned in this article you would build your own version of object detection systems. Let me know if you need any help.
Lorem ipsum dolor sit amet, consectetur adipiscing elit,


Great article, thanks!
pathIn = "contour_frames_3/" frame_array = [] files = [f for f in os.listdir(pathIn) if isfile(join(pathIn, f))] at this point, I have found an error which is The system cannot find the path specified: 'contour_frames_3/' is it not in frams.zip file please give me some suggestion
The pathIn variable contains the location of the saved frames on your local system. Kindly change it accordingly.
Loved the way you write the article about Object Detection. Is it possible to run these project over local system with only 4 GB of RAM?
Thanks Vikash! It should run a 4 GB RAM system as well.
Please how did you get it to display the running video with car detection, and not sending pictures to a separate folder. I need the program to run the video and detect the moving cars in the video, but when i follow all the procedures in this article, it sends all the detection as an image to a separate folder. Please help me out. Thanks.
actually, I m looking for the same query. If u have managed to solve the problem. can u help me out?
Thank u sir, This code is working perfectly fine in my system. how can I use a webcam for live capturing in your given code? pls, help me out.
sir, I need to run this code for webcam for live detection. what should be the code for that?
Excellent article Prateek. Great Job! Thanks much.
Hi! I want to walk on video object detection and will need your assistance.
Interesting post, thanks for sharing.