Introduction
I got a glimpse of my first self-driving car almost a decade ago when the folks at Google were still experimenting with a prototype almost a decade ago. I was instantly hooked by the idea. Admittedly, I had to wait a while before the concepts were open-sourced to the community but the wait has truly been worth it!
I have recently experimented with a few self-driving car concepts that pertain to computer vision, including lane detection. Think about it – it’s actually a pretty core concept in designing any autonomous vehicle.
Here’s a look at the lane detection system we’ll be building in this video:
Pretty cool, right? I can’t wait to get started and guide you on this computer vision inspired journey into the world of lane detection and self-driving cars using the OpenCV library. We will, of course, go through the Python code as well in this tutorial.
And a note to any deep learning or computer vision newcomer – check out the below offerings if you’re looking to get started. These resources are as good a place as any to begin your computer vision journey:
Table of Contents
- Understanding the Concept of Lane Detection
- Formulating the Problem Statement
- What is a Frame Mask?
- Image Pre-processing for Lane Detection
- Implementing Lane Detection using OpenCV in Python
Understanding the Concept of Lane Detection
So what is lane detection? Here’s how Wikipedia defines a lane:
“A lane is part of a roadway (carriageway) that is designated to be used by a single line of vehicles, to control and guide drivers and reduce traffic conflicts.” – Read more here

Source: https://en.wikipedia.org/wiki/Lane
It’s important to put a formal definition to this because it enables us to proceed with the lane detection concept. We can’t have any ambiguity when building a system, right?
As I mentioned earlier, lane detection is a critical component of self-driving cars and autonomous vehicles. It is one of the most important research topics for driving scene understanding. Once lane positions are obtained, the vehicle will know where to go and avoid the risk of running into other lanes or getting off the road. This can prevent the driver/car system from drifting off the driving lane.
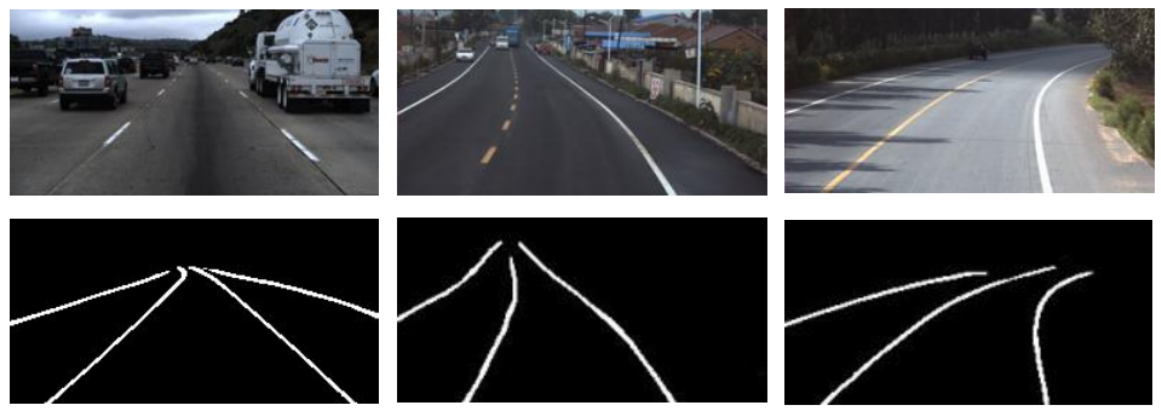
Here are a few random road images (first row) along with their detected lanes (second row):
Source: https://github.com/qinnzou/Robust-Lane-Detection
Formulating the Problem Statement
The task that we wish to perform is that of real-time lane detection in a video. There are multiple ways we can perform lane detection. We can use the learning-based approaches, such as training a deep learning model on an annotated video dataset, or use a pre-trained model.
However, there are simpler methods to perform lane detection as well. In this article, I will show you how to do it without using any deep learning model. But we will use the popular OpenCV library in Python.
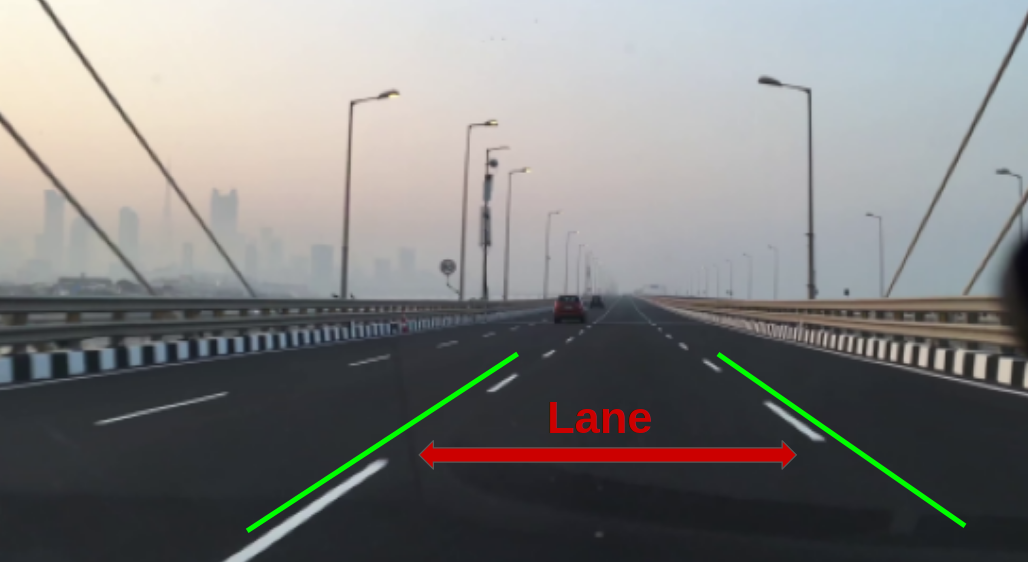
Given below is a frame from the video that we will be working with:
As we can see in this image, we have four lanes separated by white-colored lane markings. So, to detect a lane, we must detect the white markings on either side of that lane. This leads to the key question – how can we detect the lane markings?
There are so many other objects in the scene apart from the lane markings. There are vehicles on the road, road-side barriers, street-lights, etc. And in a video, a scene changes at every frame. This mirrors real-life driving situations pretty well.
So, before solving the lane detection problem, we have to find a way to ignore the unwanted objects from the driving scene.
One thing we can do right away is to narrow down the area of interest. Instead of working with the entire frame, we can work with only a part of the frame. In the image below, apart from the lane markings, everything else has been hidden in the frame. As the vehicle would move, the lane markings would fall more or less in this area only:
In the next section, I will show you how we can edit the frames of a video to select a specific area. You will also learn about some necessary image pre-processing operations.
What is a Frame Mask?
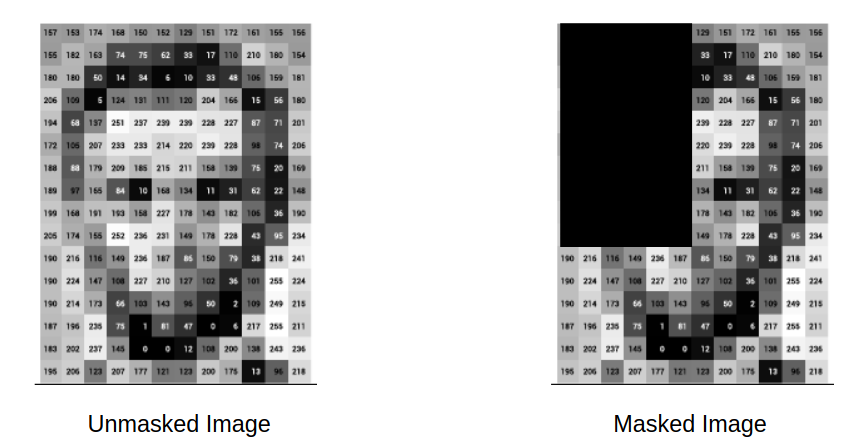
Here, a frame mask is nothing but a NumPy array. When we want to apply a mask to an image, we simply change the pixel values of the desired region in that image to 0, or 255, or any other number. Given below is an example of image masking. The pixel values of a certain region in the image have been set to 0:
It is a pretty simple but effective method of removing unwanted regions and objects from the images.
Image Pre-Processing for Lane Detection
We will first apply a mask to all the frames in our input video. Then, we will apply image thresholding followed by Hough Line Transformation to detect lane markings.
Image Thresholding
In this method, the pixel values of a grayscale image are assigned one of the two values representing black and white colors based on a threshold value. So, if the value of a pixel is greater than a threshold value, it is assigned one value, else it is assigned the other value.
As you can see above, after applying thresholding on the masked image, we get only the lane markings in the output image. Now we can easily detect these markings with the help of Hough Line Transformation.
Hough Line Transformation
Hough Transform is a technique to detect any shape that can be represented mathematically.
For example, it can detect shapes like rectangles, circles, triangles, or lines. We are interested in detecting lane markings that can be represented as lines. I strongly suggest you check out the Hough Transformation documentation.
Applying Hough Line Transformation on the image after performing image thresholding will give us the below output:
Hough Line Transformation
We need to follow this process for all the frames and then stitch the resultant frames into a new video.
Implementing Lane Detection using OpenCV in Python
It’s time to implement this lane detection project in Python! I recommend using Google Colab because of the computation power that will be required for building our lane detection system.
Let’s first import the required libraries:
Python Code:
Read Video Frames
I have sampled a few video frames from this YouTube video. You can download the frames from this link.
Let’s plot one of the frames:
Frame Mask Creation
Our region of interest is in the shape of a polygon. We want to mask everything except this region. Therefore, we first have to specify the coordinates of the polygon and then use it to prepare the frame mask:
Image Pre-processing
We have to perform a couple of image pre-processing operations on the video frames to detect the desired lane. The pre-processing operations are:
- Image Thresholding
- Hough Line Transformation
1. Image Thresholding
2. Hough Line Transformation
Now we will apply all these operations on each and every frame. We will also save the resultant frames in a new directory:
Video Preparation
Next, we will get all the frames with the detected lane into a list:
Finally, we can now combine the frames into a video by using the code below:
Awesome! There’s your lane detection system in Python.
End Notes
In this tutorial, we covered a simple technique for lane detection. We did not use any model or complex image features. Instead, our solution was purely based on certain image pre-processing operations.
However, there are going to be many scenarios where this solution will not work. For example, when there will be no lane markings, or when there is too much of traffic on the road, this system will fail. There are more sophisticated methods to overcome such problems in lane detection. I want you to explore them if the concept of self-driving cars interests you. Feel free to use the comments section in case you have any doubts or feedback for me.


Hi Prateek, Wonderful article. I downloaded the frames, extracted all and it is in my computers' downloads. I am struggling with the below code and getting the FileNotFoundError: [Errno 2] No such file or directory: 'frames/' col_frames.sort(key=lambda f: int(re.sub('\D', '', f))) I am always struggling with paths in Colab. Am I missing something here. Many thanks
Hi Emanuel, As per the error, you need to keep the downloaded frames in a folder named "frames".
Hi Prateek, I am struggling with the below code and getting the FileNotFoundError: 'NoneType' object is not subscriptable TypeError Traceback (most recent call last) in () 4 # plot frame 5 plt.figure(figsize=(10,10)) ----> 6 plt.imshow(col_images[idx][:,:,0], cmap= "gray") 7 plt.show() TypeError: 'NoneType' object is not subscriptable
Just check that col_images[idx] is a valid array.
Hi prateek It was very helpful article. While implementing the code for 'Read video frames' I'm getting an error.could you help me to fix it? I have tried using float () in place of int() but it did'nt work. Traceback (most recent call last) in () in (f) 1 # get file names of frames 2 col_frames = os.listdir ('frames') ----> 3 col_frames.sort (key = lambda f: int ( (re.sub ('\ D', '', f)))) 4 5 # load frames ValueError: invalid literal for int() with base 10: '0.png'
What % accuracy should we accept from this project, after complete extraction and executing all?
it's not happening, still getting the same error. could you please resolve this error
Hi Prateek, Your article is amazing, very nicely explained, I just had a little doubt though. I was interested in how would you implement the above solution using YOLOv7 or V8 would it require the image to be processed? and would the image detection work in real time more accurately if we use opencv together with YOLO , also if I make it using opencv what problems could we face if we use it in real time. And when do we need such deep learning models for performing what particular task? Do you know how this system works in tesla and some other companies ? If you could just give a gist of how to combine YOLO and opencv for real time lane detection it would be a great help for my project ,