Introduction
There is an abundance of resources available online for finding insights and training machine learning models on datasets, but there’s a scarcity of articles focusing on using these models to build real-world applications. Today, we embark on this journey by first training a video game sales prediction model using a dataset from a hackathon, and then utilizing the trained model to create a basic app that provides sales predictions based on user inputs.
This article is structured into sections, allowing you to progress through them at your own pace rather than attempting to consume it all at once. It took me a full week to complete the app from the moment I began working with the dataset, so I encourage you to take your time and concentrate on understanding the various aspects of app development rather than rushing to the final product.
If you’re ready, start your favorite music playlist in the background, and let’s get started.
Learning Objectives
- Understand the role of algorithms in data science and their significance in unlocking insights and optimizing business strategies.
- Explore the application of machine learning models such as linear regression and neural networks in sales forecasting, surpassing traditional methodologies.
- Learn the process of preprocessing, model training, and evaluation using a real-world dataset sourced from a Video Games sales prediction hackathon.
- Gain insight into the intricacies of model generation and optimization through Python’s data science ecosystem and state-of-the-art algorithms.
- Acquire knowledge and skills in developing backend APIs and client-side applications to bridge the gap between predictive analytics and practical implementation in real-world scenarios.
Table of contents
Generating the model
- We are going to use a dataset from the Video Games sales prediction hackathon which ran on the Machine Hack website. First, create an account on MachineHack and register for the hackathon on this link.
- Once registered go to the Data tab and download the zip file which will have three files viz Train, Test, and Sample Submission.
- Next steps will be covered in Google Colab notebook which you can open and clone from this link: Google Colab Notebook or if you would like to download and run the notebook locally or on other platforms then download the notebook from this GitHub link: Jupyter Notebook Link
- The first section in the notebook gives a brief overview of the problem statement. Upload the files we receive by running the next code cell shown below:
from google.colab import files

uploaded = files.upload()

for fn in uploaded.keys():

    print('User uploaded file "{name}" with length {length} bytes'.format(
name=fn, length=len(uploaded[fn])))- In the next code cell, we import the required python packages. Most of them are pre-installed in Google Colab so there is no need to install any of them.
- Since we cannot submit test data for evaluation after the hackathon ended, I am going to use data only for Train.csv for the rest of this article. Keep in mind that Train.csv has a lesser number of rows than what we would typically use for training a model properly. However, for learning purposes, we can use a dataset with a lesser number of rows.
- Let’s now deep dive into solving this Machine Learning Problem…
Step 1: Identifying Target and Independent Features
First, let’s import Train.csv into a pandas dataframe and run df.head() to see the columns in the dataset.
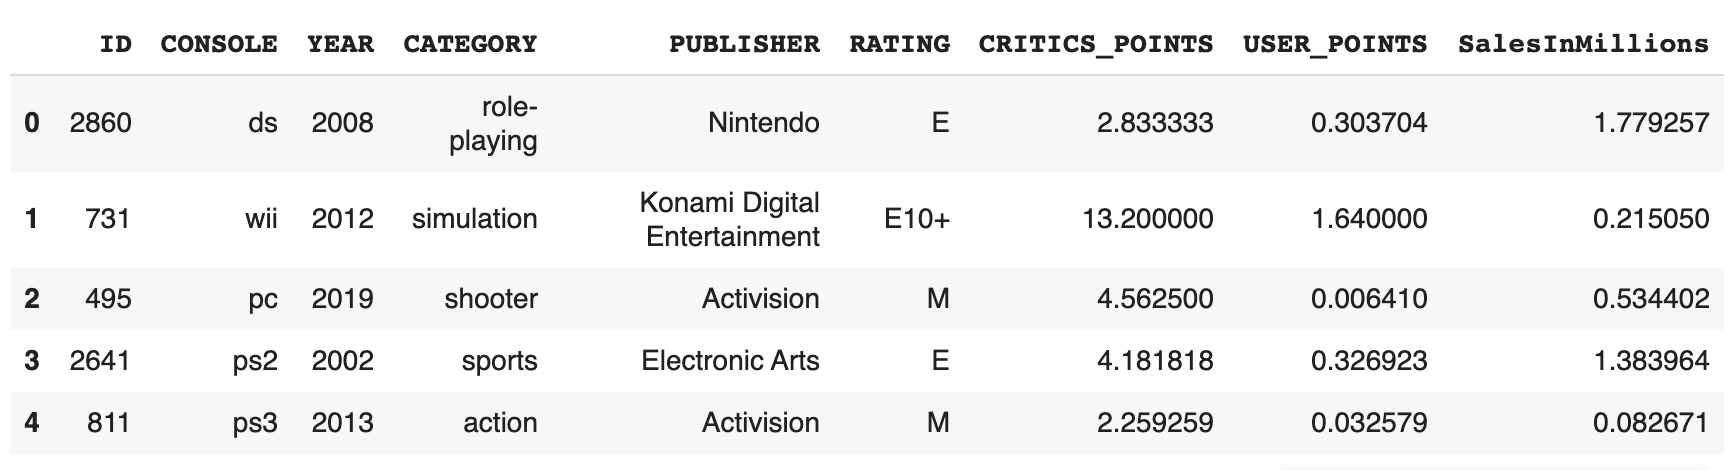
From the dataframe, we can see that the target column is SalesInMillions and rest of the columns are independent features
Step 2: Cleaning the Data Set
First, we check for null values by running input.isnull().sum() command.
input.isnull().sum()
#Output:
#ID                 0
#CONSOLE            0
#YEAR               0
#CATEGORY           0
#PUBLISHER          0
#RATING             0
#CRITICS_POINTS     0
#USER_POINTS        0
#SalesInMillions    0
#dtype: int64
We can see that there are no null values in the dataset. Next, we can drop unnecessary ID column since it does not play a role in target sales by running below command:- input = input.drop(columns=['ID'])
Next, we can split the dataframe into training and test dataset using train_test_split command:
train, test = train_test_split(input, test_size=0.2, random_state=42, shuffle=True)Step 3: Exploratory Data Analysis
Descriptive Statistics
Using df.shape command we can find a count of total rows in the dataset and df.nunique() command can be used to find unique values in each of the columns.
CONSOLE              17
YEAR                 23
CATEGORY             12
PUBLISHER           184
RATING                6
CRITICS_POINTS     1499
USER_POINTS        1877
SalesInMillions    2804
In the EDA section, we make use of pandas profiling and matplotlib packages to generate graphs of various columns and observe their relationships with the target column.
A few insight gained from EDA are:-
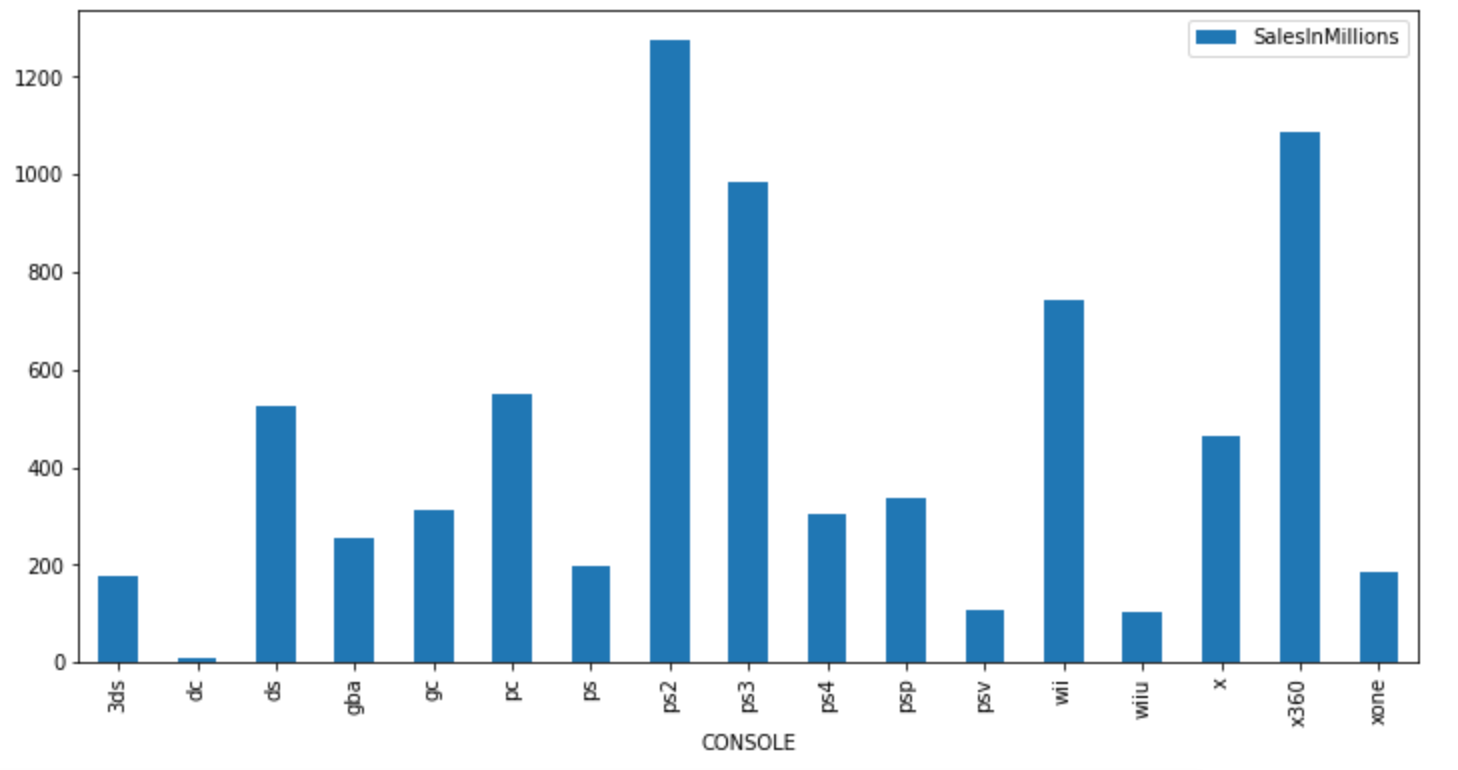
- Sales were highest for the PS3 platform. It was followed by Xbox360:
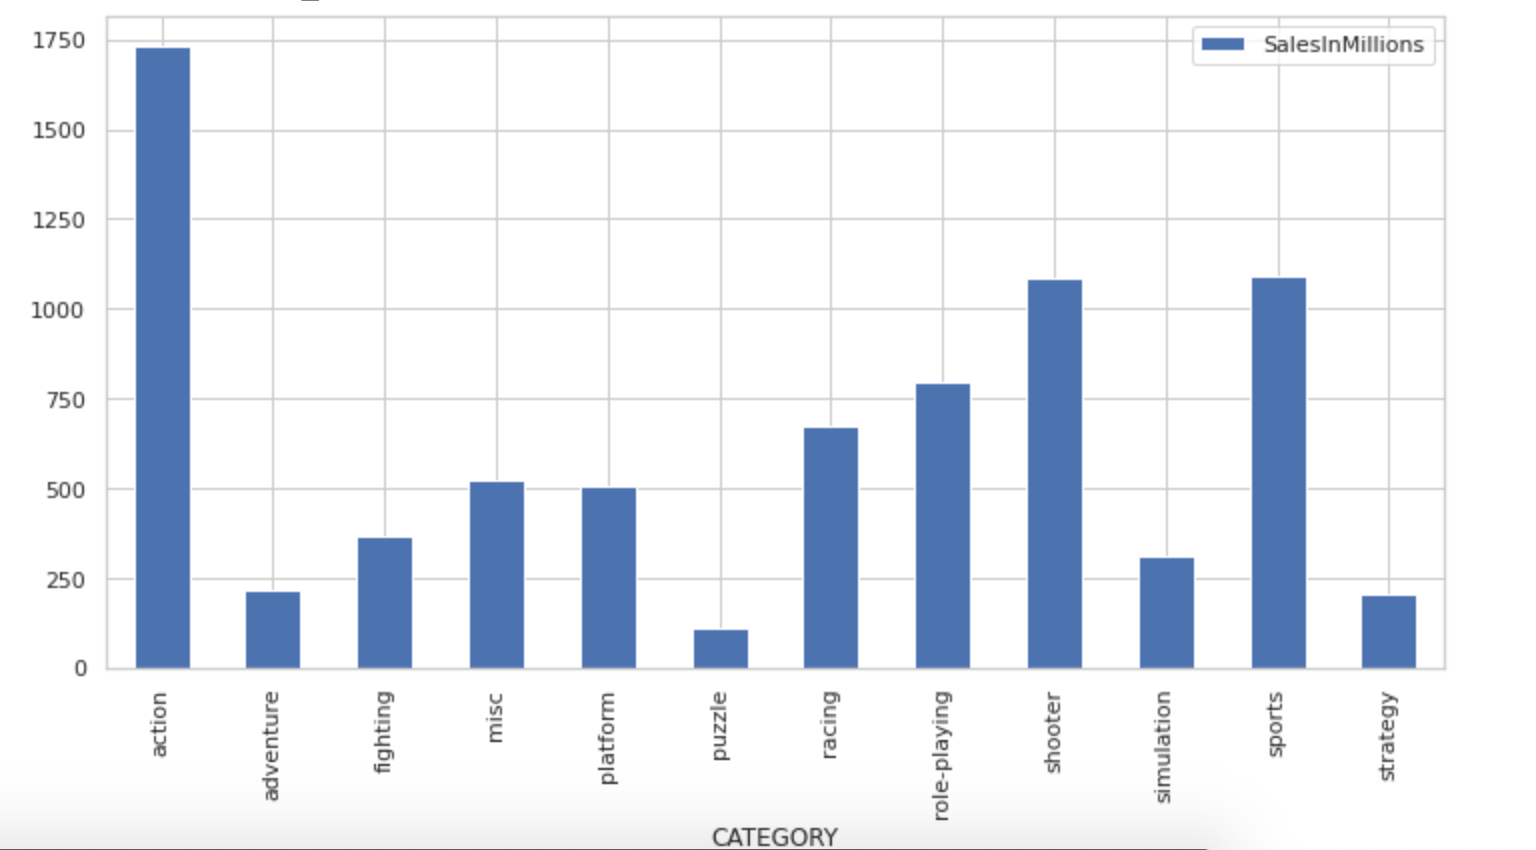
- Sales were highest for the action category and lowest for puzzles
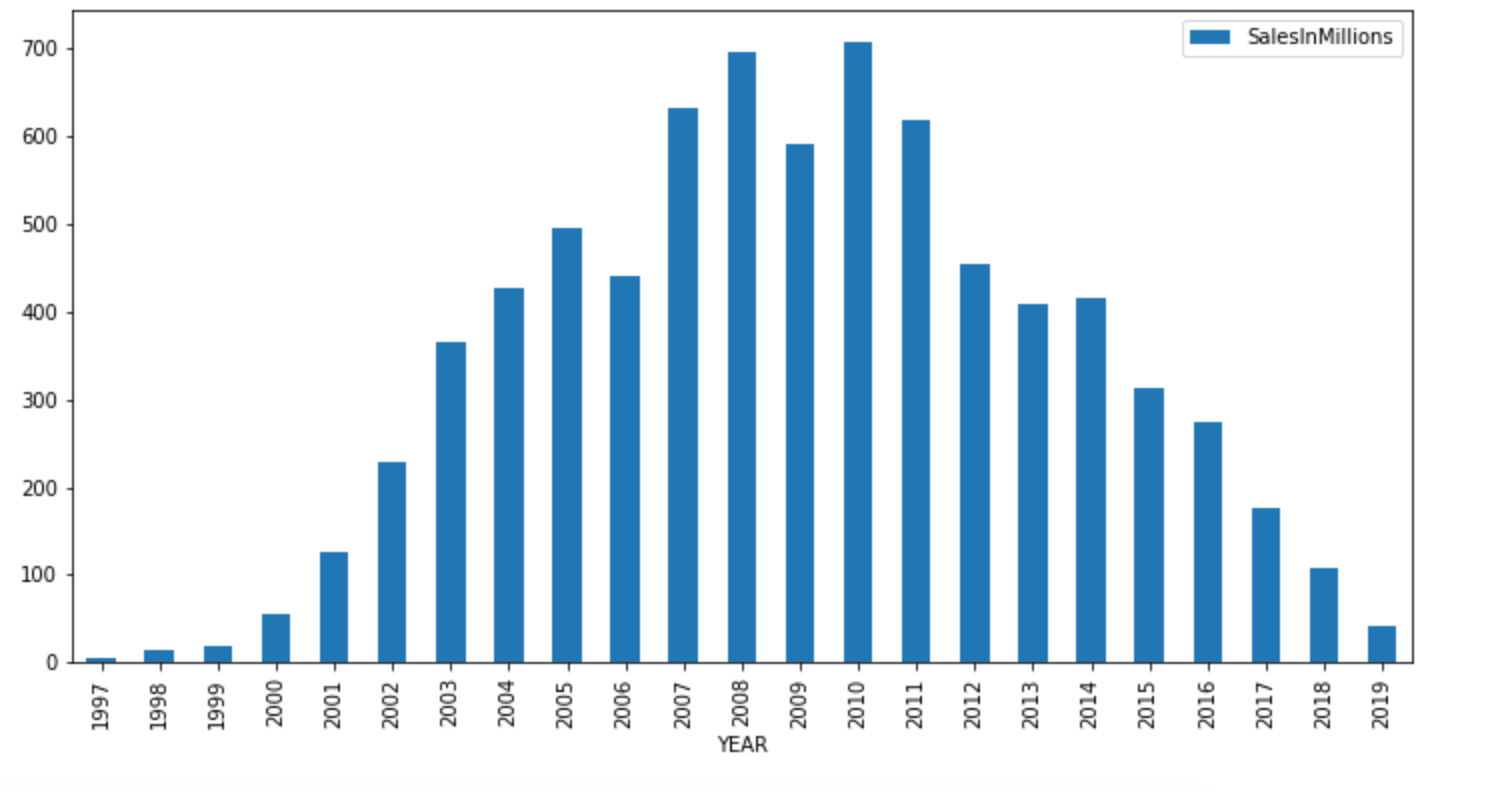
- And sales were highest in the year in the period from 2007 to 2011:
Usually, we go for feature engineering or feature selection steps after EDA. But we have fewer features and emphasis on actually using the model. So we are moving forward towards the next steps. However, keep in mind that USER_POINTS and CRITICS_POINTS columns can be used to derive extra features.
Step 4: Building a Model
We are going to use catboost regression model for our dataset since we have a lot of categorical features. This skips the step of label encoding categorical features since catboost can work on categorical features directly.
First, we install catboost package using pip install command.
Then we create a list of categorical features, pass it over to the model and then fit the model on train dataset:
import catboost as cat
cat_feat = ['CONSOLE','CATEGORY', 'PUBLISHER', 'RATING']
features = list(set(train.columns)-set(['SalesInMillions']))
target = 'SalesInMillions'
model = cat.CatBoostRegressor(random_state=100,cat_features=cat_feat,verbose=0)
model.fit(train[features],train[target])
Step 5: Check Model Accuracy
First, we create true predictions from test dataset:
y_true= pd.DataFrame(data=test[target], columns=['SalesInMillions'])
test_temp = test.drop(columns=[target])
Next, we run our trained model on test dataset to get model predictions and check model accuracy:
y_pred = model.predict(test_temp[features])
from sklearn.metrics import mean_squared_error
from math import sqrt

rmse = sqrt(mean_squared_error(y_true, y_pred))
print(rmse)
#Output: 1.5555409360901584
We have an RMSE value of 1.5 which is pretty decent. For more information about accuracy metrics in case of regression problems, you can refer to this article.
Step 6: Save the model into a pickle file
We can now save our model into a pickle file and then save it locally:
import pickle filename = 'finalized_model.sav' pickle.dump(model, open(filename, 'wb'))
Once you save the pickle file, you can download and save it locally from the left sidebar in the files section of Google colab notebook:

Bonus Tips
- Add more data: We can improve the model predictions by adding more data to the model. A few related datasets that we can use are on Kaggle.
- Improve model efficiency: We can use a stack of combined models to improve model efficiency a bit further.
If you have reached this step then give yourself a pat on the back because we just finished the first major section of our project. Take a break for a while, do stretches, change the song to your playlist, and then start into the next section of this article.
Also Read: What is Predictive Analytics | An Introductory Guide
Creating Backend API from the Model
Folder and Environment Setup
We are going to use Python Flask to create our backend APIs. So first create a folder named server locally. Also, install Python and pip package manager on your machine if you have not yet.
Next, we need to create a virtual environment within our folder. You can find more details here: Python venv. I am using python3 locally on Linux so the command for creating a virtual environment for me would be: python3 -m venv server You can check out the relevant command for your OS and Python version in this article: Python venv
Then we will activate our virtual environment by running the command: source server/bin/activate
Once done we need to install the Flask pip package: pip install -U Flask
Basic Flask API Setup
Next, create a file with the name app.py within the server folder with your preferred text editor and add the below code to create a basic API:
from flask import Flask, jsonify, make_response, request, abort
app = Flask(__name__)
@app.route("/")
def hello():
  return "Hello World!"
if __name__ == "__main__":
  app.run()
Installing Required Packages
Now open a terminal and run python3 app.py to start the server. This will mostly start the server on 5000 port. In order to test the API, open this link in the browser: http://localhost:5000/.You should get Hello World printed in the browser. If not then check if the API is running on a different port or if there is an error printed in the terminal while starting the API.
We are going to use a POST API call, so it would be better to install Postman tool before proceeding further. Use this tool to send a POST request to the server.
Next, we need to install catboost, pandas, and Flask-Cors pip packages by using this command:-pip install catboost pandas Flask-Cors
Enhancing Flask API
Next copy the trained model’s pickle file(finalized_model.sav), which we downloaded at the end of Part 1, into the server folder.
Now update the app.py with the following code:
from flask import Flask, jsonify, make_response, request, abort
import pandas as pd
import catboost
import pickle
from flask_cors import CORS,cross_origin
model = pickle.load(open( "finalized_model.sav", "rb"))
app = Flask(__name__)
app.config['CORS_HEADERS'] = 'Content-Type'
cors = CORS(app)
@app.errorhandler(404)

def not_found(error):
    return make_response(jsonify({'error': 'Not found'}), 404)

@app.route("/")
def hello():
  return "Hello World!"

@app.route("/get_prediction", methods=['POST','OPTIONS'])
@cross_origin()
def get_prediction():
    if not request.json:
        abort(400)
    df = pd.DataFrame(request.json, index=[0])
    cols=["CONSOLE","RATING","CRITICS_POINTS","CATEGORY","YEAR","PUBLISHER","USER_POINTS"]
    df = df[cols]
    return jsonify({'result': model.predict(df)[0]}), 201

if __name__ == "__main__":
  app.run()
In line 6 we import the trained model into our python file. On line 10 we initialize the CORS module to allow requests from client-side API calls.
On line 11 we have defined an error handler which will send an error response if any unhandled exception or undefined path is accessed from the server.
The main point of interest for us is the get_prediction POST API is defined from line 19. get_prediction method is where we get the data from the client side and provide sales prediction in response.
On line 24 we convert the data from the API request into pandas dataframe. Now our model expects columns to be in a particular order to provide a proper response. Therefore in line 25, we specify the column order. In the next steps rearrange the columns in the required order.
Testing the Backend API
On line 27 model.predict is used to get a prediction from the model and it is passed as a response to the client. At this step, we are ready with the API locally. We can test the API in Postman client by sending POST API call as shown in the screenshot:

A sample JSON which you can append in the body section of the above request can be found in the code gist here: Github Gist. Make sure to select raw an option in the body and body type as JSON as shown in the screenshot along with the request type as POST.
If everything works fine till this step, then congrats, you now have a backend API that gives a prediction from a trained model based on input parameters.
Bonus Tip
- Modularise code: Writing APIs in a single file is not a recommended approach for backend design and we can separate the routes and model imports into different folders to make code a bit more modular. This will also allow us to scale the code in manageable fashion if we introduce additional API routes in the future.
At this point, we can again take a break, have a snack break, and make sure to bookmark this article so that it’s easy to come back to it for starting the next section of the project.

Deploying Backend API to Heroku
- Till now our API worked locally but we need to deploy it on a remote server to be used from elsewhere. For that, we are going to use Heroku as our API hosting platform.
- First, we install gunicorn using the terminal command:
pip install gunicorn - Next, run the below command to store all the installed pip packages until now in to requirement.txt file:
pip freeze > requirements.txtYou can refer to the requirements.txt file uploaded here for reference: Github link. - Next, create a file with the name
Procfilein the server folder with the below code:web: gunicorn app:app - Next, login into Heroku from the terminal locally by running the below command:
heroku login -i - Add your Heroku app git reference using the below command:-
heroku git:remote -a {your-project-name} - Now push the code to Heroku using the below command:-
git push heroku master - At the end of running the above command, you will get the API URL in the terminal output, using which we can now make calls from the client side. We can also send an API request from the PostMan app at this point to see if we receive the response properly similar to the way described at the end of Step 2.
- The codebase until this point can be found in the Github repo here: Videogame Sales Backend
We now have a proper working API hosted on a server. If everything worked well then we can move ahead with the development of the client-side app. If you encounter any problems, then mention your problems in the comments section. Or reach out to me at the social handles mentioned at the end of the article.
Creating a Client-side App using React and Bootstrap
Setting Up Environment
We will need Node.js installed and set up properly on our machine. So download and install Node.js for your relevant OS and system before proceeding further. Also, installation of the yarn package manager is recommended: Yarn Installation
Now create a new folder called frontend outside the server folder created in the previous step and go inside the frontend folder from the terminal.
Creating React Application
Next, we will create a new react application and start it by running the below commands in the terminal:
npx create-react-app sales-prediction-app
cd sales-prediction-app
npm start
You should see the browser tab open up and react.js default template app visible in the browser. Now we need to open this project in our favorite editor(I am using VSCode) and start making changes to build our frontend application.
First, we need to import relevant bootstrap files in the index.html file found in the public folder within our app.
Integrating Bootstrap
We need to add files as per instructions provided by bootstrap docs in the index.html file as shown below:
<head>
...
<link rel="apple-touch-icon" href="%PUBLIC_URL%/logo192.png" />
<link rel="stylesheet" href="https://stackpath.bootstrapcdn.com/bootstrap/4.5.0/css/bootstrap.min.css" integrity="sha384-9aIt2nRpC12Uk9gS9baDl411NQApFmC26EwAOH8WgZl5MYYxFfc+NcPb1dKGj7Sk" crossorigin="anonymous">
...
</head>
<body>
...
<div id="root"></div>
...
<script src="https://code.jquery.com/jquery-3.5.1.slim.min.js" integrity="sha384-DfXdz2htPH0lsSSs5nCTpuj/zy4C+OGpamoFVy38MVBnE+IbbVYUew+OrCXaRkfj" crossorigin="anonymous"></script>
<script src="https://cdn.jsdelivr.net/npm/[email protected]/dist/umd/popper.min.js" integrity="sha384-Q6E9RHvbIyZFJoft+2mJbHaEWldlvI9IOYy5n3zV9zzTtmI3UksdQRVvoxMfooAo" crossorigin="anonymous"></script>
<script src="https://stackpath.bootstrapcdn.com/bootstrap/4.5.0/js/bootstrap.min.js" integrity="sha384-OgVRvuATP1z7JjHLkuOU7Xw704+h835Lr+6QL9UvYjZE3Ipu6Tp75j7Bh/kR0JKI" crossorigin="anonymous"></script>
...
</body>
Configuring UI Elements
Our final UI is a collection of dropdown items of which a single item is as shown below:

We will create a JSON file with the name optionsSources.json within the src folder. Each entry in the JSON file contains the below object:
{
    "CONSOLE": {
        "options": [
            "ps2","x360","ps3","pc"
        ],
        "icon": "🕹️",
        "dropDownPlaceholder": "Select Console"
    }
}
Implementing Dropdown Functionality
The options which are shown in the dropdown are in options array, the icon, and the label which is shown to the left of the dropdown selection are in icon and dropDownPlaceholder key item. We need to create multiple dropdowns like this, so the complete JSON file to be added is as shown in the file here: Github
Next, we need to implement the dropdown component within our app. Create a folder called components within the src folder and create a file named OptionSelection.js within the components folder
We are going to write a functional component that returns a dropdown item as shown below:
import React,{ useState } from 'react';
import optionSources from  '../optionsSources.json';
function OptionSelection({itemKey, setOptionInObject}) {
    const title = optionSources[itemKey].dropDownPlaceholder;
    const icon = optionSources[itemKey].icon;
    return(
        <div className="d-flex justify-content-start align-items-center mt-2 selection-item">
            <div className="option-label">
            <b><span role="img" aria-label="label-icon">{icon}</span>{` ${title}`}</b>
            </div>
            <div className="dropdown ml-4">
            <button className="btn btn-primary dropdown-toggle" type="button" id="dropdownMenuButton" data-toggle="dropdown" aria-haspopup="true" aria-expanded="false">
                {title}
            </button>
            <div className="dropdown-menu" aria-labelledby="dropdownMenuButton">
                {renderOptionsDropdown()}
            </div>
            </div>
        </div>
    )
}

export default OptionSelection;
In the above component, we get itemKey a prop(param) value from the parent component on line 3. Let’s assume that itemKey the received from the parent component is CONSOLE. On lines 4 and 5 we first extract the title and icon that we display at the left side of the dropdown. Then we used HTML tags in the return function from line 6 as per Bootstrap docs on creating dropdown.
Implementing renderOptionsDrop
Next, we need to implement renderOptionsDrop function which is defined within the return function as shown below:
import optionSources from  '../optionsSources.json';
function OptionSelection({itemKey, setOptionInObject}) {
...
const renderOptionsDropdown = () => {
        const selectionOptions = optionSources[itemKey].options;
        return selectionOptions.map((selectionOption, index)=>{
            return (
                <div className="dropdown-item pointer"
                     key={`${index}${selectionOption}`}
                     onClick={() => handleDropDownSelection(selectionOption)}
                >
                    {selectionOption}
                </div>
            );
        })
}
...
}
On line 5, we get the options array for a particular item from the optionSources JSON object and store it in selectionOptions variable.
Then on line 6 we iterate over the array using map function and show dropdown selection items. We have to update the selected value for a dropdown item using onClick function on line 10.
Function in onClick handler viz handleDropDownSelection is then implemented as shown below:
import React,{ useState } from 'react';
...
function OptionSelection({itemKey, setOptionInObject}) {
    const [currentSelectedOption, setSelectedOption] = useState(null);
    const handleDropDownSelection = (consoleOption) => {
        setSelectedOption(consoleOption)
        setOptionInObject(itemKey, consoleOption)
    }
    ...
}
We have imported useState hook on line 1. It is an internal function available in react.js library which allows us to dynamically update values using the concept of state variables. More info on the function can be found here: React useState docs.
On line 7 we update the selected option for the dropdown. And In line 8 we pass the selected value back to the parent function for further processing.
The complete code for this component can be found here: Github
Then we make changes in the App.js file within the src folder to import this option selection component above and make an API call to the server. The complete code can be found here: Github
Finalizing and Deployment
Then we make an API call to the backend in the handleInputSubmission function as shown below:
import React, {useState} from 'react';
import axios from 'axios';
function App() {
  ...
  const handleInputSubmission = () => {
    if(selectedObject && Object.keys(selectedObject).length === 7) {
      ...
      axios.post(process.env.REACT_APP_HEROKU_SERVER_URL, selectedObject)
      .then(function (response) {
        setPredictionLoading(false)
        setModelPrediction(response.data.result)
      })
      .catch(function (error) {
        setPredictionLoading(false)
        setRequestFailed("Some error ocurred while fetching prediction")
      });
    } else {
      setRequestFailed("Please select all fields before submitting request")
    }
  }
}
We are making use of Axios npm module to make a POST API call to the backend Heroku server. Make sure that you add your own Heroku server URL on line 8 for the process.env.REACT_APP_HEROKU_SERVER_URL placeholder to receive the response from your server API. It’s a good practice to keep the API URL variables in .env file and set them on the deployment environment later. More details can be found here: Env variables.
Find the complete source for the frontend app on Github here: Video game sales prediction frontend
This leaves us with the final step of the deployment of our web app online. So hold your patience and persistence a bit longer and let’s start off with the last step of our project.
Deploying the Client-side App to Netlify
Netlify is a platform to deploy static websites online with ease. It has a quite easy process when deploying applications made using create-react-app module. We are going to make use of this service to host our web app online.
- First, we need to create an account on Github.
- Then we need to upload the frontend folder to Github repo. We can follow the steps shown in official docs for deploying the project to Github: Official docs
- Once the project is live on GitHub deployment to netlify is straight forward and easy process by following their official docs here: Netlify Deploy
- If you have used environment variable for server URL in the previous step then make sure to add them in netlify dashboard as shown in this doc.
- Finally, we will have a web app live which looks like below:

Bonus Tips
- Improve UI and color scheme: To be honest the UI above is pretty basic. It does not have a great color scheme(mainly because developers like me are not good designers). You can improve the design and tweak the CSS for a better overall look at the web page.
Conclusion
In conclusion, this article has provided a comprehensive guide on building a video game sales prediction model and deploying it into a functional application. By leveraging time series analysis and various prediction models such as decision trees, random forests, and deep learning, along with historical sales data, artificial intelligence techniques have been effectively applied to forecast sales. The article covers key steps including data preprocessing, model training, accuracy evaluation, backend API creation using Flask, and frontend application development using React and Bootstrap.
Furthermore, the deployment process to platforms like Heroku and Netlify has been elucidated, enabling the application to be accessible online. By following the outlined procedures and bonus tips, developers can enhance their understanding of demand forecasting and application deployment while also improving the user interface and overall performance of their applications.
Frequently Asked Questions
Q1. What is Sales Forecasting?
A. Sales forecasting is the process of predicting future sales volumes or revenue using machine learning techniques and time series forecasting methods. It involves analyzing historical sales data to identify patterns, trends, and seasonality, which are then used to generate an accurate forecast of future sales. The goal is to improve forecasting accuracy by leveraging advanced algorithms and statistical models, ultimately enabling businesses to make informed decisions regarding inventory management, resource allocation, and strategic planning. By employing sophisticated techniques, sales forecasting aims to provide reliable predictions that align with business objectives and optimize operational efficiency.
Q2. How do I choose the best machine learning model for my sales forecasting task?
A. To select the ideal machine learning model for sales forecasting, analyze historical data to grasp trends and patterns. Evaluate models like XGBoost and LSTM based on accuracy metrics. Assess their ability to handle data complexity and scalability, fine-tuning as needed for optimal performance.
Q3. What are the steps involved in building a machine-learning model for sales prediction?
A. To build a machine-learning model for sales prediction, the steps involve data preprocessing, model training using algorithms like linear regression or neural networks, evaluation, and deployment through backend APIs and frontend applications for real-world accessibility and scalability.


Thank you Saurabh for such a great article!!!. It encourages me to build ML apps on my own.
Getting a ModuleNotFoundError error for google. How do I runt this locally using Jupyter Notebook?
Getting an error Cannot convert 'b'ps2'' to float when I call the API. What am I missing?