How to Code Neural Style Transfer in Python?
Introduction
Deep Learning, a subset of Machine Learning inspired by the human brain, powers remarkable applications like Face Recognition, Machine Translation, and Speech Recognition. Within this field lies an exciting art form – Neural Style Transfer.
For the aspiring artist in you, Neural Style Transfer offers the ability to paint like Picasso. In simple terms, it’s the fusion of content (the layout or sketch) with style (the painting or colors) through the magic of Deep Learning. Let’s embark on a creative exploration of the world of Neural Style Transfer and uncover its captivating applications in image transformation.
This article was published as a part of the Data Science Blogathon.
Table of contents
How Does Neural Style Transfer Work?
Unsurprisingly there have been quite a few approaches towards NST but we would start with the traditional implementation for basic understanding and then we will explore more!
The base idea on which Neural Style Transfer is proposed is “it is possible to separate the style representation and content representations in a CNN, learned during a computer vision task (e.g. image recognition task).”
I am assuming you must have heard about the ImageNet Competition from where we were introduced to the state of the art models starting from AlexNet then VGG then RESNET and many more. There is something common in all these models is that they are trained on a large ImageNet Dataset (14 million Images with 1000 classes) which makes them understand the ins and out of any image. We leverage this quality of these models by segregating the content and the style part of an image and providing a loss function to optimize the required result.
As stated earlier, we define a pre-trained convolutional model and loss functions which blends two images visually, therefore we would be requiring the following inputs
- A Content Image – image on which we will transfer style
- A Style Image – the style we want to transfer
- An Input Image(generated) – The final content plus the required style image
Building Python Model for Neural Style Transfer
Model
Like I said we will be using pre-trained convolutional neural networks. A way to cut short this process is the concept of transfer learning where libraries like keras have provided us with these giants and let us experiment with them on our own problem statements. Here we will be using keras for transfer learning…we can load the model using the following lines of code…
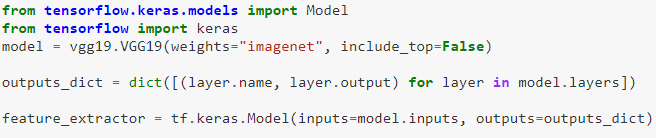
The first two lines involve importing libraries like keras. Then we will load the model using vgg19.VGG19() where include_top = False depicts that we don’t want the final softmax layer which is the output layer used to classify the 1000 classes in the competition.
The fourth line makes a dictionary that will store the key as layer name and value as layer outputs. Then we finally define our model with inputs as VGG input specification and outputs as the dictionary we made for each layer.
Next, we will define the layers from which we will extract our content and style characteristics.
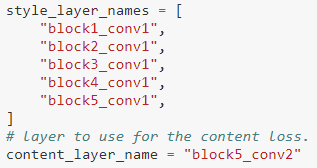
We have already made the dictionary where we can map these layers and extract the outputs.
Loss Functions
To get the desired image we will have to define a loss function which will optimize the losses towards the required result. Here we will be using the concept of per pixel losses.
Per Pixel Loss is a metric that is used to understand the differences between images on a pixel level. It compares the output pixel values with the input values. (Another method is perpetual loss functions we will discuss briefly at the later stages of the blog). Sometimes per pixel loss has its own drawbacks in terms of representing every meaningful characteristic. That’s where perpetual losses come into the picture. The loss terms we will be focusing on will be-
- Content Loss
- Style Loss
Content Loss
It makes sure the content we want in the generated image is captured efficiently. It has been observed that CNN captures information about the content in the higher levels of the network, whereas the lower levels are more focused on the individual pixel values.

Here the base is the content features while the combination is the generated output image features. Here the reduce_sum computes the sum of elements across the dimensions of the specified parameters which is in this case the difference of corresponding pixels between input(content) and generated image.
Style Loss
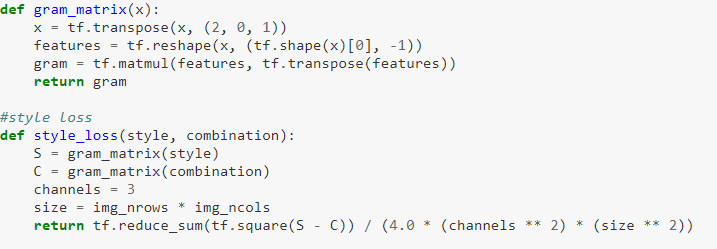
Defining the loss function for style has more work than content as multiple layers are involved in computing. The style information is measured as the amount of correlation present between the feature maps per layer. Here we use the Gram Matrix for computing style loss. So what is a gram matrix?
Gram matrix is the measure by which we capture the distribution of features over a set of feature maps in a given layer. So while you are basically computing or minimizing the style loss you are making the level of distribution of features the same in both of the styles and generated images.
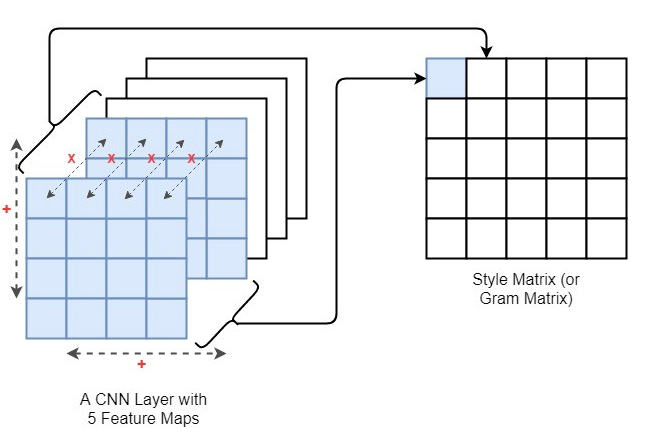
So the idea is to make gram matrices of style and generated images and then compute the difference between the two. The Gram matrix(Gij) is the multiplication of the ith and jth feature map of a layer and then summed across height and width as shown above.
Now we have computed both the loss functions. Therefore to calculate the final loss we will compute a weighted summation of both the computed content and style losses.
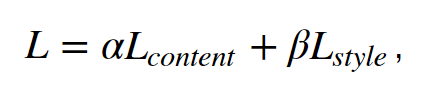
The above code is the final integration of losses by traversing through the layers and computing the final loss by taking a weighted summation in the second last line. Finally, we would have to define an optimizer(Adam or SGD) that would optimize the loss of the network.
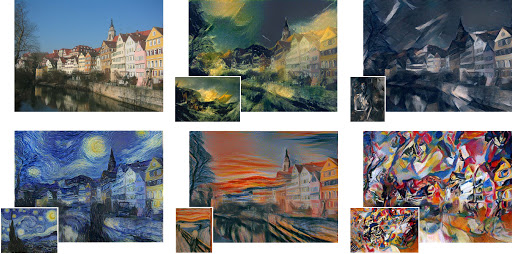
Output
Other Approaches
There are many other faster proposals of NST which I would like you to explore and come up with faster mechanisms. One concept to follow is that there is a perpetual loss concept using an Image Transformer neural network which increases the speed of NST and it allows you to train your Image transformer neural network per content and apply various styles without retraining.
It is more helpful in deploying environments as the traditional model trains for each pair of content and style while this concept allows one-time content training followed by multiple style transformations on the same content.
Brief Introduction to Fast NST
Training a style transfer model involves the use of two key networks: a pre-trained feature extractor and a transfer network. The pre-trained feature extractor plays a crucial role in avoiding the need for paired training data, as it leverages the specialized features learned by deep convolutional neural networks in image classification.
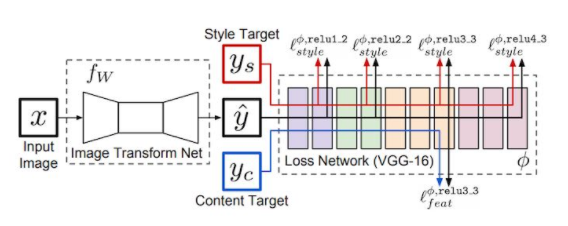
Role of the Pre-trained Feature Extractor
The pre-trained feature extractor allows us to compare the content and style of two images. However, its primary function is not the creation of stylized images; this responsibility falls on a separate neural network, known as the transfer network.
Understanding the Transfer Network
The transfer network is designed for image translation and typically follows an encode-decoder architecture. It takes an input image and generates a stylized output.
Training Process
The training process begins by running one or more style images through the pre-trained feature extractor. This results in the saving of outputs at various style layers for future comparison. Content images are then processed, undergoing the same feature extraction process. Subsequently, the content images pass through the transfer network to produce stylized images, and the feature extractor is once again employed to save outputs at both content and style layers.
Defining Stylized Image Quality
The quality of the stylized image is determined by a custom loss function that incorporates both content and style considerations. The content features of the stylized image are compared to the original content image, while the style features are compared to those extracted from reference style image(s).
Training for Desired Stylization
By assigning different weights to the loss function’s components, we can train models to generate output images with varying degrees of stylization, allowing for flexibility in the stylization process.
Conclusion
Congratulations you have learned what a Neural Style Transfer is and how it works. But that is certainly not the end, next comes exploring the topic with more recent research papers, blogs, and faster implementations. For that too you have a kick start. I hope you enjoyed the blog which targeted the basic traditional workflow of a Neural Style Transfer and I hope I was able to induce an intuition towards understanding NST.
Did you find this article helpful? Do share your valuable feedback in the comments section below. Feel free to share your complete code notebooks as well which will be helpful to our community members.
Thank you for reading!
Frequently Asked Question
A. Code neural style transfer in Python using libraries like TensorFlow or PyTorch. Implement a feature extractor, a transfer network, and optimize a custom loss function.
A. Neural style transfer uses deep learning to blend artistic style from one image onto the content of another, creating a new image with artistic attributes.
A. Neural style transfer with deep learning combines content and style of images using pre-trained feature extractors and transfer networks.
A. Neural style transfer combines content and style from two images for artistic styling. CycleGAN transforms images between domains using paired datasets for more comprehensive translation.


Wonderful Blog. multi vendor ecommerce website development
A great app for neural style transfer on your own pc is Image Style Shift from the Microsoft Store.