Introduction
Deploying Django Application using Heroku — Explained in detail
After you have developed a Django application, your next will be to make your application live and available for the users. There are various platforms through which you can deploy your application. But in this blog, I will be focusing on deploying a django application using Heroku platform.
What are the prerequisites before you go through this blog?
Before you dive into deploying django application using Heroku, you should set up a virtual environment for your Django project. Also, make sure to activate the virtual environment. But if you require guidance for configuring your virtual environment, you can view my previous blog regarding the virtual environment which has been provided below-
Furthermore, in this blog files are managed using Heroku CLI as it allows us to create and manage Heroku applications efficiently. Hence, if you have not installed Heroku CLI yet, then you can have a look at my previous blog regarding Heroku and the installation of Heroku which has been provided below-
Also, it can be handy if you have acquired knowledge regarding shell commands as we will be deploying the application using CLI (Command Line Interface). So, if you are willing to acquire knowledge regarding some of the basic shell commands then you can view the blog provided below-
Procedure for deploying a Django application using Heroku
Step 1: First of all you are required to execute the command as shown below.
pip freeze > requirements.txt
‘pip freeze’ command is used to show all the installed files. Likewise, ‘pip freeze > requirements.txt’ copies the name of all the files to a text file which is named as ‘requirements.txt’.
Then, you can execute the command as ‘cat requirements.txt’ for viewing the contents that are present in the ‘requirements.txt’ file.
cat requirements.txt
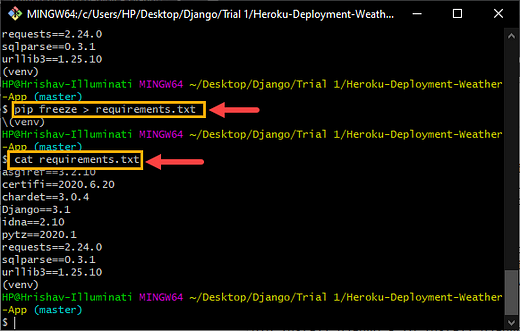
Execution of ‘pip freeze > requirements.txt’ and ‘cat requirements.txt’ command in the shell.
Step 2: Now, go to your Django project and open ‘settings.py’ as shown in the image below.

Opening ‘setting.py’ of the Django project.
Step 3: At the end of ‘settings.py’ add the following statement.
STATIC_ROOT = os.path.join(BASE_DIR, ‘static’)
Django is unable to automatically create a target directory i.e. STATIC_ROOT. Hence, in ‘settings.py’, a variable called ‘STATIC_ROOT’ is responsible for defining the single folder where you are willing to collect all your static files.
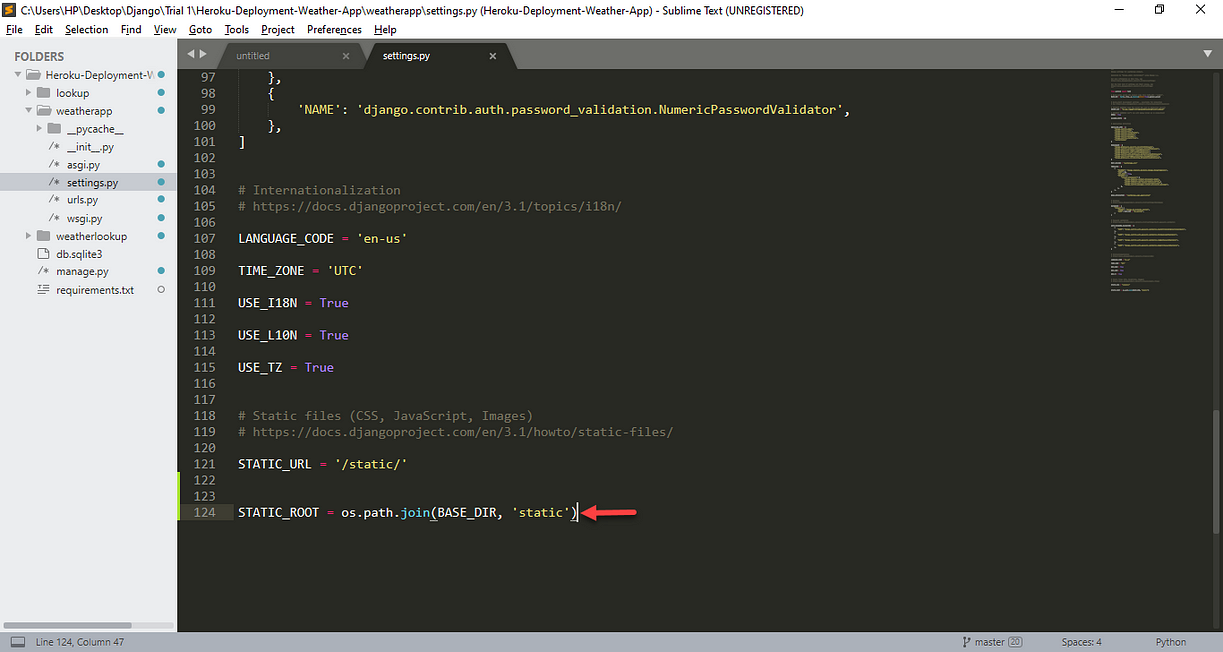
Adding ‘STATIC_ROOT = os.path.join(BASE_DIR, ‘static’)’ in ‘settings.py’
Note: Before you carry out the next steps, make sure that you have installed Heroku CLI in your PC and have developed an account at Heroku. For ensuring that Heroku has been correctly installed in the PC, execute the following command, and make sure that you obtain the output as shown in the image below.
heroku -h
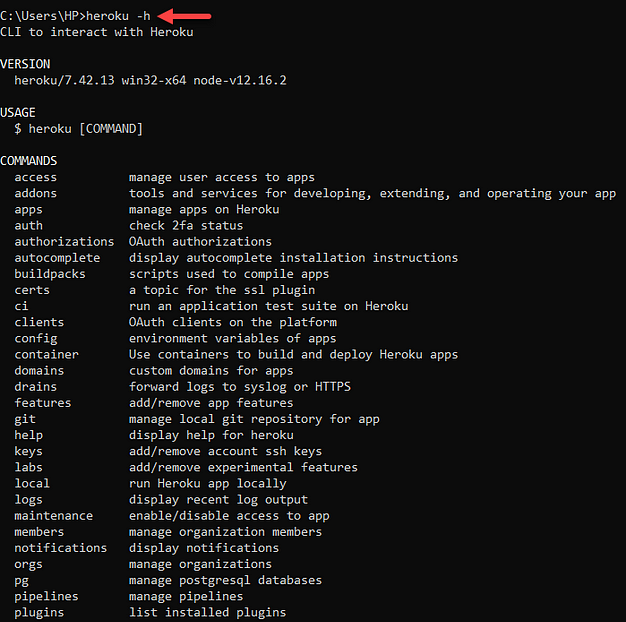
Executing command as heroku -h to ensure that Heroku is working on the PC.
Step 4: A Procfile is essential in the Heroku application. Therefore, requires a ‘nano’ command is used to edit/create the ProcFile. Hence, first of all, you are required to execute the following command.
nano ProcFile

‘nano ProcFile’ being executed to create and edit the file.
After the files open, provide the following statement in the file.
web: gunicorn myproject.wsgi
Here, the created ProcFile requires a Gunicorn as it is one of the most preferred production web server for Django applications.

Providing statement as ‘web: gunicorn myproject.wsgi’ in ProcFile.
After you have provided the statement, press ‘Ctrl+X’ then ‘Enter’ to save the changes made in the ProcFile.

Press ‘Ctrl+X’ then ‘Enter’, to save the statement in the ProcFile.
Step 5: Now, after you have successfully created the ProcFile, open the given file in the text editor. Then, you are required to update ‘web: gunicorn myproject.wsgi’ to ‘web: gunicorn weatherapp.wsgi’. The updated statement that is to be updated in the ProcFile is provided below.
web: gunicorn weatherapp.wsgi
Here, myproject.wsgi is updated as weatherapp.wsgi using a text editor (Sublime text) as shown in the image below.
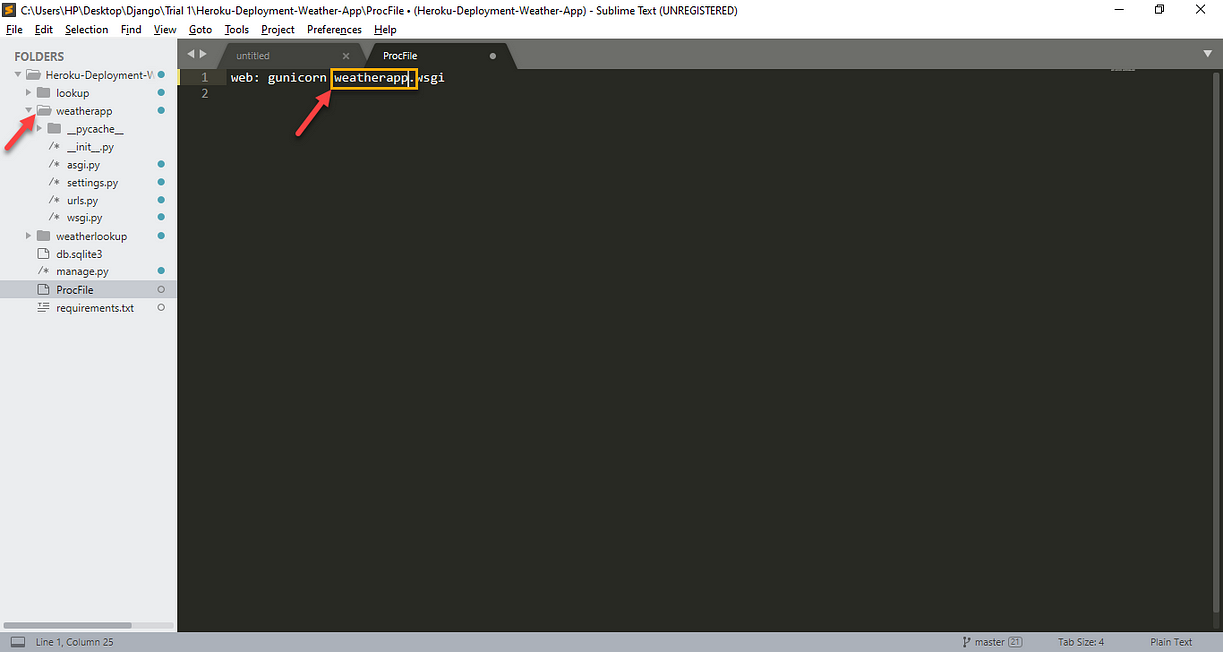
Updating version as per the requirement
Note: If you want to learn more about Web Server Gateway Interface (WSGI) in detail, please visit the link provided below.
Step 6: Now, you are required to install Gunicorn.
Hence, at first, you are required to execute the following queries before carrying out further tasks.
pip install gunicorn
‘pip install gunicorn’ is used to install Gunicorn for your project. Finally, now you can execute the following commands.
pip freeze > requirements.txtcat requirements.txt
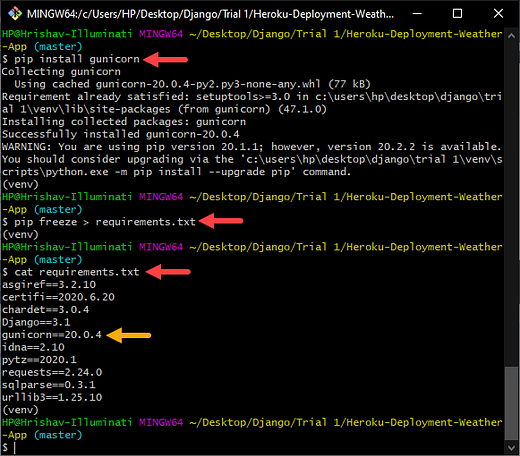
Installing ‘gunicorn’ and updating the requirements.txt file.
Step 7: Here, you are required to install ‘django-heroku’ package. So, in order to install the package, you need to run the following command.
pip install django-heroku
Django application should be configured in order to work on Heroku. Hence, ‘django-heroku’ package is able to carry out the configurations part automatically which allows your Django application to work Heroku.
Then, you can execute the following commands.
pip freeze > requirements.txtcat requirements.txt
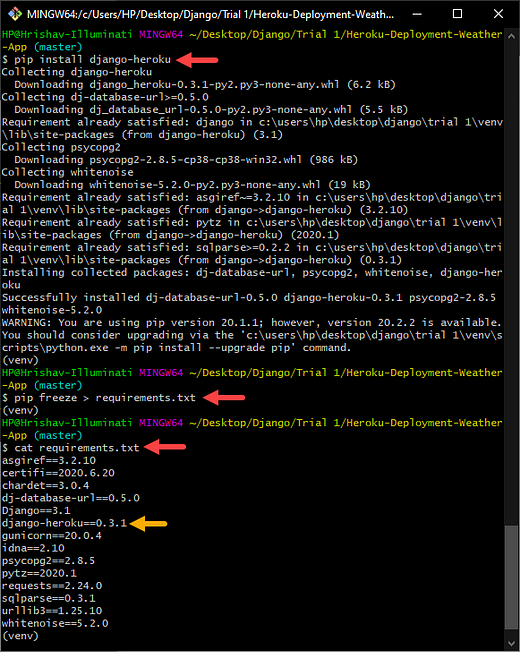
The installation of ‘django-heroku’ package and updating ‘requirements.txt’ file.
Step 8: Now, you need to import ‘os’ and ‘django-heroku’ package in setting.py as shown in the image below. The code for importing the packages has also been provided below.
import os
import django_heroku
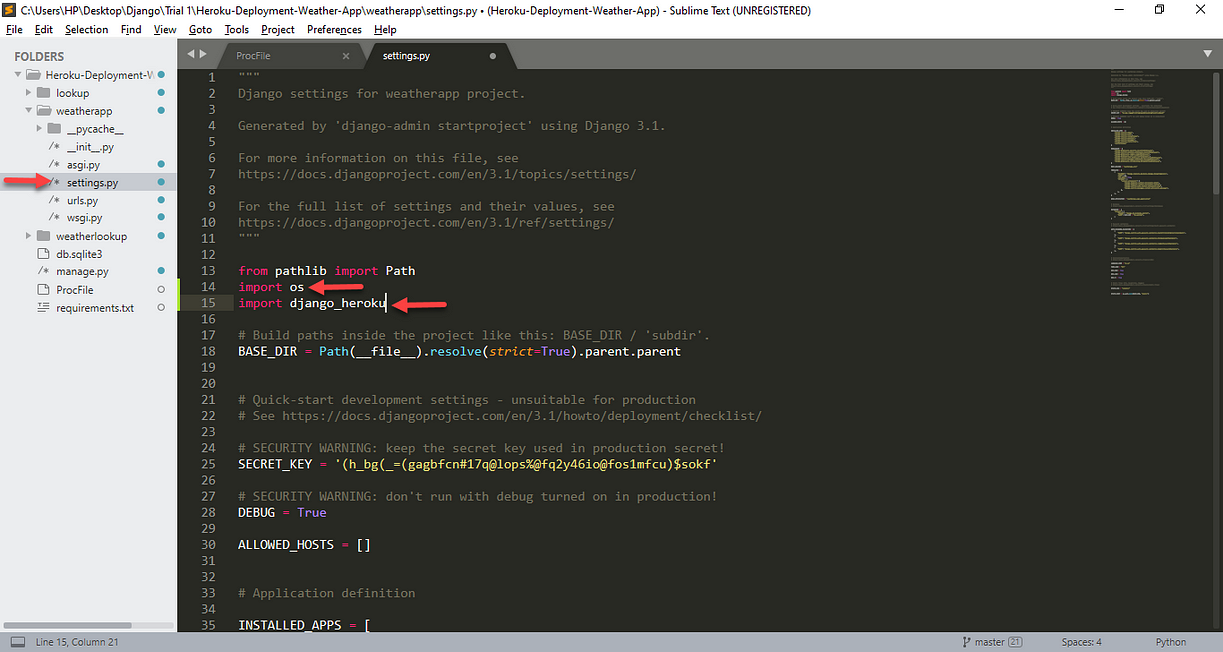
Importing ‘os’ and ‘django-heroku’ package in setting.py
Step 9: Now, to activate ‘django_heroku’ you are required to go to the end of ‘settings.py’ and add in the following lines of code.
# Activate Django-Heroku.
django_heroku.settings(locals())
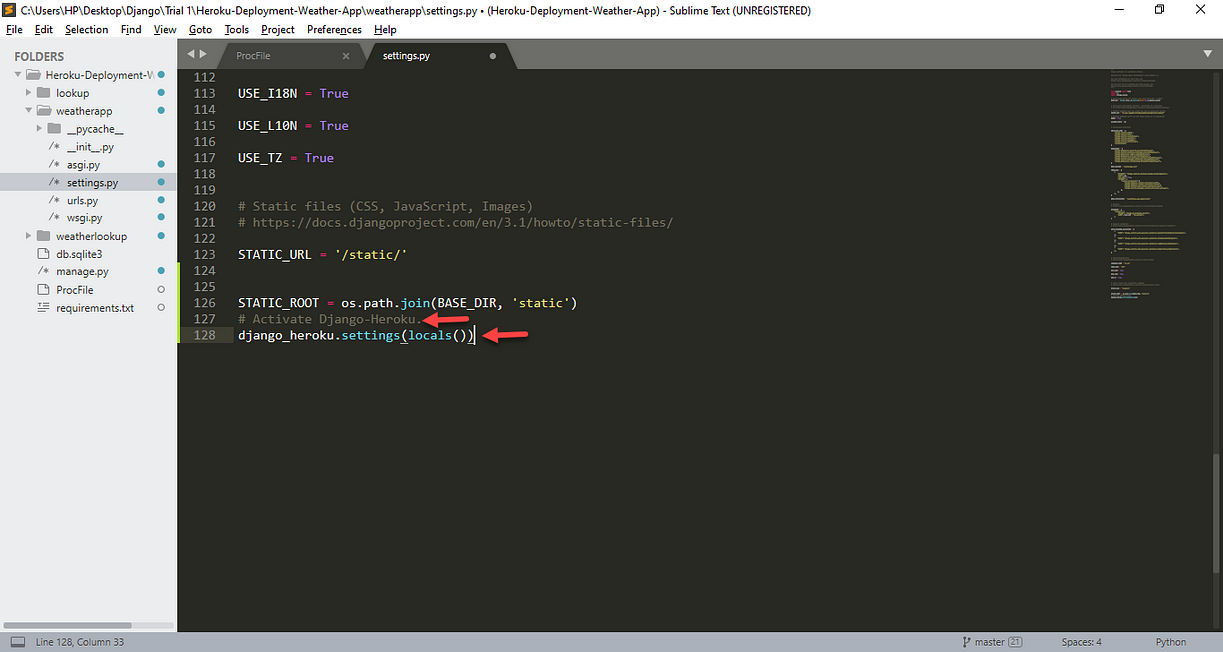
Activating ‘django_heroku’ in the Django project
Note: Here, in this blog, we are not using our GitHub repository with the application which is going to be deployed in Heroku. Therefore, if you have cloned your application from your remote repository, move your application into a fresh new folder as shown in the image below.
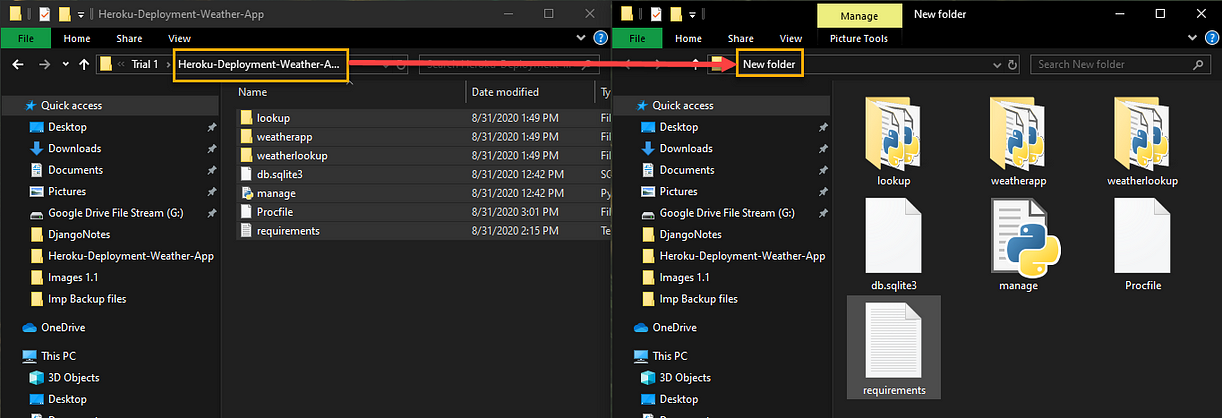
Moving Django application into a fresh folder.
Step 10: Since, you are now moving onto the production site, the ‘DEBUG’ in ‘settings.py’ should be set as ‘FALSE’ as shown in the image below.
DEBUG = False
Let us obtain an understanding of — Why do we need to set DEBUG as False?
First of all, let us understand what happens when DEBUG is set as True. DEBUG = True keeps details regarding the error pages. Hence, Django provides a stacktrace of what had gone wrong which can be quite helpful when you are debugging your application. Furthermore, Django also keeps track of all the SQL queries that had been executed in DEBUG mode.
Now, let on move onto the outcome when DEBUG is set as False. Keeping the DEBUG mode as True keeps track of all the SQL queries which had been executed in DEBUG mode which is not convenient in the production site. Hence, you are now required to provide ALLOWED_HOSTS in the settings.py file which identifies where you are hosting your Django application.
Note: If you require guidance for configuring ALLOWED_HOSTS, you can go to step 23 of this blog. Also, you should have created an app in Heroku which has been carried out in step 18 before you configure the ALLOWED_HOSTS.
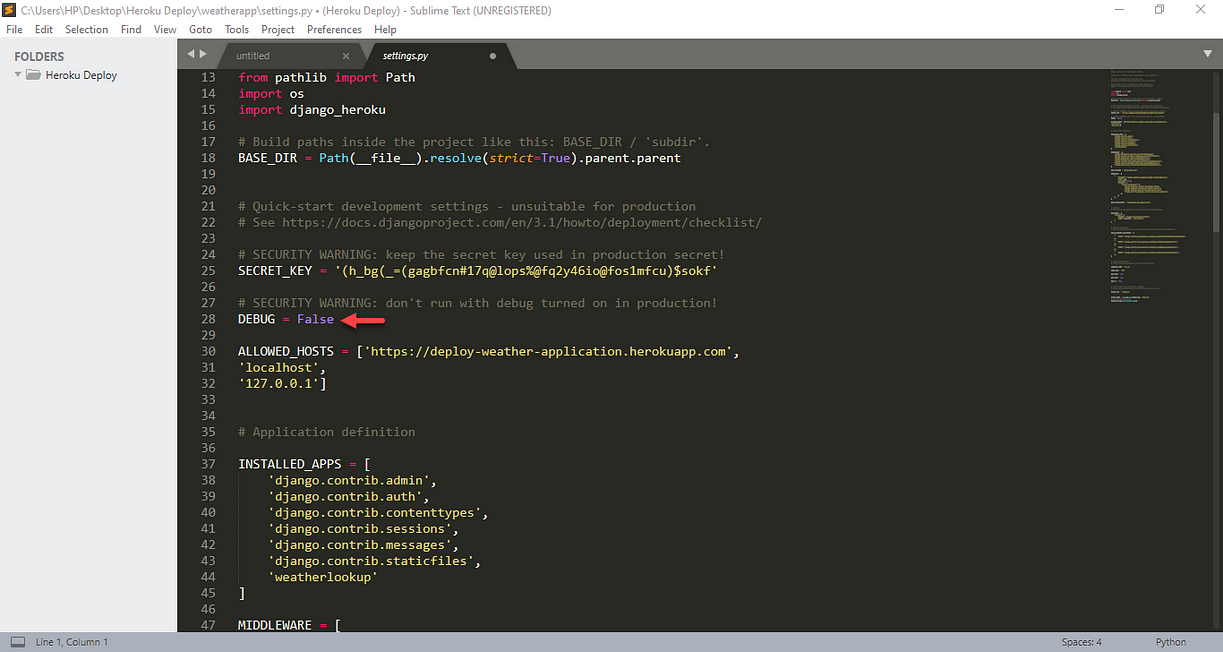
Set ‘DEBUG = True’ to ‘DEBUG = False’.
Step 11: Now, go to your file explorer and right-click, then select the ‘Git Bash Here’ option as shown in the image below.
Note: If you have not installed Git Bash yet and require guidance for installing Git bash then you can view my previous blog which consists of a detailed procedure for installing Git.
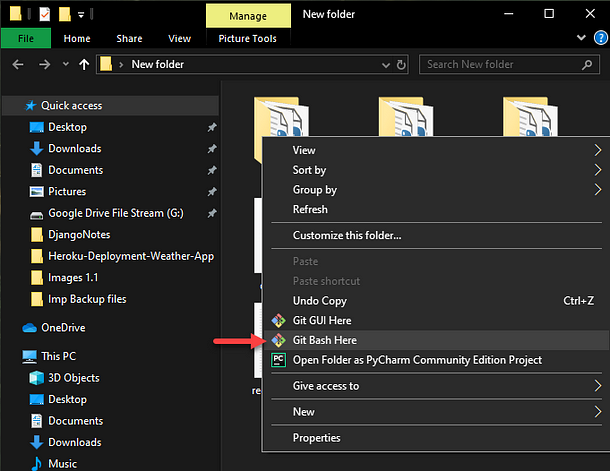
Opening Git Bash terminal.
Step 12: Provide command as ‘git init’ in order to initialize a new or empty repository as shown below.
git init

Initializing an empty Git repository.
Step 13: Give command ‘git add .’ as shown below in order to add or take all files from your directory.
git add .

Adding all the files from the local repository
Step 14: Execute command as provided below (git commit -m “deploy”) for creating a snapshot of currently staged changes of the project.
git commit -m “deploy”

committing the changes and naming the commit as ‘deploy’.
Note: Before carrying out the following procedure, make sure that you have Heroku CLI installed on your PC. For further guidance, you can view my installation blog regarding Heroku CLI.
Step 15: So, to login to Heroku, you are required to provide the following command.
heroku login

Executing command as heroku login in order to log in to the Heroku.
Step 16: After you have executed the command ‘heroku login’, in the web browser, you are now redirected to the page as shown in the image below. Here, you are required to click on the ‘Log In’ button.
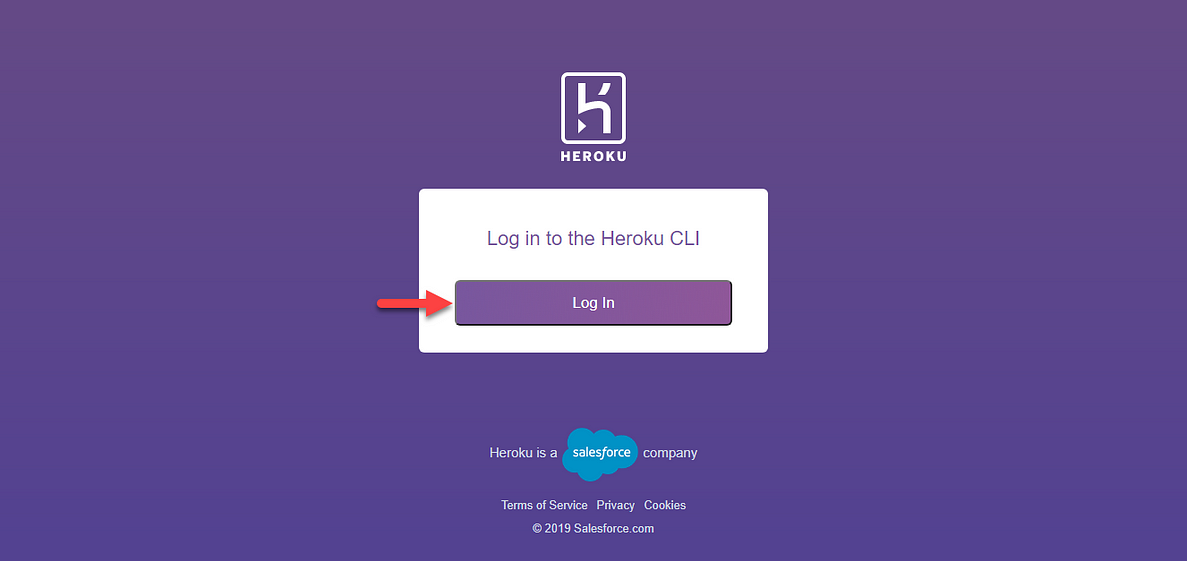
Heroku webpage where you are required to click on the ‘Log In’ button.
Step 17: After the successfully log in, you are now redirected to the page as shown in the image below.

The page you are redirected after you have successfully logged in the Heroku.
Step 18: Now, you are required to create an app in Heroku. Hence, for the stated purpose you are required to execute the following command.
heroku create app_name
Note: Here, in the above command ‘app_name’ represents the name that provided for your application which will be acting as a subdomain of Heroku.

Creating an app in Heroku
Step 19: After the successful execution of the command you can now view your application in Heroku as shown in the image below.

The application which had been created is now shown in Heroku.
Step 20: Now, for deploying your application you are required to execute the following command.
git push heroku master
The above command is used to push the code from your master or main branch of the local repository to the Heroku remote.
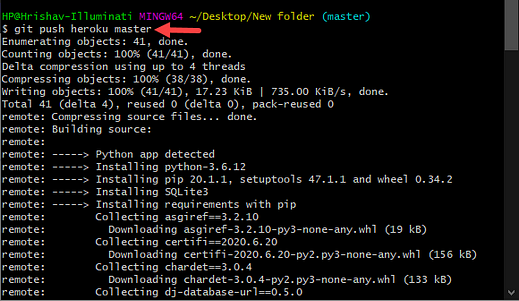
Pushing the file from the master branch of the local repository to Heroku remote
Step 21: So, to commit initial migration on the Heroku application you are required to execute the following query.
heroku run python manage.py migrate
The database which is present in Heroku and the database which is present in your local machine is not the same one. Hence, if you add/create a user, or add various types of information in your local environment, it won’t be presented in the Heroku. Therefore, you should execute all the queries of the local environment in the production.

Committing initial migration on the Heroku application.
Step 22: Finally, you can execute the following command to view your Django application.
heroku open

Opening the web application in Heroku
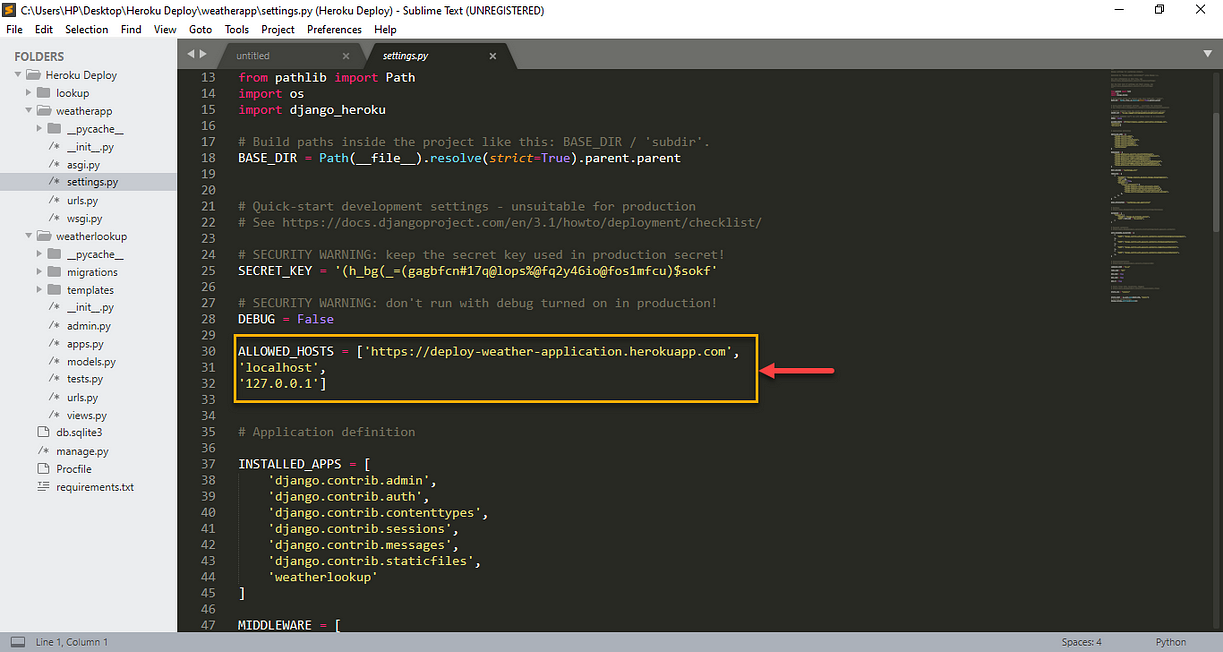
Note: However if you have not configured your ALLOWED_HOSTS, your application will not be deployed in Heroku. Hence, to configure your ‘ALLOWED_HOSTS’ go to the ‘settings.py’ and find ALLOWED_HOSTS. Then, you are required to carry out the following steps.
Step 23: You are required to allocate the allowed hosts or domain which your Django application serves. You also take the following code as the reference to update your ‘ALLOWED_HOSTS’ in ‘settings.py’ file.
ALLOWED_HOSTS = [‘https://deploy-weather-application.herokuapp.com',
‘localhost’,
‘127.0.0.1’]
Now, a question arises why is it required to provide the ALLOWED_HOSTS. Actually, by providing ALLOWED_HOSTS, it prevents the web application from HTTP Host Header attacks.
In ALLOWED_HOSTS, a URL is provided in which the Django application is going to be launched. For example https://deploy-weather-application.herokuapp.com. It is the URL in which the application is going to be hosted. Here, your URL is defined as per your application name i.e. https then the name which you have provided while creating your Heroku application, for instance, deploy-weather-application and finally the subdomain of Heroku i.e. herokuapp.com.
Also, you can obtain the URL of your application while creating the application as shown in the image below.

URL for Heroku being displayed while creating an application
In the above case scenario of ALLOWED_HOSTS, the application can also run in the localhost. Here, 127.0.0.1 refers to the loopback Internet protocol (IP) address which is also known as the localhost.
Note: You are required to make changes inside the ‘setting.py’ file in ‘ALLOWED_HOSTS’ as shown in the image below.
Step 24 : Now, you are required to execute the following commands.
git add .
git commit -m “edit”
git push heroku master
Step 25: After making the required configurations regarding ALLOWED_HOSTS, you can now view your application after executing the following command.
heroku open
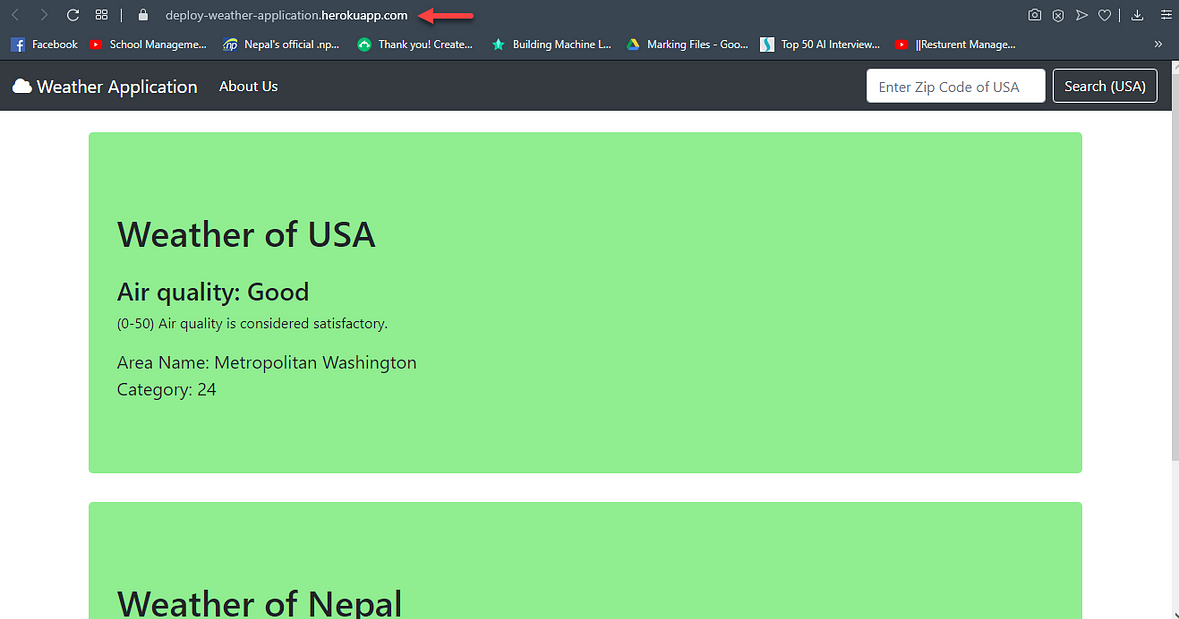
Step 26: Finally, your application is now up and running. You can now open your application in the browser using a subdomain of Heroku for instance: https://deploy-weather-application.herokuapp.com
References
https://devcenter.heroku.com/articles/django-app-configuration
https://help.heroku.com/GDQ74SU2/django-migrations
https://devcenter.heroku.com/articles/heroku-cli
About the Author
I am Hrishav Tandukar, currently working as an Assistant Lecturer and Senior Student Project Supervisor concurrently at Islington College. Likewise, I have been selected as an AWS Cloud Ambassador of Cohort 2020. Talking about my interest, I am an AI and Cloud Computing enthusiast.


Thanks for this step-by-step guide! It really summarizes some of the most important topics on machine learning.