“Testing leads to failure and failure leads to better understanding”
Introduction:
For every project, whether it is software development or data app is driven by predictive models from the backend, the quality of the final product depends on how rigorous the testing was carried by the group at various stages of the product’s lifecycle. The test engineers strive to catch them before the product is released but they always creep in and they often reappear, even with the best manual testing processes and these issues are sometimes very basic and trivial which are not caught in the manual testing process. The only way forward would be to automate the process.
There are ways to use an open-source platform/library which are easy to use, seamlessly integrates with your version control, cloud environment, and makes perfect sense especially for data science projects where most times the team size are minimal and may not have a dedicated testing team or skills to build automation scripts with third-party tools.
In this blog we will explore Pytest – a python library to define your business rules and automate the test cases and GitHub Actions to create automated workflows to automate the process.
We will be covering the following topics in the next sections:
- Overview of Pytest
- Introduction to GitHub Actions & its configuration
- Implementation of a use case
- Results and conclusions
Any Prerequisites?
You will need very basic knowledge of python and a GitHub account. I will be using Visual Studio Code as editor; you can use any editor of your choice as long as you are comfortable with it.
Getting Started:
We will be using the Loan Prediction data set from Analytics Vidhya’s hackathon.
Pytest:
Writing unit test cases for typical web development projects is normal but generally, in the case of data exploration or quality checks, there is a tendency to skip and do it manually at the end. The Pytest library makes it easier to configure the test cases, write functions to test for specific inputs & outputs. In short, write it once and keep running the test before pushing code to QA/prod environment. Refer Pytest document for more details.
Let’s create a file by name loan_test.py, import the libraries, load the data set and assign it to an object df:
# Load the libraries
import pandas as pd
import pytest
# Load the data
df = pd.read_csv("train.csv")
Let’s take a quick look at the data and its structure before proceeding to test cases.
df.head()
df.describe()
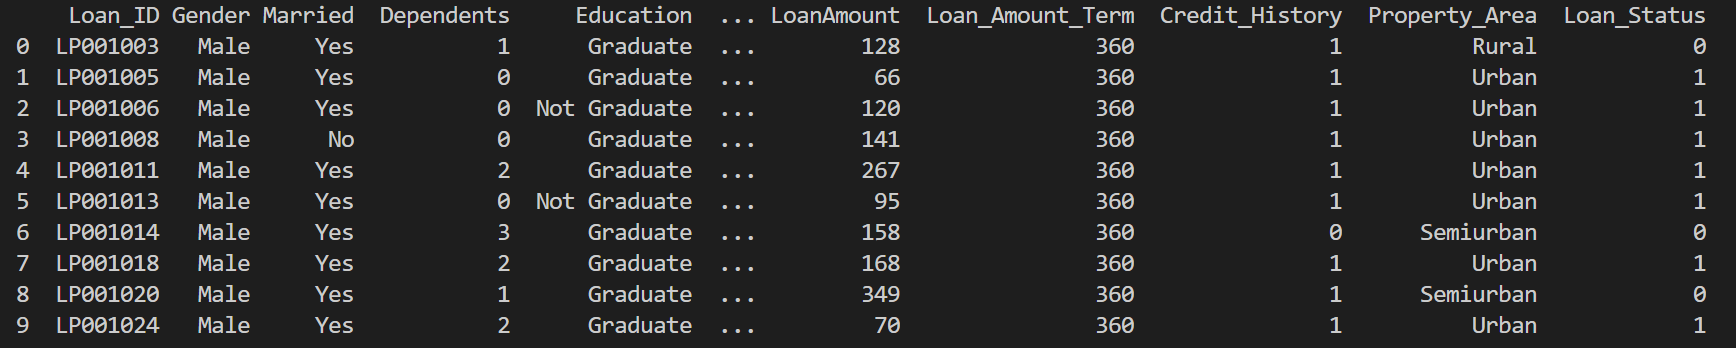

Now that we have the required libraries and the data loaded. Let’s identify some of the validations that make sense, to begin with.
- The number of columns, their names, and sequence should be as per the defined process.
- Gender can only have two possible values either Male or Female.
- The married column can have only two categories either Yes or No.
- Property Areas can have three values Rural, Urban or semi-urban.
- Loan Amount Term should not exceed 600.
It’s time to translate these rules into code. We will define a function by the name test_Gender() and check if the values from our dataset have these two values. If yes, the test case will Pass and if not, the test case will Fail. This is achieved using the assert keyword to test our criteria. We will follow a similar structure and define all other cases as shown below.
# Test to check if the Gender has only Male or Female
def test_Gender():
    assert df['Gender'].unique().tolist() == ['Male', 'Female']
#Test for checking if the Married columns has only two values either Yes or No
def test_Married():
    assert df['Married'].unique().tolist() == ['Yes','No']
# Test for checking if Applicant Income is less than zero
def test_ApplicantIncome():
    assert df[df['ApplicantIncome'] < 0].shape[0]  == 0
#Test for checking if the Married columns has only two values either Male or Female
def test_PropertyArea():
    assert df['Property_Area'].unique().tolist() == ['Rural','Urban','Semiurban']
# Test for checking if Loan Amount is more than 500
def test_LoanAmountTerm():
    assert df[df['Loan_Amount_Term'] > 600].shape[0]  == 0
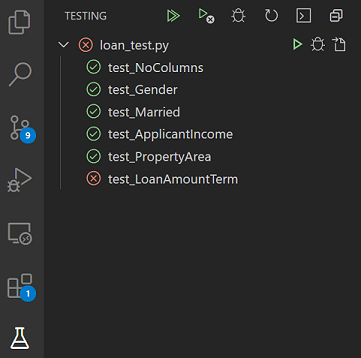
The moment you start writing the cases, Pytest identifies them automatically. If you are using vscode then you will see the test cases as below. For the sake of the demo, I have inserted a defect that resulted in the failure of one test case – test_LoanAmountTerm
Now, we have successfully defined and checked our test cases by manually running them in vscode. In the next section, we will look into how these test cases can be integrated with GitHub under a workflow with GitHub Actions.
GitHub Actions:
We have been using GitHub for version control and also to collaborate across teams and communities, but GitHub has more to offer than being a mere code repository. The GitHub Actions feature helps you automate tasks within your development life cycle. They are event-driven, meaning that you can run a series of commands after a specified event has occurred. For example, every time someone pushes the code to a repository, you can automatically run a command that executes a testing script and in this case, it will be our Pytest script which we defined in the previous section.
“No amount of testing can prove a software right; a single test can prove a software wrong.” — Amir Ghahrai
Navigate to your GitHub repository and you will be able to see the Actions tab as shown below.

In your repository, create the .github/workflows/ directory to store your workflow files i.e., the .yaml file which will have the following sections.
- The on: [push] to automatically trigger the workflow every time there is a code push to the repository.
- The jobs group together all the jobs that run in the workflow file.
- Create an environment where all the dependencies are installed from the requirements.txt file.
- Finally, once our setup is completed we call pytest to execute our test case in the environment we newly created.
Putting it all together, the .yaml file should look like this. Our main focus will be on the last three lines where we are executing our test cases in the GitHub environment.
# This workflow will install Python dependencies, run tests and lint with a single version of Python
# For more information see: https://help.github.com/actions/language-and-framework-guides/using-python-with-github-actions
name: Automated Testing With Pytest
on:
  push:
    branches: [ main ]

jobs:
  build:
    runs-on: ubuntu-latest
    steps:
    - uses: actions/checkout@v2
    - name: Set up Python 3.9
      uses: actions/setup-python@v2
      with:
        python-version: 3.9
    - name: Install dependencies
      run: |
        python -m pip install --upgrade pip
        pip install flake8 pytest
        if [ -f requirements.txt ]; then pip install -r requirements.txt; fi
    - name: Lint with flake8
      run: |
        # stop the build if there are Python syntax errors or undefined names
        flake8 . --count --select=E9,F63,F7,F82 --show-source --statistics
        # exit-zero treats all errors as warnings. The GitHub editor is 127 chars wide
        flake8 . --count --exit-zero --max-complexity=10 --max-line-length=127 --statistics
    - name: Test with pytest
      run: |
        pytest
Once, the above setup is completed any new changes/pushes to your repository will trigger the workflow which in turn will create a new GitHub Ubuntu environment, install all dependencies and execute our test cases.
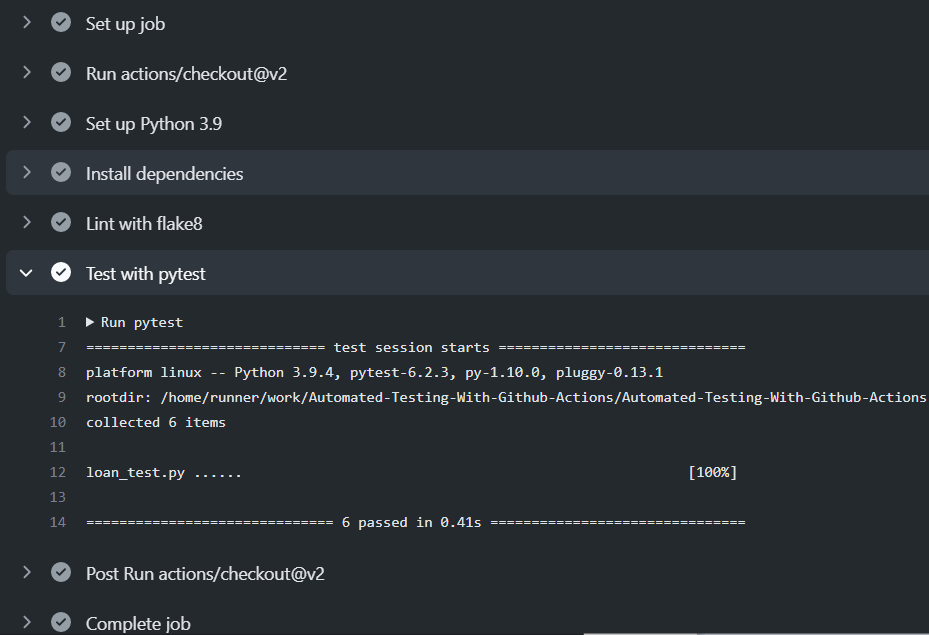
As you can see on the console all the steps defined in the yaml file were set up and our six test cases were successfully executed with a 100% pass rate.
Conclusion:
The objective of the blog was to showcase features of Pytest / GitHub actions / vscode and how easy it is to automate many of the routine data-related activities that are carried out day in day out. One can also use a more sophisticated cloud platform with advanced features which let you achieve similar results with automation but, if you have a smaller team, a limited budget, and a shortage of test automation skills then Pytest / GitHub is more than handy to accomplish your project objectives.
Some scenarios where I have applied this approach:
1. I used to receive periodic data from multiple external systems and teams. Such automated workflows helped me ensure that the data received meets the agreed format & data quality.
2. The framework can be used to test model results, if the model has performed better than the last iteration then the model gets pushed to a staging environment. If no, then the existing model continues to be in the staging environment, and I can get back to experiment on the model with parameter tuning and new features, etc.
Happy learnings !!!!
You can connect with me – Linkedin
You can find the code for reference – Github
References
https://docs.github.com/en/actions
Amit Kulkarni
12 Apr, 2021


