This article was published as a part of the Data Science Blogathon.
Introduction
In this article, I’ll share 4 lesser-known Python libraries, that I feel don’t get the popularity they deserve and that’ll help you to take your Data Science projects to the next level. Let’s get started, in order these are:
- argh – Create seamless CLIs
- tqdm – Easy progress bars
- msgpack – Binary JSON, fast and small
- Redis Simple cache – For memoization
And there’s a bonus library I’ve mentioned at the end of the article! Be sure to check it out. Now let’s get started!
1. argh
argh is a wrapper around argparse which is dead simple to use. Given some function definition, argh will create a command-line interface for you automatically. First, we install argh. It can be easily installed using pip.
> pip install argh
Let us create a simple dummy function to help understand argh better:
import argh
def do_the_thing(required_arg, optional_arg=1, other_optional_arg=False):
    """
    I am a docstring
    """
    print((required_arg, type(required_arg)))
    print((optional_arg, type(optional_arg)))
    print((other_optional_arg, type(other_optional_arg)))
First, we import argh, next we start creating our function. Note that we can write up custom documentation using docstring for our function, which we can access later in our command line also. As we can see our function takes 3 variables as arguments. The first one doesn’t have a default value so it’ll be interpreted as a required argument, the second one does have a default value, which happens to be an integer, and argh will recognize that and same with the third one, but this is a bool and argh will handle this differently.
Now we want to make this function available for somebody to call from the command line. To do that, in the place where our script is supposed to run, we do this:
if __name__ == '__main__':
    argh.dispatch_command(do_the_thing)
And that’s it! This is all you have to do to create a CLI for your function. you can gain more control over your function. argh also provides a decorator called @args.arg using which you can specify options for a specific argument. You can specify a shorthand for these arguments as well as some help.
@argh.arg('--bool-arg-for-flag', '-b', help="Flip this flag for things")
@argh.arg('arg_with_choices', choices=['one', 'two', 'three'])
def do_the_other_thing(arg_with_choices, bool_arg_for_flag=False):
    print(arg_with_choices)
    print(bool_arg_for_flag)
if __name__ == '__main__':
    argh.dispatch_command(do_the_other_thing)
Also sometimes it is very nice for command-line interfaces to give you the list of options that they accept rather than just take in any input. This is done in the above code using the ‘choices’ argument and giving it a list of values.
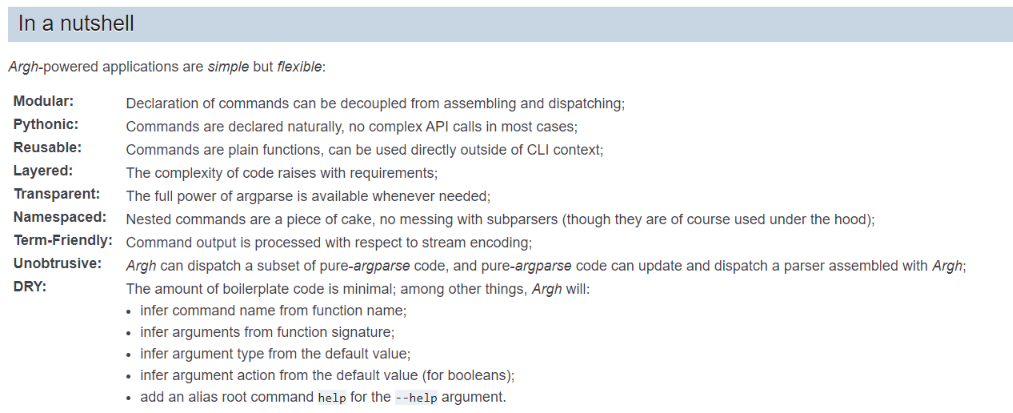
Here is a summary of the argh module from its creator, explaining it in a nutshell:
You can check out the official documentation and many in-depth tutorials here.
2. tqdm
This is my goto progress bar generator. It is very very easy to use, you can nest loops and can easily customize your progress bar as well. From the module tqdm, the 2 most useful functions you’ll be requiring most are “tqdm” and “trange“. Now, let us start exploring this awesome package. Installing tqdm:
> pip install ipywidgets
> jupyter nbextension enable --py widgetsnbextension
> jupyter labextension install @jupyter-widgets/jupyterlab-manager
By doing this you can activate the ipywidgets plugin for JupyterLabs. After that add this cell to activate tqdm in a notebook:
%%capture
from tqdm import tqdm_notebook as tqdm
tqdm().pandas()
Fun fact : tqdm derives from the Arabic word taqaddum (تقدّم) which can mean “progress,” and is an abbreviation for “I love you so much” in Spanish (te quiero demasiado).
The tqdm() function takes in an iterable and produces a progress bar as Python starts iterating through it. Here is a simple example:
from tqdm import tqdm
import time
L = list(range(10000))
for ele in tqdm(L):
    time.sleep(0.2)
Now a nice alternative to tqdm(range(x)) is trange(). Also, you can create multiple progress bars for nested loops:
for i in trange(10):
    for j in trange(10, desc="inner_loop"):
        time.sleep(0.01)

A few of the useful arguments along with their syntaxes:
a) desc – Used to specify the description of the progress bar created.
tqdm (self, iterable, desc= “Your description”)
b) total – used to specify the expected number of iterations if not already specified or needs modification.
tqdm (self, iterable, total= 500)
c) ncols – Used to specify the width of the progress bar generated. Remains dynamic to the window if left unspecified.
tqdm (self, iterable, ncols= 50)
d) miniinterval – Used to change the minimum progress display update. The default value is 1/10th of a second.
tqdm (self, iterable, mininterval=3)
e) ascii – ASCII characters can be used to fill up the progress bar.
tqdm ( self, iterable, ascii= “123456789$”, desc=”Your description” )
3. msgpack
This is just a Python client to a serialization protocol called MessagePack. msgpack is essentially what a binary version of JSON would be. It makes it really easy for you to serialize and deserialize the data and save it into either a byte array or a file. Almost every other language has an implementation of MessagePack so it has pretty much the same kind of portability that you would expect from a JSON file.
However, because msgpack saves data in a binary format you can get a lot of space savings especially when this data needs to be transferred over a network.
Here is the official description of the MessagePack module:

You can install the package using:
pip install msgpackNow let’s get on with examples:
import msgpack
import json
import random
def msgpack_example():
    example_dict = {i: random.random() for i in range(10000)}
    with open('json_file.json', 'w') as f:
        json.dump(example_dict, f)
    with open('json_file.json') as f:
        back_from_json = json.load(f)
    # Saving and loading
    with open('msgpack_file.msgpack', 'wb') as f:
        f.write(msgpack.packb(example_dict))
    with open('msgpack_file.msgpack', 'rb') as f:
        back_from_msgpack = msgpack.unpackb(f.read())

What we’ve essentially done here is create a dictionary of floating-point values, and then dumping it into a JSON and reloading it and also dumping it into a MessagePack file and reloading it.
Since the MessagePack is in binary format, when it’s opened you have to use the binary format “b”. So you can see, using msgpack is really easy. Another thing I’d like to point out is about the data integrity of the files:
# Data integrity
print(type(next(iter(back_from_json.keys()))))
print(type(next(iter(back_from_msgpack.keys()))))

So the outputs are <class ‘str’> for JSON and <class ‘int’> for MessagePack. We know that JSON requires you to have string keys, even though our original data has integer keys in the dictionary, the JSON is going to forcibly turn them into strings. Whereas MessagePack maintains the integrity of the data and keeps it integer type. I’ve personally run into subtle problems multiple times while using JSON, while this is not even an issue.
Secondly, if we look at the files that we’ve saved, the JSON file is 275kb and the Messagepack is 117kb. This might not seem a lot right now, but when you are working with more and more huge datasets, and you involve network, these savings become really important.
4. Redis Simple Cache
Installation:
pip3 install git+https://github.com/YashSinha1996/redis-simple-cache.git
For those that aren’t familiar with Redis, it is an in-memory key-value store that has very low latencies for data access.
As the name suggests, redis_cache does cache using Redis. To use redis_cache, there are two decorators – @cache_it and @cache_it_json. The only difference between these is cache_it uses pickle to serialize your data and cache_it_json does not use pickle, instead uses JSON.
import time
from redis_cache import cache_it, cache_it_json
@cache_it(limit=1000, expire=5)
def function_that_takes_a_long_time(i):
    print(f"function was called with input {i}")
    return i**2
if __name__ == '__main__':
    for i in range(10):
        print(i, function_that_takes_a_long_time(2))
This is a dummy function to help visualize a function that takes a long time to execute, and then run a loop to call it 10 times. Using the @cache_it decorator, with arguments limit which implies in this scenario that only a 1000 unique input values will be cached, and then if the function is called with more different input values, the old ones will start getting pushed off and the new ones will start getting added. And the expire argument, in this case, signifies that anything cached for more than 5 seconds will automatically be deleted.
This module is most useful when you are working with Databases, and pull a lot of data. This helps to keep the data from getting stale.
End Notes
I hope this article comes in handy to my fellow Data Science beginners. All these libraries can help you a lot if you can implement them in your day-to-day programming and development. Another library which you might find very useful and interesting is Numba. This library is mainly used to optimize your python code to make it run almost 1000 times faster! Yes exactly! a 1000 times fast. You can read all about numba in my article:
Numba for Data Science, make your Py code run 1000x faster
Thank you for reading this article. Cheers!


