This article was published as a part of the Data Science Blogathon
Introduction
A lot of social media platforms have been using AI these days to classify vulgar and offensive posts and automatically take them down. I thought why not try doing something similar; and so, I’ve come up with this end-to-end tutorial that will help you build your own corpus for training a text classification model, and later export and deploy it on an Android app for you to use. All this, absolutely on a custom dataset of your choice.
So, are you excited to build your own text classifier app? If yes, let’s begin the show.
Now, before we begin, let me tell you that we’ll be doing all the model’s hyperparameter configuration and training on Google Colab. To build the Android app, we’ll need to have Android Studio. If you haven’t installed it yet, find it here.
Step 1: Build a corpus
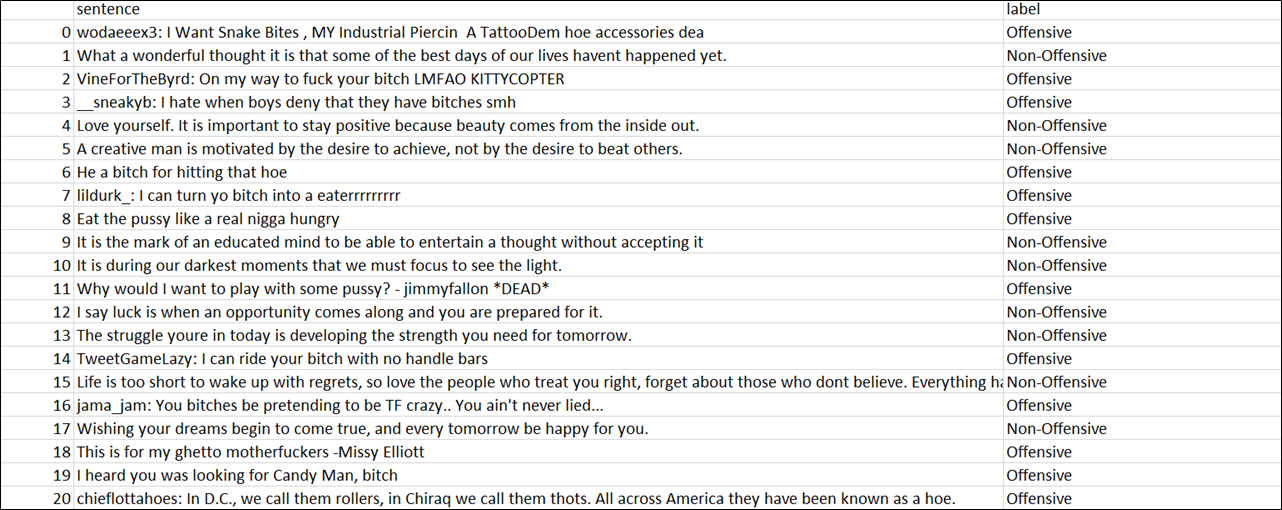
I’m building a text classifier that will classify an input text as offensive or non-offensive. Hence, for simplicity purposes, I have limited my text classification model to two classes. Feel free to create a custom dataset of your choice with any number of classes. The overall process will exactly be the same.
Coming to the data collection part, let me be honest here. Although plenty of datasets are available on Kaggle, I didn’t find any of them suitable for my application. So, I have manually built my own dataset by scraping texts and quotes online, that I felt could be best classified as offensive or non-offensive. I have collected about 1000 sentences and labelled them as ‘offensive’ and ‘non-offensive’, depending upon the nature of the language used in each sentence. The ratio of the training and test data is 7:3.
Below is a snapshot of how my dataset looks like.
 Dataset
Note: Needless to say, but hope it is understood that no offense is intended for anyone here. 🙂
To create your own dataset, create a CSV file containing two columns – sentence and label respectively as shown in the image above. Add the texts and their respective labels in both these columns. The first column is the index column which is later created by the Pandas library automatically. Simply ignore it while creating your dataset.
Note: If your dataset contains many labels, make sure you collect enough data for each label so that the dataset doesn’t become biased.
Once you’ve collected enough texts for your corpus, split the dataset into two different CSV files – train.csv and test.csv respectively. The ideal ratio would be 7:3. As I keep repeating in my articles, “Garbage in, garbage out”. So, take your own sweet time to build the corpus and do not hurry.
Alright, if you feel you have created a healthy dataset with enough text samples, you’re good to go for the next step.
Step 2: Training the model
Clone this GitHub repository on your local machine. Inside this repository, you’ll find a notebook file named Custom_Text_Classification.ipynb.
Sign in to your Google account and open the notebook on Google Colab and connect to the runtime. Upload the train.csv and test.csv files you created in Step 1; as shown in the figure below.
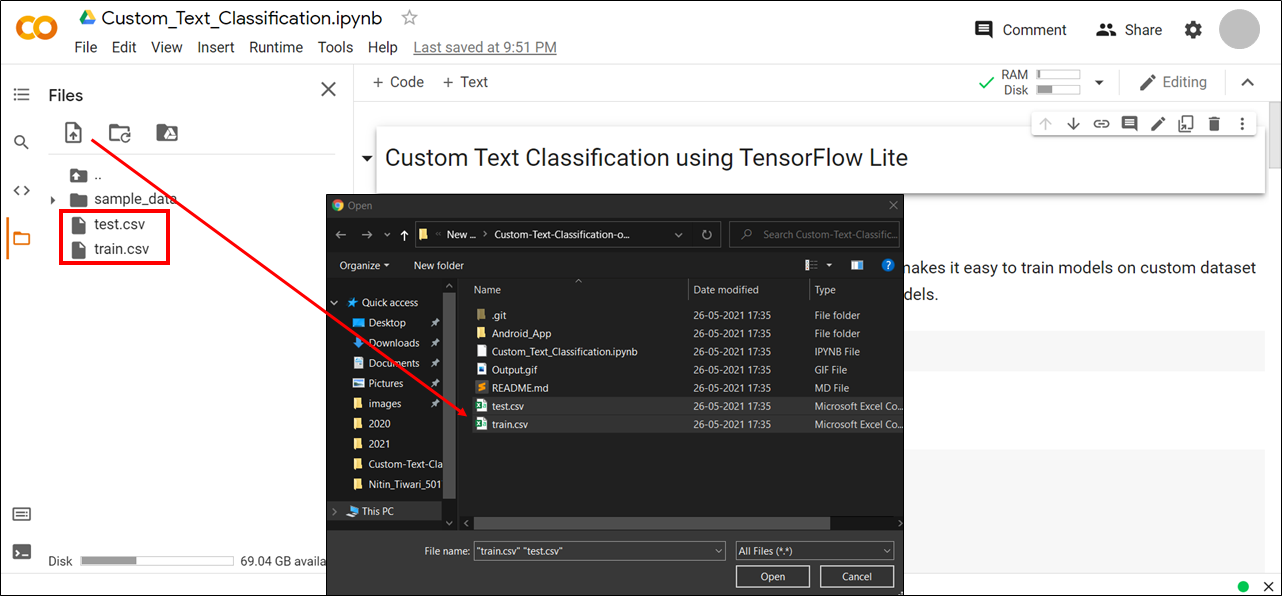 Connect to runtime and upload a dataset
Now, run the notebook cells one by one by following the instructions.
Install TF Lite Model Maker
Install the TensorFlow Lite Model Maker library. TF Lite Model Maker makes it easy to train models on a custom dataset and reduces time to train by using Transfer Learning on pre-trained models.
!pip install -q tflite-model-maker
Install necessary libraries.
import numpy as np
from numpy.random import RandomState
import pandas as pd
import os
from tflite_model_maker import model_spec
from tflite_model_maker import text_classifier
from tflite_model_maker.config import ExportFormat
from tflite_model_maker.config import QuantizationConfig
from tflite_model_maker.text_classifier import AverageWordVecSpec
from tflite_model_maker.text_classifier import DataLoader
import tensorflow as tf
assert tf.__version__.startswith('2')
tf.get_logger().setLevel('ERROR')
Import dataset
df_train = pd.read_csv('train.csv', error_bad_lines = False, engine = "python")
df_test = pd.read_csv('test.csv', error_bad_lines = False, engine = "python")
View dataset
Check your dataset and see if it is properly imported or not.
df_train.head()
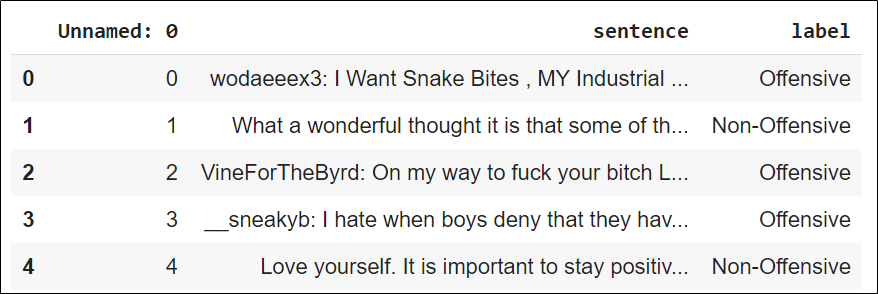 Sample Train Data
df_test.head()
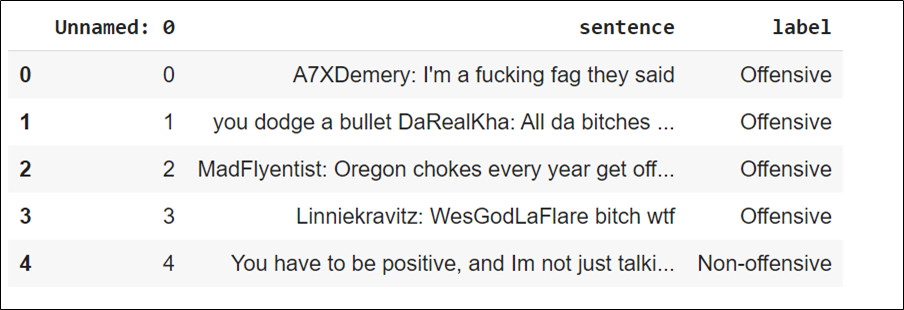 Sample Test Data
Choose a model architecture.
Choose any one model architecture of your choice and comment the rest. Each model architecture is different from the other and will yield different results. The MobileBERT model takes more time to train as its architecture is quite complex. However, feel free to play with different architectures until you find the best result.
spec = model_spec.get(‘average_word_vec’)
# spec = model_spec.get(‘mobilebert_classifier’)
# spec = model_spec.get(‘bert_classifier’)
# spec = AverageWordVecSpec(wordvec_dim = 32)
The architecture and working of these models are beyond the scope of this article. However, if you want to learn more about how each of these models works, feel free to visit the following link.
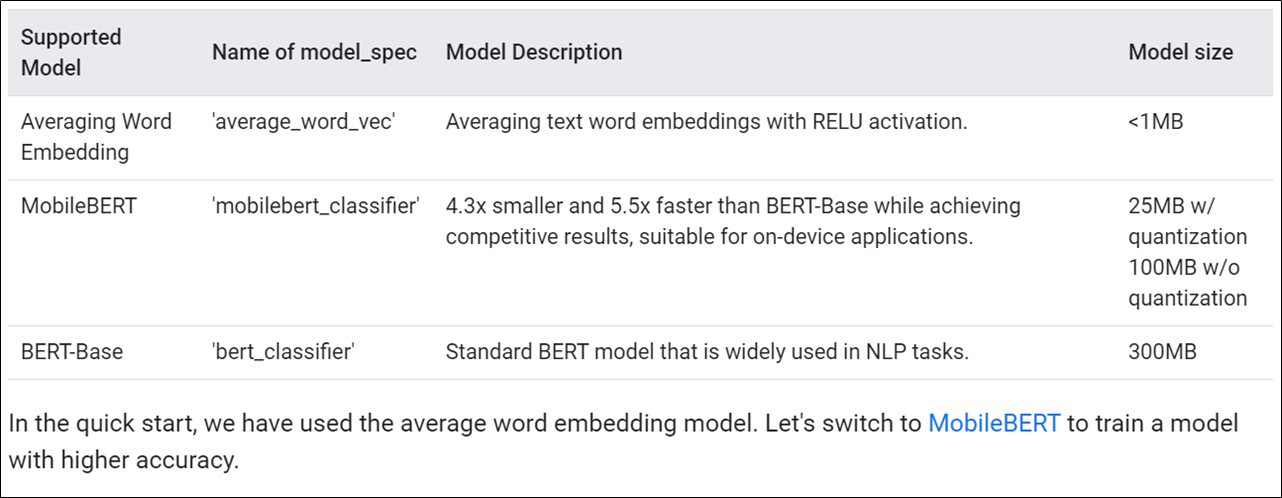 Summary of different Text Classification Models [Reference: Official TensorFlow website].
Customize the MobileBERT model hyperparameters (optional).
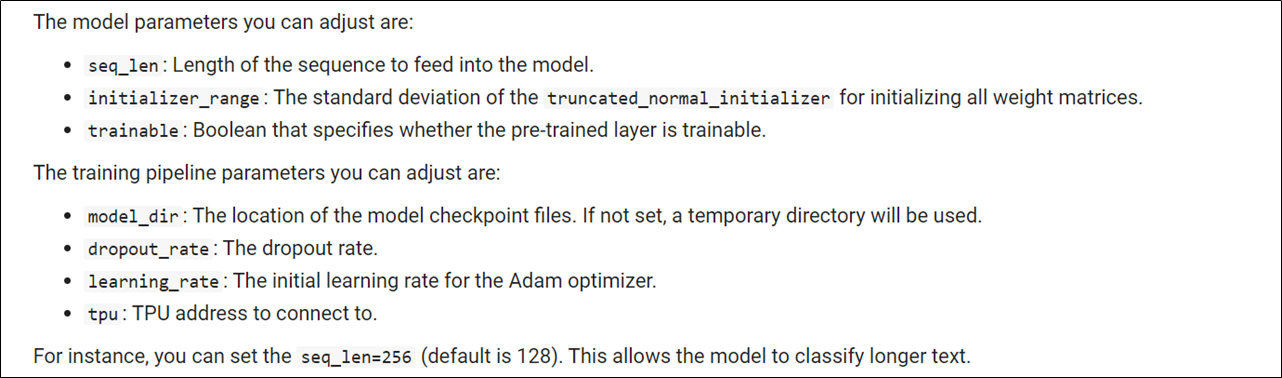 MobileBERT Hyperparameter Configuration
Run this cell only if you have selected the ‘mobilebert_classifier’ architecture in the previous cell.
# spec.seq_len = 256
Load training and test data.
Load the training and test data CSV files to prepare the model training process. Make sure the is_training parameter for test_data is set to False.
train_data = DataLoader.from_csv(
     filename = 'train.csv',
     text_column = 'sentence',
     label_column = 'label',
     model_spec = spec,
     is_training = True)

test_data = DataLoader.from_csv(
     filename = 'test.csv',
     text_column = 'sentence',
     label_column = 'label',
     model_spec = spec,
     is_training = False)
Train model.
Start the model training on the training dataset. Feel free to play around with different no. of epochs until you find the ideal epoch value that gives the best results.
model = text_classifier.create(train_data, model_spec = spec, epochs = 100)
Examine your model structure – Layers of the neural network.
model.summary()
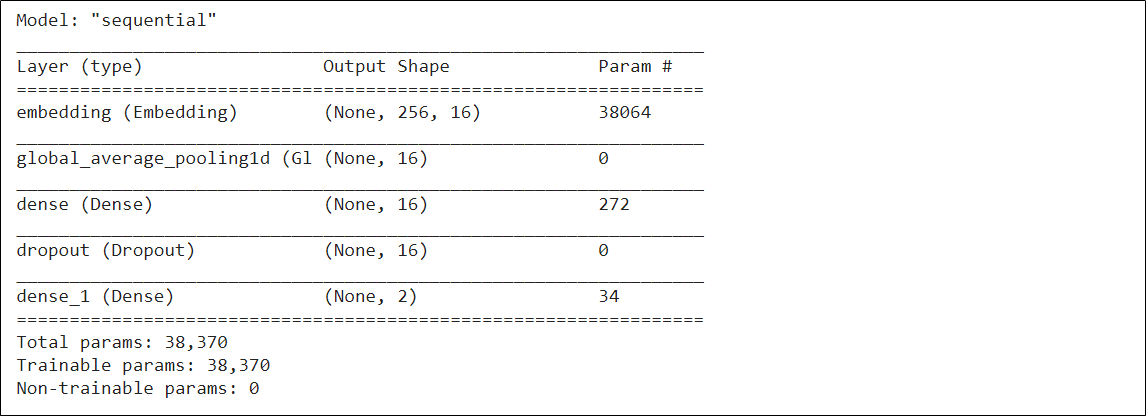 Model Summary
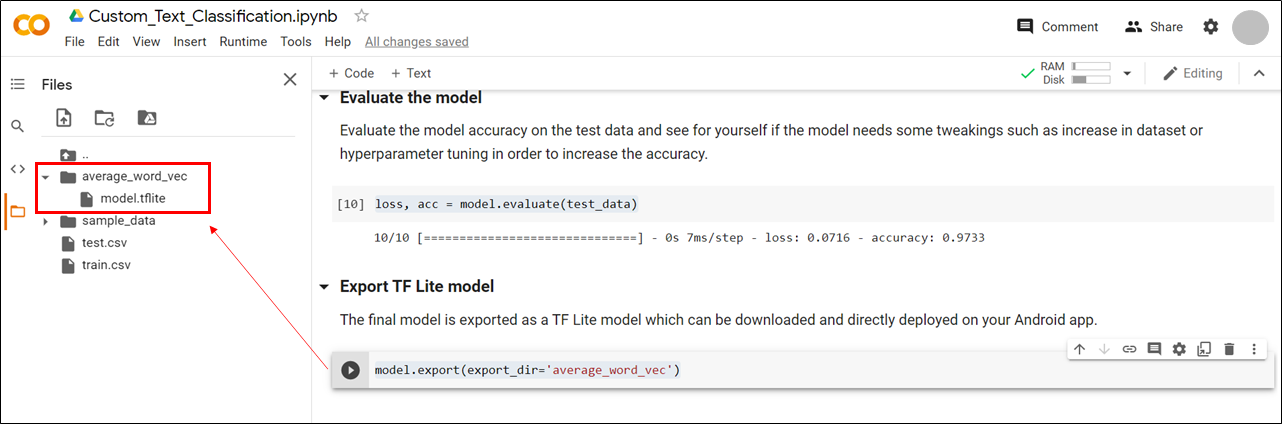
Evaluate the model
Evaluate the model accuracy on the test data and see for yourself if the model needs some tweaking such as an increase in the dataset or hyperparameter tuning in order to increase the accuracy.
loss, acc = model.evaluate(test_data)
Export TF Lite model
The final model is exported as a TF Lite model which can be downloaded and directly deployed on your Android app.
model.export(export_dir = ‘average_word_vec’)
When you run the above cell, a folder named ‘average_word_vec’ will be created that contains the TF Lite model named model.tflite. Download this model on your local machine.
 TF Lite Model
This model is now ready to be deployed on our Android app now. But where is the Android app? Find it in the next step.
Step 3: Creating an Android app
I’ve already built an Android app by referencing the official TensorFlow Lite text classification app and customizing it to my own needs where the predictions can be represented visually. You can find this app inside the Android_App folder in the repository you cloned earlier.
Now, let’s deploy the model on the app.
Copy the model.tflite file inside the Custom-Text-Classification-on-Android-using-TF-Lite/Android_App/lib_task_api/src/main/assets directory.
Once you’ve copied the model in the designated directory, open the project in Android Studio and let it build itself for some time. Meanwhile, the project builds, let’s go for a walk and have a cup of beverage together. I’d prefer tea over coffee on any given day. 🙂
Now, when the project is finally built successfully, all you have to do is, open the TextClassificationClient.java file under lib_task_api and edit Line 31 by replacing <your_model.tflite> it with the name of your model file. In this case, replace it with model.tflite . Build the project once again after making this change.
What’s next? Nothing. Sip your coffee and install the app on your mobile and enjoy using your own text classification app.

Testing the app
So, congratulations on building your own end-to-end custom text classifier app. If you enjoyed working on it, don’t forget to give the repository a star. Feel free to fork it and update the app with more exciting features.
About me: I’m Nitin Tiwari, a B.E undergraduate in Information Technology. I’m currently exploring Machine Learning and Computer Vision. If you liked my article and would want to talk more about it, feel free to connect with me on LinkedIn. Happy to address any feedbacks and queries too. Till then, adieu.
The media shown in this article are not owned by Analytics Vidhya and is used at the Author’s discretion.


Hi, I did everything like in the tutorial and tried running the app, however it keeps crashing and I keep getting this, even with the already provided model: java.lang.NullPointerException: Attempt to invoke virtual method 'int java.lang.Integer.intValue()' on a null object reference What's the problem?
Hi, Im Ashra. I need a help. i want to create a mobile application which have to support ML. If you can please let me know. Then i'll give you full deatils.