Deploy Your ML/DL Streamlit Application on Heroku
Introduction
Did you developed a Machine Learning or Deep Learning application using Streamlit and don’t know how to deploy it on Heroku? Don’t worry, I’ve got your back. In this article, I will be discussing How to Deploy Your ML/DL Streamlit Application on Heroku. So, let’s get started!
Note: This article considers that the reader has already developed a streamlit application and we will be using one demo application in this article.
Table of Contents
- Building a Demo Application
- Required Softwares
- Deployment on Heroku
- Endnotes
Building a Demo Application
Let us build a demo application. We’ll be using a simple and famous House Price Prediction Application. You can download the datasets from here. Following is the code.
import pandas as pd
import numpy as np
import streamlit as st
import time
from sklearn.preprocessing import StandardScaler
from sklearn.linear_model import LinearRegression
from sklearn.model_selection import train_test_split
def main():
    df = load_data()
    df = preprocess_data(df)
    st.title('House Price Prediction for Silicon Valley of India - Bangalore')
    st.markdown('Just Enter the following details and we will predict the price of your **Dream House**')
    st.sidebar.title('Developer's Contact')
    st.sidebar.markdown('[![Harsh-Dhamecha]'
                        '(https://img.shields.io/badge/Author-Harsh%20Dhamecha-brightgreen)]'
                        '(https://www.linkedin.com/in/harsh-dhamecha/)')
    st.warning('Only Enter Numeric Values in the Following Fields')
    bhk = st.text_input("Total BHK")
    area = st.text_input("Area in Square Feet")
    baths = st.text_input("Total Bathrooms")
    balcony = st.selectbox("Total Balcony", ['0', '1', '2', '3'])
    submit = st.button('Predict Price')
    if submit:
        if bhk and area and baths and balcony:
            with st.spinner('Predicting...'):
                time.sleep(2)
                bhk, area, baths, balcony = int(bhk), int(area), int(baths), int(balcony)
                x_test = np.array([[bhk, area, baths, balcony]])
                prediction = predict(df, x_test)
                st.info(f"Your **Dream House** Price is {prediction} lacs")
        else:
            st.error('Please Enter All the Details')
@st.cache
def train_model(df):
    global scaler
    X, y = df.iloc[:, :-1].values, df.iloc[:, -1].values
    scaler = StandardScaler().fit(X)
    X = scaler.transform(X)
    X_train, X_test, y_train, y_test = train_test_split(X, y, test_size=0.2, random_state=23)
    model = LinearRegression().fit(X_train, y_train)
    return model, scaler
def predict(df, x_test):
    model, scaler = train_model(df)
    X_test = scaler.transform(x_test)
    y_pred = model.predict(X_test)
    return round(y_pred[0], 2)
def load_data():
    return pd.read_csv('Datasets/house-price-prediction.csv')
def preprocess_data(df):
    df = df.loc[:, ['size', 'total_sqft', 'bath', 'balcony', 'price']]
    df.dropna(inplace=True)
    df = df[df['size'].str.contains('BHK', na=False)]
    df['size'] = df['size'].str.replace(r'D', '').astype(int)
    df['total_sqft'] = df['total_sqft'].str.extract(r'(d+)', expand=False)
    df['bath'] = df['bath'].astype(int)
    df['balcony'] = df['balcony'].astype(int)
    df['total_sqft'] = df['total_sqft'].astype(int)
    return df
if __name__ == '__main__':
    main()
You can run your streamlit application locally using the following command.
streamlit run app.py
Note: app.py is the file that we want to run.
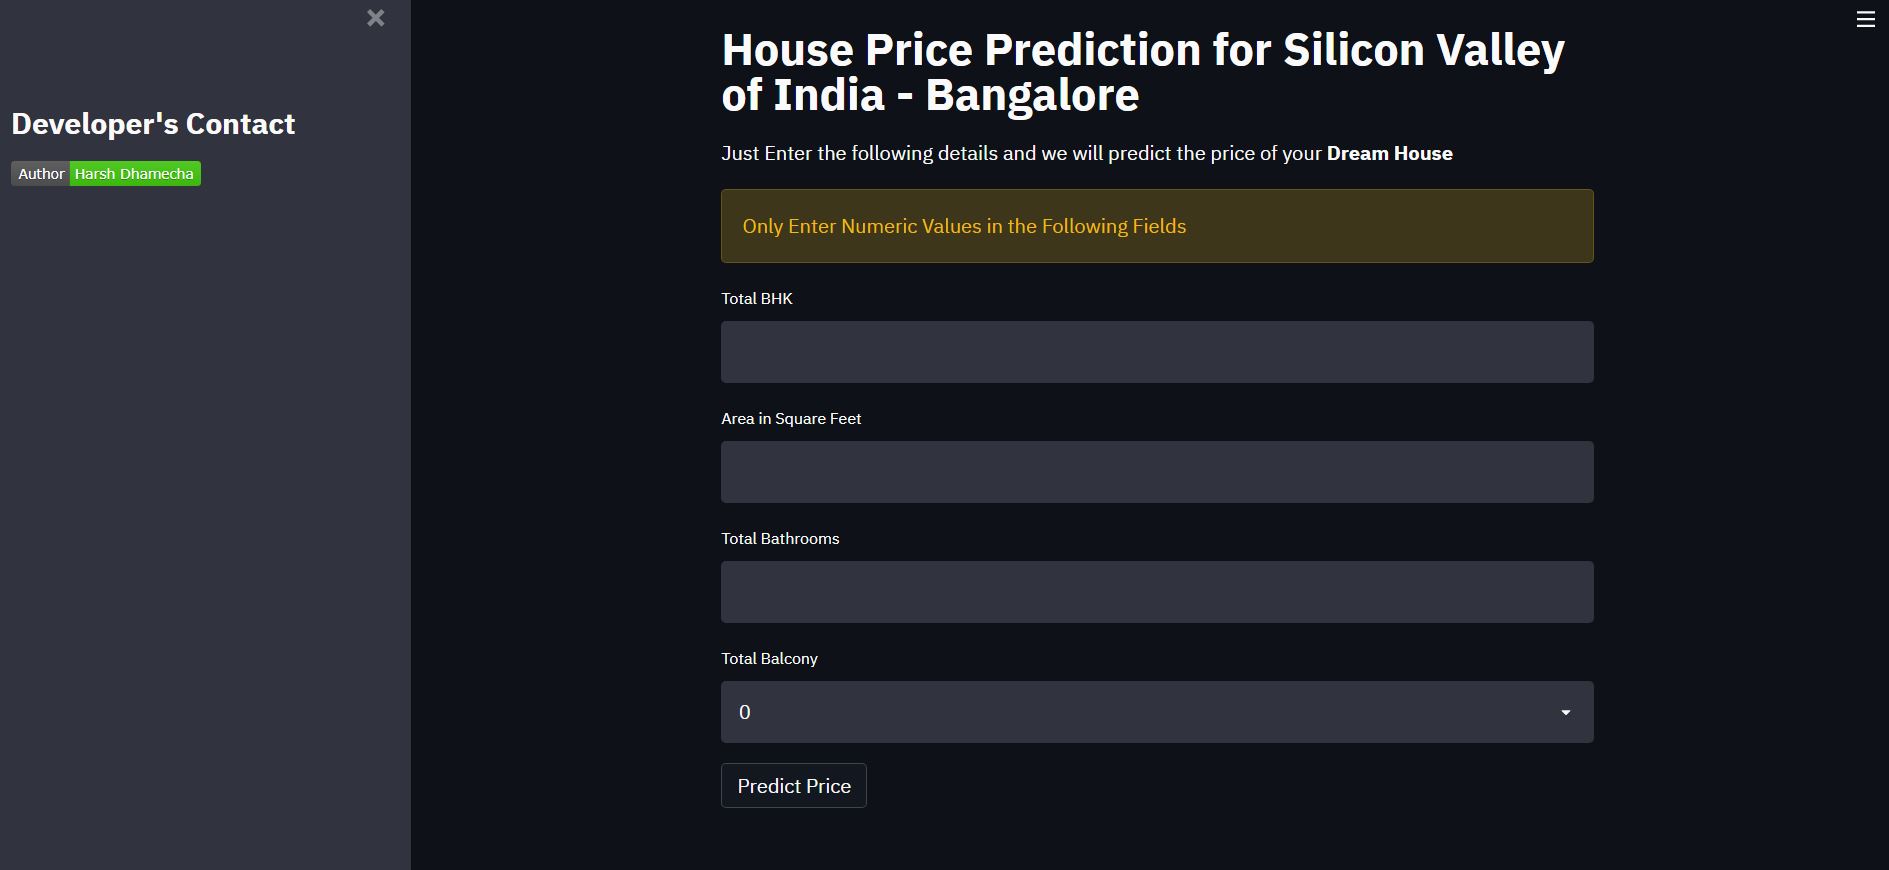
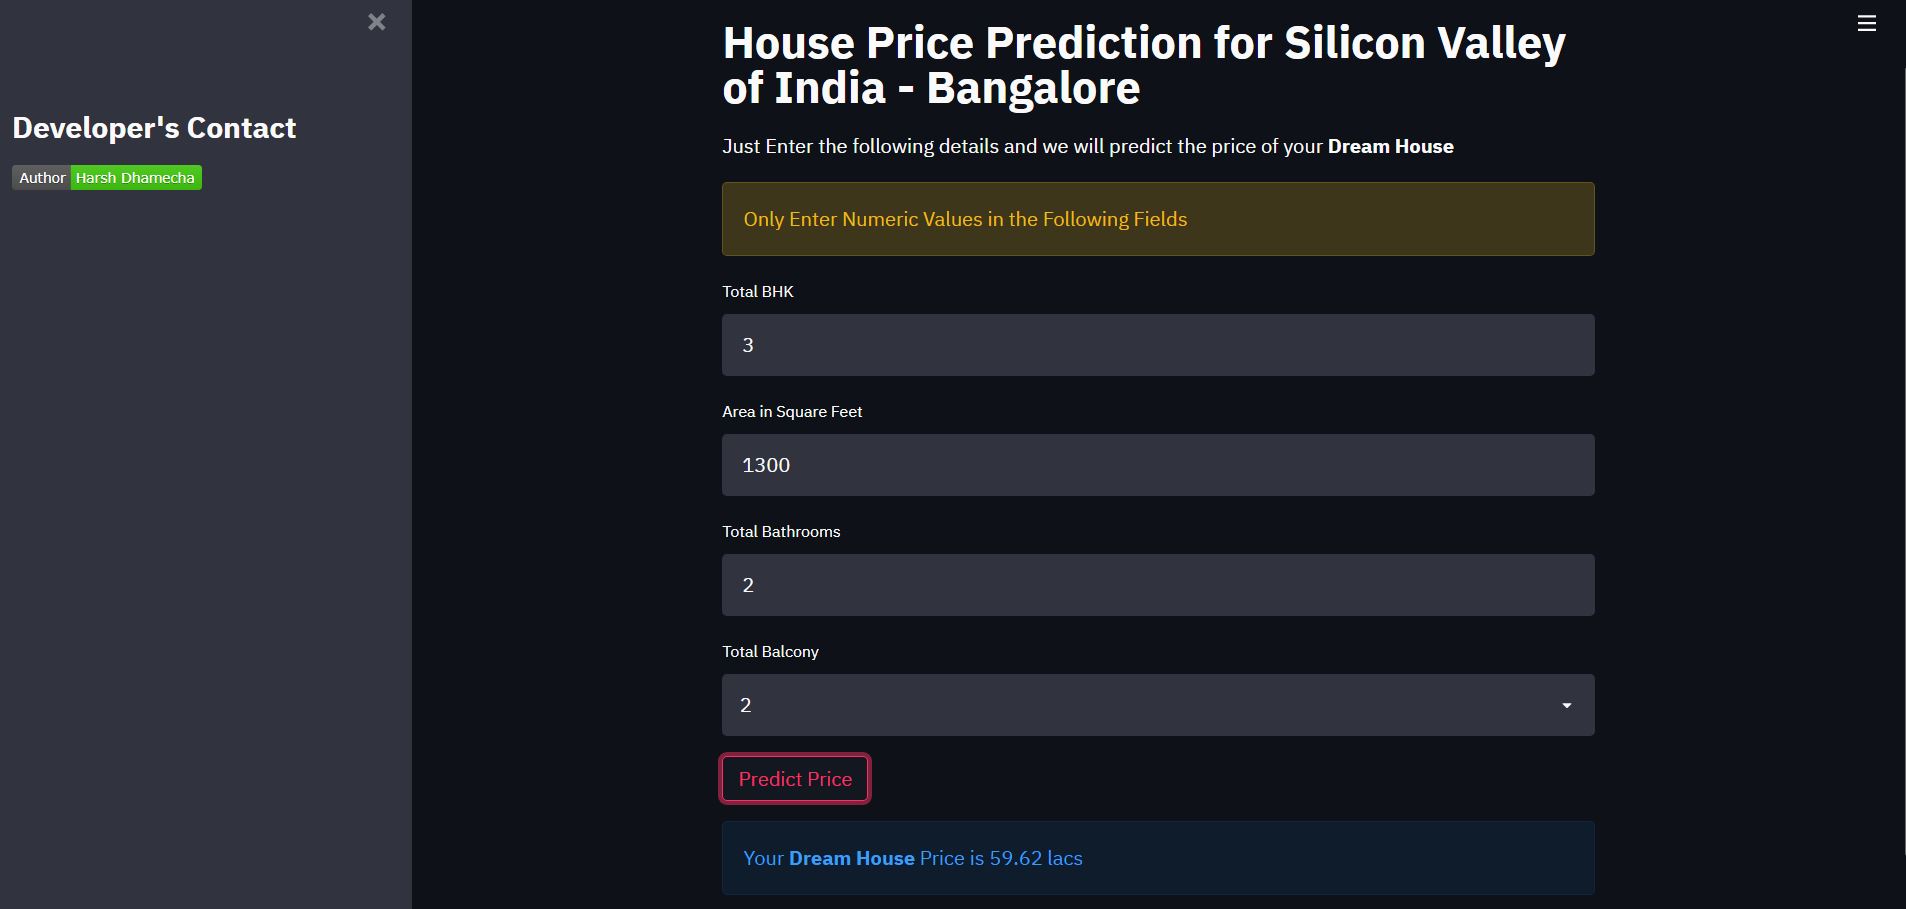
Our application is looking something like the following.
Before Entering the Details:
After Entering the Details:
Required Softwares
To deploy our streamlit application, we need the following software:
- Git Download from here
- Heroku CLI Download from here
- Free Heroku Account Create here
and follow the on-screen instructions.
Deployment on Heroku
Now that we have our demo application and the required software in our hands, let us deploy our application on Heroku.
Needed Files
First, we need to add some files which allow Heroku to install all the required libraries and run our application.
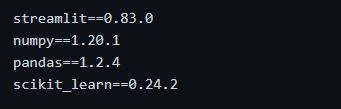
requirement.txt
This file contains all the required libraries to be installed for the project to work. This file can be created manually by going through the project and listing all the libraries that used in the project. But we will be using the pipreqs module to do that which automatically creates a requirement.txt file. Install it by the following command if you haven’t already.
pip install pipreqs
Now, navigate to your project directory and type the following command.
pipreqs ./
Our requirement.txt file is now ready! It should look something like the following.
Procfile and setup.sh
Using these two files, we tell Heroku the needed commands to start our application.
In the setup.sh file we will create a streamlit folder with credentials.toml and a config.toml file. Following is the command to be pasted in setup.sh file.
mkdir -p ~/.streamlit/
echo "
[general]n
email = "[email protected]"n
" > ~/.streamlit/credentials.toml
echo "
[server]n
headless = truen
enableCORS=falsen
port = $PORTn
" > ~/.streamlit/config.toml
The Procfile is used to first execute the setup.sh and then call streamlit run to run the application. Your Procfile should look something like the following.
web: sh setup.sh && streamlit run app.py
Note: app.py is the file that we want to run first (contains the main function). If you’ve defined your main function in some other file, pass that instead of app.py.
Creating a Git Repository
Heroku provides different ways for deployment but we’ll be using git as it is simple.
Type the following command to initialize an empty git repository. Make sure that you’re in your project root directory.
git init
Login to Heroku
Next, we need to log in to Heroku. We can do that with the following command.
heroku login
You’ll be asked to press a button and after you have done so you’ll be redirected to a login screen in your default browser.
.png)
After entering your credentials, you should see something like the following.
.png)
Deploy the Application
Finally, we can deploy our application to Heroku. Let us first create an instance of our application. We can do that with the following command.
heroku create houses-prices-predictor
houses-prices-predictor is a name which I chose for my application. You can’t use the same name as it is already taken by me. So choose your application name accordingly.
Lastly, push the code to that instance using the following commands.
git add .
git commit -m "some message"
git push heroku master
When running git push Heroku master you should notice that it should automatically detect that you have a Python app and it should install all packages inside the requirements.txt. After the command has finished you should see something like the following.
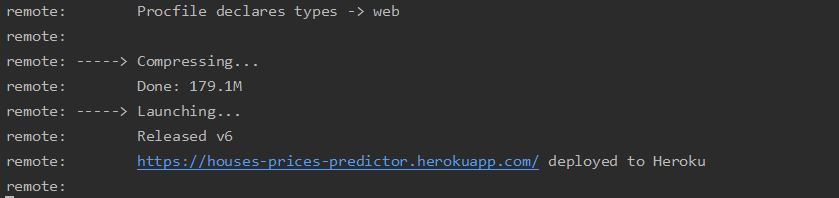
Note: As I chose the name houses-prices-predictor, I got this URL. You would get a URL according to your app name.
Click on the URL to see your live deployed application.
Congratulations! We’ve successfully deployed our first application.
Bonus Tips
If you would like to change/edit the files after deployment, you can do that in your files and run the following commands to get those changes reflected in your live deployed application.
git add .
git commit -m "some message"
git push heroku master
You would again get the same URL as shown in the above image, click on that and you are good to go!
Endnotes
This completes today’s discussion.
Thank you for reading this!
I hope you enjoyed the article and successfully deployed your first streamlit application on Heroku!
Click here to watch our first live streamlit application. Feel free to put up your first live application link in the comments section down below.
Did I miss something important or want to share your thoughts? Comment down below and I’ll get back to you.
About the Author
I am Harsh Dhamecha, an aspiring Data Scientist. I am a final year undergrad student of Computer Science with a specialization in Artificial Intelligence. A self-motivated learner who is eager to help the Data Science Community as much as he can.
If you have any queries, you can directly email me or connect with me on LinkedIn or Twitter.
If you like the way I write, you may also look for the other articles I have written.
Still reading! Special thanks to you 🙌


Thank you so much for the all details. It is useful.