This article was published as a part of the Data Science Blogathon
YOLO is a Deep Learning architecture proposed by Joseph Redmon, Santosh Divvala, Ross
Girshick, Ali Farhadi in the paper ‘You Only Look Once: Unified, Real-Time Object Detection’ [1] uses a totally different approach. It is a clever convolutional neural network (CNN) for object
detection used in real-time.
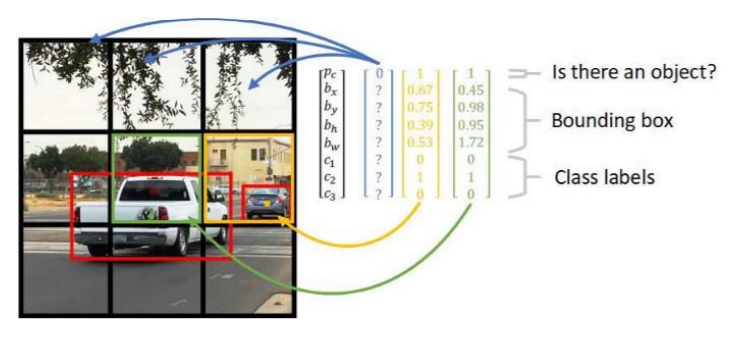
Further, It is popular because it has a very high accuracy while also being able to run in real-time or used for real-time applications. The YOLO algorithm “only looks once” at the input image that is it needs only one forward propagation pass through the network to make the predictions.
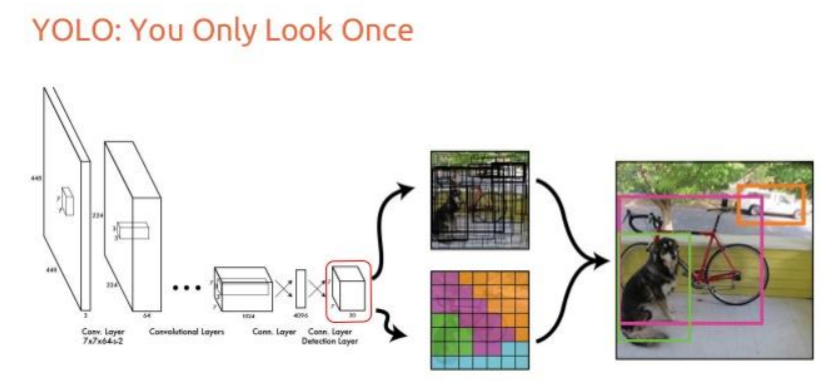
Source: “You Only Look Once: Unified, Real-Time Object Detection” paper
Prior detection systems use localizers or classifiers to carry out the detection process. Then the model is applied to an image at different scales and locations. The regions of the image with High scoring are considered for detections.
YOLO algorithm uses a completely different approach. The algorithm applies a single neural network to the entire full image. Then this network divides that image into regions which provides the bounding boxes and also predicts probabilities for each region. These generated bounding boxes are weighted by the predicted probabilities.
Source: ‘Reasearchget.net’
The non-max suppression technique makes sure that the object detection algorithm only detects each object once and it discards any false detections, it then gives out the recognized objects along with the bounding boxes.
Source: “You Only Look Once: Unified, Real-Time Object Detection” paper
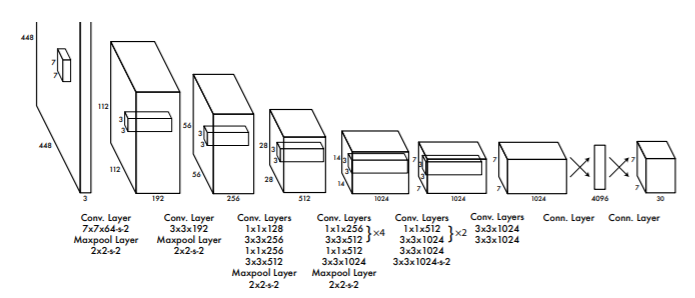
YOLO is a convolution neural network. It consists of a total of 24 convolutional layers and followed
by 2 fully connected layers. Each layer has its own importance and the layers are separated by their
functionality.
— The First 20 convolutional layers followed by an average pooling layer and a fully connected layer is pre-trained on the ImageNet dataset which is a 1000-class classification dataset.
— The pretraining for classification is performed on the dataset with the image resolution of 224 x 224×3.
— The layers comprise 3×3 convolutional layers and1x1 reduction layers.
— For object detection, in the end, the last 4 convolutional layers followed by 2 fully connected layers are added to train the network.
— Object detection requires more precise detail hence the resolution of the dataset is increased to 448 x 448
— Then the final layer predicts the class probabilities and bounding boxes.
— All the other convolutional layers use leaky ReLU activation whereas the final layer uses a linear activation.
— The input is of 448 x 448 image and the output is the class prediction of the detected object enclosed in the bounding box.

First, download the weights and configuration files from the below link.
Download the weights and cfg files of YOLO named YOLOv3-320 and YOLOv3-tiny.
https://pjreddie.com/darknet/yolo/
Install OpenCV version 3.4.2.16
pip install opencv-python==3.4.2.16
Download coco.names file here
Once all files are downloaded place them in the project directory.
Now let’s start
First defining the input, here webcam feed is used for real-time input. Mention the detection confidence threshold and non-max suppression threshold.
import cv2
import numpy as np
cap = cv2.VideoCapture(0)
whT = 320
confThreshold = 0.5
nmsThreshold = 0.3
Then read the classes in the file coco.names
classesFile = 'coco.names'
classNames = []
with open(classesFile,'rt') as f:
    classNames = f.read().rstrip('n').split('n')
#print(classNames)
#print(len(classNames))
Now initializing the weights and configuration files, I have selected yolov3-tiny, you can even select yolov3-320. The using OpenCV darknet module we will read the model configuration file and model weight file.
modelConfiguration = 'yolov3.cfg'
modelWeights = 'yolov3.weights'
net = cv2.dnn.readNetFromDarknet(modelConfiguration, modelWeights)
net.setPreferableBackend(cv2.dnn.DNN_BACKEND_DEFAULT)
net.setPreferableTarget(cv2.dnn.DNN_TARGET_CPU)
Then create a function to find the objects and assign the bounding box thresholds. Here we will use the “NMSBoxes” function from the OpenCV darknet module to do the non-max suppression. And then using the OpenCV rectangle function we draw the bounding boxes and using putText function we add the labels to the output.
def findObjects(outputs,img):
    hT, wT, cT = img.shape
    bbox = []
    classIds = []
    confs = []
    for output in outputs:
        for det in output:
            scores = det[5:]
            classId = np.argmax(scores)
            confidence = scores[classId]
            if confidence > confThreshold:
                w,h = int(det[2]* wT), int(det[3]*hT)
                x,y = int((det[0]*wT)-w/2), int((det[1]*hT)-h/2)
                bbox.append([x,y,w,h])
                classIds.append(classId)
                confs.append(float(confidence))


    #print(len(bbox))
    indices = cv2.dnn.NMSBoxes(bbox, confs,confThreshold,nmsThreshold)

    for i in indices:
        i = i[0]
        box = bbox[i]
        x,y,w,h = box[0], box[1], box[2], box[3]
        cv2.rectangle(img, (x,y),(x+w,y+h),(255,0,255),2)
        cv2.putText(img,f'{classNames[classIds[i]].upper()} {int(confs[i]*100)}%',
                    (x,y-10), cv2.FONT_HERSHEY_SIMPLEX, 0.6,(255,0,255),2)
Then for testing the setup, we will write a small code inside the while loop.
while True:
    success, img = cap.read()
    blob = cv2.dnn.blobFromImage(img, 1/255,(whT,whT),[0,0,0],crop=False)
    net.setInput(blob)

    layerNames = net.getLayerNames()
    outputNames = [layerNames[i[0]-1] for i in net.getUnconnectedOutLayers()]

    outputs = net.forward(outputNames)
    findObjects(outputs,img)

    cv2.imshow('Image', img)
    cv2.waitKey(1)
The entire code is given below.
import cv2
import numpy as np
cap = cv2.VideoCapture(0)
whT = 320
confThreshold = 0.5
nmsThreshold = 0.3

classesFile = 'coco.names'
classNames = []
with open(classesFile,'rt') as f:
    classNames = f.read().rstrip('n').split('n')
#print(classNames)
#print(len(classNames))

modelConfiguration = 'yolov3-tiny.cfg'
modelWeights = 'yolov3-tiny.weights'

net = cv2.dnn.readNetFromDarknet(modelConfiguration, modelWeights)
net.setPreferableBackend(cv2.dnn.DNN_BACKEND_DEFAULT)
net.setPreferableTarget(cv2.dnn.DNN_TARGET_CPU)


def findObjects(outputs,img):
    hT, wT, cT = img.shape
    bbox = []
    classIds = []
    confs = []

    for output in outputs:
        for det in output:
            scores = det[5:]
            classId = np.argmax(scores)
            confidence = scores[classId]
            if confidence > confThreshold:
                w,h = int(det[2]* wT), int(det[3]*hT)
                x,y = int((det[0]*wT)-w/2), int((det[1]*hT)-h/2)
                bbox.append([x,y,w,h])
                classIds.append(classId)
                confs.append(float(confidence))


    #print(len(bbox))
    indices = cv2.dnn.NMSBoxes(bbox, confs,confThreshold,nmsThreshold)

    for i in indices:
        i = i[0]
        box = bbox[i]
        x,y,w,h = box[0], box[1], box[2], box[3]
        cv2.rectangle(img, (x,y),(x+w,y+h),(255,0,255),2)
        cv2.putText(img,f'{classNames[classIds[i]].upper()} {int(confs[i]*100)}%',
                    (x,y-10), cv2.FONT_HERSHEY_SIMPLEX, 0.6,(255,0,255),2)


while True:
    success, img = cap.read()

    blob = cv2.dnn.blobFromImage(img, 1/255,(whT,whT),[0,0,0],crop=False)
    net.setInput(blob)

    layerNames = net.getLayerNames()
    outputNames = [layerNames[i[0]-1] for i in net.getUnconnectedOutLayers()]

    outputs = net.forward(outputNames)
    findObjects(outputs,img)

    cv2.imshow('Image', img)
    cv2.waitKey(1)
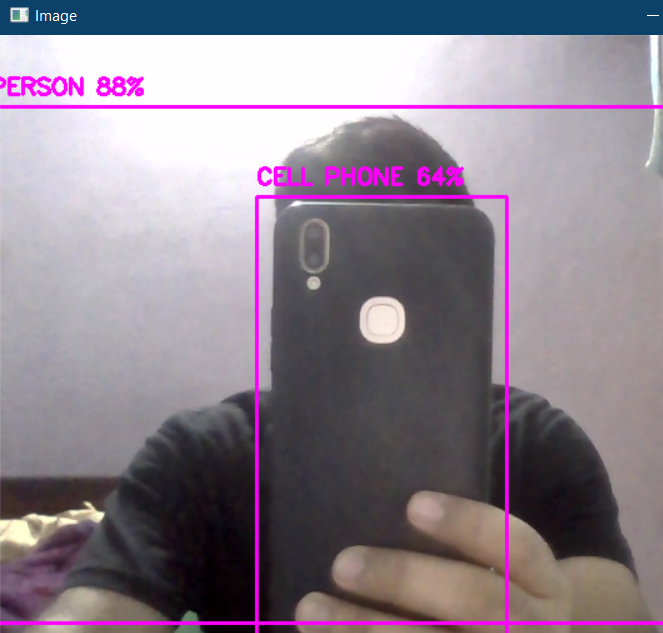
The output from the real-time feed is given below.
The above code can also be accessed here.
[1]. Joseph Redmon, Santosh Divvala, Ross Girshick, Ali Farhadi: You Only Look Once: Unified, Real-Time Object Detection, May 2016, DOI: https://arxiv.org/pdf/1506.02640.pdf
Thank you
The media shown in this article are not owned by Analytics Vidhya and are used at the Author’s discretion.
I am an enthusiastic AI developer, I love playing with different problems and building solutions.
Lorem ipsum dolor sit amet, consectetur adipiscing elit,


