This article was published as a part of the Data Science Blogathon
Introduction
OpenCV is a great tool to play with images and videos. Either you want to give your photos a 90s black and white look or perform complex mathematical operations OpenCV is always ready to serve. If you are into computer vision, having knowledge of OpenCV is a must. The library includes more than 2500 optimized algorithms which can be used to perform a wide variety of tasks. It is used by many of the industry giants such as Google, Microsoft, IBM and is extensively used in research groups. The library supports multiple languages including java, c++, and python.
This article will show you how to perform the complex task of object tracking using some of the basic functions in OpenCV.
Object Tracking
Object tracking is the process of locating a moving object in a video. You can consider an example of a football match. You have a live feed of the match going on and your task is to track the position of the ball at every moment. The task seems simple for an average human but it’s way too complex for even the smartest machine. As you may know, computers only understand numbers. It doesn’t understand what an image is but the pixel values associated with the image. Two images appearing to be exactly the same to the human eye may not be the same case for your computer, as even a slight change in a pixel will result in a difference. Because of that object tracking is considered one of the most complex tasks in computer vision. Although complex, it’s not something unachievable.
Object tracking can be performed using Machine learning as well as deep learning-based approaches. The deep learning approach on the one side provides better results on complex tasks and is pretty generalized, requires a lot of training data. Whereas ML-based approaches are quite straightforward but are not generalized. For this article, we are using an ML-based approach along with various computer vision techniques that we will be discussing later in this article.
The technique is widely used in surveillance, security, traffic monitoring, robot vision, video communication, and much more. Moreover, object tracking has several use cases such as crowd counting, self-driving cars, face detection, etc. Can you think of some more examples where you can use object tracking in your day-to-day life?
Because of so many real-life applications, constant research is being conducted in this field to achieve higher accuracy and make the model more robust.
For this article, we will be using this video. As you will see there is a red-colored ball moving through a maze and our task is to detect the location of the ball and find its centroid. You could also see a huge noise (sorry people), in the background, to make the task a bit more challenging.
.png)
1.
First of all we import the required libraries that will be using.
import numpy as np
import cv2
2.
We will be defining a function that will resize the images so that they will fit on our screen in case they are big enough. This step is completely optional and feels free to skip it.
def resize(img):
        return cv2.resize(img,(512,512)) # arg1- input image, arg- output_width, output_height
3.
As you might know, videos are made of frames. Frames are nothing but one of many still images that together make up the whole moving picture. The next step will be reading those frames using the VideoCapture() function in OpenCV and using the while loop, we can see the frames moving. You can adjust the speed of the video using cv2.waitKey(x) which pauses the screen for x milliseconds.
cap=cv2.VideoCapture(vid_file_path)
ret,frame=cap.read()

while ret==True:
    ret,frame=cap.read()
    cv2.imshow("frame",resize(frame))
    key=cv2.waitKey(1)
    if key==ord('q'):
        break
cv2.waitKey(0)
cv2.destroyAllWindows()
4.
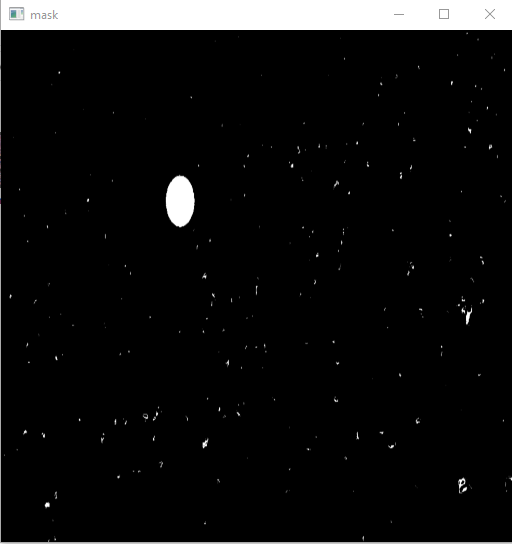
Now it’s time to perform some thresholding and preprocessing. OpenCV reads images in BGR format, so we will be converting the colourspace from BGR to HSV. Why HSV and not BGR or any other format?
We are using the HSV colour format because it is more sensitive to minor changes in external lighting. Hence it will give more accurate masks and hence better results.
After converting the colourspace what we have to do is to filter out the red channel and create a mask frame.
Red channel in hsv format is present in [0,230,170] to [255,255,220] range.
cap=cv2.VideoCapture(vid_file_path)


ret,frame=cap.read()
l_b=np.array([0,230,170])# lower hsv bound for red
u_b=np.array([255,255,220])# upper hsv bound to red

while ret==True:
    ret,frame=cap.read()

    hsv=cv2.cvtColor(frame,cv2.COLOR_BGR2HSV)
    mask=cv2.inRange(hsv,l_b,u_b)

    cv2.imshow("frame",resize(frame))

    cv2.imshow("mask",mask)


    key=cv2.waitKey(1)
    if key==ord('q'):
        break
cv2.waitKey(0)
cv2.destroyAllWindows()
(This image has been resized)
5.
Till now, we have created the masked image of the frame and we have filtered out most of the noise. What next is to get the boundaries of the ball. To do that we will be using the concept of contour detection. Contours are nothing but boundaries that will surround our ball. Thankfully, we don’t have to find those boundaries on our own as OpenCV allows a function findContours() which we can use for our purpose. It takes a masked image and returns an array of contours. For more about contours visit me. Ideally in our case, the value of contours should be one as we have one ball only, but due to some people who were wearing red hats, we will get more than one. Can you think of something to further reduce this noise?
To handle this problem we will be going to use another function from OpenCV that is cv2.contourArea(). We know in the masked image, the ball has the largest area and so will its contour. Hence, we will get the contour with the largest area.
We have the contours of the ball and we can directly draw these contours using cv2.drawContours() function. But for detection tasks, what we generally do is to use a tightly bound rectangle to show that the object has been detected. To do so we will be using cv2.boundingRect() function. This function will return the coordinates of the rectangle and then cv2.rectangle() function will draw the rectangle for us.
cap=cv2.VideoCapture(vid_file_path)


ret,frame=cap.read()
l_b=np.array([0,230,170])# lower hsv bound for red
u_b=np.array([255,255,220])# upper hsv bound to red

while ret==True:
    ret,frame=cap.read()

    hsv=cv2.cvtColor(frame,cv2.COLOR_BGR2HSV)
    mask=cv2.inRange(hsv,l_b,u_b)

    contours,_= cv2.findContours(mask,cv2.RETR_TREE,cv2.CHAIN_APPROX_SIMPLE)

    max_contour = contours[0]
         for contour in contours:
                if cv2.contourArea(contour)>cv2.contourArea(max_contour):

                      max_contour=contour

         contour=max_contour
         approx=cv2.approxPolyDP(contour, 0.01*cv2.arcLength(contour,True),True)
         x,y,w,h=cv2.boundingRect(approx)
         cv2.rectangle(frame,(x,y),(x+w,y+h),(0,255,0),4)

    cv2.imshow("frame",resize(frame))

    cv2.imshow("mask",mask)
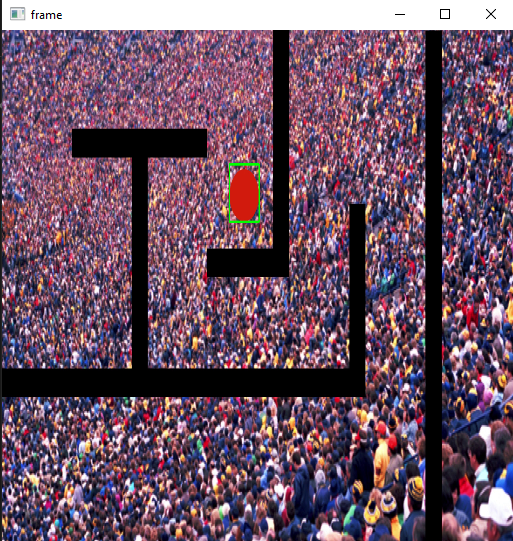
(This image has been resized)
6.
Moreover, what we can do is detect the centroid of the ball simultaneously. For that, we will be using cv2.moments. cv2.moments calculates the weighted average sum of pixel intensities within the contour and hence allows to get some more useful information from the blob, like its radius, centroid, etc. Make sure to convert the image to binary format before using the function. You can know more about moments here.
cap=cv2.VideoCapture(vid_file_path)


ret,frame=cap.read()
l_b=np.array([0,230,170])# lower hsv bound for red
u_b=np.array([255,255,220])# upper hsv bound to red

while ret==True:
    ret,frame=cap.read()

    hsv=cv2.cvtColor(frame,cv2.COLOR_BGR2HSV)
    mask=cv2.inRange(hsv,l_b,u_b)

    contours,_= cv2.findContours(mask,cv2.RETR_TREE,cv2.CHAIN_APPROX_SIMPLE)

    max_contour = contours[0]
         for contour in contours:


                if cv2.contourArea(contour)>cv2.contourArea(max_contour):

                  max_contour = contour

         approx=cv2.approxPolyDP(contour, 0.01*cv2.arcLength(contour,True),True)
         x,y,w,h=cv2.boundingRect(approx)
         cv2.rectangle(frame,(x,y),(x+w,y+h),(0,255,0),4)

         M=cv2.moments(contour)
cx=int(M[‘m10’]//M[‘m00’])
cy=int(M[‘m01’]//M[‘m00’])
cv2.circle(frame, (cx,cy),3,(255,0,0),-1)
    cv2.imshow("frame",resize(frame))

    cv2.imshow("mask",mask)

    key=cv2.waitKey(1)
    if key==ord('q'):
        break
cv2.waitKey(0)
cv2.destroyAllWindows()
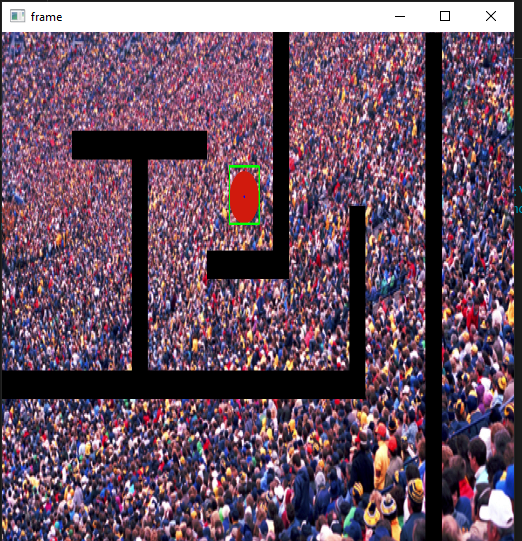
(This image has been resized)
Where to go from here
In this article, we have used object detection in each frame for the task of object tracking. Though useful, it might not work well with every case. While reading the article, several questions might have hit your brain. What if there is more than one object in the video? What if the images of the mask are not helpful in detecting the object? What if the object constantly moves in and out of the frame? What if there is no object at all?
The one way to find is to try them out on your own. You can always tweak with the inputs and make the task a bit more challenging until it stops amusing you.


Thank you so much.🤗🤗🤗