This article was published as a part of the Data Science Blogathon
Introduction
You may be frequently using Google Assistant or Apple’s Siri or even Amazon Alexa to find out quick answers on the web or to simply command something. These AI assistants are well known for understanding our speech commands and performing the desired tasks. They quickly respond to the speech commands like “OK, Google. What is the capital of Iceland?” or “Hey, Siri. Show me the recipe of Lasagna.” and display the accurate result. Have you ever wondered how they really do it? Today, we shall build a very simple speech recognition system that takes our voice as input and produces the corresponding text by hearing the input.
TLDR Show me the code!
If you are impatient like me, this is practically the full source code that can be quickly copied, pasted, and executed through a Python file. Make sure to have a file named ‘my-audio.wav’ as your speech input. Also, make sure you have all the libraries installed.
In the later part of the tutorial, we will be discussing what each of the lines is doing.
Here’s the code!
import torch
import librosa
import numpy as np
import soundfile as sf
from scipy.io import wavfile
from IPython.display import Audio
from transformers import Wav2Vec2ForCTC, Wav2Vec2Tokenizer
tokenizer = Wav2Vec2Tokenizer.from_pretrained("facebook/wav2vec2-base-960h")
model = Wav2Vec2ForCTC.from_pretrained("facebook/wav2vec2-base-960h")
file_name = 'my-audio.wav'
data = wavfile.read(file_name)
framerate = data[0]
sounddata = data[1]
time = np.arange(0,len(sounddata))/framerate
input_audio, _ = librosa.load(file_name, sr=16000)
input_values = tokenizer(input_audio, return_tensors="pt").input_values
logits = model(input_values).logits
predicted_ids = torch.argmax(logits, dim=-1)
transcription = tokenizer.batch_decode(predicted_ids)[0]
print(transcription)
Before we begin
Make sure to check the full source code of this tutorial in this Github repo.
Wav2Vec: A Revolutionary Model
We will be using Wave2Vec — a state-of-the-art speech recognition approach by Facebook.
The researchers at Facebook describe this approach as:
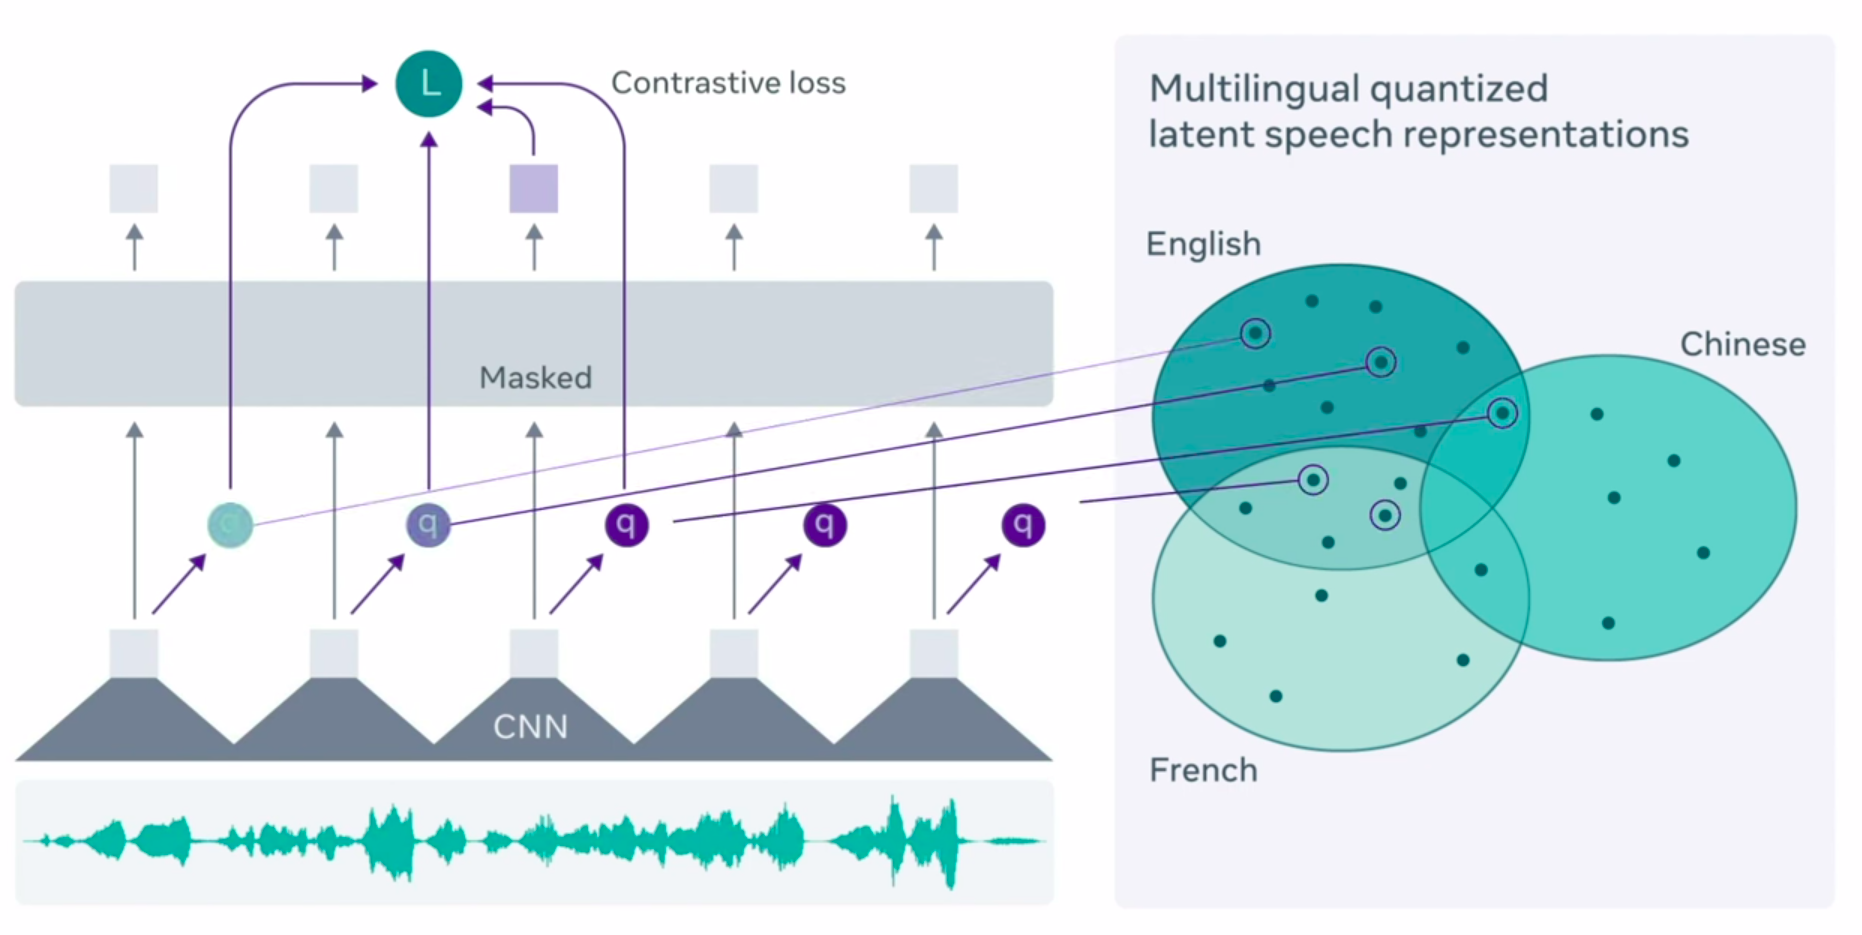
There are thousands of languages spoken around the world, many with several different dialects, which presents a huge challenge for building high-quality speech recognition technology. It’s simply not feasible to obtain resources for each dialect and every language across the many possible domains (read speech, telephone speech, etc.). Our new model, wav2vec 2.0 , uses self-supervision to push the boundaries by learning from unlabeled training data to enable speech recognition systems for many more languages, dialects, and domains. With just one hour of labeled training data, wav2vec 2.0 outperforms the previous state of the art on the 100-hour subset of the LibriSpeech benchmark — using 100 times less labeled data.
There you go! Wav2Vec is a self-supervised model that aims to create a speech recognition system for several languages and dialects. With very little training data (roughly 100 times less labelled), the model has been able to outperform the previous state-of-the-art benchmark.
This model, like BERT, is trained by predicting speech units for masked audio segments. Speech audio, on the other hand, is a continuous signal that captures many features of the recording without being clearly segmented into words or other units. Wav2vec 2.0 addresses this problem by learning basic units of 25ms in order to learn high-level contextualized representations. These units are then utilized to characterize a wide range of spoken audio recordings, enhancing the robustness of wav2vec. With 100x less labelled training data, we can create voice recognition algorithms that surpass the best-semisupervised approaches. Thanks to self-supervised learning, Wav2vec 2.0 is part of machine learning models that rely less on labelled input. Self-supervision has aided in the advancement of image classification, video comprehension, and content comprehension systems. The algorithm could lead to advancements in speech technology for a wide range of languages, dialects, and domains, as well as for current systems.
Choosing our environment and libraries
We will be using PyTorch, an open-source machine learning framework for this operation. Similarly, we will use Transformers, a State-of-the-art Natural Language Processing library by Hugging Face.
Below is the list of all the requirements that you might want to install through pip. It is recommended that you install all these packages inside a virtual environment before proceeding.
- Jupyter Notebook
- Torch
- Librosa
- Numpy
- Soundfile
- Scipy
- IPython
- Transformers
Working with the code
Open your Jupyter notebook while activating the virtual environment that contains all the essential libraries mentioned above.
Once the notebook is loaded, create a new file and begin importing the libraries.
import torch
import librosa
import numpy as np
import soundfile as sf
from scipy.io import wavfile
from IPython.display import Audio
from transformers import Wav2Vec2ForCTC, Wav2Vec2Tokenizer
Now that we have successfully imported all the libraries, let’s load our tokenizer and the model. We will be using a pre-trained model for this example. A pre-trained model is a model that has already been trained by someone else which we can reuse in our system. The model we are going to import is trained by Facebook.
tokenizer = Wav2Vec2Tokenizer.from_pretrained("facebook/wav2vec2-base-960h")
model = Wav2Vec2ForCTC.from_pretrained("facebook/wav2vec2-base-960h")
This might take some time to download.
Once done, you can record your voice and save the wav file just next to the file you are writing your code in. You can name your audio to “my-audio.wav”.
file_name = 'my-audio.wav'
Audio(file_name)
With this code, you can play your audio in the Jupyter notebook.
Next up: We will load our audio file and check our sample rate and total time.
data = wavfile.read(file_name)
framerate = data[0]
sounddata = data[1]
time = np.arange(0,len(sounddata))/framerate
print('Sampling rate:',framerate,'Hz')
The result from this example would vary from yours as you may be using your own audio.
Sampling rate: 44100 Hz
This is printed out for my sample audio.
We have to convert the sample rate to 16000 Hz as Facebook’s model accepts the sampling rate at this range. We will take help from Librosa, a library that we had installed earlier.
input_audio, _ = librosa.load(file_name, sr=16000)
Finally, the input audio is fed to the tokenizer which is then processed by the model. The final result will be stored in the transcription variable.
input_values = tokenizer(input_audio, return_tensors="pt").input_values
logits = model(input_values).logits
predicted_ids = torch.argmax(logits, dim=-1)
transcription = tokenizer.batch_decode(predicted_ids)[0]
print(transcription)
The output:
'DEEP LEARNING IS AMAZING'
Well, that is exactly what I had recorded in the my-audio.wav file.
Go on and try recording your own speech and re-execute the last block of code. It should work within seconds.
About the Author:
Hi there! My name is Akash and I’ve been working as a Python developer for over 4 years now. In the course of my career, I began as a Junior Python Developer at Nepal’s biggest Job portal site, Merojob. Later, I was involved in Data Science and research at Nepal’s first ride-sharing company, Tootle. Currently, I’ve been actively involved in Data Science as well as Web Development with Django.
You can find my other projects on:
https://github.com/akashadhikari
Connect me on LinkedIn
https://www.linkedin.com/in/akashadh/
Email: [email protected] | [email protected]
Website (Working on The Data Science Blog): https://akashadhikari.github.io/
Image Sources:
Image 1 – https://www.bullfrag.com/how-to-program-google-assistant-commands-type-ok-google-turn-off-the-lights-in-10-minutes/
Image 2 – https://www.bullfrag.com/how-to-program-google-assistant-commands-type-ok-google-turn-off-the-lights-in-10-minutes/
End Notes:
Thanks for reading!
I hope you enjoyed reading the article. If you found it useful, please share it among your friends on social media too. For any queries, suggestions, constructive criticisms, or any other discussion, please ping me here in the comments or you can directly reach me through email.


Excellent work, I loved it. I have a question: Can I use this same project for other languages? For example Spanish?
Excellent work, I loved it. I have a question: Can this code be used for other languages? For example Spanish?