Overview of MongoDB
Because of its outstanding performance, extensive developer support, and generous free tier, MongoDB has rapidly become my non-relational database platform of choice. User management and access control, like with many database engines, can be difficult to maintain, especially when the software stack incorporates other resources, such as microservices or cloud storage. Fortunately, we can separate user authentication from the rest of the application using so-called “federated identity providers” like Google, Facebook, and Amazon.
Introduction
We’ll walk through every step of creating a secure MongoDB-powered application from the start in this article. To read from the database, users must sign in using their Google account.
Google authentication provider:
Users may use Google Sign-In to log in using their current Google account, thanks to the Google authentication provider. When a user logs in, MongoDB Realm receives an OAuth 2.0 access token from Google. The token identifies the user and allows Realm to access data from Google APIs on their behalf.
How does Google OAuth for MongoDB work?
Your app sends a user to a Google URL that includes the list of permissions requested as URL query parameters. The user must agree to the permissions that your app seeks. Your user is sent back to your app and given an authorization number by Google.
Set Up a Project in the Google API GCP console
The first step is to create a Google account for our application. It will allow us to customize the user experience by accessing customers’ profile information, besides using existing security infrastructure (and legitimizing the login page with a familiar UI).
To get started, go to the Google Cloud Console and create a new project with a comprehensive name.
Setting up the OAuth consent page, which will inform users about the rights that app requires.
To handle authentication and user rights, the Google authentication provider requires a project in the Google API Console. The steps to lead you through setting up the project, generating OAuth credentials, and configuring the provider to connect to it.
By selecting Google from the Authentication page in the Realm UI, you may activate and configure the Google authentication provider.
Once your new project is up and running, go to the sidebar and search for “APIs & Services,” then select “Create an External User” under the “OAuth consent screen” button. You’ll need to offer an application name and an email address for user help on the first page of the setup wizard.

We’ll describe our application scope on the following page, which specifies which components of a user’s Google account we have permission to view or edit. Because we may seek users’ contact information, calendars, location, or other personal stuff, this is one of the most important aspects of the entire process. Our program will read a user’s email address and their profile, which contains their name and picture, in this example.
Assign at least one test user after that. Log-in access will be limited to these accounts until our app is officially allowed for public use by Google.
Configuring the Client ID credentials
We’ll need to generate a Client ID for our Google app once we’ve set up the OAuth consent page. Navigate to the “Credentials” tab in the sidebar while still in APIs & Services. Select “OAuth client ID” under “Create Credentials.”
Because we will make the login request from our local development server, create the client as a web application and add http://localhost:8000 as an approved JavaScript origin.
Your app’s client ID will be generated as a result (something like 123453435890.apps.googleusercontent.com). We’ll need this in a few places, so make a copy and keep it somewhere handy.
We have successfully set up the project in GCP. Now let’s move on to the AWS console.
Create an IAM (Identity Access Management) Role in AWS
Once your application has been registered with Google, log into your AWS Console Account. Search for “IAM”, select “Roles” in the sidebar, and click “Create Role”. For the type of trusted entity, select “Web Identity” and choose Google as the identity provider (you’ll notice that we can use a similar flow for Facebook, Amazon, and other federated identity providers). Paste your Google Client ID under Audience. Accept the defaults for the rest of the Role setup.
Note the Role ARN (e.g. arn:aws:iam::AWS ACCOUNT:role/roleName) after your Role has been established. We’ll need it in the following step.
This completes the AWS setup for this sample, but we may link our application to other AWS resources, such as S3 buckets and Lambda functions, by altering the Policy Document associated with this role.
Creating the MongoDB Database
The next step is to deploy and set up our MongoDB cluster in the cloud. Create a new organization in MongoDB Atlas.
Create a database. I’ll be using a free Shared Cluster for this demonstration.
For this cluster, be sure you use AWS as the cloud provider and the M0 Sandbox Tier (which is also free). You shouldn’t need to link a credit card unless you’ve chosen a higher capacity, which isn’t required in our simple example.
Using the web interface to add documents to our MongoDB collection. You may also try out the following queries.
Click the “Collections” tab after it’s finished. If you’re not familiar with MongoDB, “Collections” are like SQL tables, whereas “Documents” are JSON-based entries or rows within tables. When you create a new collection for the first time, you’ll be given the choice of using a sample dataset or creating your own. We’ll go with the latter option.
_id: objectId("61754f709b78504ed75830fb")
name: "Red Velvet"
Description: "A light German Chocolate chiffon cake with red coloring"
price: "$ 49"
Quantity":"40"
OnSales:"false"
_id: objectId("6175510c9b78504ed75830fc")
name: "Strawberry"
Description: "Our moist white crème cake with fresh strawberry in whip cream"
price: "$ 50"
Quantity":"39"
OnSales:"true"
Let’s link our database to our IAM Role now. Go to the “Database Access” page on the side tab and create a new database user. Select “AWS IAM” for the Authentication Method and “IAM Role” from the “AWS IAM Type” drop-down menu. In the entry, paste the Role ARN.
Changing user privileges is another complicated issue. This user will have read-only access to the “marketplace” collection we’ve just established.
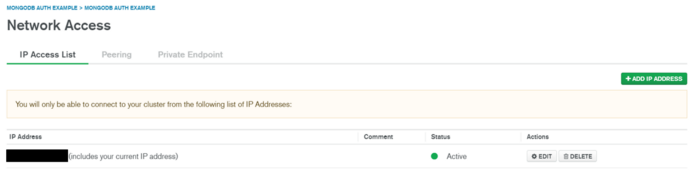
Only allow network access to IP addresses that are strictly necessary.
MongoDB may limit access to certain IP addresses besides user-based authentication. To assist resist threats like DDoS assaults, we would only accept requests that came from our application’s servers in a production environment. Because we’ll be running the sample application locally, merely put your current IP address under “Network Access,” following the concept of least privilege.
All together in Web application
We’re now ready to write some code now that the setup is complete. Signing in with our Google account should yield an ID token that can get credentials for the AWS IAM Role if all goes properly. Our application’s server will then read from the database using those credentials.
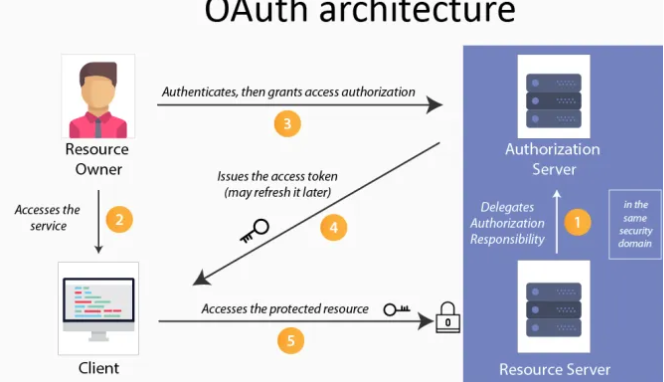
Image1: Source
We sign in, get the credentials, transmit them to our backend, then use the result to change the site on the client
<!DOCTYPE html>
	<html>
	 <head>
	 <title>Fruit Market</title>
	 <meta charset="utf-8">
	 <meta name="viewport" content="width=device-width, initial-scale=1">
	 <!-- Bootstrap CSS -->
	 <link href="https://cdn.jsdelivr.net/npm/[email protected]/dist/css/bootstrap.min.css" rel="stylesheet" integrity="sha384-+0n0xVW2eSR5OomGNYDnhzAbDsOXxcvSN1TPprVMTNDbiYZCxYbOOl7+AMvyTG2x" crossorigin="anonymous">
	 <link rel="stylesheet" href="https://cdn.jsdelivr.net/npm/[email protected]/font/bootstrap-icons.css">
	 </head>
	 <body>
	 <header class="page-header">
	 <div class="container">
	 <nav class="navbar navbar-expand-lg navbar-light bg-light">
	 <div class="container-fluid">
CakeWorld
	 <button class="navbar-toggler" type="button" data-bs-toggle="collapse" data-bs-target="#navbarSupportedContent" aria-controls="navbarSupportedContent" aria-expanded="false" aria-label="Toggle navigation">
	 <span class="navbar-toggler-icon"></span>
	 </button>
	 </div>
	 </nav>
	 </div>
	 </header>
	 <main class="container">
	 <div class="row">
	 <div class="col">
	 <div class="container">
	 <div class="row my-3">
	 <div class="col">
	 <h5>Profile</h5>
	 <div class="g-signin2 mx-auto" id="signin-button" data-onsuccess="signinCallback"></div>
	 <div class="card my-3 mx-auto" style="max-width: 540px;" id="profile-card" hidden>
	 <div class="row g-0">
	 <div class="col-md-4">
	 <img src="#" class="img-responsive" alt="..." id="profile-image" style="object-fit: cover; height: 150px;">
	 </div>
	 <div class="col-md-8">
	 <div class="card-body">
	 <h5 class="card-title" id="profile-name">Name</h5>
	 <p class="card-text" id="profile-email">Email Address</p>
Sign out
	 </div>
	 </div>
	 </div>
	 </div>
	 </div>
	 <div class="col">
	 <h5 class="fruit-list" hidden>Fruit for Sale</h5>
	 <ul id="fruit-list" class="list-group mx-auto fruit-list" style="max-width: 540px;"></ul>
	 </div>
	 </div>
	 </div>
	 </div>
	 </div>
	 </main>
	<script src="https://cdn.jsdelivr.net/npm/[email protected]/dist/js/bootstrap.bundle.min.js" integrity="sha384-gtEjrD/SeCtmISkJkNUaaKMoLD0//ElJ19smozuHV6z3Iehds+3Ulb9Bn9Plx0x4" crossorigin="anonymous"></script>
	<script src="https://code.jquery.com/jquery-3.5.0.js"></script>
	<script src="https://apis.google.com/js/platform.js" async defer></script>
	<script src="https://sdk.amazonaws.com/js/aws-sdk-2.953.0.min.js">
	</script><meta name="google-signin-client_id" content="GOOGLE_CLIENT_ID">
	<script>
	var AWS = require("aws-sdk");
	AWS.config.region = 'us-east-1';
	function signinCallback(googleUser) {
	 var profile = googleUser.getBasicProfile();
	 console.log('ID: ' + profile.getId()); // Do not send to your backend! Use an ID token instead.
	 console.log('Name: ' + profile.getName());
	 console.log('Image URL: ' + profile.getImageUrl());
	 console.log('Email: ' + profile.getEmail());
	 document.getElementById('profile-email').innerHTML = profile.getEmail();
	 document.getElementById('profile-name').innerHTML = profile.getName();
	 document.getElementById('profile-image').setAttribute('src', profile.getImageUrl());
	 document.getElementById('profile-card').hidden = false;
	 document.getElementById('signin-button').hidden = true;
	 document.querySelector('.fruit-list').hidden = false;
	 AWS.config.credentials = new AWS.WebIdentityCredentials({
	 RoleArn: 'ROLE_ARN',
	 ProviderId: null, // this is null for Google
	 WebIdentityToken: googleUser.getAuthResponse().id_token
	 });
	 // Obtain AWS credentials
	 AWS.config.credentials.get(async function(){
	 // Access AWS resources here.
	 var accessKeyId = AWS.config.credentials.accessKeyId;
	 var secretAccessKey = AWS.config.credentials.secretAccessKey;
	 var sessionToken = AWS.config.credentials.sessionToken;
	 const response = await fetch('http://localhost:8000/fruits', {
	 method: 'POST',
	 body: JSON.stringify({
	 'AccessKeyId': accessKeyId,
	 'SecretAccessKey': secretAccessKey,
	 'SessionToken': sessionToken
	 }),
	 headers: {
	 'Content-Type': 'application/json'
	 }
	 });
	 const myJson = await response.json(); //extract JSON from the http response
	 const fruits = JSON.parse(myJson['fruits']);
	 console.log(typeof fruits);
	 console.log(fruits);
	 var str = ''
	 var arrayLength = fruits.length;
	 for (var i = 0; i < arrayLength; i++) {
	 str += '<li class="list-group-item d-flex justify-content-between align-items-center">' + fruits[i]['name'] +
	 '<button type="button" class="btn btn-primary position-relative">$' + fruits[i]['price'] +
	 '<span class="position-absolute top-0 start-100 translate-middle badge rounded-pill bg-danger">\n' +
	 fruits[i]['quantity'] +
	 '</span>' +
	 '</button></li>'
	 // str += '<li class="list-group-item d-flex justify-content-between align-items-center">' + fruits[i]['name'] + ' Price: $' + fruits[i]['price'] + ' ' + '<span class="badge bg-primary rounded-pill">' + fruits[i]['quantity'] + '</span></li>'
	 }
	 document.getElementById('fruit-list').innerHTML = str;
	 });
	}
	function signOut() {
	 var auth2 = gapi.auth2.getAuthInstance();
	 auth2.signOut().then(function () {
	 console.log('User signed out.');
	 document.getElementById('profile-card').hidden = true;
	 document.getElementById('fruit-list').innerHTML = null;
	 document.getElementById('signin-button').hidden = false;
	 });
	}
	</script>
	</body>
	</html>
We’re sending a POST request with the AWS credentials to the /fruits endpoint within the signinCallback function (again, we’re simplifying things for this demo by using an HTTP server — in production, you’d want to encrypt this connection in transit with HTTPS). Our Fast API-based web server will handle this request as follows:
@app.post("/CakeWorld")
	async def cakeWorld(request: Request):
	 body = await request.json()
	 access_key_id = urllib.parse.quote_plus(body['AccessKeyId'])
	 secret_key_id = urllib.parse.quote_plus(body['SecretAccessKey'])
	 session_token = urllib.parse.quote_plus(body['SessionToken'])
	 uri = f"mongodb+srv://{access_key_id}:{secret_key_id}@cluster0.bjrye.mongodb.net/myFirstDatabase"
	 f"?authSource=%24external&authMechanism=MONGODB-AWS&retryWrites=true&w=majority"
	 f"&authMechanismProperties=AWS_SESSION_TOKEN:{session_token}"
	 mongo_client = pymongo.MongoClient(uri)
	 mongo_db = mongo_client.test
	 fruit_list = []
	 fruits = mongo_db['marketplace'].find({}, {{"_id":"61754f709b78504ed75830fb"},"name":"Red Velvet","Description":"A light German Chocolate chiffon cake with redncoloring ","price":"$ 49","Quantity":"40","OnSales":"false"})
	 for fruit in fruits:
	 fruit_list.append(fruit)
	 return JSONResponse({"fruits": json.dumps(fruit_list)})
While I chose a Pythonic implementation, MongoDB supports drivers in hundreds of programming languages, so you could construct a scalable server in Go, Node.js, or Rust instead.
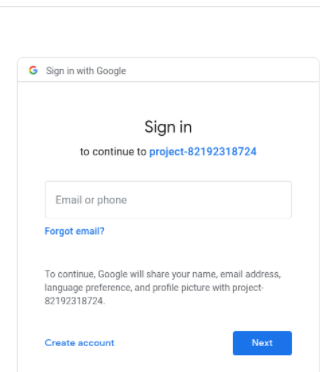
We’ll be routed to the following Google login form after clicking on a “Google” link:
personalized and secure application
That’s all there is to it! Something may easily change this architecture to handle different identity providers or other AWS services, despite being a simple sample.
About Myself
Hello, my name is Lavanya, and I’m from Chennai. I am a passionate writer and enthusiastic content maker. The most intractable problems always thrill me. I am currently pursuing my B. Tech in Chemical Engineering and have a strong interest in the fields of data engineering, machine learning, data science, and artificial intelligence, and I am constantly looking for ways to integrate these fields with other disciplines such as science and chemistry to further my research goals.
Linkedin URL: https://www.linkedin.com/in/lavanya-srinivas-949b5a16a/
Conclusion
I hope you found this blog post interesting! You should now be familiar with the Google OAuth and database using MongoDB, as well Google Cloud Platform with AWS Deployment. In this article, we looked at how to Authenticate our application using Google Sign In and how it may help you address some of your most typical Network Security.
ENDNOTES:
Because the user is not logged in because of the rule set in Routes.tsx, the application will first land on the login page. Users will use the pop-up to check in to the Google login page. After that, the Realm application will redirect the application to the /redirect URL we specified in the GCP console. Remember to use GCP’s handleAuthRedirect method to close the pop-up page and return you to the login page. Finally, the user will view your application’s landing page.
Hello, my name is Lavanya, and I’m from Chennai. I am a passionate writer and enthusiastic content maker. The most intractable problems always thrill me. I am currently pursuing my B. Tech in Computer Engineering and have a strong interest in the fields of data engineering, machine learning, data science, and artificial intelligence, and I am constantly looking for ways to integrate these fields with other disciplines such as science and computer to take further my research goals.


