This article was published as a part of the Data Science Blogathon
Neural networks. One of the booming technological breakthroughs in the 21st century.
Are you interested in creating your own neural network from scratch in Python?. Well, you are at the right place. In this article, we will be creating an artificial neural network from scratch in python. The Artificial Neural Network that we are going to develop here is the one that will solve a classification problem. So stretch your fingers, and let’s get started.
Artificial Neural Networks(ANN) are part of supervised machine learning where we will be having input as well as corresponding output present in our dataset. Our whole aim is to figure out a way of mapping this input to the respective output. ANN can be used for solving both regression and classification problems.
From the perspective of this blog, we will be developing an ANN for solving the classification class of problems.

Following will be the libraries and software that we will be needing in order to implement ANN.
1. Python – 3.6 or later
2. Jupyter Notebook ( Google Colab can also be used )
3. Pandas
4. Numpy
5. Tensorflow 2. x
6. Scikit-Learn
Here we are dealing with a dataset from the finance domain. We have a dataset where we are having 14 dimensions in total and 100000 records. The dimensions that we will be dealing with are as follows:-
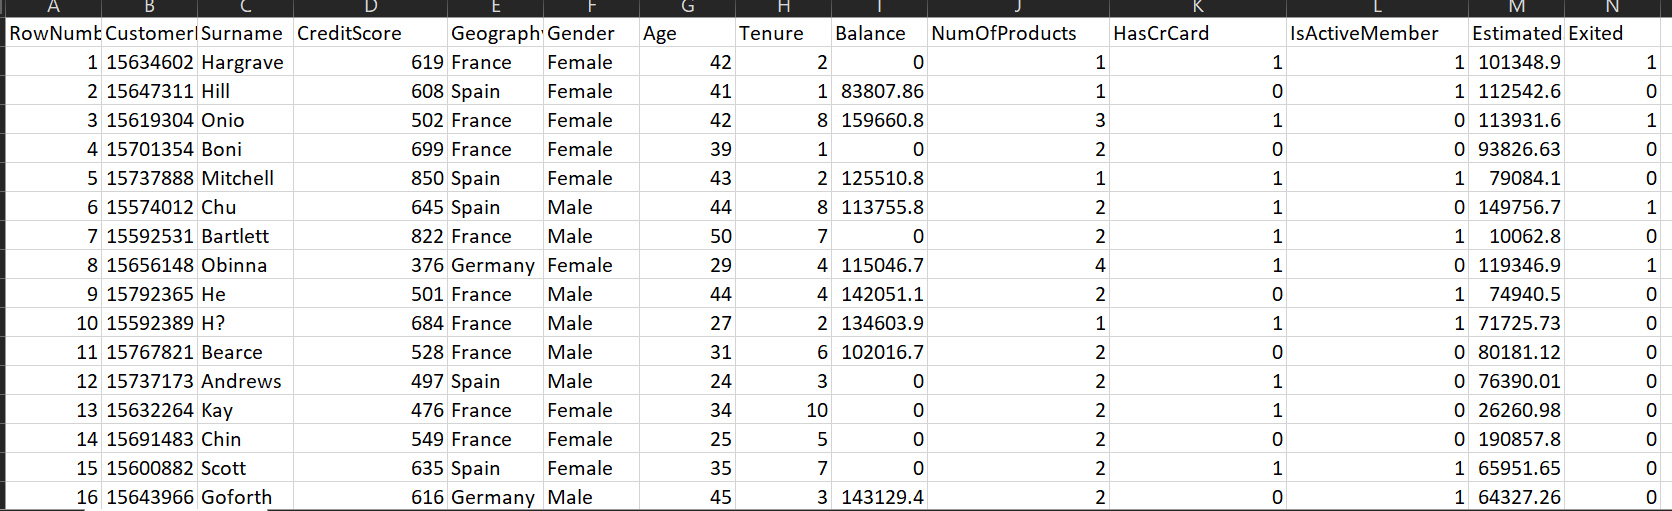
As we can see from the above data dictionary, we are dealing with a total of 14 dimensions.
Here our main goal is to create an artificial neural network that will take into consideration all independent variables(first 13) and based on that will predict if our customer is going to exit the bank or not(Exited is dependent variable here).
Once we understand the steps for constructing neural networks, we can directly implement those same steps to other datasets as well.
One of the ways where we can find such datasets is the UCI machine learning repository. These datasets are classified into regression and classification problems. Since we are implementing this neural network to solve classification problems, you can download any classification dataset from there and can apply the same steps on any dataset of your choice !. How cool is that?
Let’s import all the necessary libraries here
#Importing necessary Libraries
import numpy as np
import pandas as pd
import tensorflow as tf
In this step, we are going to import our dataset. Since our dataset is in csv format, we are going to use the read_csv() method of pandas in order to load the dataset.
#Loading Dataset
data = pd.read_csv("Churn_Modelling.csv")
The basic principle while creating a machine learning model is to generate X also called as Matrix of Features. This X basically contains all our independent variables. Let’s create the same here.
Python Code:
Here I have used iloc method of Pandas data frame which allows us to fetch the desired values from the desired column within the dataset. Here as we can see that we are fetching all the data from the 3rd column till the last minus one column. The reason for that is the first 3 columns i.e RowNumber, CustomerId, and Surname have nothing to do with deciding whether the customer is going to exit or not. Hence in this case we started fetching all the values from the 3rd column onwards. Lastly, since our last column is basically a dependent variable hence we have mentioned -1 in iloc method using which allows us to exclude the last column from being included in our matrix of features X.
In the same fashion where we have created our matrix of features(X) for the independent variable, we also have to create a dependent variable vector(Y) which will only contain our dependent variable values.
#Generating Dependent Variable Vectors
Y = data.iloc[:,-1].values
Now we have defined our X and Y, from this point on we are going to start with one of the highly time-consuming phases in any machine learning problem-solving. This phase is known as feature engineering. To define it in a simple manner, feature engineering is a phase where we either generate new variables from existing ones or modify existing variables so as to use them in our machine learning model.
In the above image depicting the structure of the dataset, we can see that most of the variables are numeric in nature with exception of a few – Gender, Country. Essentially, a machine learning model is a mathematical formula that is only going to accept digits as input. So we try to create an ML model using this dataset which contains a mix of data( numeric + string), our model will simply fail during the creation process itself. Hence we need to convert those string values into their numerical equivalent without losing their significance.
One of the most efficient ways of doing this is by using a technique called encoding. It is a process that will convert strings or categories directly into their numerical equivalent without losing significance.
Here our gender column has only 2 categories which are male and female, we are going to use LabelEncoding. This type of encoding will simply convert this column into a column having values of 0 and 1. In order to use Label Encoding, we are going to use LabelEncoder class from sklearn library.
#Encoding Categorical Variable Gender
from sklearn.preprocessing import LabelEncoder
LE1 = LabelEncoder()
X[:,2] = np.array(LE1.fit_transform(X[:,2]))
Here we have applied label encoding on the Gender column of our dataset.
Now let’s deal with another categorical column named country. This column has a cardinality of 3 meaning that it has 3 distinct categories present i.e France, Germany, Spain.
Here we have 2 options:-
1. We can use Label Encoding here and directly convert those values into 0,1,2 like that
2. We can use One Hot Encoding here which will convert those strings into a binary vector stream. For example – Spain will be encoded as 001, France will be 010, etc.
The first approach is easy and faster to implement. However, once those values are encoded, those will be converted into 0,1,2. However, there does exist another method of encoding known as one-hot encoding. In one hot encoding, all the string values are converted into binary streams of 0’s and 1’s. One-hot encoding ensures that the machine learning algorithm does not assume that higher numbers are more important.
#Encoding Categorical variable Geography
from sklearn.compose import ColumnTransformer
from sklearn.preprocessing import OneHotEncoder
ct =ColumnTransformer(transformers=[('encoder',OneHotEncoder(),[1])],remainder="passthrough")
X = np.array(ct.fit_transform(X))
Here we have used OneHotEncoder class from sklearn in order to perform one-hot encoding. Now you might have a query here. What is the use of ColumnTransformer? Well, ColumnTransformer is another class in sklearn that will allow us to select a particular column from our dataset on which we can apply one-hot encoding.
In this step, we are going to split our dataset into training and testing datasets. This is one of the bedrocks of the entire machine learning process. The training dataset is the one on which our model is going to train while the testing dataset is the one on which we are going to test the performance of our model.
#Splitting dataset into training and testing dataset
from sklearn.model_selection import train_test_split
X_train,X_test,Y_train,Y_test = train_test_split(X,Y,test_size=0.2,random_state=0)
Here we have used the train_test_split function from the sklearn library. We have split our dataset in a configuration such that 80 percent of data will be there in the training phase and 20 percent of data will be in the testing phase.
Additionally, the best part about using the train_test_split function from sklearn is that, while splitting it will also be performing data shuffling in order to create a more generalized dataset.
The very last step in our feature engineering phase is feature scaling. It is a procedure where all the variables are converted into the same scale. Why you might ask?. Sometimes in our dataset, certain variables have very high values while certain variables have very low values. So there is a chance that during model creation, the variables having extremely high-value dominate variables having extremely low value. Because of this, there is a possibility that those variables with the low value might be neglected by our model, and hence feature scaling is necessary.
Now here I am going to answer one of the most important questions asked in a machine learning interview. ” When to perform feature scaling – before the train-test split or after the train-test split?”.
Well, the answer is after we split the dataset into training and testing datasets. The reason being, the training dataset is something on which our model is going to train or learned itself. While the testing dataset is something on which our model is going to be evaluated. If we perform feature scaling before the train-test split then it will cause information leakage on testing datasets which neglects the purpose of having a testing dataset and hence we should always perform feature scaling after the train-test split.
Now how we are going to perform feature scaling? Well, there are many ways of performing feature scaling. The two most efficient techniques in the context are:-
1. Standardization
2. Normalization
Whenever standardization is performed, all values in the dataset will be converted into values ranging between -3 to +3. While in the case of normalization, all values will be converted into a range between -1 to +1.
There are few conditions on which technique to use and when. Usually, Normalization is used only when our dataset follows a normal distribution while standardization is a universal technique that can be used for any dataset irrespective of the distribution. Here we are going to use Standardization.
#Performing Feature Scaling
from sklearn.preprocessing import StandardScaler
sc = StandardScaler()
X_train = sc.fit_transform(X_train)
X_test = sc.transform(X_test)
Here we have used StandardScalar class from the sklearn library in order to perform standardization.
Now we have completed our feature engineering phase. We can now start with the creation of our artificial neural network from the next point onwards.
This is the very first step while creating ANN. Here we are going to create our ann object by using a certain class of Keras named Sequential.
#Initialising ANN
ann = tf.keras.models.Sequential()
As a part of tensorflow 2.0, Keras is now integrated with tensorflow and is now considered as a sub-library of tensorflow. The Sequential class is a part of the models module of Keras library which is a part of the tensorflow library now.
Once we initialize our ann, we are now going to create layers for the same. Here we are going to create a network that will have 2 hidden layers, 1 input layer, and 1 output layer. So, let’s create our very first hidden layer
 #Adding First Hidden Layer
ann.add(tf.keras.layers.Dense(units=6,activation="relu"))
Here we have created our first hidden layer by using the Dense class which is part of the layers module. This class accepts 2 inputs:-
1. units:- number of neurons that will be present in the respective layer
2. activation:- specify which activation function to be used
For the first input, I had tested with many values in the past and the optimal value that I had found is 6. Obviously, we can try with any other value as there is no hard rule about the number of neurons that should be present in the layer.
For the second input, we are always going to use “relu”[rectified linear unit] as an activation function for hidden layers. Since we are going to create two hidden layers, this same step we are going to repeat for the creation of the second hidden layer as well.
 #Adding Second Hidden Layer
ann.add(tf.keras.layers.Dense(units=6,activation="relu"))
In this step, we are going to create our output layer for ann. The output layer will be responsible for giving output.
 #Adding Output Layer
ann.add(tf.keras.layers.Dense(units=1,activation="sigmoid"))
Here again, we are going to use the Dense class in order to create the output layer. Two important things to remember here:-
1. In a binary classification problem(like this one) where we will be having only two classes as output (1 and 0), we will be allocating only one neuron to output this result. For the multiclass classification problem, we have to use more than one neuron in the output layer. For example – if our output contains 4 categories then we need to create 4 different neurons[one for each category].
2. For the binary classification Problems, the activation function that should always be used is sigmoid. For a multiclass classification problem, the activation function that should be used is softmax.
Here since we are dealing with binary classification hence we are allocating only one neuron in the output layer and the activation function which is used is softmax.
We have now created layers for our neural network. In this step, we are going to compile our ANN.
#Compiling ANN
ann.compile(optimizer="adam",loss="binary_crossentropy",metrics=['accuracy'])
We have used compile method of our ann object in order to compile our network. Compile method accepts the below inputs:-
1. optimizer:- specifies which optimizer to be used in order to perform stochastic gradient descent. I had experimented with various optimizers like RMSProp, adam and I have found that adam optimizer is a reliable one that can be used with any neural network.
2. loss:- specifies which loss function should be used. For binary classification, the value should be binary_crossentropy. For multiclass classification, it should be categorical_crossentropy.
3. metrics:- which performance metrics to be used in order to compute performance. Here we have used accuracy as a performance metric.
This is the last step in our ann creation process. Here we are just going to train our ann on the training dataset.
#Fitting ANN
ann.fit(X_train,Y_train,batch_size=32,epochs = 100)
Here we have used the fit method in order to train our ann. The fit method is accepting 4 inputs in this case:-
1.X_train:- Matrix of features for the training dataset
2.Y_train:- Dependent variable vectors for the training dataset
3.batch_size: how many observations should be there in the batch. Usually, the value for this parameter is 32 but we can experiment with any other value as well.
4. epochs: How many times neural networks will be trained. Here the optimal value that I have found from my experience is 100.
Are you interested to see how the training process looks like? Well here is the snap for the same.
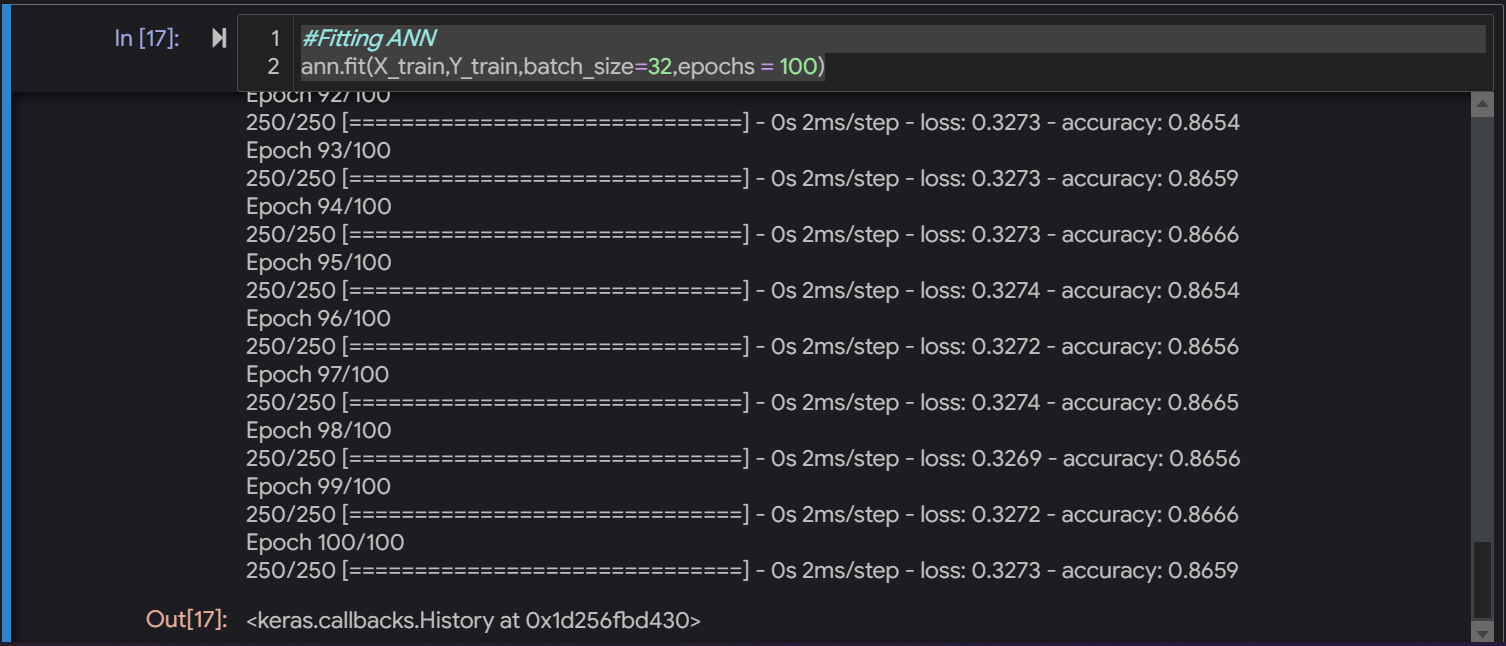
Training of Artificial Neural Network
Here we can see that in each epoch our loss is decreasing and our accuracy is increasing. As we can see here that our final accuracy is 86.59 which is pretty remarkable for a neural network with this simplicity.
That’s it :). We have created our artificial neural network from scratch using Python.
As an additional bonus, I am attaching the code below that will allow us to perform single-point prediction for any custom values of input.
#Predicting result for Single Observation
print(ann.predict(sc.transform([[1, 0, 0, 600, 1, 40, 3, 60000, 2, 1, 1,50000]])) > 0.5)
Output:
[[False]]
Here our neural network is trying to predict whether our customer is going to exit or not based on the values of independent variables

iPhone 13 Pro Max- Image is taken from Apple.com
Now we have created our model. I am giving you a pro tip now on how can you save your created neural network.
#Saving created neural network
ann.save("ANN.h5")
That’s it. Using this one line of code allows us to save our ML model. You might have a query here?
What is the h5 file format? Well, h5 is a specific file format used by neural networks. Using this format we can directly save our neural network as a serialized object. It is similar to the pickle file format implementation that we use for storing traditional machine learning models.
Well, that’s all about implementing neural networks from scratch in Python.
If you’re an enthusiast who is looking forward to unravel the world of Generative AI. Then, please register for our upcoming event, DataHack Summit 2023.
A. A neural network in Python is a computational model inspired by the human brain’s structure, used for tasks like pattern recognition and data analysis. It consists of interconnected nodes (neurons) organized in layers, including an input layer, one or more hidden layers, and an output layer. By adjusting the connections’ weights, neural networks learn to make predictions or decisions from input data.
A. Neural networks are used for a wide range of tasks such as image and speech recognition, natural language processing, autonomous driving, game playing, financial modeling, and medical diagnosis. They excel at processing complex data patterns, enabling them to learn from examples and make accurate predictions, classifications, or decisions in various fields of artificial intelligence and machine learning.
Hope you like this article.
Lorem ipsum dolor sit amet, consectetur adipiscing elit,


thank you thank you thank you!!
Your write up is too much helpful for me. I have learnt a lot. However, I have a confusion. You have said that, for binary classification, the activation function should be sigmoid. But in the next paragraph, you have told that, you are using softmax because of binary classification. I am in confused state for this.
This one seems like copied from the super data science machine learning course.
too good explanation. Appreciate your work.
Hello, How to download the dataset?