This article was published as a part of the Data Science Blogathon.
Whether you’ve been in the Data Science and Machine Learning arena for quite some time or have just stepped into this exciting avenue – you sure have stumbled upon Python’s popular Machine Learning model building library, you guessed it right – Scikit learns. One of the most robust libraries of Python, Scikit learn or sklearn extends an array of efficient tools for machine learning and statistical modeling, including classifiers, regressors, clustering models, and dimensionality reduction modules.
In order to be trained, these Machine Learning models are to be fed with training data. Data, we know, is being generated every millisecond in superfluity – which opens tremendous prospects for these ML models to be trained with jaw-dropping accuracies. Despite its diverse model-building tools and capabilities, sklearn tends to exhaust a large amount of time when it comes to dealing with massive amounts of data – causing delays in ML/DL workflows and making the entire process cumbersome. This limited speed of Scikit Learn is because it works on CPUs that only have 8 cores. However, with GPU acceleration, one can make use of the aspects of parallel computing and more no. of cores to accelerate the speed of ML models at an impressive scale. This can be achieved by NVIDIA’S RAPIDS library cuML (read as CUDA ML). In this article, we will understand the rudimentary syntax of cuML, its usage, and finally compare its time consumption with sklearn.

cuML
cuML (CUDA ML) is NVIDIA’s open-source GPU accelerated machine learning algorithms suite designed for data science, machine learning, and analytical tasks. The best part about cuML is that its syntax has been developed ensuring that it has a flat learning curve. So here’s the good news – if you know sklearn’s syntax, you have already mastered cuML!
cuML provides a sklearn-like API – making the shift from Scikit Learn to cuML quite simple for Data Scientists, Machine Learning Engineers and analytics personnel; consequentially, all the in-built Scikit Learn functions are available with the same name and syntax in cuML.
Running cuML on Kaggle Notebooks
Now for running your Machine Learning models on GPU using cuML you need to have NVIDIA’s specific GPUs (check pre-requisites here). If you happen to not have the right GPU – worry not, you still can work with NVIDIA’s accelerated libraries on Google Colaboratory or Kaggle Notebooks. For Google Colab, the installation steps are quite hectic; besides, RAPIDS only supports P4, P100, T4, or V100 GPUs in Google Colab – thus, if you are not allocated one of these GPUs, you’ll have to restart the notebook runtime and try again. However, using RAPIDS libraries on Kaggle is much easier; that is what we are going to dive into.
In order to run Kaggle notebook on GPU just follow these steps:
Step-1: Go to www.kaggle.com (You will have to sign up if you’re a new user) and click on the Create button in the navigation bar on the left-hand side. This will create a new notebook.
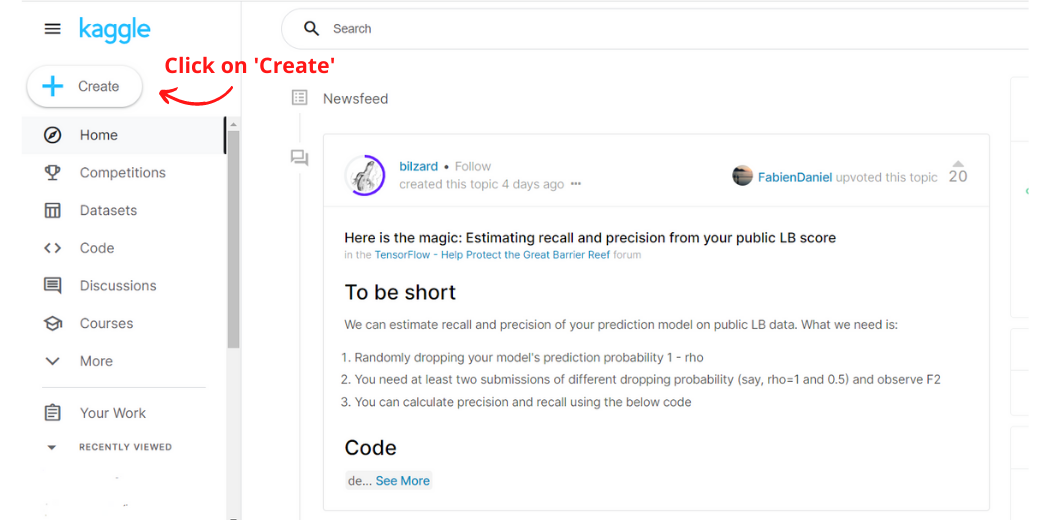
Image Created by Author
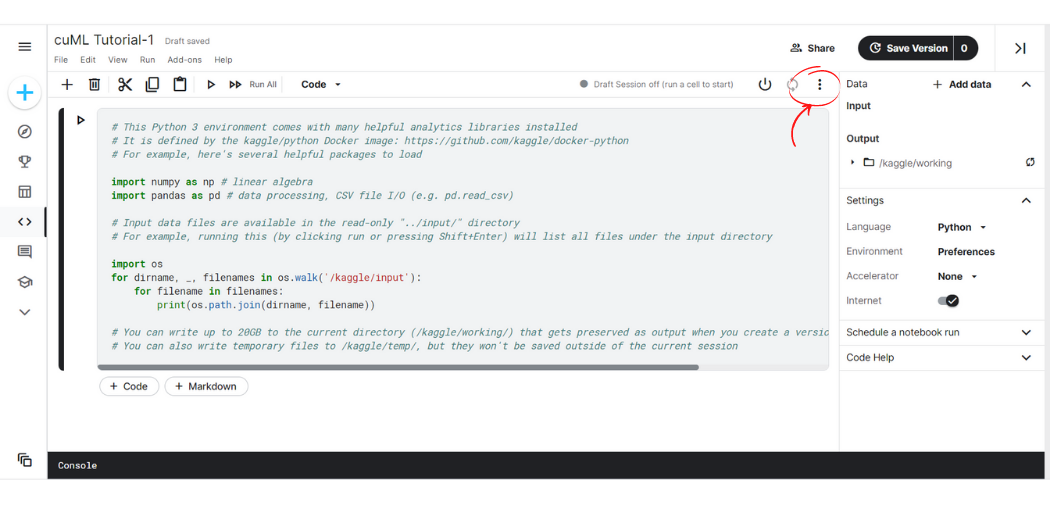
Step-2: Towards the top right-hand side click on the three dots symbol, a drop-down menu will pop upon the screen.
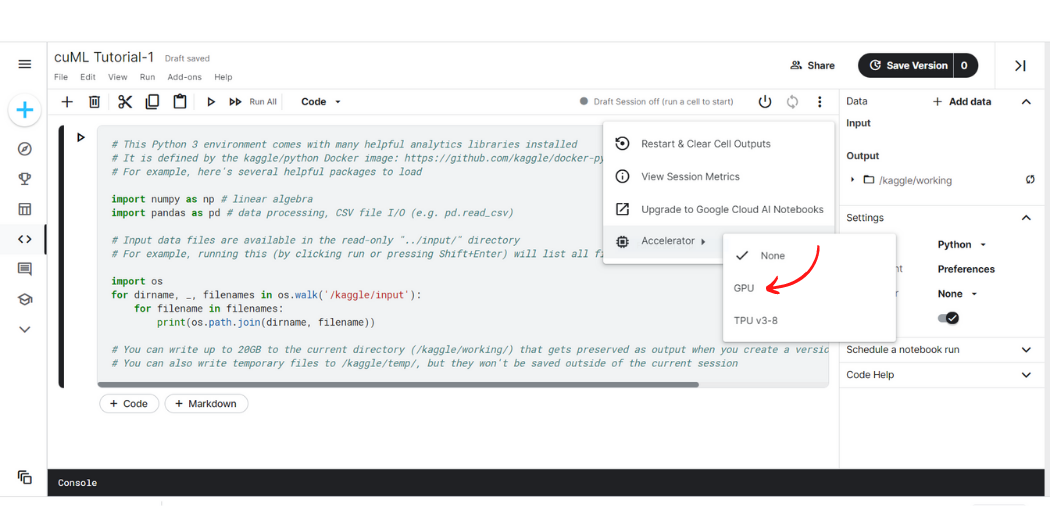
Step-3: Hover the cursor over the ‘Accelerator’ option at last, another drop-down will show up. Click on GPU.
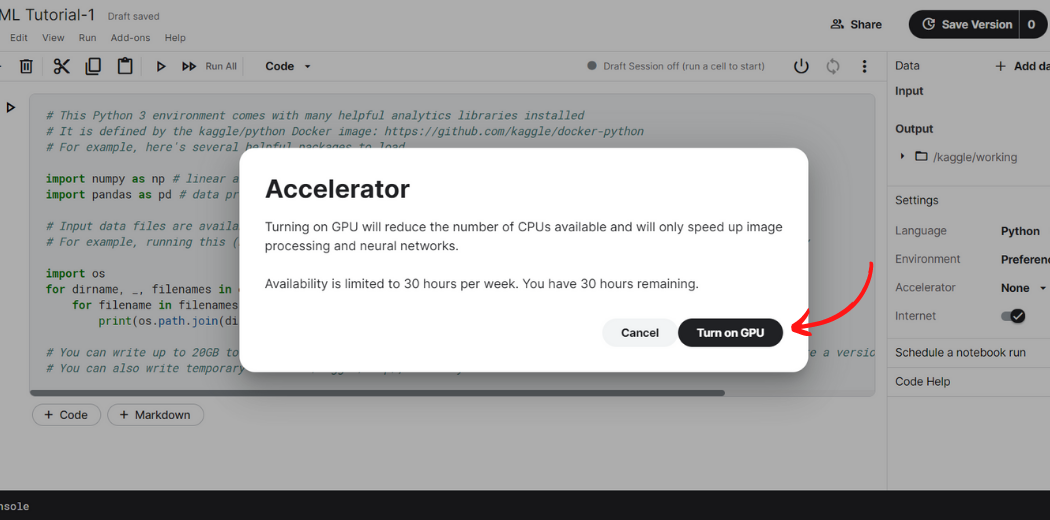
Step-4: Finally, a dialogue box will pop up. Kaggle provides 30 hours of GPU access a week. Click on ‘Turn on GPU’.
Now, your Kaggle notebook is backed with the power of GPU and you can use cuML and all other RAPIDS library on it.
Comparison between computational times of sklearn and cuML
Let us compare the computational times taken by sklearn with that of cuML. As already stated, cuML mirrors the syntax of sklearn – which means that one does not need to learn the syntax of cuML from scratch; all the in-built modules and functions of sklearn are available inherently in cuML.
Now, we will train a K-Nearest Neighbour model first using sklearn and then using cuML, compute the processing times in each situation and compare the two.
Training KNN Model using Sklearn
# KNN Using sklearn
# Import necessary modules
import time
from sklearn.neighbors import KNeighborsClassifier
import pandas as pd
#cudf is NVIDIA's GPU accelerated Pandas-like library
start = time.time()
# Loading the training data
Data_train = pd.read_csv('../input/mnist-digit-recognition-using-knn/train_sample.csv')
# Create feature and target arrays for training data
X_train = Data_train.iloc[:,:-1]
Y_train = Data_train.iloc[:,-1]
# Loading the testing data
Data_test = pd.read_csv('../input/mnist-digit-recognition-using-knn/test_sample.csv')
# Create feature and target arrays for testing data
X_test = Data_test.iloc[:,:-1]
Y_test = Data_test.iloc[:,-1]
knn = KNeighborsClassifier(n_neighbors=7)
knn.fit(X_train, Y_train)
# Predict on dataset which model has not seen before
Y = knn.predict(X_test)
end = time.time()
CPU_time = end-start
print("Time taken on CPU = ",CPU_time)
Output:
Time taken on CPU = 8.159586906433105
Training KNN Using cuML
# KNN Using cuml
# Import necessary modules
import time
from cuml.neighbors import KNeighborsClassifier
import cudf
#cudf is NVIDIA's GPU accelerated Pandas-like library
start = time.time()
# Loading the training data
Data_train = cudf.read_csv('../input/mnist-digit-recognition-using-knn/train_sample.csv')
# Create feature and target arrays for training data
X_train = Data_train.iloc[:,:-1]
Y_train = Data_train.iloc[:,-1]
# Loading the testing data
Data_test = cudf.read_csv('../input/mnist-digit-recognition-using-knn/test_sample.csv')
# Create feature and target arrays for testing data
X_test = Data_test.iloc[:,:-1]
Y_test = Data_test.iloc[:,-1]
knn = KNeighborsClassifier(n_neighbors=7)
knn.fit(X_train, Y_train)
# Predict on dataset which model has not seen before
Y = knn.predict(X_test)
end = time.time()
GPU_time = end-start
print("Time taken on GPU = ",GPU_time)
Output:
Time taken on GPU = 0.7302286624908447
Comparing the Computational Times of Sklearn vs cuML
# Comparing sklearn and cuml processing times
print("CPU Time to GPU time ratio: ",CPU_time/GPU_time)
Output:
CPU Time to GPU time ratio: 11.174016202815658
Visualizing the Computational Time in both cases
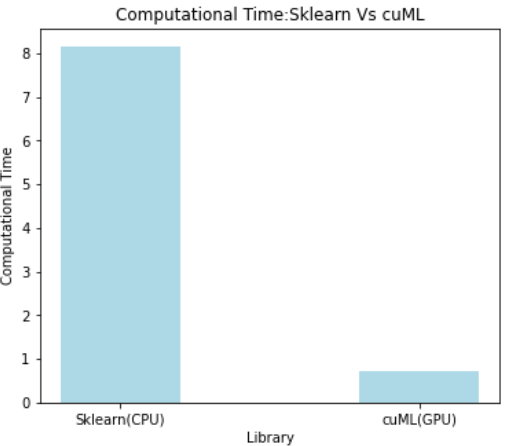
Image Created by Author
From the above outputs, we can clearly see for our KNN Model training cuML provides 11 times faster speed when compared to Python’s classic sklearn library.
It is clear from the above results that GPU-based cuML can speed up model training processes on a tremendous scale. In the present day, where dataset sizes are growing incredibly, traditional Python libraries like sklearn tend to be slow owing to the limited capabilities of CPUs. Thus, GPU acceleration is a refuge when handling big data and fuels data science life cycles quite impressively; thus, bridging the gap between big data and its plausible potential.
The media shown in this article is not owned by Analytics Vidhya and are used at the Author’s discretion.


