This article was published as a part of the Data Science Blogathon.
In this article, we will be making hands landmarks detection model with the profound library i.e. mediapipe as the base library, and for other computer vision preprocessing CV2 libraries. There are many use cases in the market for this problem statement whether it’s for business-related virtual reality or in the gaming section for the real-time experience.
Let’s build our hand detection model
Here we will import all the libraries that will be required in the whole pipeline.
import cv2
import numpy as np
import mediapipe as mp
import matplotlib.pyplot as plt
Whenever we talk about the detection whether it is an object, person, animal, or as in our case hands detection then the very first step is to initialize the model with valid parameters no matter what detection technique we are following it can either be Mediapipe or Yolo but initializing the model is important, following the same principle we will be following all the given steps:
# First step is to initialize the Hands class an store it in a variable
mp_hands = mp.solutions.hands

# Now second step is to set the hands function which will hold the landmarks points
hands = mp_hands.Hands(static_image_mode=True, max_num_hands=2, min_detection_confidence=0.3)

# Last step is to set up the drawing function of hands landmarks on the image
mp_drawing = mp.solutions.drawing_utils
Code-breakdown:
mp.solutions.hands with a variable.mp.solutions.hands.Hands().By far we understood the structure of hands model initialization now let’s deep dive into the arguments used in hands the function.
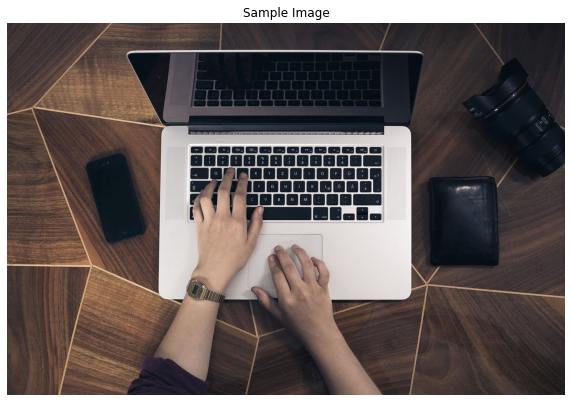
static_image_mode: This argument takes up the boolean value as its valid value i.e. it can be either True or False. the by default condition remains the False condition which remains for the video streaming when I say video streaming then that means it results in the lower latency of processing i.e. it keeps on focusing on particular hands and localizes the same hands until it loses the track of that particular hand which can be beneficial when we have to detect the hands in live stream or videos but according to our requirement we have to detect the landmarks on image hence we will set the value to True.max_num_hands: This argument will indicate the maximum number of hands that the model will detect at one instance. By default, the value is 2 which also make sense that at least we will want a pair of hand to be detected though we can change that for sure.min_detection_confidence: This argument provides us the flexibility that how much rigidity we want from our detection model and in that case it provides the threshold value of the level of confidence. The ideal range of minimum detection confidence is [0.0,1.0] and by default, it remains 0.5 which means that if the confidence level drops below 50% then the hands will not be detected at all in the output image.mp.solutions.drawing_utils which will be responsible to draw all the hand’s landmarks points on the output image which were detected by our Hands function.Here we will be first use the cv2.imread() to read the image on which hands detection is to be performed and matplotlib library to show that particular input image.
# Reading the sample image on which we will perform the detection
sample_img = cv2.imread('media/sample.jpg')

# Here we are specifing the size of the figure i.e. 10 -height; 10- width.
plt.figure(figsize = [10, 10])

# Here we will display the sample image as the output.
plt.title("Sample Image");plt.axis('off');plt.imshow(sample_img[:,:,::-1]);plt.show()
Output:
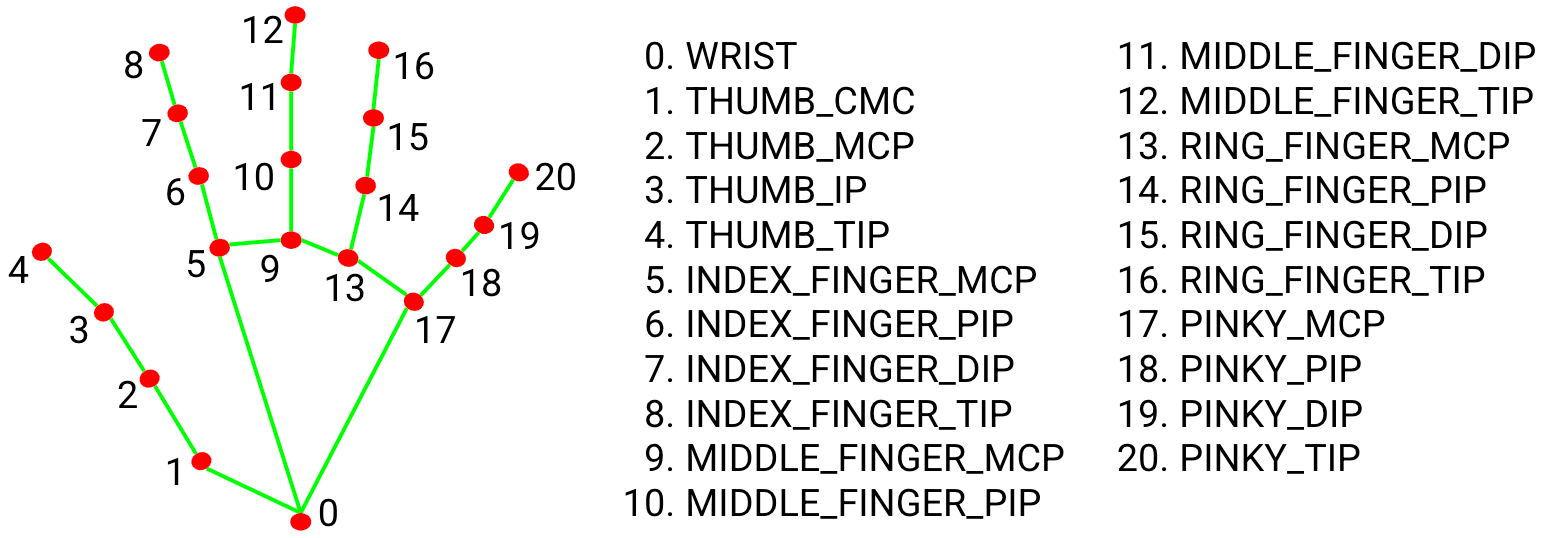
So as we have initialized our hand detection model now our next step will be to process the hand landmarks detection on the input image and draw all the 21 landmarks points on that image with the above-initialized model for doing that we will be going through the following steps.
results = hands.process(cv2.cvtColor(sample_img, cv2.COLOR_BGR2RGB))

if results.multi_hand_landmarks:

   for hand_no, hand_landmarks in enumerate(results.multi_hand_landmarks):
        print(f'HAND NUMBER: {hand_no+1}')
        print('-----------------------')

        for i in range(2):
            print(f'{mp_hands.HandLandmark(i).name}:')
            print(f'{hand_landmarks.landmark[mp_hands.HandLandmark(i).value]}')
Output:
Code-breakdown:
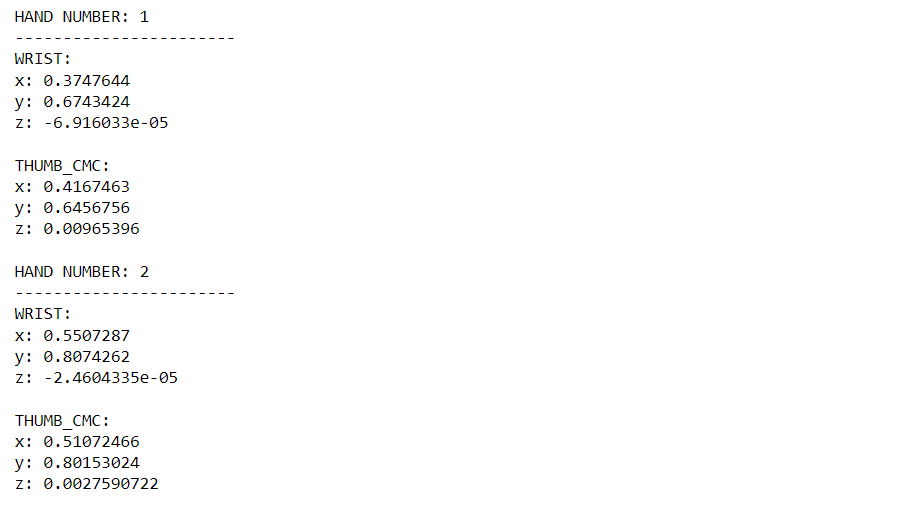
process function from the Mediapipe library to store the hand landmarks detection results in the variable along with that we have converted the image from the BGR format to the RGB format.From the above processing, we have encountered that all the landmarks which were detected are normalized to the common scales but now for the user end those scaled points are not relevant for that reason we will bring back those landmarks to the original state.
image_height, image_width, _ = sample_img.shape

if results.multi_hand_landmarks:

    for hand_no, hand_landmarks in enumerate(results.multi_hand_landmarks):

        print(f'HAND NUMBER: {hand_no+1}')
        print('-----------------------')

        for i in range(2):
            print(f'{mp_hands.HandLandmark(i).name}:')
            print(f'x: {hand_landmarks.landmark[mp_hands.HandLandmark(i).value].x * image_width}')
            print(f'y: {hand_landmarks.landmark[mp_hands.HandLandmark(i).value].y * image_height}')
            print(f'z: {hand_landmarks.landmark[mp_hands.HandLandmark(i).value].z * image_width}n')
Output:
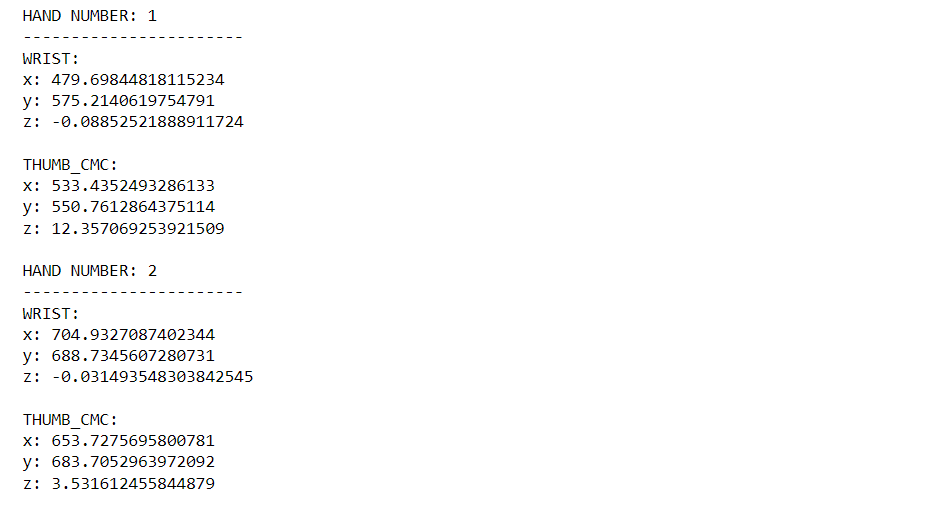
Code-breakdown:
There is only one extra step that we need to perform here i.e. we will attain the original width and height of the image from the sample image that we defined and then all the steps will be the same as we have done previously only difference in the output will be that now the landmarks points are not scaled specifically.
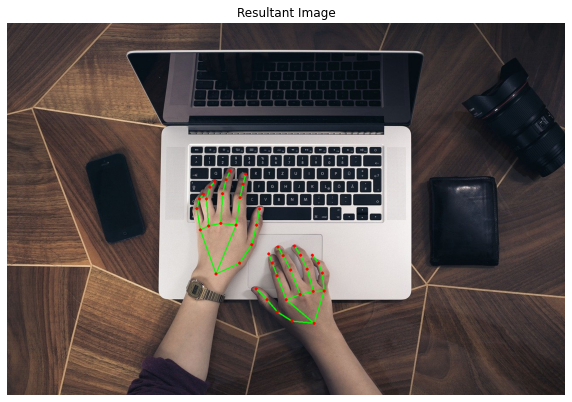
As we have got the hands landmarks from the above preprocessing now it’s time to execute our final step which is to draw the points on the image so that we can visually see how our hand landmarks detection model is performing.
img_copy = sample_img.copy()

if results.multi_hand_landmarks:

    for hand_no, hand_landmarks in enumerate(results.multi_hand_landmarks):

        mp_drawing.draw_landmarks(image = img_copy, landmark_list = hand_landmarks,
                                  connections = mp_hands.HAND_CONNECTIONS)
    fig = plt.figure(figsize = [10, 10])

    plt.title("Resultant Image");plt.axis('off');plt.imshow(img_copy[:,:,::-1]);plt.show()
Output:
Code-breakdown:
mp_drawing.draw_landmarks function, we will draw the landmarks on the image.imshow function after converting the BGR format into RGB format because for the end-user RGB format makes more sense.In the complete pipeline, we first have initialise the model then we read the image to have a look at our input image later for the preprocessing we have scaled down the landmarks point yet those points are not relevant for the user to end so for that we have reverted it to the original state at the last we will draw the landmarks points on the image.
Here’s the repo link to this article. Hope you liked my article on Hands landmarks detection using Mediapipe. If you have any opinions or questions, then comment below.
Read on AV Blog about various predictions using Machine Learning.
Greeting to everyone, I’m currently working in TCS and previously, I worked as a Data Science Analyst in Zorba Consulting India. Along with full-time work, I’ve got an immense interest in the same field, i.e. Data Science, along with its other subsets of Artificial Intelligence such as Computer Vision, Machine Learning, and Deep learning; feel free to collaborate with me on any project on the domains mentioned above (LinkedIn).
The media shown in this article is not owned by Analytics Vidhya and are used at the Author’s discretion.
Lorem ipsum dolor sit amet, consectetur adipiscing elit,


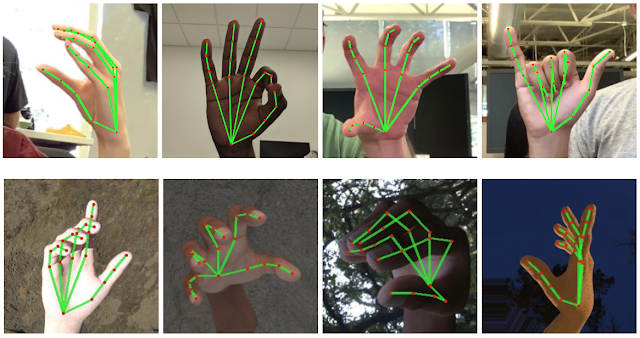
Why is it that for the same kind of hand images MediaPipe successfully detects hand landmarks in some but not in others?