This article was published as a part of the Data Science Blogathon.

Introduction
As organizations expand in their businesses and market values, the need for making important and meaningful insights with the business data becomes crucial. On the other hand, gaining insights from gradually increasing unstructured text data can be a cumbersome and time-taking task. Text data lacking a structured natural language format can be very poor in generating meaningful trends, patterns, and insights for gaining business values. Here’s where text analytics saves growing organizations and businesses by culminating natural language processing, statistical and linguistic techniques to process a large knowledge base of unstructured text data.
Named Entity Recognition is a very crucial technique in text analytics and text mining where we extract significant information from text data by recognizing entities like location, organization, people, and several entity chunks and classify those entities into several predefined classes.
Let’s see what we will learn from this article in the next section!
Tutorial Overview
In this tutorial, we will explore how to perform Named Entity Recognition and gain meaningful insights from a text corpus. Let’s see what we will cover –
1. Import necessary libraries in Python
2. Loading the data
3. Text Preprocessing and EDA
4. Use SpaCy for Named Entity Recognition
Let’s get our hands on it without ado!
Prerequisites for Named Entity Recognition
Please install the following dependencies if you haven’t yet! In your project directory, make sure to add a text file called ‘requirements.txt’ and add the following libraries below one after another-
Note – Do not add the numbers!
1. NLTK
2. SpaCy
3. word cloud
4. NumPy
5. Pandas
6. Plotly
7. Matplotlib
8. Seaborn
Finally, after you have saved your requirements.txt file with the above dependencies, make sure to run this command in your terminal.
pip install -r requirements.txt
In this tutorial, we will be working on a very famous dataset called Amazon Alexa Reviews. The data can be downloaded from here.
Great! Now you are ready to get your hands-on. Let’s jumpstart our task now!
Import Necessary Libraries in Python
Let’s import the necessary libraries before loading the data.
import numpy as np
import pandas as pd
import re
import nltk
import spacy
import matplotlib.pyplot as plt
import seaborn as sns
plt.style.use(‘ggplot’)
import plotly.offline as po
from plotly.offline import init_notebook_mode,iplot
import plotly.graph_objs as go
from plotly import tools
init_notebook_mode(connected=True)
import plotly.figure_factory as ff
import os
print(os.listdir(‘../input/’)
Loading the Data: Named Entity Recognition
Let us now load our dataset! Our dataset consists of a list of 3150 Amazon customers reviews for Alexa Echo, Firestick, Echo Dot, etc.
data = pd.<a onclick="parent.postMessage({'referent':'.pandas.read_csv'}, '*')">read_csv('../input/amazon-alexa-reviews/amazon_alexa.tsv', delimiter='t')

data.shape
data.head(10)
Let’s have a sanity check at the output-
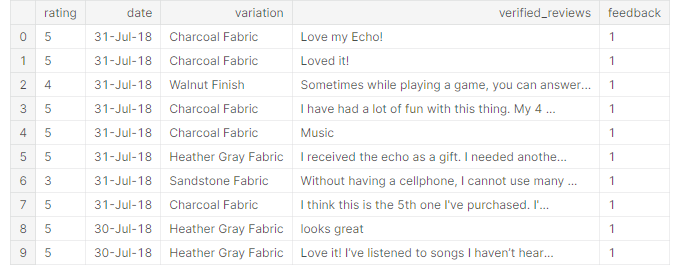
Source – Author
Let me explain what those columns/attributes refer to-
1. rating – The rating score (0- very poor, 1- poor, 2- ok, 3-good, 4 – very good, 5- best)
2. date – the date when the review was given in the date-month-year format
3. variation – various models of Amazon Alexa
4. verified_reviews – reviews given by verified users of Amazon who purchased Alexa
5. feedback – number of the feedback given
Text Preprocessing and EDA
Preprocessing the text is extremely crucial before carrying out any analysis. A healthy text can be great for gaining insights, whereas unstructured texts pose various problems and bad outcomes/ insights. According to data scientists, “60% of the hard work required to do a data analysis is done while preprocessing and cleaning the data”.
Let us first check a few things –
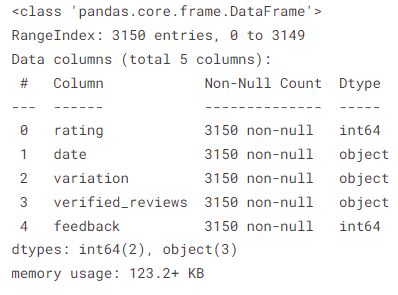
1. Let’s get pocket-friendly information about our data-
data.info()
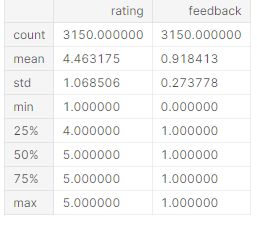
2. A brief statistics –
data.describe()
3. Null value check-
data.isnull().any()
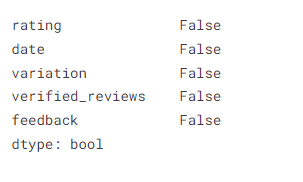
So, we see that we have no missing/null values in our data! Pretty awesome.
Now let us do some text preprocessing –
1. Remove stopwords –
nltk.download(‘stopwords’)
from nltk.corpus import stopwords
from nltk.stem.porter import PorterStemmer
corpus= []
for i in range(0,3150):
review = re.sub(‘[^a-zA-Z]’, ”, data[‘verified_reviews’][i])
review = review.lower()
review = review.split()
ps = PorterStemmer()
review = [ps.stem(word) for word in review if not word in set(stopwords.words(‘english’))]
review = ”.join(review)
corpus.append(review)
Great! The text is now clean and ready for data analysis.
Let’s first visualize the ratings distribution –
total_ratings = data['rating'].value_counts()

idx_rating = total_ratings.index
val_rating = total_ratings.values

color_palette = ['pink', 'indigo', 'cyan','yellow','red']

vizby_pie = go.<a onclick="parent.postMessage({'referent':'.plotly.graph_objs.Pie'}, '*')">Pie(labels=idx_rating,
                  values = val_rating,
                  marker= dict(colors = color_palette ),
                  name='ALEXA', hole= 0.3)

df = [vizby_pie]

layout = go.<a onclick="parent.postMessage({'referent':'.plotly.graph_objs.Layout'}, '*')">Layout(title = 'User Rating Distribution of Alexa')

fig = go.<a onclick="parent.postMessage({'referent':'.plotly.graph_objs.Figure'}, '*')">Figure(data=df, layout = layout)

po.<a onclick="parent.postMessage({'referent':'.plotly.offline.iplot'}, '*')">iplot(fig)
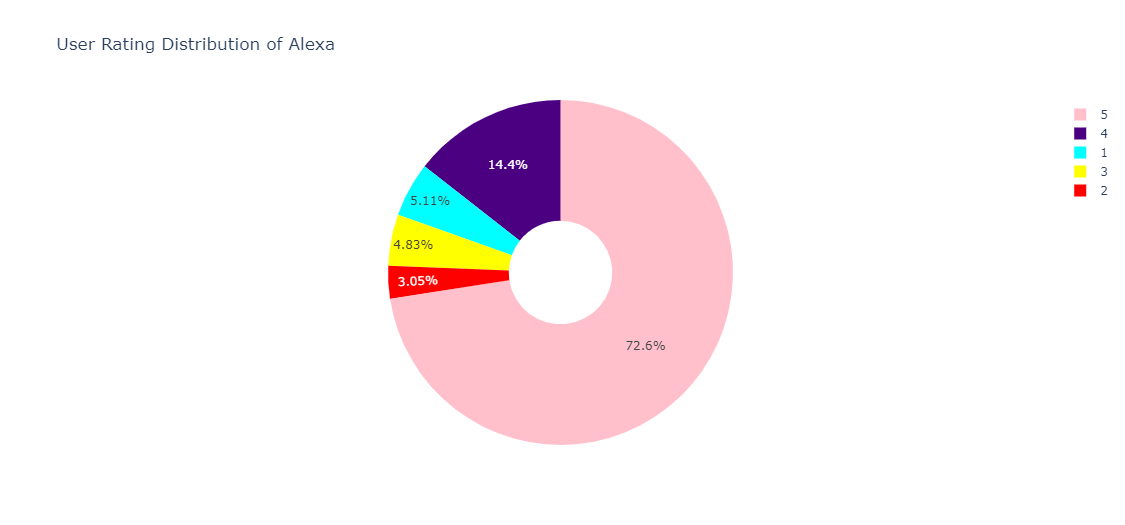
We can see that more than 70% of users have rated 5 stars! Very high confidence in this graph, that notifies that the product is worth a purchase!
Next, let us see the user sentiment distribution –
sns.<a onclick="parent.postMessage({'referent':'.seaborn.countplot'}, '*')">countplot(x='feedback', data=data)
plt.<a onclick="parent.postMessage({'referent':'.matplotlib.pyplot.xlabel'}, '*')">xlabel('Sentiment Score')
plt.<a onclick="parent.postMessage({'referent':'.matplotlib.pyplot.ylabel'}, '*')">ylabel('Number of Records')
plt.<a onclick="parent.postMessage({'referent':'.matplotlib.pyplot.show'}, '*')">show()
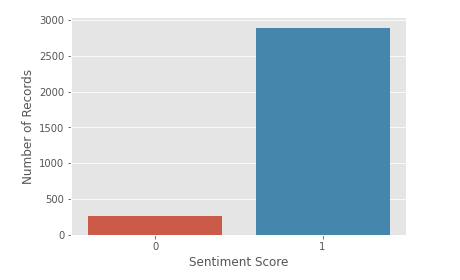
Almost all the sentiment scores are positive (1), and very, very few are negative (0).
Let’s see the most frequently occurring words in the reviews by an attractive word cloud!
from wordcloud import WordCloud

wordcloud = WordCloud(background_color='salmon',mode='RGB',
                      width = 3000, height = 2000,
                     colormap='Pastel1').generate_from_frequencies(dict(words_freq))

plt.<a onclick="parent.postMessage({'referent':'.matplotlib.pyplot.style'}, '*')">style.use('bmh')
plt.<a onclick="parent.postMessage({'referent':'.matplotlib.pyplot.figure'}, '*')">figure(figsize=(10, 10))
plt.<a onclick="parent.postMessage({'referent':'.matplotlib.pyplot.axis'}, '*')">axis('off')
plt.<a onclick="parent.postMessage({'referent':'.matplotlib.pyplot.imshow'}, '*')">imshow(wordcloud)
plt.<a onclick="parent.postMessage({'referent':'.matplotlib.pyplot.title'}, '*')">title("Word Vocabulary from Reviews", fontsize = 20)
plt.<a onclick="parent.postMessage({'referent':'.matplotlib.pyplot.show'}, '*')">show()
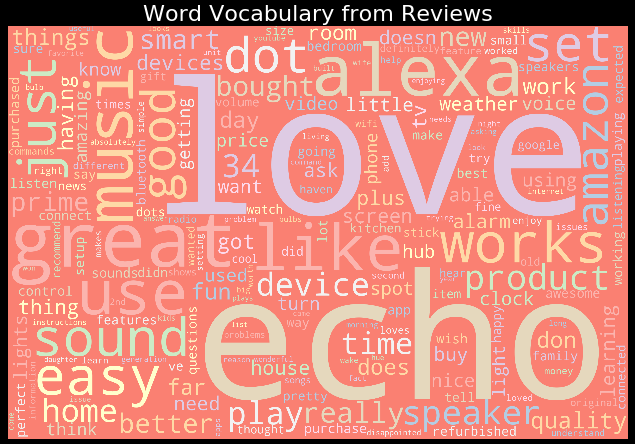
Seems like users LOVE ALEXA ECHO!❤️
As we have had quite fun analyzing the dataset, now it’s time to get to the main part, i.e. see how Named Entity Recognition works!
Use SpaCy for Named Entity Recognition
Before starting with this, let me give you all readers a brief introduction to SpaCy.
What is SpaCy?
An open-sourced Natural Language Processing library, SpaCy is considered to be the smoothest and fastest of all NLP libraries for text analytics tasks. It has an in-built model for named entity recognition and helps data scientists generate analytics reports in very little time, so they don’t have to spend hours on preprocessing and can move on to the modeling part!
So, now let’s see how we can do NER using SpaCy!
import spacy
nlp = spacy.<a onclick="parent.postMessage({'referent':'.spacy.load'}, '*')">load('en')

def text_entities(<a onclick="parent.postMessage({'referent':'.kaggle.usercode.17548111.65247162.text_entities..text'}, '*')">text):
    <a onclick="parent.postMessage({'referent':'.kaggle.usercode.17548111.65247162.text_entities..doc'}, '*')">doc = nlp(<a onclick="parent.postMessage({'referent':'.kaggle.usercode.17548111.65247162.text_entities..text'}, '*')">text)
    for <a onclick="parent.postMessage({'referent':'.kaggle.usercode.17548111.65247162.text_entities..entity'}, '*')">entity in <a onclick="parent.postMessage({'referent':'.kaggle.usercode.17548111.65247162.text_entities..doc'}, '*')">doc.ents:
        print(f'Entity: {ent}, Label: {ent.label_}, {spacy.explain(ent.label_)}')

for i in range(15,50):
    sentence = data['verified_reviews'][i]
    doc = nlp(sentence)
    spacy.<a onclick="parent.postMessage({'referent':'.spacy.displacy'}, '*')">displacy.render(doc, style='ent',jupyter=True)
Let’s look at the output-
.png)
.png)
See, how SpaCy recognizes entities like a person (Jimmy Buffett), organization(Amazon Music, Apple), time(every morning) and so on!
This can be a very important and handy thing for emerging day to day NLP drove applications like searching the web, machine translation, question-answering, chatbots, content classification, spell checks and what not!
Conclusion
Hope you had fun exploring what is Named Entity Recognition and how it works.
In this article, you successfully learned how to-
- Do simple text preprocessing on text data
- Carry out standard text analysis practices to gather the information and pattern in your data
- Perform Named Entity Recognition to successfully detect entities and classify them for further high-level applications in NLP!
I suggest you get your hands dirty with Named Entity Recognition and also with SpaCy to get your text analysis done in no time! There are plenty of text datasets available on Kaggle which will help you explore and practise this standard yet essential NLP practice.
Also, this article was just intended to show you how Named Entity Recognition works. The main problem statement, however, was to classify user sentiment from the reviews! If you want to explore the entire notebook, along with the models used for the solution, please feel free to hover over my Kaggle Notebook or GitHub on the same!
For more blogs on Machine Learning and NLP, do follow me on Medium and LinkedIn.
Happy Learning!
The media shown in this article is not owned by Analytics Vidhya and are used at the Author’s discretion.
An ace multi-skilled programmer whose major area of work and interest lies in Software Development, Data Science, and Machine Learning. A proactive and detail-oriented individual who loves data storytelling, and is curious and passionate to solve complex value-oriented business problems with Data Science and Machine Learning to deliver robust machine learning pipelines that ensure maximum impact.
In my free time, I focus on creating Data Science and AI/ML content, providing 1:1 mentorships, career guidance and interview preparation tips, with a sole focus on teaching complex topics the easier way, to help people make a successful career transition to Data Science with the right skillset!


