Vehicle Motion Detection using Background Subtraction
This article was published as a part of the Data Science Blogathon.
Overview
In this article, we will be working on object motion detection (specifical vehicles) by implying the techniques of contours detection and background subtraction. In this, we will be using a video of vehicles for car detection. It’s going to be a real-time experience.
Application of Motion Detection
- Traffic Monitoring: Motion detection could be a very handy application to control and monitor traffic.
- Security System: For maintaining the security of the society and firms. It can detect unwanted human activities also.
- Automatic door opening system: If the camera will detect someone out of the door. And if we allow that person so the door can automatically get opened.
So let’s build this motion detection application.
Import the Libraries
We will start by importing all the necessary libraries.
import cv2
import numpy as np
import matplotlib.pyplot as plt
%matplotlib inline
Why Background Subtraction Technique?
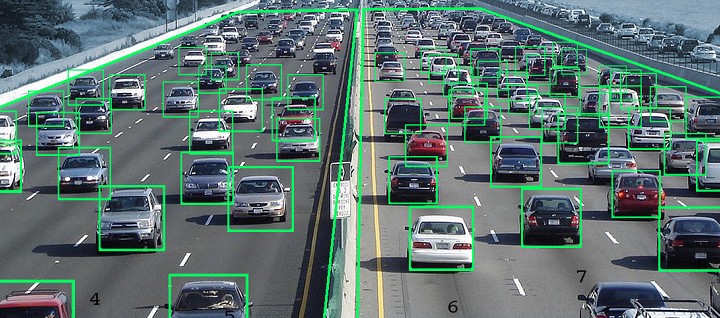
Source: SpringerLink
Background subtraction is one of the most effective and easiest methods to detect and extract objects from images or videos. But why other masking methods are not that effective? Let’s answer this question!
So let’s assume you have one picture of the highway with the cars, i.e., the foreground image, and on the other hand, you have the picture of the highway without the cars, i.e., this image can be used as the background image. Hence from this approach, we can easily use the segmentation technique to segment the background image from the foreground image (differentiate cars) and then use the mask to extract the cars.
So if we can use the above method then why is Background subtraction is needed? This technique comes into play when you don’t have a clear background image, practically speaking, it’s hard to take a clear picture of the highway with the moving cars right! So in those cases, background subtraction techniques can also detect the real-time moment and not only in the images. The most important feature of this algorithm is that it is faster and has better adaptability, and it is way more efficient than the above-mentioned traditional technique.
Note: Though OpenCV has ample methods to solve the same problem here we will be discussing the Background Subtractor MOG2.
First, we will look for the syntax of this function.
background_subtractor = cv2.createBackgroundSubtractorMOG2(history, varThreshold, detectShadows)
Now, let’s discuss what kind of parameters this algorithm holds:
history– It’s an int-type of argument, i.e., we specify a specific length to history. The default value is 500.
varThreshold– This parameter is also optional, and when I say optional, it means that it will take a default value only when it won’t be able to find a user-given value. As the name suggests, it holds the threshold value which is the squared distance between the pixel and the algorithm to decide whether the pixel is well defined by the model or not. The default value is 16.
detectShadows–This parameter holds the boolean-type of value (True/False), and it decides whether the algorithm will detect and mark the shadow or not in the output. It usually marks the shadow in gray color. The default value is True, but there is also a drawback of this feature as when it is mapped to True, it hampers the speed, so for that reason, if you don’t want this functionality, then you can set it to False.
Returns:
object– It will return the output in the format of the MOG2 Background Subtractor.
cap = cv2.VideoCapture('media/videos/vtest.avi')

backgroundobject = cv2.createBackgroundSubtractorMOG2( history = 2, detectShadows = True )

while(1):
    ret, frame = cap.read()
    if not ret:
        break

    fgmask = backgroundobject.apply(frame)

    real_part = cv2.bitwise_and(frame,frame,mask=fgmask)

    fgmask_3 = cv2.cvtColor(fgmask, cv2.COLOR_GRAY2BGR)

    stacked = np.hstack((fgmask_3,frame,real_part))
    cv2.imshow('All three',cv2.resize(stacked,None,fx=0.65,fy=0.65))

    k = cv2.waitKey(30) &  0xff
    if k == 27:
        break

cap.release()
cv2.destroyAllWindows()
Output:

Code breakdown
- First, we will be loading the video on which we want to test our algorithm. We can do this test on a live webcam for that we need to change the parameter from the path of the video to 0.
- Now we will be creating the background subtractor object, which is our model, taking history value as 2, and detecting shadow as True.
- Then in the infinite while loop, we will read the video/live stream. Depending on what we have chosen, we will perform the following functions:
- First, we will apply the background object to every frame of the video.
- Then we will extract the detected foreground part of the frame, this is an optional step.
- As we know, we have one channeled mask, so for that reason, with the help of h-stack, i.e., horizontal stack, we will stack all three frames, and then we will show the image.
- At last, when the Esc key is pressed and it is detected too then, we will release the camera and destroy all the windows.
Creating the Vehicle Motion Detection Application
Now we will be building our vehicle detection application using a background subtractor, for that, we need to follow a few steps. So first, we will see the code, and then its explanation.
video = cv2.VideoCapture('media/videos/carsvid.wmv')

kernel = None

backgroundObject = cv2.createBackgroundSubtractorMOG2(detectShadows = True)

while True:

    ret, frame = video.read()

    if not ret:
        break

    foreground_mask = backgroundObject.apply(frame)

    _, foreground_mask = cv2.threshold(foreground_mask, 250, 255, cv2.THRESH_BINARY)

    foreground_mask = cv2.erode(foreground_mask, kernel, iterations = 1)
    foreground_mask = cv2.dilate(foreground_mask, kernel, iterations = 2)

    contours, _ = cv2.findContours(foreground_mask, cv2.RETR_EXTERNAL, cv2.CHAIN_APPROX_SIMPLE)

    frameCopy = frame.copy()

    # loop over each contour found in the frame.
    for cnt in contours:

        # We need to be sure about the area of the contours i.e. it should be higher than 400 to reduce the noise.
        if cv2.contourArea(cnt) > 400:

            # Accessing the x, y and height, width of the cars
            x, y, width, height = cv2.boundingRect(cnt)

            # Here we will be drawing the bounding box on the cars
            cv2.rectangle(frameCopy, (x , y), (x + width, y + height),(0, 0, 255), 2)

            # Then with the help of putText method we will write the 'Car detected' on every car with a bounding box
            cv2.putText(frameCopy, 'Car Detected', (x, y-10), cv2.FONT_HERSHEY_SIMPLEX, 0.3, (0,255,0), 1, cv2.LINE_AA)

    foregroundPart = cv2.bitwise_and(frame, frame, mask=foreground_mask)

    stacked_frame = np.hstack((frame, foregroundPart, frameCopy))

    cv2.imshow('Original Frame, Extracted Foreground and Detected Cars', cv2.resize(stacked_frame, None, fx=0.5, fy=0.5))

    k = cv2.waitKey(1) & 0xff

    if k == ord('q'):
        break

video.release()
cv2.destroyAllWindows()
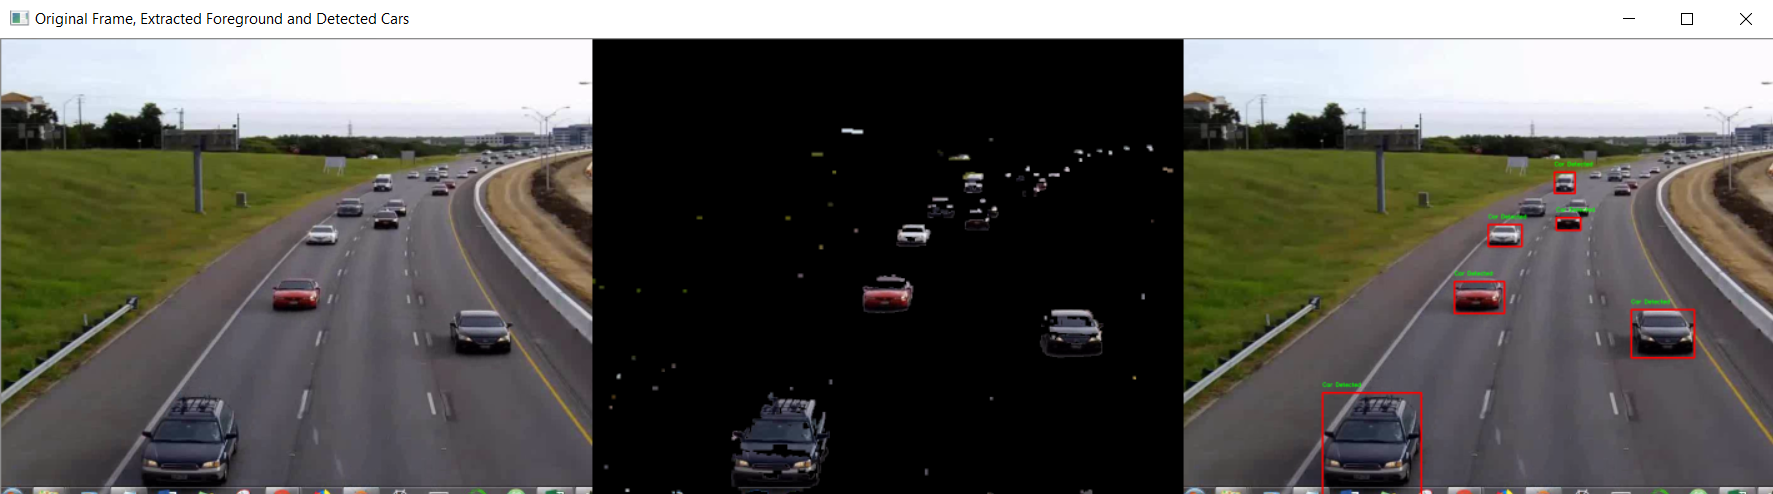
Output:
Code breakdown:
- Our first step will be to load the video which will have the cars in the moving state. Then we’ll apply the algorithm so that our algorithm could easily detect them.
- Then we will set the kernel to
None. We can give our custom size but to remove the complexity of the model we will be giving it No value.
- Now we will be initializing our
background subtractormodel and then storing the instance of it in a variable.
- Then after some initialization steps, we will start the main work in the infinite loop. The first step is to read each frame of the video and determine if they are detectable or not.
- Then with the help of
the backgroundObjectfunction, we will apply it to every frame to get the segmented mask.
- So from the above step, we might not get a completely accurate result, so, for that, we will be using the thresholding (
cv2.thereshold) technique so that we could get rid of unwanted shadows.
- Then we will perform some
morphological operationsso that we could have a better mask (more efficient and accurate), for that, we will be using two cv2 functions:cv2.erode(): to improve the erosion of frame.cv2.dilate(): to improve the dilation of frame.
- Now we will detect the contours of the particular frame. Note: Not all the frames, for that, we will first copy the frames so that we can draw the bounding box on the detected cars. And then, we’ll loop over each frame.
- Now, as if cars are detected, so it’s time to retrieve the foreground from each frame, and we will do that with the help of
the cv2.bitwisefunction.
- Now as we are almost done, it’s time to display our result, but before that, we will stack all the three frames, i.e., the Original frame, Foreground frame, and Annotated frame, and it will be done using
np.hstackfunction to stack all the three frames together. And at last, we will display the stacked format with the help ofthe cv2.imshowfunction.
- After all the processing is done, we can exit from the application by pressing q. We will release the video capture object and destroy all the windows.
Conclusion
While we will look into the documentation of OpenCV, we could find ample algorithms for object detection or motion detection. You can try different algorithms and look at what fits best according to your requirements. Here, I used the background subtraction because it gave me better results as well as it seems to be more reliable and easy to use.
Key takeaways from this article
- You may have gone through the article titled Vehicle motion detection. But if you read the article carefully then you’ll find that it can help detect any object, as we saw in case of the human detection.
- Here we also learned about an algorithm that is-background subtraction. Wherein we discussed it in-depth from its origin to breaking down each parameter.
- In the middle of the pipeline, we have also learned about morphological operations such as erode() and dilate. These are the ones that can improve our image pre-processing skills.
Endnotes
Here’s the repo link to this article. Hope you liked my article on Vehicle motion detection using subtraction. If you have any opinions or questions, then comment below.
Read on AV Blog about various predictions using Machine Learning.
About Me
Greeting to everyone, I’m currently working in TCS and previously, I worked as a Data Science Analyst in Zorba Consulting India. Along with full-time work, I’ve got an immense interest in the same field, i.e., Data Science, along with its other subsets (Artificial Intelligence such as Computer Vision, Machine Learning, and Deep Learning). Feel free to collaborate with me on any project on the domains mentioned above (LinkedIn).
The media shown in this article is not owned by Analytics Vidhya and are used at the Author’s discretion.


