This article was published as a part of the Data Science Blogathon.
Introduction
In this article, we will learn how to make a real-time blink detector application using computer vision. Also, we will be using more libraries and mathematics to build such an application while going through a complete pipeline and code-by-code analysis.

Application of Blink Detection Application
1) Driver drowsiness detection: As the name suggests, this application is very useful in building real-world applications like detecting whether the driver is sleepy or not while detecting the eye moment or blink.
2) Iris tracking: This is another use case while we can also track the iris movement for building an AR kind of application.
3) Virtual gaming: We are in the age of virtual reality evolution, and by far, mostly VR-powered games are either hand or body movement driven, but we can also build eye movement driven games.
How will we achieve this?
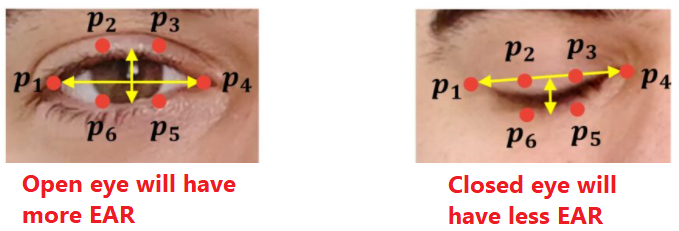
- Firstly, we will extract only those points located near our eyes to get the enclosed area of the eye, and then we will find out the EAR (Eye Aspect Ratio), which will help us determine the blink as an event has occurred or not.
- There is a total of 6 XY coordinates for an eye which starts from the left corner of the eye, and then from that position, it will go in the clockwise direction.
- There will be a relation between the height and width of these coordinates.
Let’s Start by Importing the Required Libraries
from scipy.spatial import distance as dist
from imutils.video import FileVideoStream
from imutils.video import VideoStream
from imutils import face_utils
import numpy as np
import imutils
import time
import dlib
import cv2
The functionality of each library:
- distance: This library will help us to find the Euclidean distance and remove some burden of applying mathematical calculations.
- FileVideoStream: This library will help us to stream the videos from the file explorer i.e. video file (.mp4 or another type).
- VideoStream: This library will help us to stream real-time video from the webcam.
- face_utils: This library will be responsible for grabbing the face landmarks (here eyes).
- NumPy: This library will help us to perform some other mathematical operations like arrays.
- time: This library is to get the system time or to get delayed i.e. sleep function.
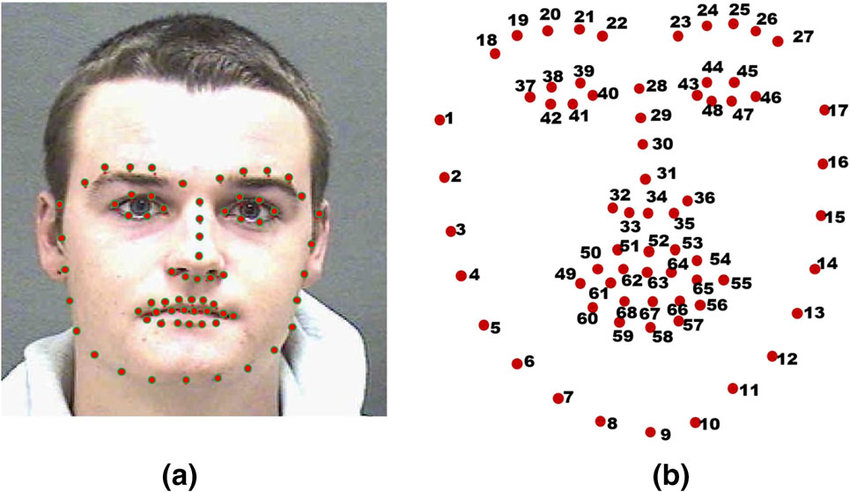
- dlib: This is the heart of this application as this library will help us get access to 68 landmarks of the face in real-time.
- cv2: Computer vision library to perform some image processing techniques.
Function to Calculate Eye Aspect Ratio (EAR)
def eye_aspect_ratio(eye):

    A = dist.euclidean(eye[1], eye[5])
    B = dist.euclidean(eye[2], eye[4])

    C = dist.euclidean(eye[0], eye[3])

    ear = (A + B)/ (2.0 * C)

    return ear
Code breakdown:
1) First, we will get the Euclidean distance between the 2 coordinates of the eyes.
2) While grabbing the coordinates, we will first have the vertical eye landmarks.
3) Then we will have the horizontal eye landmarks using the same algorithm.
4) After grabbing the coordinates, we will calculate the Eye Aspect ratio.
5) Then, at last, we will return the EAR.
Define Constants
EYE_AR_THRESH = 0.3
EYE_AR_CONSEC_FRAMES = 3
- Eye aspect ratio constant: This constant value will act as a threshold value to detect the blink.
- Count of frames:: This constant value is the threshold value for the number of consecutive frames.
Initializing the Variables
COUNTER = 0
TOTAL = 0
- Counter: This value will denote the total number of consecutive frames that will have the threshold value less than the EYE ASPECT RATIO constant.
- Total: This value will make a count of the total number of blinks in a certain number of frames.
Initialize the Dlib’s Face Detector
print("Loading the dlib's face detector")
detector = dlib.get_frontal_face_detector()
predictor = dlib.shape_predictor("shape_predictor_68_face_landmarks.dat")
Output:
Loading the dlib's face detector
- detector: Here we will initialize the dlib library (frontal face detector).
- predictor: Now we will use the shape_predictor method to load the .dat file and predict the landmarks accordingly.
Get the Index of Facial Landmarks (Eye)
(lStart, lEnd) = face_utils.FACIAL_LANDMARKS_IDXS["left_eye"]
(rStart, rEnd) = face_utils.FACIAL_LANDMARKS_IDXS["right_eye"]
- Firstly we are grabbing the coordinates values of the left eye using the face_utils function.
- Secondly, we will do the same for right_eye.
Loading the Video/Real-time Streaming
print("Starting the video/live stteaming")
vs = FileVideoStream("Video.mp4").start()
fileStream = True
# vs = VideoStream(src = 0).start() # run this line if you want to run it on webcam.
# vs = VideoStream(usePiCamera = True).start()
fileStream = False
time.sleep(1.0)
Output:
Starting the video/live stteaming
Code breakdown:
- While using FileVideoStream we will initialize the object with the video file location and then start() the same.
- Setting the fileStream value as True after successful streaming of file (video).
- If we want a real-time streaming we will be using the VideoStream(src=0).start().
- Then we will be using the sleep function from the time library to delay the frame.
Main Logic
while True:
if fileStream and not vs.more():
break
frame = vs.read()
frame = imutils.resize(frame, width = 450)
gray = cv2.cvtColor(frame, cv2.COLOR_BGR2GRAY)
rects = detector(gray, 0)
for rect in rects:
shape = predictor(gray, rect)
shape = face_utils.shape_to_np(shape)
leftEye = shape[lStart:lEnd]
rightEye = shape[rStart:rEnd]
leftEAR = eye_aspect_ratio(leftEye)
rightEAR = eye_aspect_ratio(rightEye)
ear = (leftEAR + rightEAR) / 2.0
leftEyeHull = cv2.convexHull(leftEye)
rightEyeHull = cv2.convexHull(rightEye)
cv2.drawContours(frame, [leftEyeHull], -1, (0, 255, 0), 1)
cv2.drawContours(frame, [rightEyeHull], -1, (0, 255, 0), 1)
if ear < EYE_AR_THRESH:
COUNTER += 1
else:
if COUNTER >= EYE_AR_CONSEC_FRAMES:
TOTAL += 1
#reset the eye frame counter
COUNTER = 0
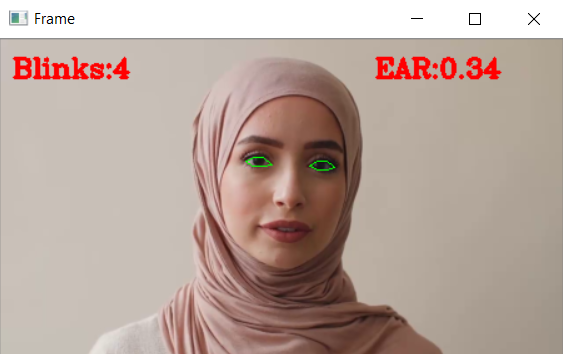
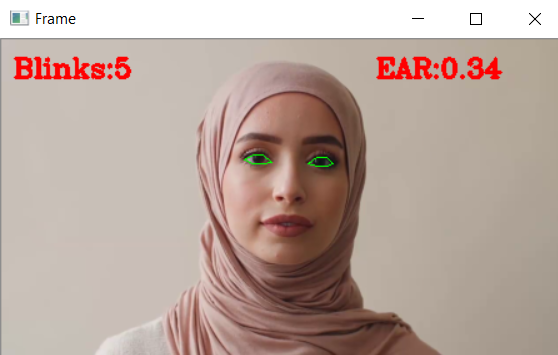
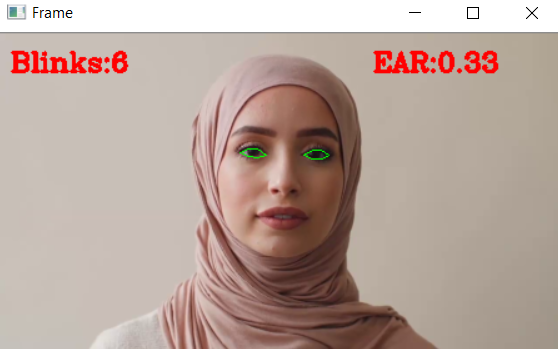
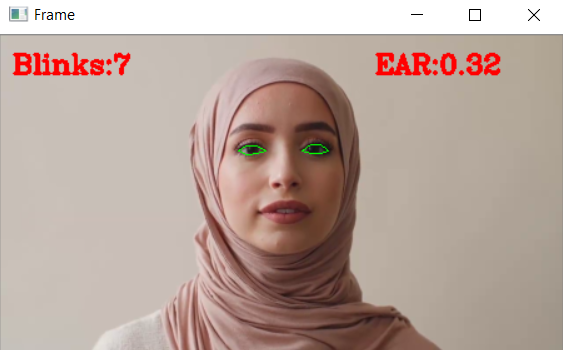
cv2.putText(frame, "Blinks:{}".format(TOTAL), (10, 30), cv2.FONT_HERSHEY_COMPLEX, 0.7, (0, 0, 255), 2)
cv2.putText(frame, "EAR:{:.2f}".format(ear), (300, 30), cv2.FONT_HERSHEY_COMPLEX, 0.7, (0, 0, 255), 2)
cv2.imshow("Frame", frame)
key = cv2.waitKey(12) & 0xFF
if key == ord("q"):
break
cv2.destroyAllWindows()
vs.stop()
Output:
Code breakdown:
- Firstly we will loop over the video streaming, and along with that, we will also check whether there are any more frames left in the buffer.
- We will first pick all the frames from the video/live streaming, then we will resize them to our desired dimensions, and at last, convert them to grayscale.
- Then using the detector function, we will detect the faces.
- Now, with the help of the predictor function, we will detect the facial landmarks and then convert them into a NumPy array.
- Then we will first grab the left, and right eye coordinates then will compute the Eye Aspect Ratio and do the average by 2, i.e., 2 eyes.
- Then we will compute the convex hull for both eyes so that we can visualize the eyes by drawing methods using contours.
- Now, we will check that our calculated EAR should be below the threshold value so that we can increase the blink counter.
- Else if the EAR is greater than the threshold value, then we will increase the counter of Total frames so that we can check other frames as well. If the eyes were closed for certain frames, then also we will increase the number of blinks.
- Then using the put text method, we will draw the number of blinks in each frame and also the Eye Aspect Ratio (EAR) value
- Then, at last, using the show function, we will show the mainframe, and along with that, we will also code to exit from the loop, i.e., q, and at last, for the clean-up process, we will destroy all the windows.
Conclusion
- Firstly we saw the real-world application of blink detection application then we saw what we would be doing in a nutshell.
- The main key takeaway from this article is to segment the eyes by using their coordinates.
- We have also learned about the concept of Euclidean distance and its formulae using the specific library.
- Along with that, we also came across the concept of Eye Aspect Ratio (EAR), which is the soul of this application.
- We also learned how the dlib library could detect the landmarks of the face and, along with that, read the video files as well as live streaming.
Here’s the repo link to this article. Hope you liked my article on the Blink detection application using computer vision. If you have any opinions or questions, then comment below.
Read on AV Blog about various predictions using Machine Learning.
The media shown in this article is not owned by Analytics Vidhya and are used at the Author’s discretion.


