Introduction
Most hodlers (crypto asset holders) store their coins or tokens on a centralized exchange. Our keys are held by this exchange, so if they decide to halt or suspend withdrawals, our assets will be stuck. It’s essential to consider adding token in Phantom wallet for decentralized control.
This is where decentralization comes into play, which puts power into the hands of the people. Users may store their assets on the blockchain via a Web3 wallet. By storing assets on the blockchain, our assets are safe, we can take advantage of DeFi (Decentralized Finance), and most importantly, we users have complete control over our assets, including the ability to add token in Phantom wallet.
In this guide, we’ll explore how to use Phantom, a Web3 wallet for storing assets and interacting with decentralized applications on the Solana blockchain. Additionally, we’ll cover how to add a token in Phantom wallet.
This article was published as a part of the Data Science Blogathon.
Table of contents
What is a Web3 wallet?
A web3 wallet is software that allows us to store, send, receive, swap, and manage digital assets (such as coins, tokens, and NFTs) on the blockchain. Furthermore, a Web3 wallet enables us to interact with decentralized applications (dapps).
By using a web3 wallet, we store our crypto assets on-chain. These assets are stored in an extremely secure and decentralized way, and we users have complete control over our assets.
The Phantom Web3 wallet is accessible as both a web wallet and a mobile application for Android and iOS. This guide will teach you how to utilize the Phantom Web3 web extension wallet, including how to add token in Phantom wallet for managing your cryptocurrency assets efficiently.

Source: https://play.google.com/store/apps/details?id=app.phantom&hl=en_US&gl=US
How to Add Token in Phantom Wallet?
The Phantom Web3 wallet extension can be downloaded by visiting add token to Phantom Wallet’s official site. You can do so by clicking here.
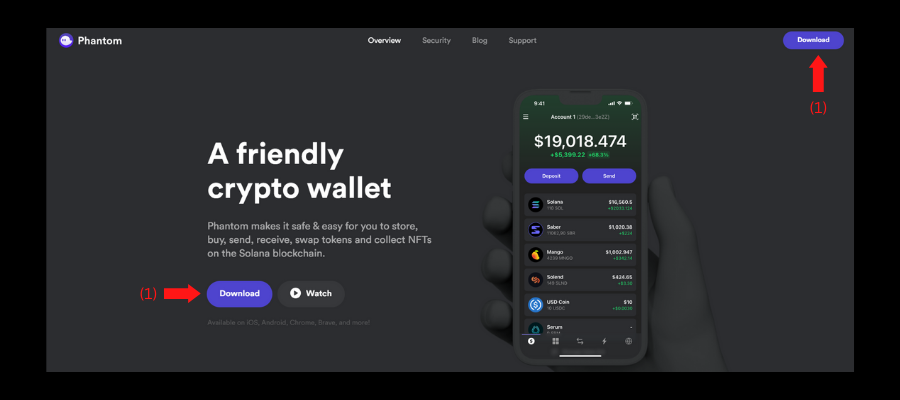
To add the phantom wallet extension to your browser, follow the steps below:
- On the Phantom website homepage, click on the Download button.
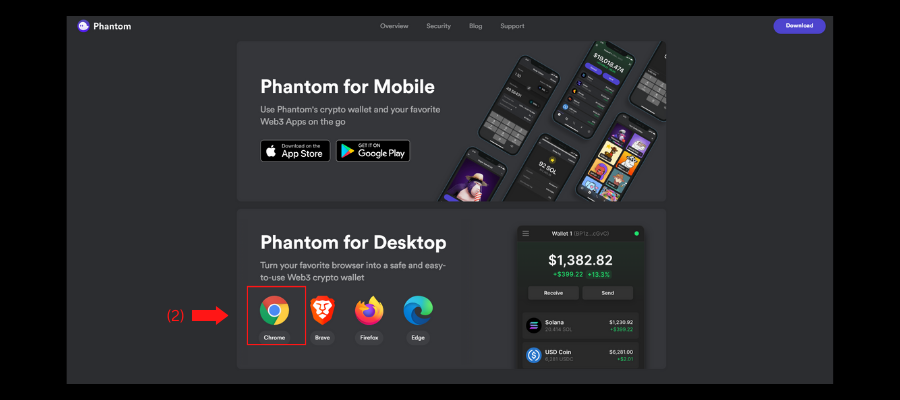
- Select the browser on which you want to download the Phantom wallet.
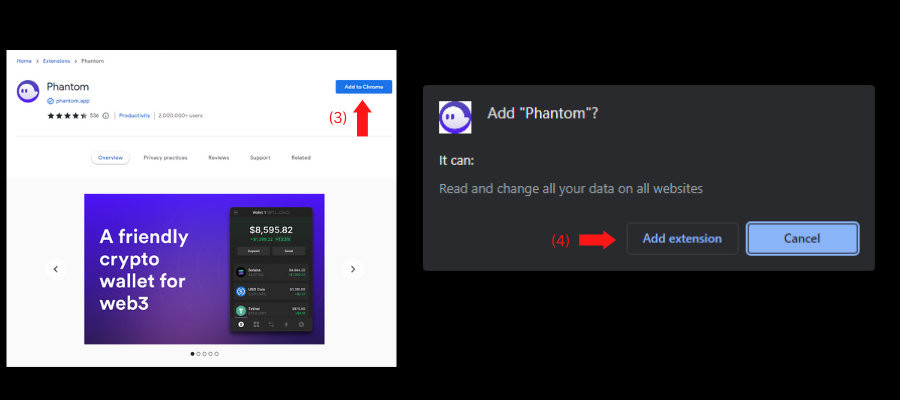
- Click on the Add to Chrome button on the chrome extensions page.
- On the popup window, click on Add extension.
Once installed, you may pin the wallet to your browser’s extension tab. The next step is to create a new account or import an existing account.
Create or Import an account
Creating a new account
To access a Web3 wallet, you are required to create a wallet account. You can create an account by following the steps below:
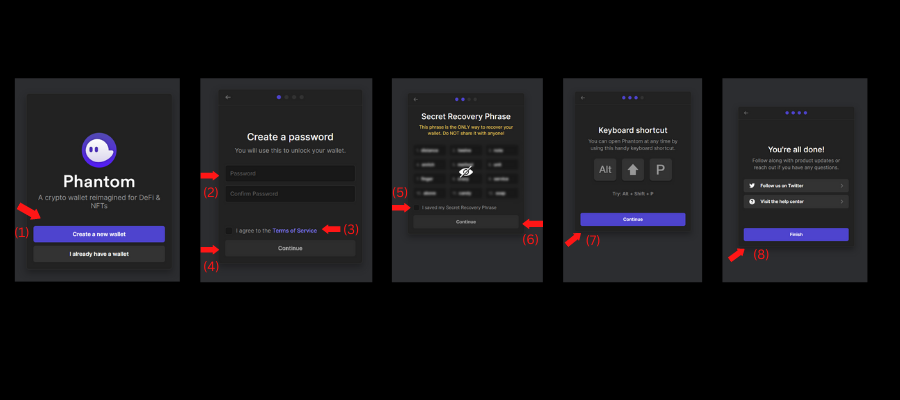
- Click on Create a new wallet.
- Enter and confirm a secure password for your wallet.
- Tick the checkbox to agree to terms and conditions.
- Click on the Continue button.
- Hover over your Secret Recovery Phase and note this phrase (Very Important Step). Tick the box after you have saved your recovery phrase.
- Click on the Continue button.
- Click on the Continue button.
- Click on the Finish button.
Importing an existing account
If you already have a phantom account, you may follow the steps below to import an existing account:
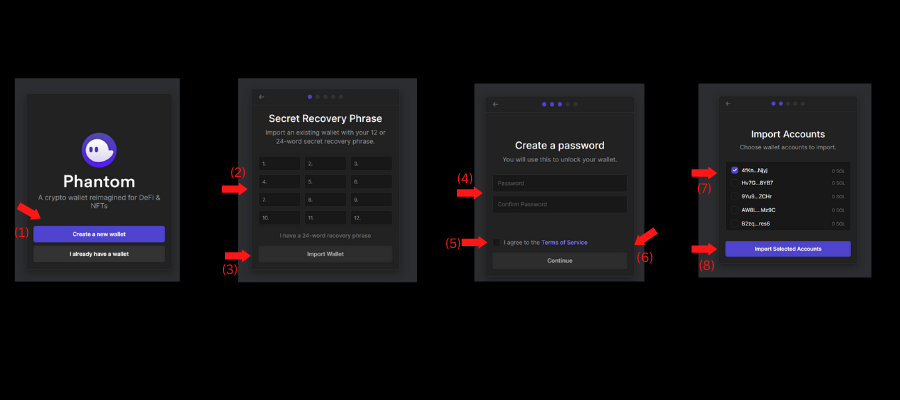
- Click on I already have a wallet.
- Enter your Secret recovery phrase.
- Click on Import Wallet.
- Enter and confirm a secure password for your wallet.
- Tick the checkbox to agree to terms and conditions.
- Click on the Continue button.
- Select the wallets you want to import.
- Click on Import Selected Accounts.
- Follow steps (7) and (8) from the above process.
Public and Private Keys
Public and Private keys are the most essential concepts which allow a user to send and receive assets on the blockchain. Both the keys together, encrypted with a cryptographic algorithm, keep your crypto assets secure.
Public Key
A public key enables you to receive assets. A sender must know your public address for you to receive crypto assets or NFTs. You can access your public key by following the steps below:
- Enter your password if prompted to unlock your wallet.
- Click on the Unlock button.
- On the wallet homepage, click on the wallet name on the top.
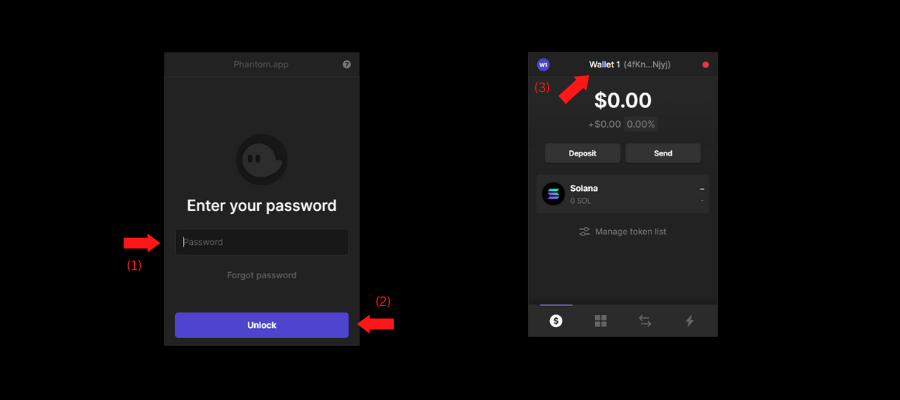
Your public address has been copied to your clipboard, and you can now share it.
Private Key:
As its name suggests, a private key must be kept private, i.e., secure. These keys are used to send digital assets. NEVER DISCLOSE YOUR PRIVATE KEY TO ANYONE. Store this key (address) in a safe place at all times. Anyone who gains access to your private key has access to your assets. Hence the phrase – “Not your keys, Not your crypto.”
You can access your private key by following the steps below:
- Click on the wallet icon on the top left-hand side of the wallet homepage.
- Click on the wallet name (Highlighted Area).
- Click on the three dots near your account name.
- Select Export Private Key.
- Enter your wallet password.
- Click on Next.
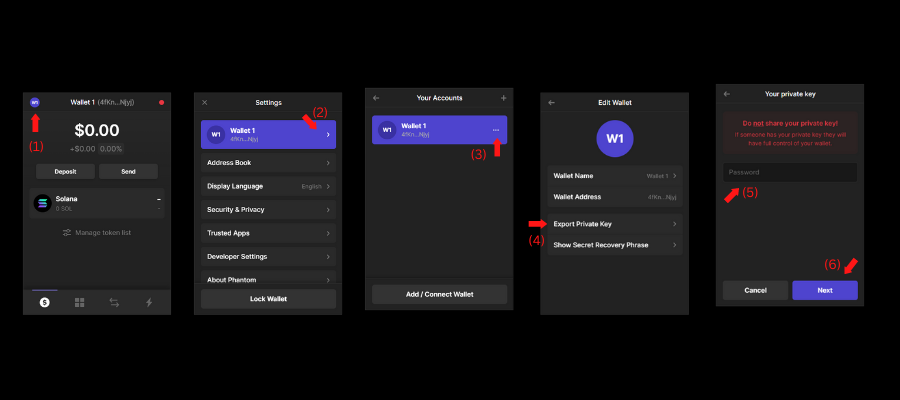
Your private key is now visible. Note down this key and keep it safe at all times.
Send or Receive Assets
A Web3 wallet’s main function is to store crypto assets in a secure and decentralized manner. Hence, crypto assets, when sent to your wallet, are stored in the wallet. You can receive and send crypto assets via your wallet by using your wallet’s public and private keys, respectively.
Send Assets:
To send digital assets such as cryptocurrency or NFTs, your wallet’s private key is utilized. You may follow the steps below to send crypto assets:
- Click on the Send button on the wallet homepage.
- Select or Search for the coin or token you want to send.
- Enter the recipient’s wallet address (public key) and the number of coins or tokens you want to send.
- Click on the Next button.
- Confirm your transaction and click Send.

Bonus Tip! – Always double-check the address to where you are sending your digital assets. Blockchain transactions are immutable, meaning they cannot be changed. Hence, If one letter also is incorrect in the address, you will lose your assets forever.
Receive Assets:
To receive digital assets such as cryptocurrency or NFTs, your wallet’s public key is utilized. You may follow the steps below to receive crypto assets:
- Click on the Deposit button on the wallet homepage.
- Select or search for the coin or token which you want to receive.
- Copy the wallet address or ask the sender to scan the QR code.
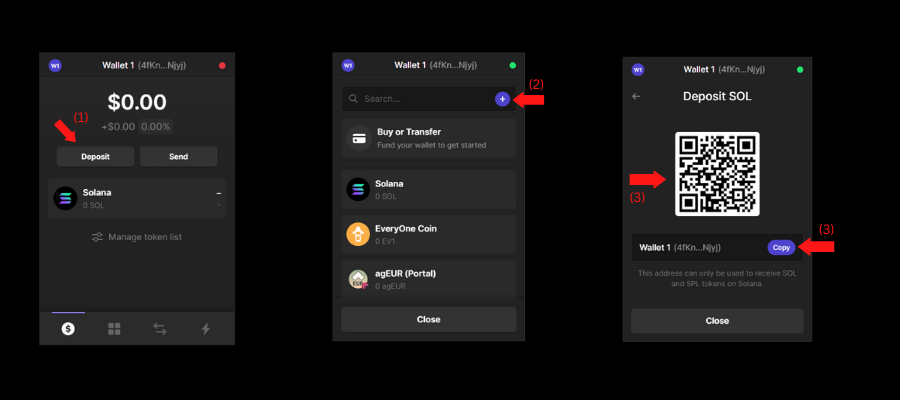
The tokens will be available in your wallet when the sender sends them and once the transaction is validated.
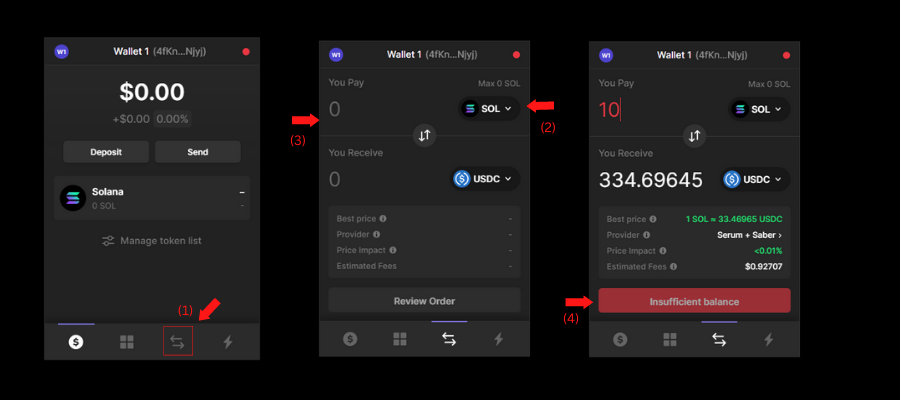
Swap Assets
Swapping is the process of exchanging one crypto asset for another. Swapping allows users to trade their crypto assets in a decentralized manner. Initially, users could swap their assets by connecting their wallet to a Decentralized Exchange (DEX). But one of the cool features of Phantom is that you can directly swap your assets within your wallet.
For example, a user may Swap their SOL coins for USDC. You may follow the steps below to swap your assets:
- Select the Swap icon on the wallet homepage.
- Select the coins or tokens you want to swap.
- Enter the number of tokens or coins to be swapped.
- Click on the Confirm button.
Transaction History
A blockchain is a public ledger meaning all the transactions performed on a blockchain by you are recorded. You can access your past transaction history via your crypto wallet in the following manner:
- Select the Transaction (lighting) icon on the wallet homepage.
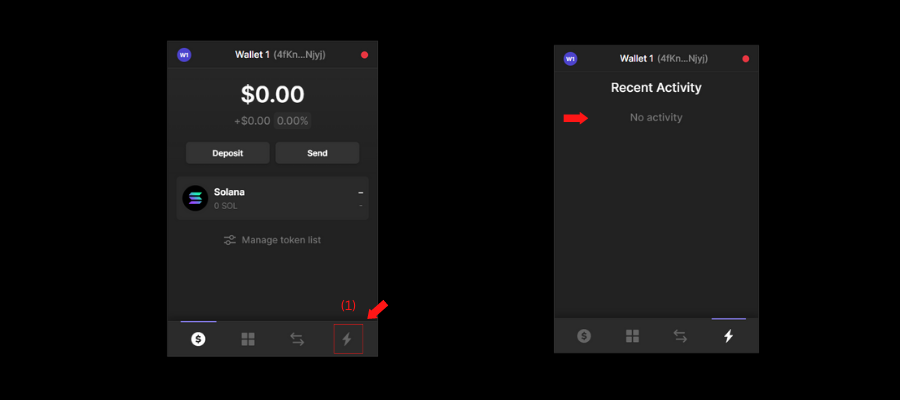
You may now view all of your past transactions.
Import Tokens
You will only notice the SOL coin when you set up your Phantom wallet. However, after a token is sent to your wallet, it may or may not be displayed in your wallet. As a result, we must manually add the token.
You may do so by following the steps below:
- Click on the Manage token list on the wallet homepage.
- Click on the + icon.
- Enter the token’s mint address, token name, and token symbol.
- Click on Add.
- Click on Continue.
- You may copy the wallet address or ask the sender to scan the QR code.

Once imported, you will see the respective token in your wallet.
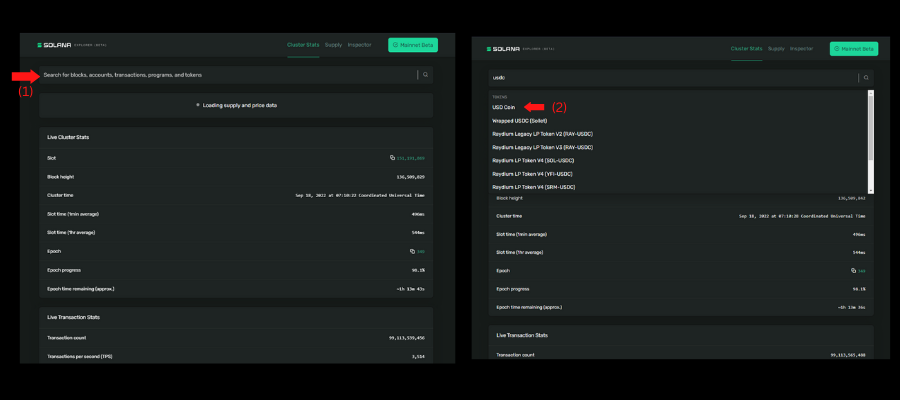
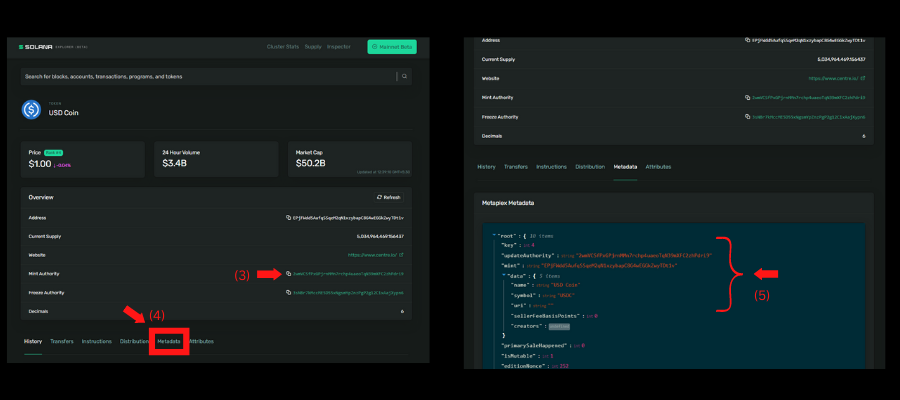
Token Details:
It may be wondering, in step 3, where can we get the token’s details? with that you can search for the token on Solana’s blockchain explorer.
You may visit Solana’s blockchain explorer by clicking here.
You can get the details of the token by following the steps below:
- On the explorer’s homepage, navigate to the search bar and enter the token you are searching for.
- Select the respective token.
- The token data will be shown on the token page.
- Furthermore, you may get the token details by clicking on the Metadata section.
- All the tokens details are displayed here.
Add, Rename, and Switching Accounts
A crypto wallet can have multiple accounts, each with its public and private key. You can create several accounts for different purposes, like managing your NFTs, crypto assets, or even a burner wallet. Additionally, you may want to learn how to add a token to your Phantom wallet to manage various assets efficiently.
Adding Accounts:
You can add multiple accounts by following the steps below:
- Click on the wallet icon on the top left-hand side of the wallet homepage.
- Click on the Wallet name (highlighted area).
- Click on the Add/Connect wallet button.
- Select Create a new Wallet.
- A new wallet has now been created.


Bonus Tip! – Remember to store your new account’s private and public keys. The private key is more important.
Renaming Account:
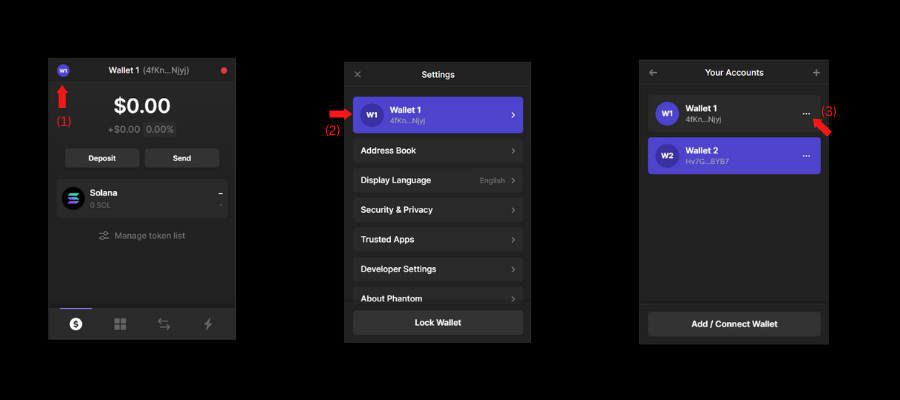
You can rename the accounts you have created by following the steps below:
- Click on the wallet icon on the top left-hand side of the wallet homepage.
- Click on the Wallet name (highlighted area).
- Click on the three dots near the wallet name.
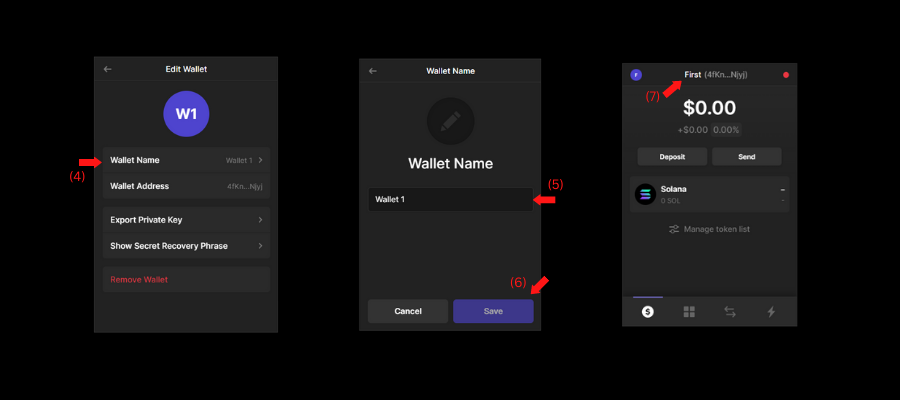
- Click on Wallet Name.
- Enter your new wallet name.
- Click on Save.
- You will notice your wallet name is now changed on your wallet homepage.
Switching Accounts:
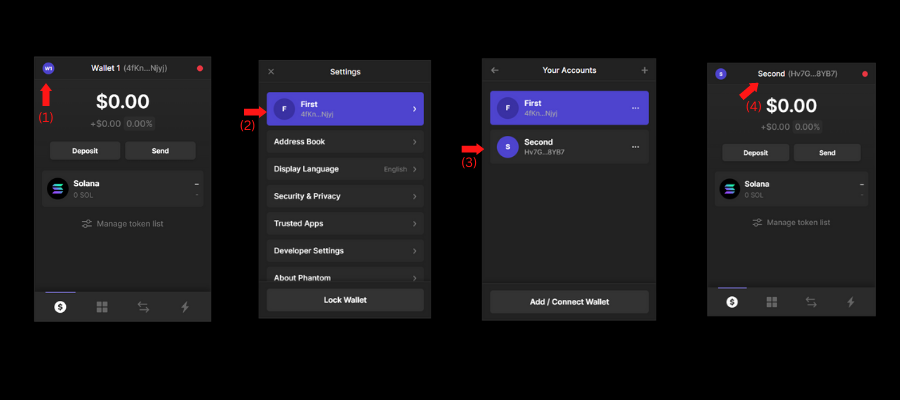
You can switch between your accounts by following the steps below:
- Click on the wallet icon on the top left-hand side of the wallet homepage.
- Click on the Wallet name (highlighted area).
- Select the wallet you want to switch to.
- Your wallet homepage will notice that your wallet accounts have been switched.
Accessing a Decentralized Application (Dapp)
Decentralized applications (Dapps) are protocols or applications built on a blockchain, offering various services like exchanges, yield farming, and borrowing. These Dapps are decentralized, meaning they operate without a central authority. For example, you can add tokens to a Phantom wallet for Dapp transactions.
A dapp is similar to applications on your smartphone. For example, you may download apps from the app store for IOS and the play store for android. Some applications on the app store are unavailable on the play store and vice versa. Similarly, blockchains operate on the same principle. Some dapps are not available on another blockchain.
This guide will see how to connect to Raydium, the most popular decentralized application in the Solana ecosystem.
You may visit Raydium by clicking here.
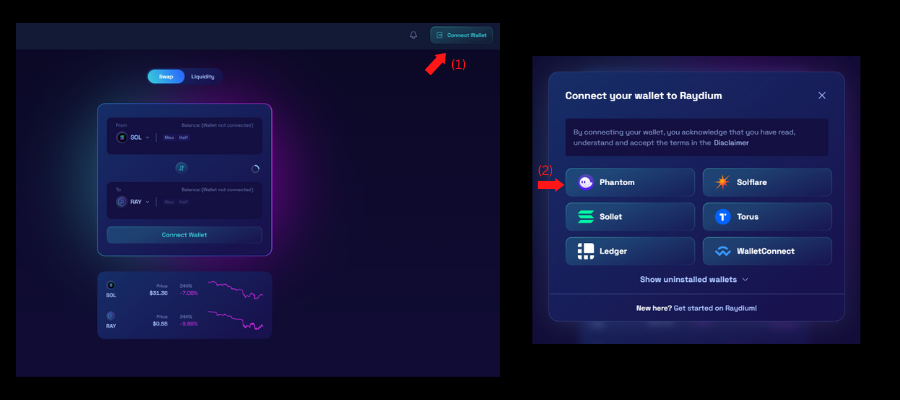
You can connect to the dapp by following the steps below:
- Select the Connect Wallet button on the top right-hand side of the dapps homepage.
- Select Phantom Wallet.
- Click on Connect button on your wallet.
- The wallet is now connected to the dapp.
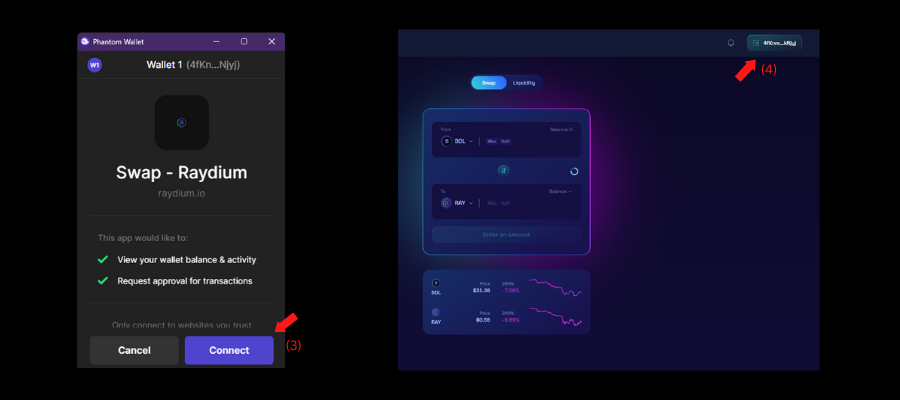
Your wallet is now connected to the decentralized application. With the application, you can now interact – swap, farm, stake.
Settings
The settings section of your wallet enables you to modify and view the basic features of the wallet.
Address Book
In this section, you may save the addresses of the wallets you frequently send your crypto assets to. You can do so by following the steps below:
- Click on the wallet icon on the top left-hand side of the wallet homepage.
- Click on the Address Book.
- Click on Add Address.
- Enter the label and the public address.
- Click on the Add button.
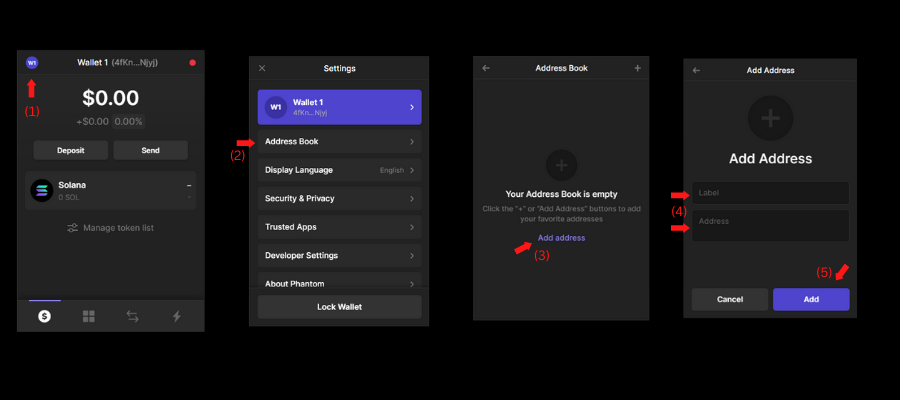
You can now easily send coins and tokens to your saved addresses.
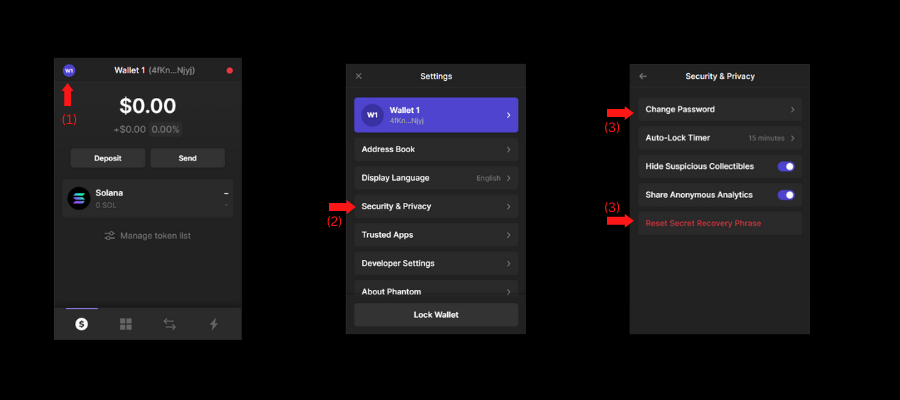
Security and Privacy
In this section, you may alter some of your wallet’s security and privacy features. To do so, follow the steps below:
- Click on the wallet icon on the top left-hand side of the wallet homepage.
- Click on Security and Privacy.
- You may change your password or reset your secret recovery phrase.
Bonus Tip!
This section is very, very important. I want you’ll to go through this section twice, maybe thrice, and please follow it.
So, whenever you connect your wallet to any decentralized application, sometimes we as users do not read the permissions before connecting our wallet to the dapp. Due to this, we blindly click on the connect button and connect our dapp to the site.
Sometimes, by accepting permissions from unknown sites, you may have given access to the dapp to withdraw your funds. So once permission is granted, the owner of the dapp or smart contract may withdraw your funds to another account. To prevent this, we must always revoke access to sites we have connected our wallets to. You may do this by following the steps below:
- Click on the wallet icon on the top left-hand side of the wallet homepage.
- Click on the Trusted Apps.
- You will find a list of all the applications you have connected your wallet to. Click on the revoke button (red).

Please ensure that you follow these steps as a risk protection method. I lost over $300 (Rs 25000) because I did not revoke access to the protocol I had connected to.
Conclusion
You now understand how to access decentralized applications on the Solana ecosystem. Remember, decentralized apps carry risks like smart contract exploits and software bugs. Before connecting your wallet to any application, consider the risks of DeFi. If you want to add a token to your Phantom wallet, follow the steps for wallet safety and research thoroughly.
If you have enjoyed this guide, please let me know in the comments and consider following. Thank you for your time.
Key Takeaways
- A Web3 wallet enables you to have full control over your crypto assets and store these assets in a secure and decentralized manner.
- Phantom is the most popular crypto wallet in the Solana ecosystem.
- Connect your wallet to only trusted sites.
- Never disclose your private keys to anyone.
- The seed phrase must be kept safe always.
- Go through the Bonus Tip section thoroughly. TRUST ME.
The media shown in this article is not owned by Analytics Vidhya and is used at the Author’s discretion.
Myron Dsilva
21 Mar, 2024


