This article was published as a part of the Data Science Blogathon.
Introduction
This article will discuss how we can wirelessly send data of various IoT sensors from a microcontroller to a web application. Also, we will store that data in a MongoDB database to process it according to our needs and requirements.
Sending the sensor data from the Microcontroller to a Web Application Server is not a much more difficult task. We have to follow the below four steps simply:
1. Making Hardware Connections
2. Compiling the Arduino code
3. Making a Web App
4. Run the server
I will explain to you every step in detail.
What are IoT & Microcontrollers
IoT stands for Internet of Things. These are the physical entities like embedded devices and sensors that can connect through a network and exchange data over the internet.
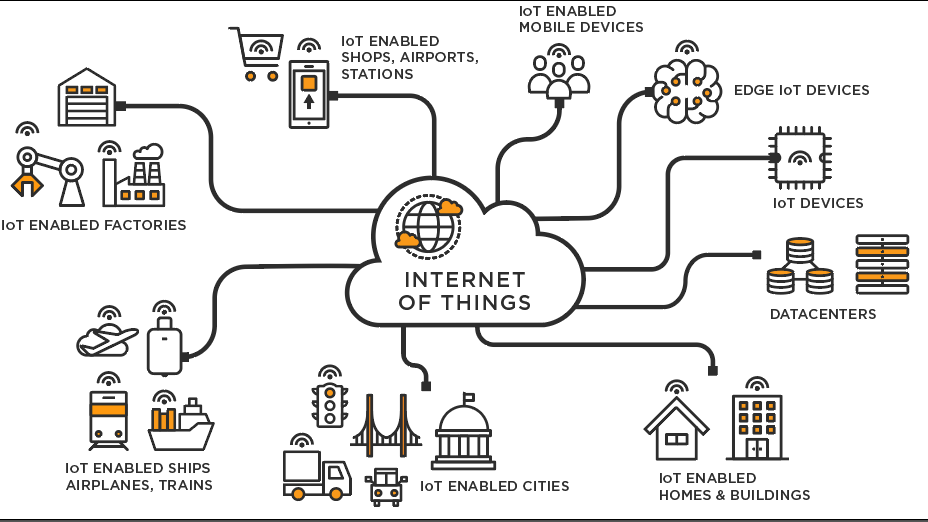
The primary purpose of IoT is to make such systems that can work without human intervention or follow a self-reporting mechanism in real-time. Also, these can help to collect valuable data and information from various devices that can be beneficial for improving the overall experience with that product. We can also produce many valuable insights from that data by applying multiple machine learning algorithms to it.
There are many examples of IoT devices, like CCTV Cameras, Smart Alarms, that are 24×7 connected via the internet and send all the data on smartphones. Some other examples of IoT devices are Air Quality Monitoring and Weather Monitoring are also significantly trending these days.
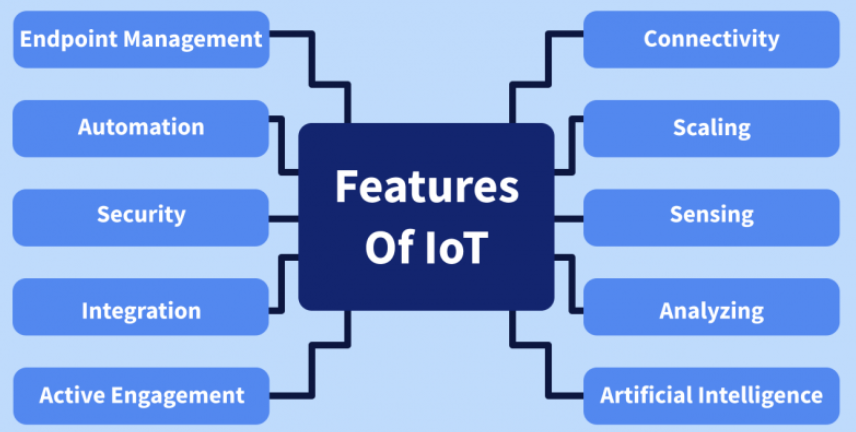
Features of IoT
IoT made it possible for physical objects to connect and interact, transforming it from a physical to a digital world. It makes companies and organizations simplify their daily tasks by automating them. Below are some basic features of IoT devices.
What are Microcontrollers?
These devices automatically control various products and sensors like remote controls, toys, machines, etc. They include a Microprocessor, RAM, ROM, and I/O Pins fabricated on a single chip using VLSI technology.
The majority of these microcontrollers are programmed using C and C++ programming languages. They use natural operating systems and demand very high speed and efficiency that only C and C++ can provide.
One of the most popular microcontrollers used in IoT is Arduino UNO. It is developed on a Microchip ATmega328P microcontroller. Its user-friendly design, low cost, and compact size have made it the most commonly used Microcontroller.
It consists of 14 Digital I/O Pins and 6 Analog Pins. Also, it has 32Kb of Flash Memory and works at a clock rate of 16MHz.
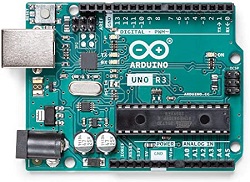
Source – amazon.com
One of the main drawbacks of Arduino UNO is that it doesn’t contain any built-in Bluetooth or Wi-Fi connectivity. We must use a separate Bluetooth or Wi-Fi module to connect it wirelessly.
We have another microcontroller, NodeMCU (ESP8266), which can overcome the above issues. It has almost all the features similar to Arduino, but it also has a built-in Wi-Fi module, which enables it to connect to other applications using Wi-Fi.
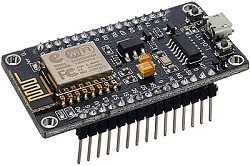
Source – https://components101.com/development-boards/nodemcu-esp8266-pinout-features-and-datasheet
In this article, we will use NodeMCU to send data of Ultrasonic Sensors to a Web Application.
Let’s get started, 😉
Prerequisites
In this section, we will see all the basic requirements and technologies you must be familiar with before starting the project.
1. You must have some basic knowledge of backend web application development.
2. You must have a basic knowledge of IoT-based devices.
3. We will use Windows 10 machine in the complete tutorial.
4. You must have some virtual hardware devices like:
- NodeMCU
- Ultrasonic Sensor
- Bread Board
- Jumper Wires (F-F)
- 5V Power Supply
- USB Cable
You can find these components in any electronic shop or on famous e-commerce websites.
It is good if you have the hardware, but you need not worry if you don’t have that. At the end of the article, I will show you how you can test your application without needing physical hardware.
Setting up the Hardware Connections
In this section, we will see the hardware connection of NodeMCU with the Ultrasonic Sensor.
1. Circuit Diagram
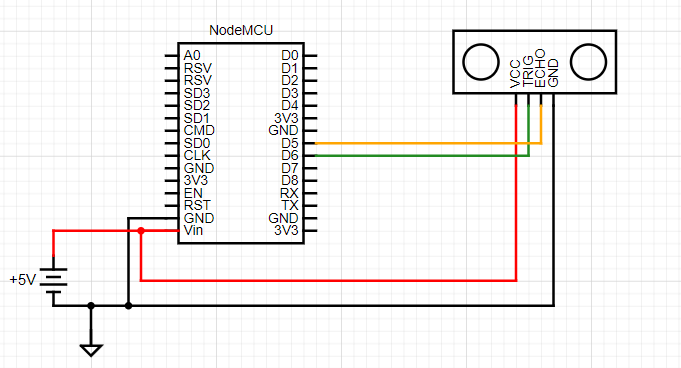
2. Connections
| NodeMCU | Ultrasonic Sensor |
| Vin | VCC |
| GND | GND |
| D6 | TRIG |
| D5 | ECHO |
After making the above connections, connect a 5V power supply or a battery with the NodeMCU, as shown in the above diagram. Finally, connect your PC with the NodeMCU using a Micro-USB cable so that we can burn the code into it.
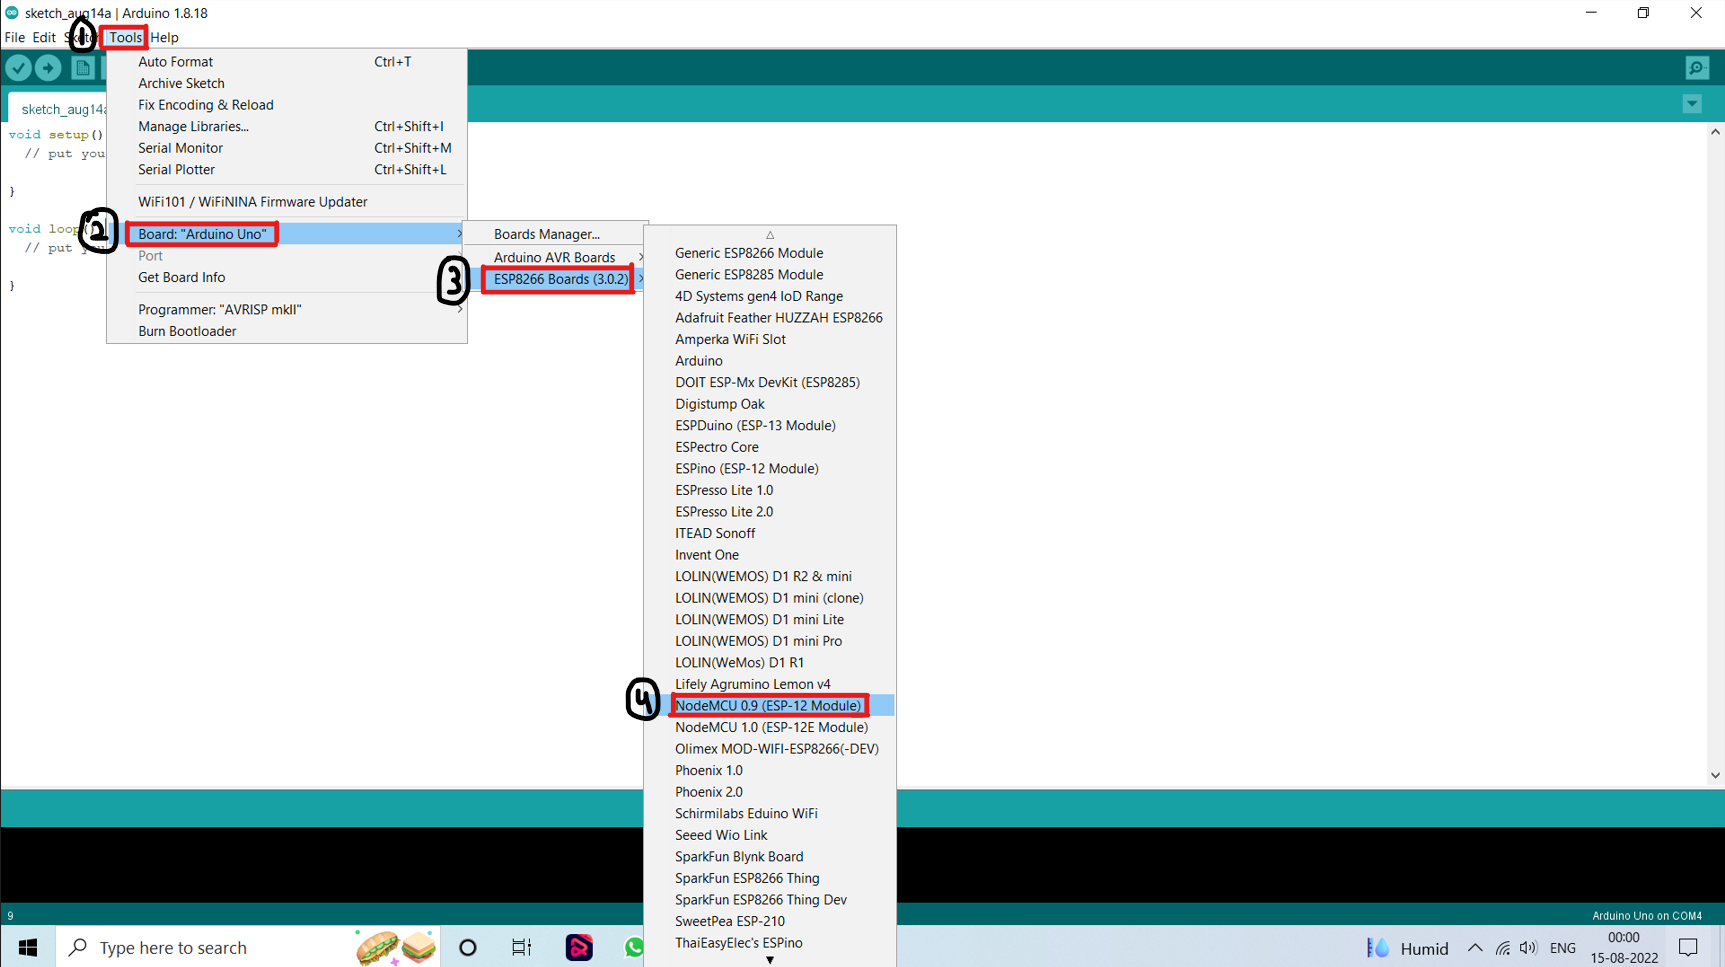
Setting up Arduino IDE
In this section, we will set up our Arduino IDE and also see the code we will burn in the microcontroller.
1. Go to the official Arduino page and download your IDE.
2. Create a new Arduino Project.
3. Select the Board from Arduino UNO to NodeMCU (ESP8266). The procedure is shown below.
4. Now, paste the below code into your IDE.
#include

char ssid[]     = "";
char password[] = "<your_wifi_password";
const char* HOST_IP = "";     // Localhost Server IP
const int HOST_PORT = 80;
String url = "/liveSensorData"; // URL for sending the data
The above code consists of:
1. If you have not installed the above package, “ESP8266WiFi”, then you can also install it by navigating through Sketch << Include Libraries << Manage Libraries. Then type the name of the library that you want to install.
2. Your SSID and Password of your Wi-Fi network.
3. Your Host IP Address and your Host Port Number. The Host Port number is the Port on which your web application runs. And the Host IP address is a 32-bit number that can uniquely identify your computer. Connect to a Wi-Fi network to identify your IP address and type ipconfig on your command prompt. Then you will be able to see your IP Address. But your private IP will change if you connect to a different network.

5. We will now define some variables which store the Input Ports and Distance of the Ultrasonic Sensor.
const int trig = 12; // D6
const int echo = 14; // D5

int distance;  // This variable will store the object's distance from the sensor.
Note: TRIG is connected to Port D6, and ECHO is connected to port D5. If you change the ports in the code, you must also change them in the circuit connections.
6. In the void setup() function, we will write the code to initialize the above pins and connect the NodeMCU with the Wi-Fi network. We will also define the baud rate.
What is Baud Rate?
Baud Rate is the rate at which information is transferred in a network/channel. Mainly it is used in the serial communications of electronics. For example, the baud rate of 9600 means it can move 9600 bits per second through the serial Port. In general, the baud value of NodeMCU is 115200.
void setup() {
  // Ultrasonic
  pinMode(trig, OUTPUT);
  pinMode(echo, INPUT);

  // Defining the Baud Rate
  Serial.begin(115200);
  delay(10);

  // Establishing Connection with WIFI:
  Serial.println();
  Serial.println();
  Serial.print("Connecting to ");
  Serial.println(ssid);
  WiFi.begin(ssid, password);
  while (WiFi.status() != WL_CONNECTED) {
    delay(500);
    Serial.print(".");
  }
  Serial.println("");
  Serial.println("WiFi connected");
  Serial.println("IP address: ");
  Serial.println(WiFi.localIP());
}
7. In the void loop() function, we will write the code to input the data from the Ultrasonic Sensor and then send that data to a server.
void loop() {
  // Checking the connection status of Wi-Fi:
  if(WiFi.status() != WL_CONNECTED) {
    WiFi.begin(ssid, password);
    Serial.println("Not connected to WIFI");
    return;
  } else {
    // Connecting To the Server:
    Serial.print("connecting to ");
    Serial.println(HOST_IP);
    // Use WiFiClient class to create TCP connections
    WiFiClient client;
    if (!client.connect(HOST_IP, HOST_PORT)) {
      // If NodeMCU is not able to connect to the server.
      Serial.println("connection failed");
    } else {
        // Input the data of Ultrasonic Sensor
        digitalWrite(trig, LOW);
        delayMicroseconds(2);
        digitalWrite(trig, HIGH);
        delayMicroseconds(10);
        digitalWrite(trig, LOW);
        // Calculating the distance by multiplying the speed of sound by the time of echo
        distance = pulseIn(echo, HIGH) * 0.034 / 2;
        String data = "{'data':" + String(distance) + "'}";
        Serial.println(data);
        // Send a request to the server:
        client.println("POST " + url + " HTTP/1.1");
        client.println("Host: server_name");
        client.println("Accept: *" + url + "*");
        client.println("Content-Type: application/x-www-form-urlencoded");
        client.print("Content-Length: ");
        client.println(data.length());
        client.println();
        client.print(data);
        unsigned long timeout = millis();
        while (client.available() == 0) {
          if (millis() - timeout > 5000) {
            Serial.println(">>> Client Timeout !");
            client.stop();
            return;
          }
        }
        // Read all the lines of the reply from the server and print them to Serial
        while (client.available()) {
          String line = client.readStringUntil('r');
          Serial.print(line);
        }
        Serial.println();
        Serial.println("closing connection");
    }
  }
  // We will send the requests every 5 seconds. We are adding a delay of 5000 milliseconds => 5 sec.
  delay(5000);
}
8. Below is the complete code for the Arduino IDE
#include

char ssid[] = "";

char password[] = "<your_wifi_password";

const char* HOST_IP = ""; // Localhost Server IP

const int HOST_PORT = 80;

// URI for the request

String url = "/liveSensorData";

const int trig = 12; // D6

const int echo = 14; // D5

int distance; // This variable will store the object's distance from the sensor.

void setup() {

// Ultrasonic

pinMode(trig, OUTPUT);

pinMode(echo, INPUT);

// Defining the Baud Rate

Serial.begin(115200);

delay(10);

// Establishing Connection with WIFI:

Serial.println();

Serial.println();

Serial.print("Connecting to ");

Serial.println(ssid);

WiFi.begin(ssid, password);

while (WiFi.status() != WL_CONNECTED) {

delay(500);

Serial.print(".");

}

Serial.println("");

Serial.println("WiFi connected");

Serial.println("IP address: ");

Serial.println(WiFi.localIP());

}

void loop() {

// Checking the connection status of Wi-Fi:

if(WiFi.status() != WL_CONNECTED) {

WiFi.begin(ssid, password);

Serial.println("Not connected to WIFI");

return;

} else {

// Connecting To the Server:

Serial.print("connecting to ");

Serial.println(HOST_IP);

// Use WiFiClient class to create TCP connections

WiFiClient client;

if (!client.connect(HOST_IP, HOST_PORT)) {

// If NodeMCU is not able to connect to the server.

Serial.println("connection failed");

} else {

// Input the data of Ultrasonic Sensor

digitalWrite(trig, LOW);

delayMicroseconds(2);

digitalWrite(trig, HIGH);

delayMicroseconds(10);

digitalWrite(trig, LOW);

// Calculating the distance by multiplying the speed of sound by the time of echo

distance = pulseIn(echo, HIGH) * 0.034 / 2;

String data = "{'data':" + String(distance) + "'}";

Serial.println(data);

// Send a request to the server:

client.println("POST " + url + " HTTP/1.1");

client.println("Host: server_name");

client.println("Accept: *" + url + "*");

client.println("Content-Type: application/x-www-form-urlencoded");

client.print("Content-Length: ");

client.println(data.length());

client.println();

client.print(data);

unsigned long timeout = millis();

while (client.available() == 0) {

if (millis() - timeout > 5000) {

Serial.println(">>> Client Timeout !");

client.stop();

return;

}

}

// Read all the lines of the reply from the server and print them to Serial

while (client.available()) {

String line = client.readStringUntil('r');

Serial.print(line);

}

Serial.println();

Serial.println("closing connection");

}

}

// We will send the requests every 5 seconds. We are adding a delay of 5000 milliseconds => 5 sec.

delay(5000);

}
Creating a Database
This section will create a database on MongoDB under the free tier category. You can skip this section if you already have a MongoDB database.
1. Go to MongoDB Cloud’s official website and complete the registration.
2. Create a New Organization

3. Name your organization and select the MongoDBAtlas
4. Create a new project inside the organization you made earlier
5. Build a new Database
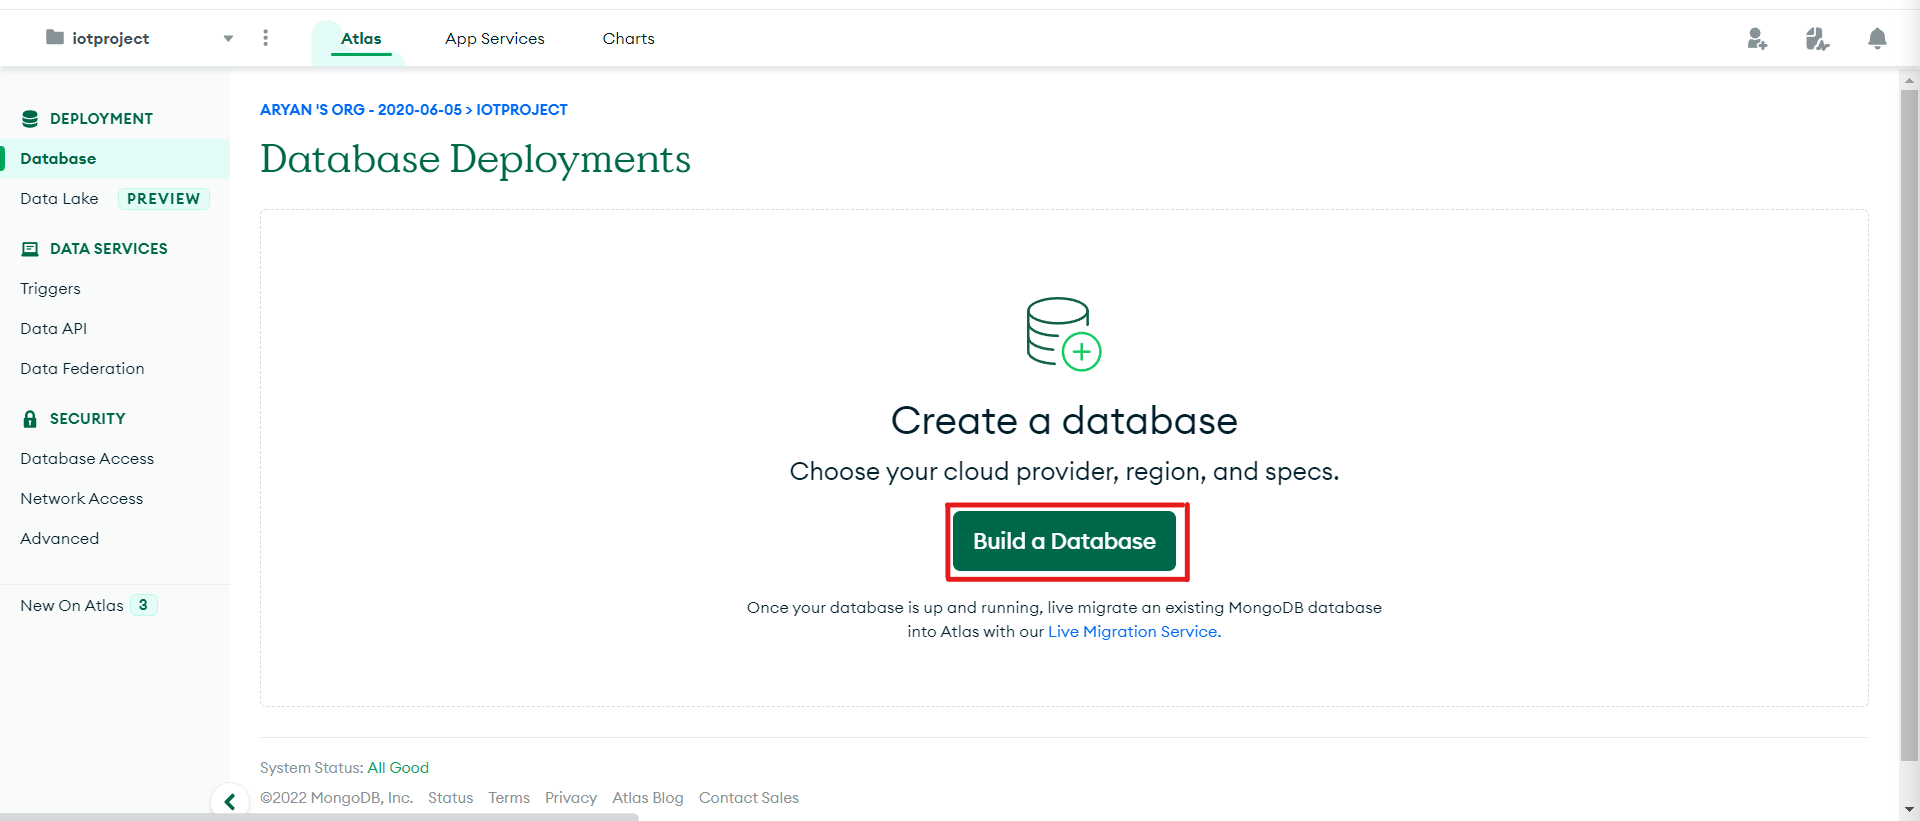
6. Select the Free Tier and then choose the cloud provider of our choice
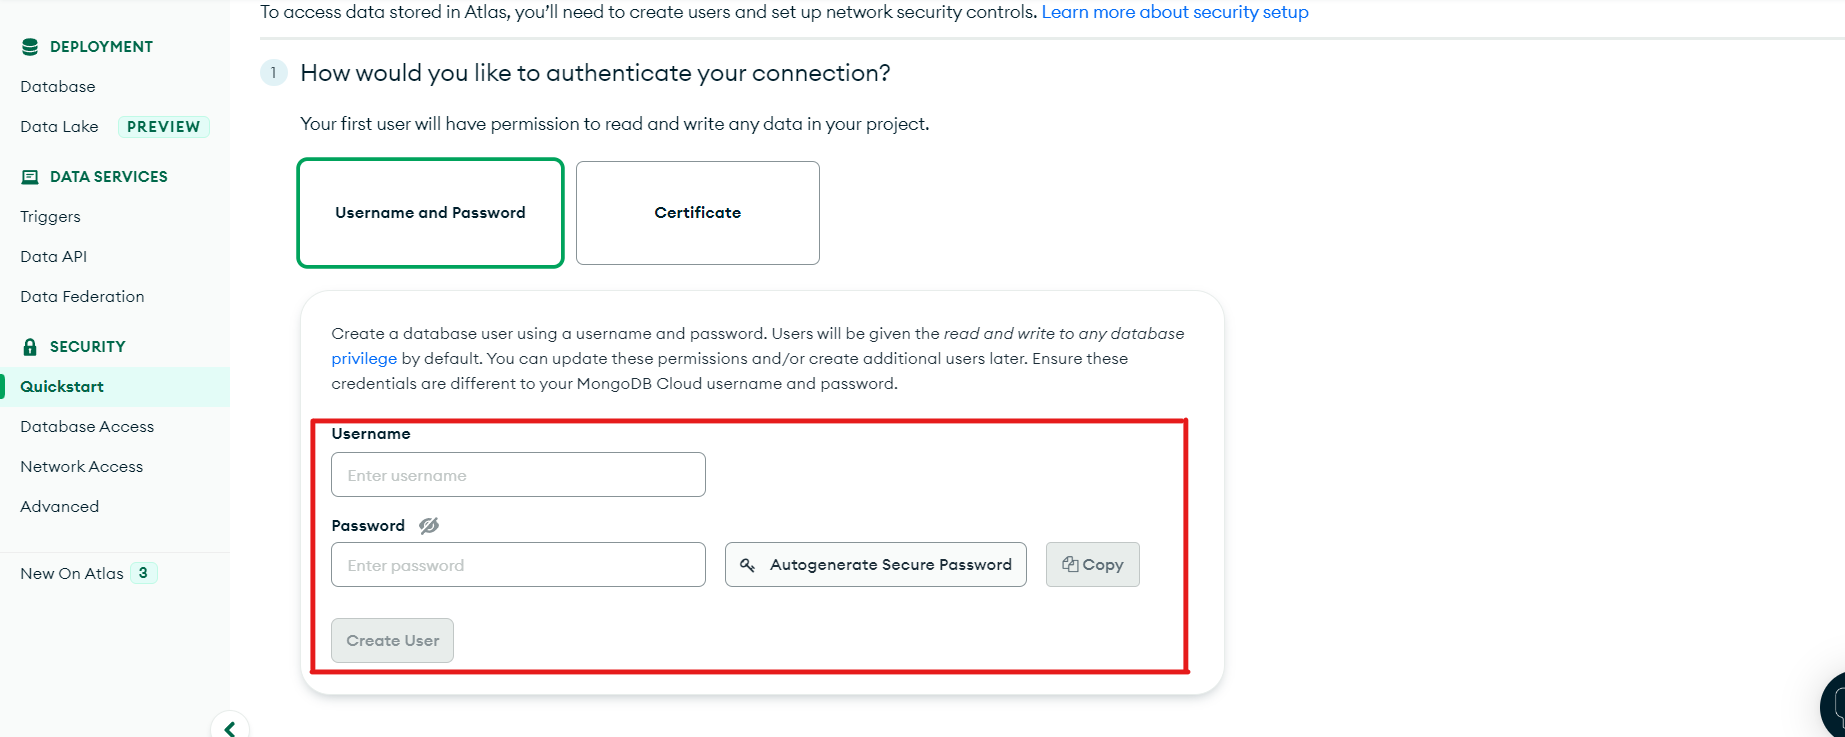
7. Now, enter the username and password for your database. Also, add your current IP address to the IP List.
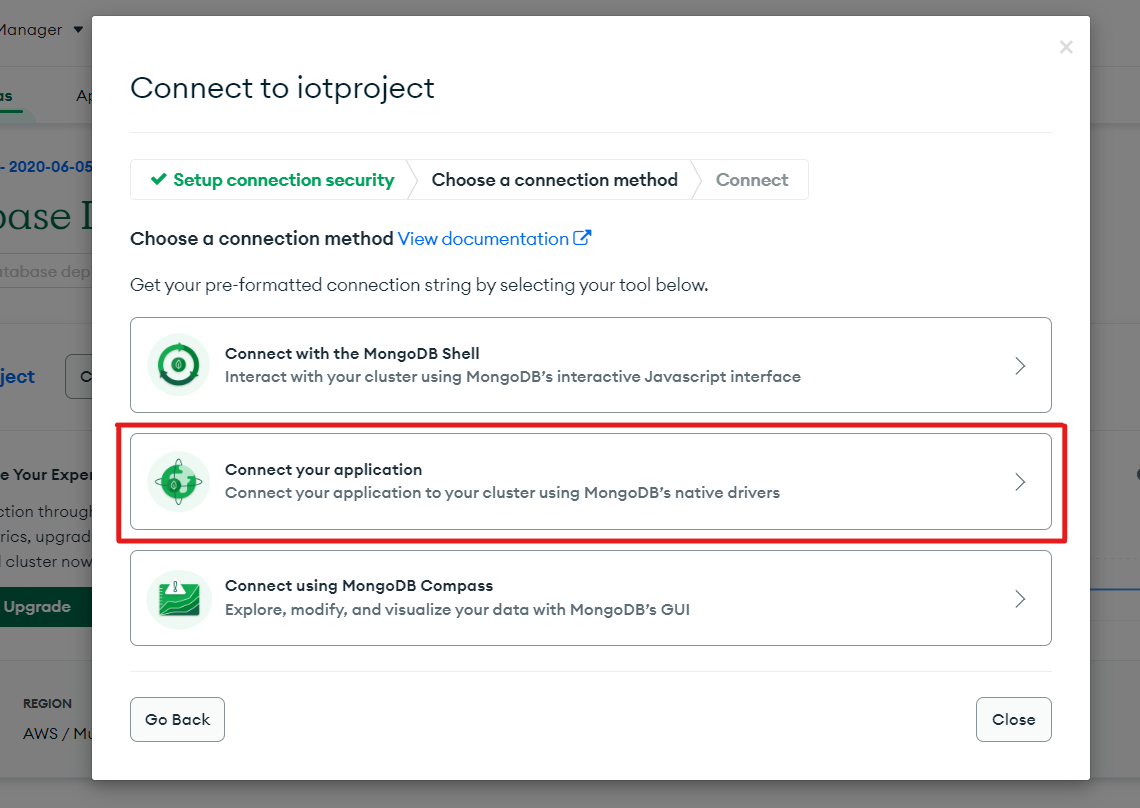
8. When your database is ready, then click on Connect.
9. Click on the option as shown in the image below
10. The URL in the below image is MongoURI. It will be different for every database. In this URI, instead of typing your database’s password, which you set during its creation.
Save this URI. We will use that later in our web application.

Creating Web Application
In this section, we will create a simple NodeJS web application that receives the data from the NodeMCU and, displays it on an HTML Web Page, also stores that data in a MongoDB Database so that we can use it to perform some analysis and pre-process of that data using machine learning tools.
1. Download and Install the latest version of NodeJS from their official website
2. Create a project directory
$ mkdir   // iot_project
$ cd   // iot_project
3. Initialize the node project into this directory
$ npm init
4. Installing the express library
$ npm install express --save
5. Installing all the required libraries
$ npm i nodemon -g
$ npm i dotenv
$ npm i ejs
$ npm i express
$ npm i express-ejs-layouts
$ npm i mongoose
6. Create a file named server.js
// Get .env data

require('dotenv').config();

const mongoose = require("mongoose");

const express = require("express");

const app = express();

const expressEjslayouts = require("express-ejs-layouts");

const path = require("path");


const DbConnect = async () => {

try {

await mongoose.connect(process.env.MongoURI, {

useNewUrlParser: true,

useUnifiedTopology: true,

});

console.log("DB Connected");

} catch (err) {

console.log(err.message);


// Exit Process with Failure

process.exit(1);

}

};


//Connect Database

DbConnect();


app.use(expressEjslayouts);

app.set("views", path.join(__dirname, "views"));

app.set("view engine", "ejs");

app.use(express.json());

app.use(express.urlencoded({ extended: true }));


// Server Routes

app.use('/', require("./routes/sensor"));


app.get("/", (req, res) => {

return res.render("index");

});

const PORT = process.env.PORT || 5000 ;

app.listen(PORT, () => {

console.log(`Server running on port ${PORT}`);

});
7. Create a .env file that stores all the Environment Variables of our project, like the Port Number and MongoURI.
Use that MongoURI that we have created in the previous section.
PORT=80
MongoURI=
USE_PYTHON_SCRIPT=false
We will use the variable USE_PYTHON_SCRIPT later in this tutorial. I will explain this in a later section.
8. Make a new directory named models, then create a file inside it called Sensor.js
const mongoose = require("mongoose");


const SensorsSchema = new mongoose.Schema({

name: {

type: String,

required: false,

default: "Ultrasonic-1"

},

time: {

type: String,

required: true,

},

data: {

type: String,

required: true,

},

});


module.exports = mongoose.model("Sensors", SensorsSchema);
9. Create a directory named views in the parent folder.
Inside that directory, create an EJS Template named index.ejs and layout.ejs. In these files, we will write the code of our HTML Templates.
In layout.ejs, paste the below code
<link href="https://cdn.jsdelivr.net/npm/[email protected]/dist/css/bootstrap.min.css" rel="stylesheet"

integrity="sha384-gH2yIJqKdNHPEq0n4Mqa/HGKIhSkIHeL5AyhkYV8i59U5AR6csBvApHHNl/vI1Bx" crossorigin="anonymous">


* {

margin: 0;

padding: 0;

}


html {

scroll-behavior: smooth;

box-sizing: border-box;

}
In index.ejs, paste the below code
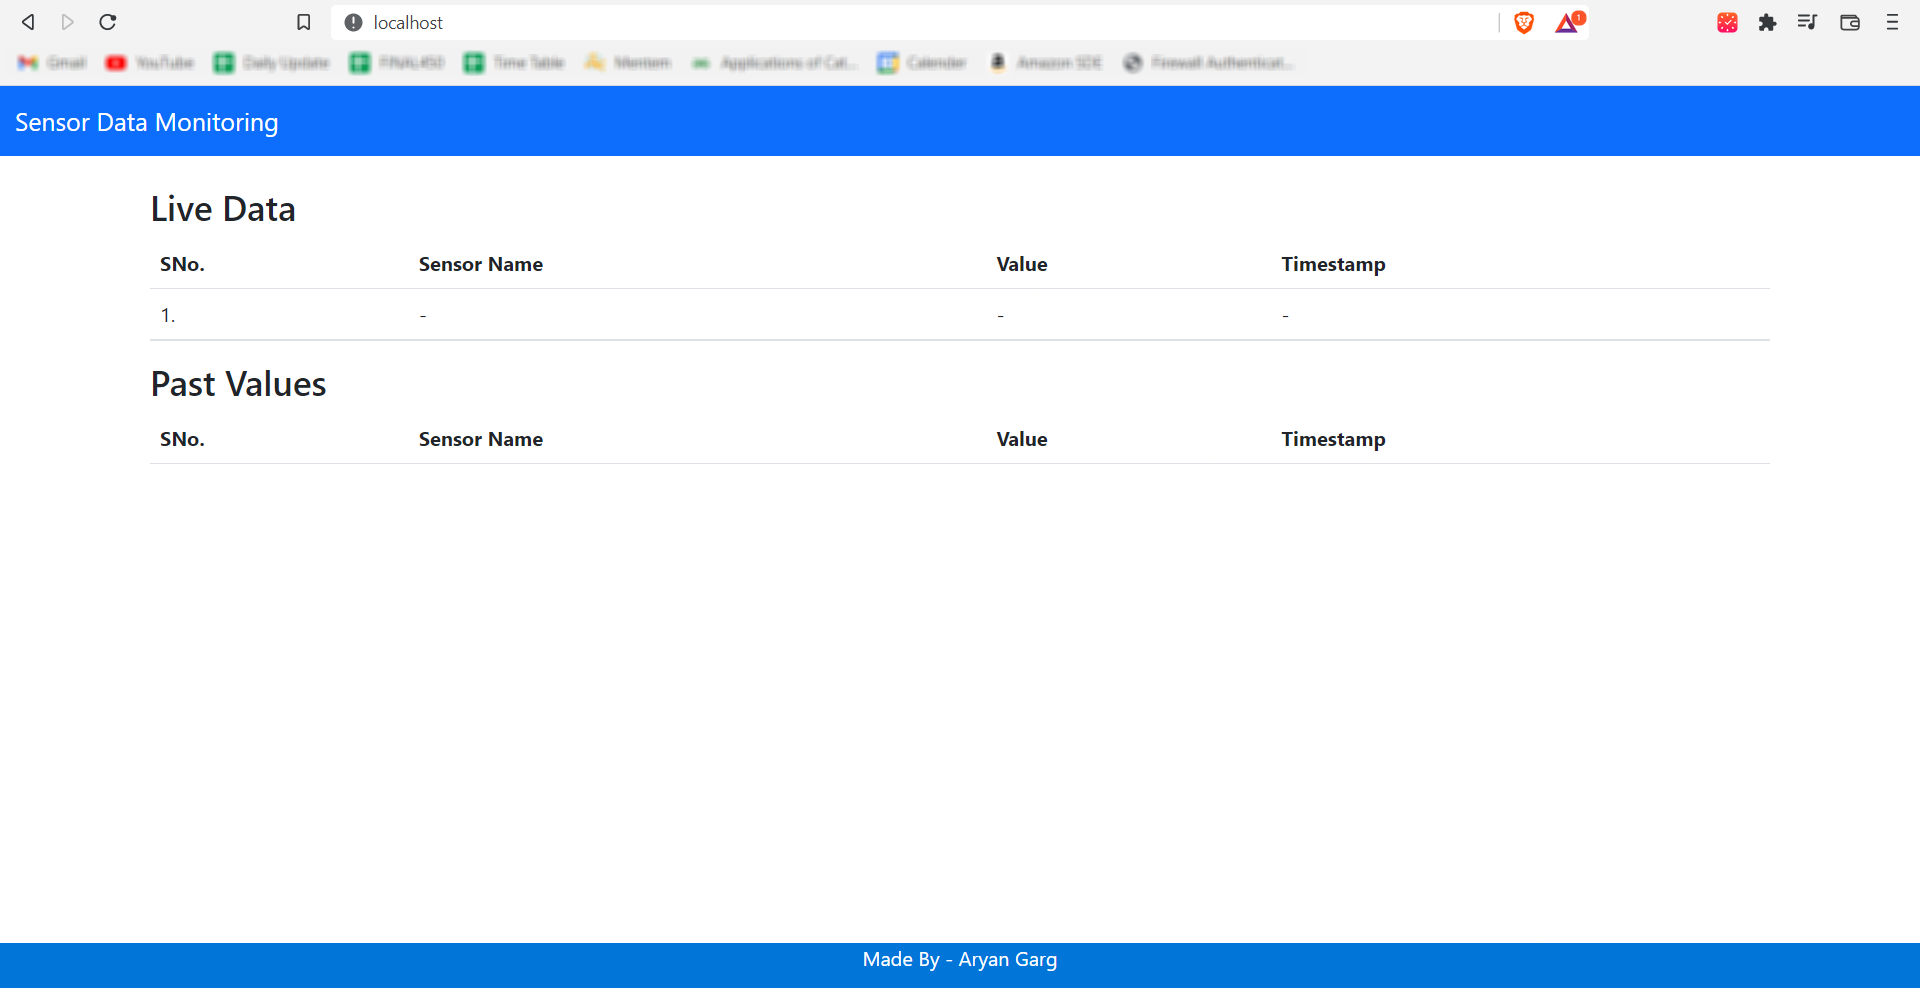
Sensor Data Monitoring
<button class="navbar-toggler" type="button" data-bs-toggle="collapse" data-bs-target="#navbarNavAltMarkup"

aria-controls="navbarNavAltMarkup" aria-expanded="false" aria-label="Toggle navigation">
Live Data
SNo.
Sensor Name
Value
Timestamp
1.
–
–
–
Past Values
SNo.
Sensor Name
Value
Timestamp
Made By – Aryan Garg
<script src="https://cdn.jsdelivr.net/npm/[email protected]/dist/js/bootstrap.bundle.min.js"

integrity="sha384-A3rJD856KowSb7dwlZdYEkO39Gagi7vIsF0jrRAoQmDKKtQBHUuLZ9AsSv4jD4Xa"

crossorigin="anonymous">


function createRow(rowData, i) {

var row = document.createElement("tr");


var serialNo = document.createElement("td");

var sensorName = document.createElement("td");

var sensorValue = document.createElement("td");

var sensorTime = document.createElement("td");


serialNo.innerText = `${i + 1}.`;

sensorName.innerText = rowData.name;

sensorValue.innerText = rowData.data;

sensorTime.innerText = new Date(rowData.time).toLocaleTimeString() + " " + new Date(rowData.time).toDateString();


row.append(serialNo);

row.append(sensorName);

row.append(sensorValue);

row.append(sensorTime);


return row;

}


async function getAllData() {

const settings = {

method: "GET",

headers: {

Accept: "application/json",

"Content-Type": "application/json",

},

};


// Calling the API to get all the data

const response = await fetch("/getAllData", settings);

allData = await response.json();


var n = allData.length;

var liveData = allData[n - 1];


// Filling the current value of the sensor

document.getElementById("sensorNameLive").innerText = liveData.name;

document.getElementById("sensorValueLive").innerText = liveData.data;

document.getElementById("sensorTimeLive").innerText = new Date(liveData.time).toLocaleTimeString() + " " + new Date(liveData.time).toDateString();


// Filling the past data in the table

var dataTable = document.getElementById("dataTable");

dataTable.innerHTML = "";

for (var i = n - 2; i >= 0; i--) {

dataTable.append(createRow(allData[i], n - i - 2));

}

}

getAllData();


// Refresh the page with new data every 5 seconds

setInterval(getAllData, 5000);
Preview of frontend:
Your directory structure will look something like this:
iot_project/
    models/
        Sensors.js
    node_modules/
    views/
        index.ejs
        layout.ejs
    .env
    package-lock.json
    package.json
    server.js
In the next section, we will create APIs to connect it with the Microcontroller.
Creating APIs
In this section, we will create an API to receive requests from the Microcontroller and another API to get all the sensor data to display on the web application.
Create directory named routes/ and a file named sensor.js inside it. Inside this file, we will create our API.
1. API for receiving data from Microcontroller:
API Name – /liveSensorData. The same API name you have to enter in the NodeMCU Code.
router.post("/liveSensorData", async (req, res) => {

const main = [];

let content;

if (process.env.USE_PYTHON_SCRIPT == "true") {

content = JSON.parse(`${JSON.stringify(req.body.data)}`); // For testing through python script.

} else {

content = JSON.parse(`${JSON.stringify(req.body)}`.slice(1, -4)); // For actual purposes.

}

const arr = content.split("|");

arr.forEach((elm) => {

let obj = JSON.parse(elm.replace(/'/gi, `"`));

obj["time"] = new Date().toISOString();

main.push(obj);

});

console.log("Received Value: ", main[0]);

res.json({ msg: "Data received succesfully!" });


// Adding the current data in the database

const newSensor = new Sensor({

time: main[0].time,

data: main[0].data,

});

await newSensor.save();

});
2. API for getting the sensor’s data for the web page
API Name – /getAllData
// @ Get all the data of the sensors

router.get("/getAllData", async (req, res) => {

try {

const data = await Sensor.find();

return res.status(200).json(data);

} catch (err) {

console.log(err);

return res.status(500).json({ msg: "Internal Server Error" });

}

});
3. Complete code for the sensor.js file containing all the above APIs
const express = require("express");

require("dotenv").config();

const router = express.Router();

const Sensor = require("../models/Sensors");
router.post("/liveSensorData", async (req, res) => {

const main = [];

let content;

if (process.env.USE_PYTHON_SCRIPT == "true") {

content = JSON.parse(`${JSON.stringify(req.body.data)}`); // For testing through python script.

} else {

content = JSON.parse(`${JSON.stringify(req.body)}`.slice(1, -4)); // For actual purposes.

}

const arr = content.split("|");

arr.forEach((elm) => {

let obj = JSON.parse(elm.replace(/'/gi, `"`));

obj["time"] = new Date().toISOString();

main.push(obj);

});

console.log("Received Value: ", main[0]);

res.json({ msg: "Data received succesfully!" });
// Adding the current data in the database

const newSensor = new Sensor({

time: main[0].time,

data: main[0].data,

});

await newSensor.save();

});

// @ Get all the data of the sensors

router.get("/getAllData", async (req, res) => {

try {

const data = await Sensor.find();

return res.status(200).json(data);

} catch (err) {

console.log(err);

return res.status(500).json({ msg: "Internal Server Error" });

}

});
module.exports = router;
The coding part is completed, and now we are ready to test our application✨.
Final directory structure:
iot_project/
    models/
        Sensors.js
    node_modules/
    views/
        index.ejs
        layout.ejs
    routes/
        sensor.js
    .env
    package-lock.json
    package.json
    server.js
Testing the application
In this section, we will discuss the two ways to get our application tested.
1. Test application using NodeMCU:
Upload the code given in Section 5 to your NodeMCU and connect it with a Wi-Fi Network.
When your NodeMCU connects, connect your laptop/computer with that same Wi-Fi network.
Note: Please double-check the below two points:
1. You must connect your NodeMCU and PC to the same Wi-Fi network.
2. Your IP address entered in the NodeMCU code must be correct. You can check your IP address by running the ipconfig command in Command Prompt.
Run the development server:
$ nodemon server
You will see that you have started getting the data on the server.

Open your localhost URL (http://localhost/). Then you will also see the data on the web page
2. Test application using a Python Script:
At the beginning of the article, I have to tell you how to test the application without using a microcontroller.
If you remember, in Section-7, in the .env file, I have included a boolean variable named USE_PYTHON_SCRIPT and marked it as false.
We will create a Python language script to send fake requests to our server. And these requests will behave like the actual requests coming from a microcontroller.
In the .env file, mark the variable named USE_PYTHON_SCRIPT as true.
Create a python file and paste the below code inside it.
import requests

import random

import time


for i in range(1, 100):

data = "{'data':" + str(random.randint(10, 500)) + "}"

x = requests.post("http://localhost/liveSensorData", {"data": data})

print(data)

time.sleep(5)
Now, run your development server.
$ nodemon server
After running the server, run the above python script. It will send requests to the server every five seconds.
Conclusion
Find the complete code for that article on my GitHub.
You can also Host this application on a Cloud Server. To learn how to host an AWS website, please refer to the End-to-End Guide for Hosting a NodeJS App.
After hosting, you need to change your IP Address from your local IP to the IP of your cloud server in the NodeMCU Code. Then, your NodeMCU will send data to your cloud server.
In this article, we have discussed the complete steps of sending data of ultrasonic sensors from a microcontroller to a remote web server. Instead of ultrasonic sensors, you can also use various other types of sensors like light, temperature, humidity etc. Or, you can also create a complete monitoring system by connecting multiple sensors with that NodeMCU. For example, you can create your own Air Quality Monitoring System by clicking various gas sensors that detect the concentration of gases like Sulphur dioxide, Nitrogen dioxide, Smoke, etc. And you can monitor all this data in real-time on your dashboard.
Furthermore, the future demand for IoT IN Web Applications is limitless. Advancements in the industrial sector and the field of Artificial Intelligence has increased the demand for these interconnected devices, which can automate and secure diverse form of applications at a mega scale. It is expected that the market for IoT will reach $1 trillion by 2026, and the demand is increasing at an annual growth rate of 24.7%.
Key takeaways of that article:
1. Firstly, we have discussed the meaning of IoT and Microcontrollers.
2. Then, we learned about the wire connections of NodeMCU.
3. After that, we discussed the coding part of NodeMCU.
4. Then, we developed our web application using NodeJS.
5. Finally, we connected our web application with the NodeMCU and wirelessly sent the ultrasonic sensor data.
It is all for today. I hope you have enjoyed the article. If you have any doubts or suggestions, feel free to comment below. Or you can also connect with me on LinkedIn. I will be delighted to get associated with you.
Do check my other articles also.
Thanks for reading, 😊
The media shown in this article is not owned by Analytics Vidhya and is used at the Author’s discretion.
I am currently pursuing my Bachelor of Technology (B.Tech.) in Electrical Engineering and Engineering from the Indian Institute of Technology Jodhpur(IITJ). I am very enthusiastic about Machine learning, and Software Development. Feel free to connect with me on Linkedin.


From [email protected] I have understood the overall concepts. My question is . Can I use my own website with Lixux hosting facility for my Iot project ? Presently I have built a simple project controlling 4 Relays using Node Mcu esp8266 E12. I am using free Arduino Cloud platform plan to remotely controlling my relay-switching. Well, I have my own website. Can I use my website/hosting for this instead of Arduino cloud platform ? Please advise. How to create a database etc ...need classifications please. Thanks danraja