This article was published as a part of the Data Science Blogathon.
Introduction
We may encounter many issues when working on a machine learning project. It is challenging to train and monitor multiple models. It’s possible that each model has unique characteristics or parameters. Assessing and exploiting these models without suitable performance monitoring and model version control tools becomes complicated. Sharing these models with the rest of the team for testing is also challenging. If we have a tool that we can use to keep track of our models, it becomes more convenient. A platform that makes it simple for teams to collaborate to develop effective automated machine learning pipelines.
In this article, we will learn about collaborative machine learning and how to train, track and share our machine learning models using a platform called “Layer.”
Best practices to remember while working on an ML project in a team.
- Central Data Storage: There is a need for centralized data storage to which a team member can get access to save and use the dataset for the project. To save time going over the entire cleaning process for other team members, all cleaned and preprocessed data should be saved in one location.
- Data Validation: The statistical properties of the data may vary over time as more and more samples are added. This is critical since it can impact the model’s accuracy over time.
- Model’s Accessibility: The trained model must be stored somewhere to load when making predictions. It should be handy for other team members to use for experimentation in their projects.
- Model monitoring: As mentioned in data validation, data properties may change over time, affecting the model’s accuracy. So the model’s performance should be monitored continuously to detect the degradation in its performance.
- Model versioning: While training the model, we may use different features, models, or hyperparameters to create different models. Therefore it becomes crucial to track these models to gauge their performances and improve their accessibility to the one using them.
What is Layer?
The layer is a platform for building production-level machine learning pipelines. After uploading our data and model to this platform, we can easily train and retrain our models. It seamlessly supports model version control and performance tracking. We can share data and models, making it a simple collaborative machine learning platform. Team members can review and evaluate their peers’ model development cycles using model versioning.
Due to a lack of coordination, teams often spend time doing redundant work. Layer functions like a central repository for data and models, letting team members access data used in the process without having to preprocess it again, reducing repetitive efforts. The automated version control allows you to quickly switch back to the earlier versions of the model and recreate previously acquired results.
The wonderful thing about Layer is that we don’t have to modify our present programming methods or platforms. We can use Layer’s capabilities with just a few lines of code.
Implementation
We will employ the water quality dataset to train a classification model to probe water potability using factors like pH, hardness, and other chemical properties in our machine learning project. During the retraining of our model, we will change some parameters. In most cases, older versions of the model are lost during this procedure. However, in this case, we will employ the Layer platform to aid in model version control and compare the performance of different model versions.
To install Layer, use this code.
!pip install -U layer -q
Import necessary libraries
from layer.decorators import dataset, model,resources
from sklearn.ensemble import RandomForestClassifier
from sklearn.model_selection import train_test_split
from sklearn.metrics import accuracy_score
import pandas as pd
import numpy as np
import layer
from layer import Dataset
Register and Login
The layer requires you to first register and log in. When you run the following code, a prompt will appear to paste a key, and the link to the key will also appear. Copy and paste the URL into your browser, then log in to your Layer account to find the key; copy this key and enter it into the prompt.
import layer
layer.login()
Initialize Your First Layer Project
It’s time to start working on your first Layer Project. Your entire project can be found at https://app.layer.ai.
layer.init("new_project")
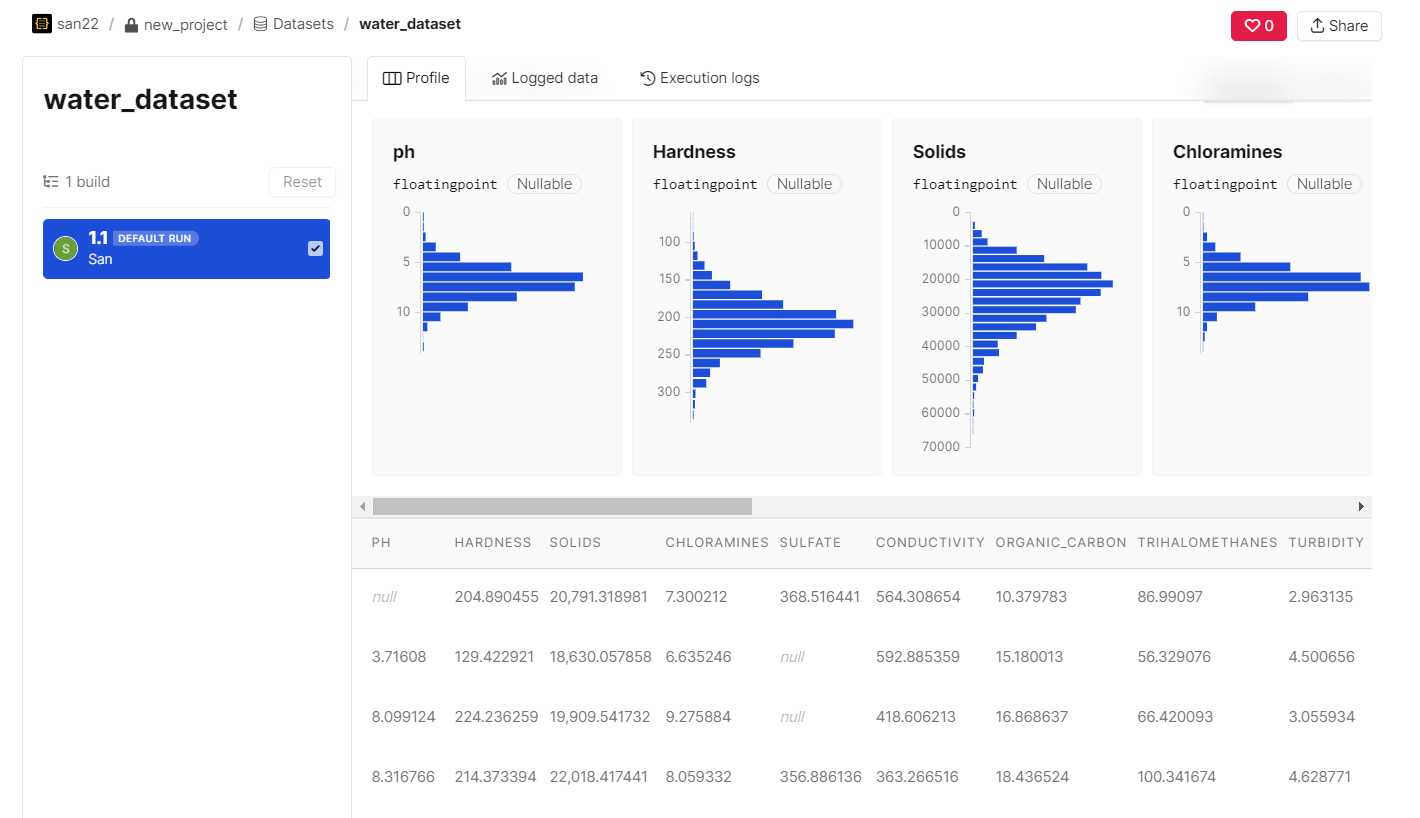
Load the Dataset
To load the data into the Layer project, we will use the decorator @dataset and specify the dataset’s name and the path to it using the decorator @resources.
@dataset("water_dataset")
@resources(path="./")
def create_dataset():
    data = pd.read_csv('water_potability.csv')
    return data
Run this to build the dataset in your layer project
layer.run([create_dataset])
You can navigate inside your project to access the dataset.
Train Model
To our training function train(), we will add the decorator @model to register it with Layer. To do so, the function must return the model object. The layer.log() function logs all the parameters defined to the Layer dashboard.
@model(name='classification_model',dependencies=[Dataset('water_dataset')])
def train():
import seaborn as sns
import matplotlib.pyplot as plt
from sklearn.metrics import accuracy_score
from sklearn.metrics import confusion_matrix, ConfusionMatrixDisplay
from sklearn.metrics import average_precision_score, roc_auc_score, roc_curve,precision_recall_curve
parameters = {
"test_size": 0.20,
"random_state": 20,
"n_estimators": 150
}
layer.log(parameters)
# load the dataset from layer
df = layer.get_dataset("water_dataset").to_pandas()
df.dropna(inplace=True)
features_x = df.drop(["Potability"], axis=1)
target_y = df["Potability"]
X_train, X_test, y_train, y_test = train_test_split(features_x, target_y, test_size=parameters["test_size"], random_state=parameters["random_state"])
random_forest = RandomForestClassifier(n_estimators=parameters["n_estimators"])
random_forest.fit(X_train, y_train)
y_pred = random_forest.predict(X_test)
layer.log({"accuracy":accuracy_score(y_test, y_pred)})
cm = confusion_matrix(y_test, y_pred, labels=random_forest.classes_)
disp = ConfusionMatrixDisplay(confusion_matrix=cm, display_labels=random_forest.classes_)
disp.plot()
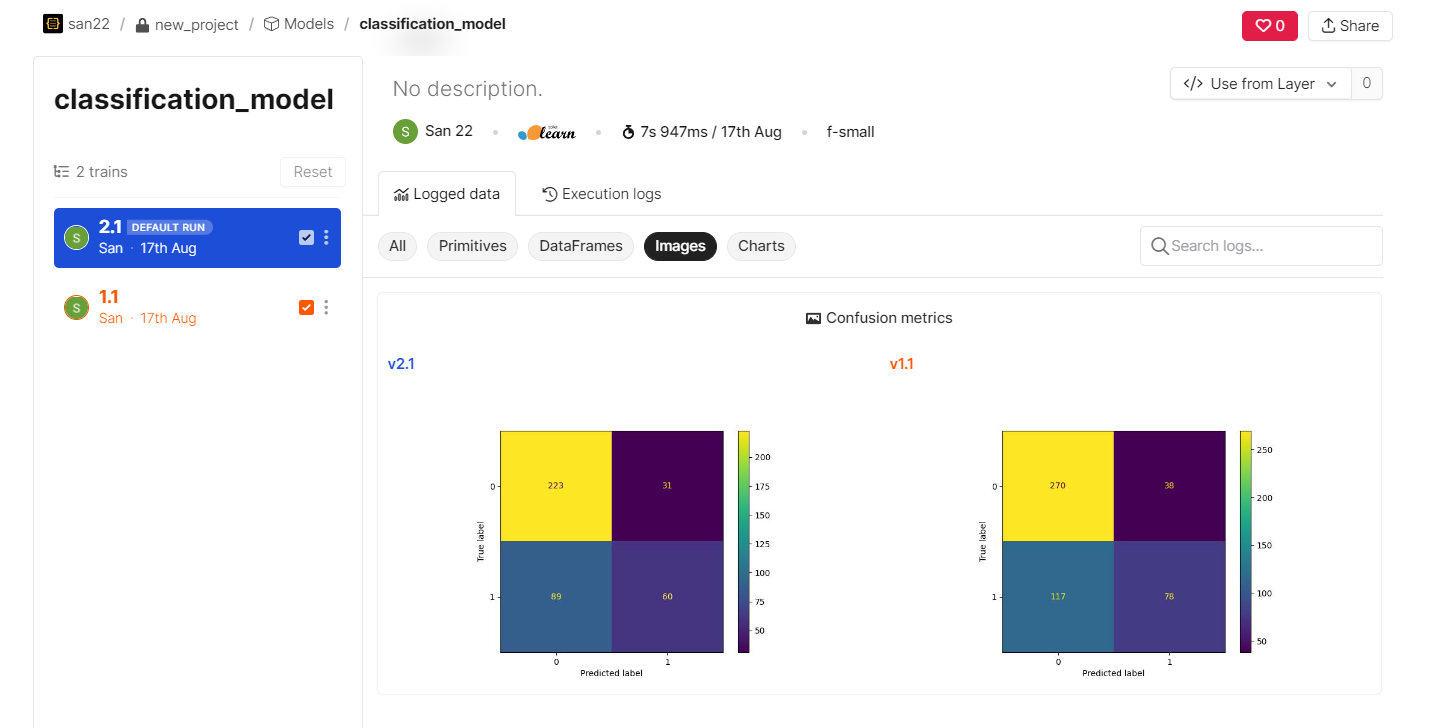
layer.log({"Confusion metrics" : plt.gcf()})
probs = random_forest.predict(X_test)
# Calculate ROC AUC
auc = roc_auc_score(y_test, probs)
layer.log({"AUC":f'{auc:.4f}'})
sample_preds = X_test
sample_preds["predicted"] = y_pred
layer.log({"Sample predictions":sample_preds.head(100)})
return random_forest
To log the parameter and upload the trained model, pass the training function to Layer.
layer.run([train])
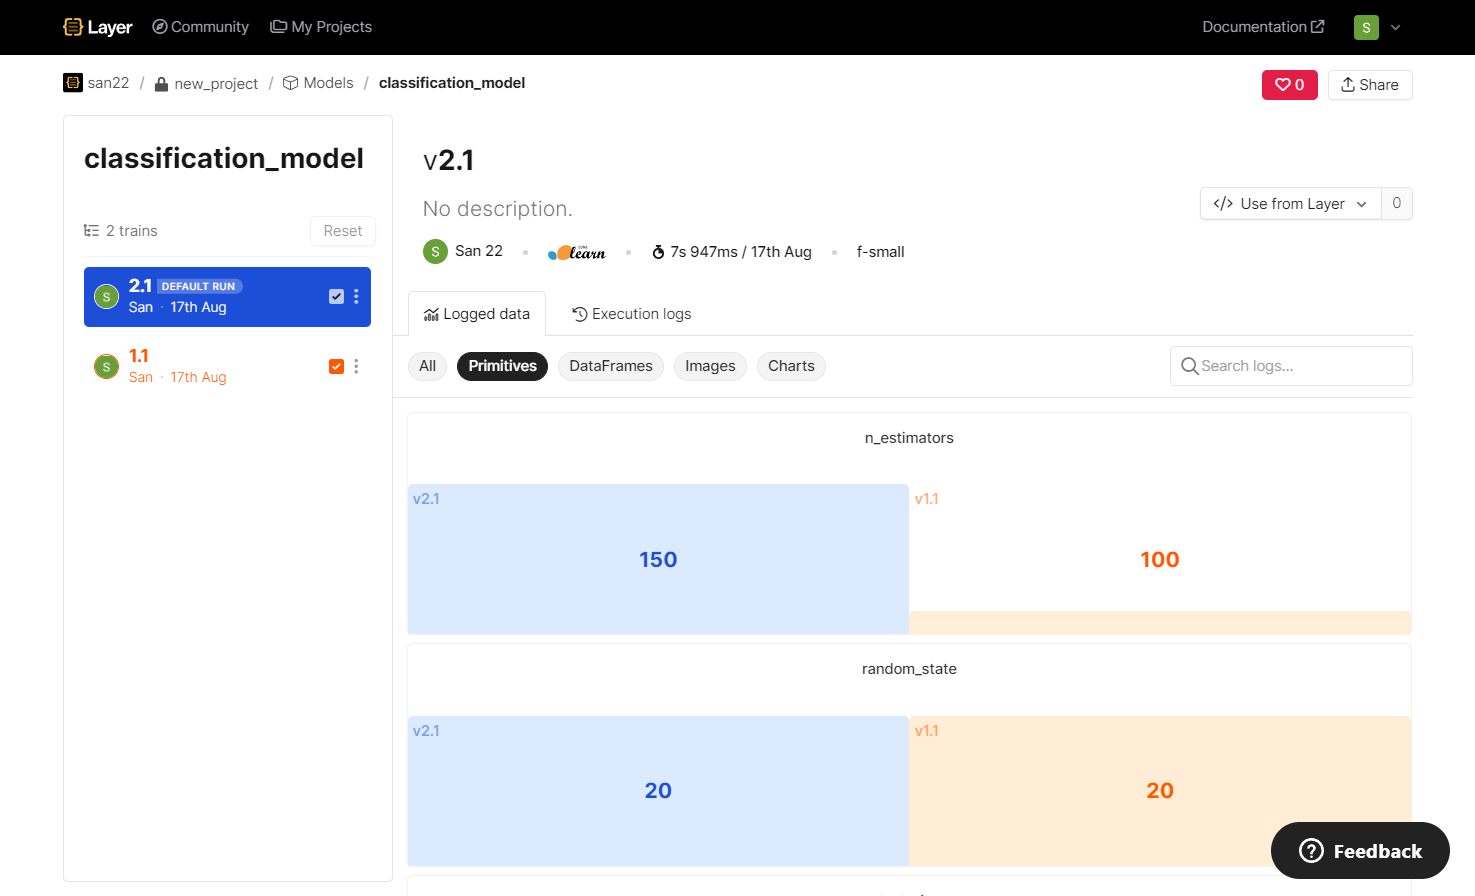
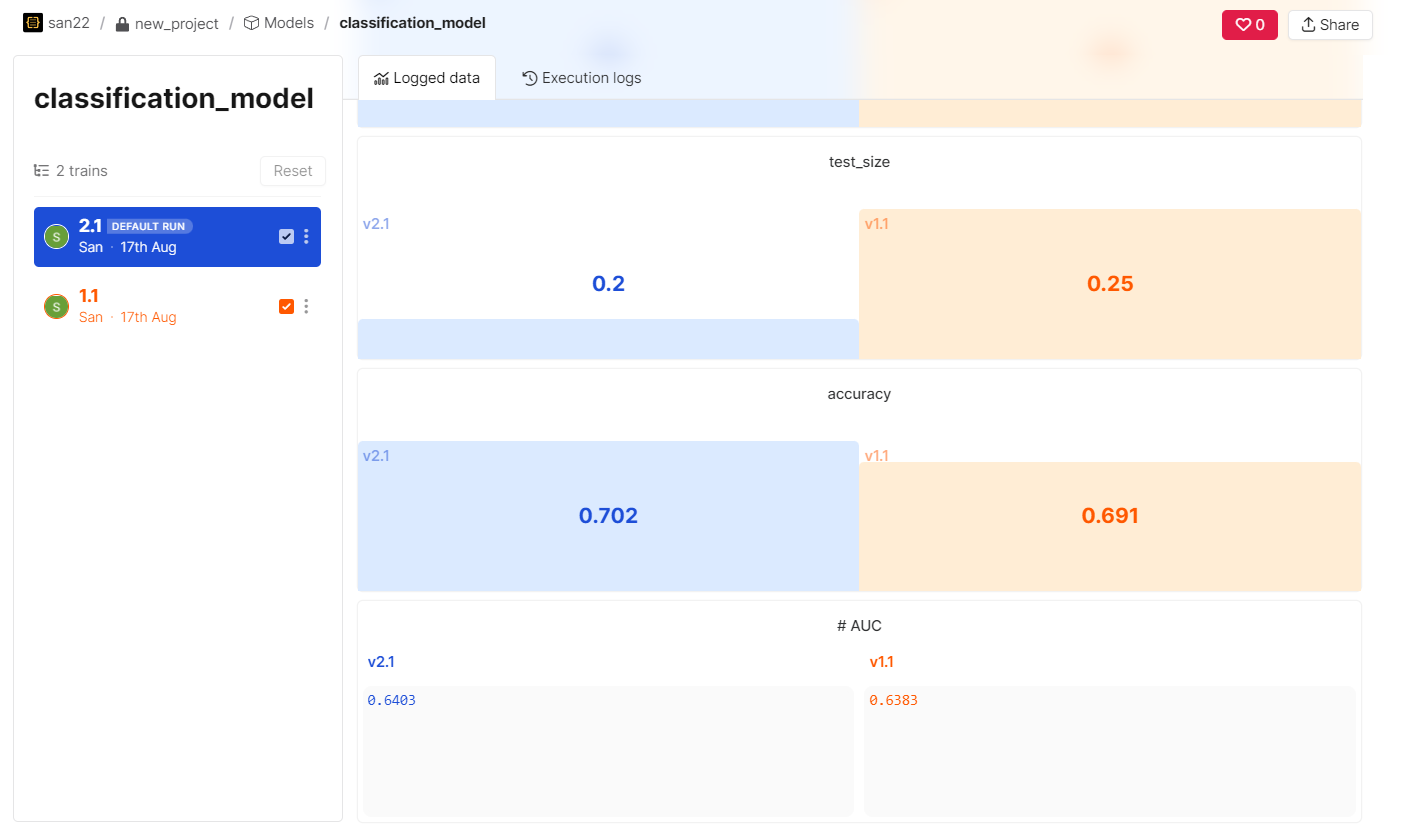
Comparing Training Results
Open the Layer project there; you will see the uploaded models and the datasets. All the parameters and graphs you have logged will be there, along with the model version. Every time you run the training function, a new version of the model gets uploaded along with all the logged parameters. This makes it easy to compare the performances of all models and use the earlier version.
We can compare the logged parameters and results such as test data size, hyperparameters, accuracy, and ROC-AUC score.
The following shows the sample predictions.
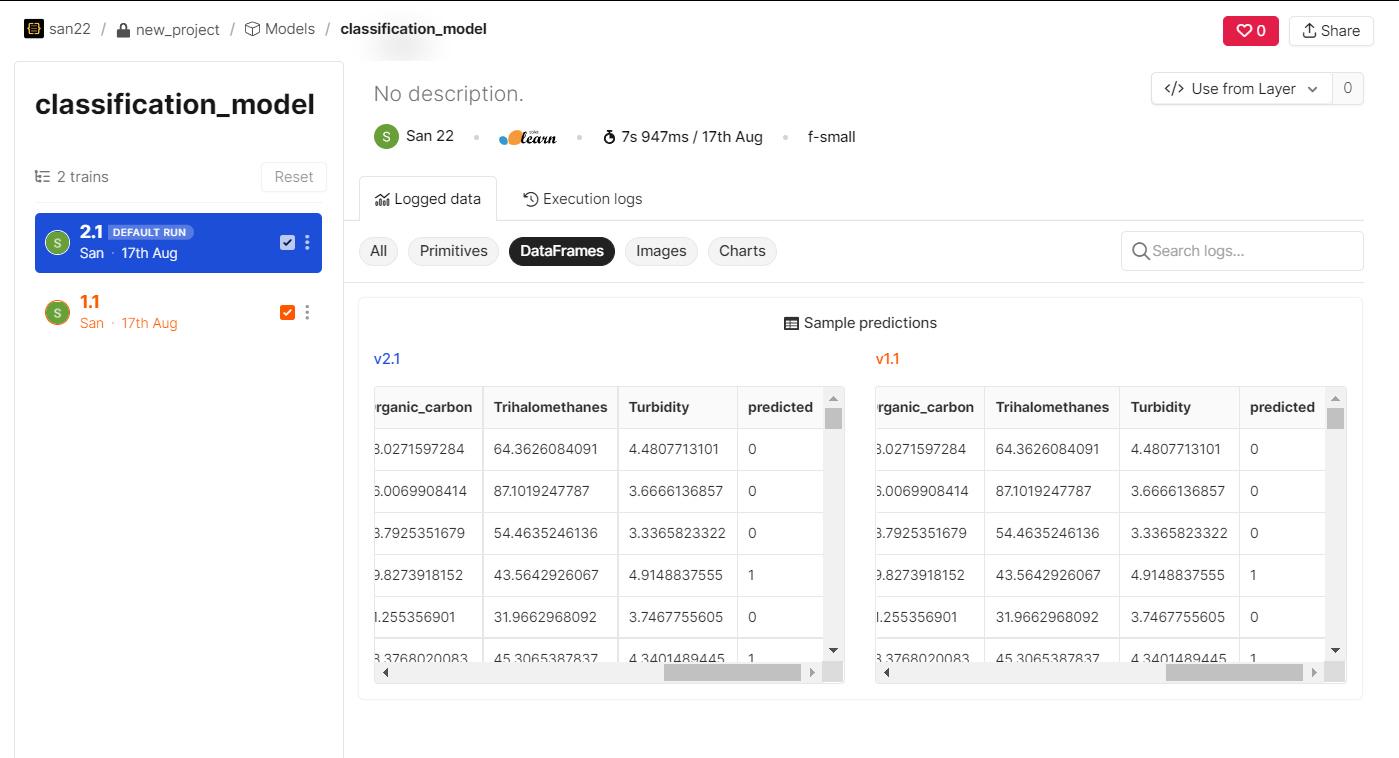
Different model versions’ logged graphs can also be visualized and compared.
Fetching an ML model from Layer
After we have trained and uploaded the model to the Layer platform, we may load the desired version of the model to make predictions. With the help of this code, we can get the necessary model version from the layer app.
import layer
model = layer.get_model("san22/new_project/models/classification_model:2.1").get_train()
This model object can be a regular model to perform predictions based on the input data.
Conclusion
In this article, we learned about the many issues that teams may encounter in the machine learning industry when collaborating and managing model versions. Later, we saw some of the best practices for working on ML projects as a team. In this post, we designed a Layer project that considers all the challenges that teams face in an ML project. Important takeaways from this article:
- We learned how to use Layer- a collaborative ML platform.
- We used automated model version control with the help of this platform.
- By logging the model parameters and the results, we could compare the results of different model versions.
The media shown in this article is not owned by Analytics Vidhya and is used at the Author’s discretion.


