Introduction
Machine Learning and Deep Learning models are often created and run either in the Jupyter notebook or in IDE. Very few of them get deployed, and the deployment of these models usually tends to be website based. Rarely do developers convert them into standalone apps due to a lack of not knowing how? These windows executable files can come in really handy when you want to share a DL/ML model with someone who does not have an IDE.
In reality, it is very easy to deploy machine learning and deep learning models into windows applications. There are posts online on how to add the GUI functionality to ML and DL models using the infamous Tkinter library. But most of them just run the model through an IDE and do not show how to deploy these GUI apps into a Windows application, that is, into an executable file. In this article, we will take it a step further; by using the Pyinstaller and Tkinter libraries, we will convert the deep learning model with a GUI made using Tkinter into an executable file.
For this, we will use DenseNet, a pre-trained model created using Convolutional Neural Networks to classify images. For this DenseNet model, we will create a UI using the Tkinter module, so the user can upload an image through the Tkinter UI and get the predicted label. And finally, we will convert this whole python file into an executable file using the Pyinstaller module.
Learning Objectives
- Understanding the process of building a user interface for deep learning models using the Tkinter Framework.
- Learn how to import pre-trained models such as Densenet and load them with imagenet weights to improve the model’s performance on fresh photos.
- Learning how to divide different steps, like processing the image and classifying them into functions.
- Understanding how to utilize the Pyinstaller module to bundle the Tkinter application and the deep learning model into a single executable file for distribution.
- Learn how to distribute deep learning models as Windows executables and make them user-friendly.
This article was published as a part of the Data Science Blogathon.
Table of Contents
- Building the Deep Learning Model
- Creating the Model’s Front-End: User Interface
- Wrapping Up Everything: Creating a Main Function
- Packaging the Application: Wrapping Up Your Model
- Conclusion
Building the Deep Learning Model
In this section, we will discuss the DenseNet121 model and how to import it with pre-trained weights. To get started, make sure you have TensorFlow and PIL library installed. These libraries are necessary for downloading the DenseNet model and PIL for preprocessing the images before they can be sent to the model for classifying it.
pip install tensorflow
pip install Pillow
.png)
Source: commons.wikimedia
The following will download the TensorFlow and pillow and the supporting libraries to get started with this section.
We’re using a pre-trained model here; building it from scratch will not be necessary. We only need to import the model. One must ensure that the model’s weights are supplied to the DenseNet so that we do not have to train the model again. This may be accomplished by:
from tensorflow.keras.applications.densenet import DenseNet121
from tensorflow.keras.preprocessing import image
from tensorflow.keras.applications.densenet import preprocess_input, decode_predictions
import numpy

model = DenseNet121(weights='imagenet')
To use the Densenet model, we first import the model from the tensorflow.keras.applications module and then load the pre-trained weights of the model by assigning the variable weights with ‘imagenet’.
The ImageNet dataset, a massive image dataset with millions of photos and thousands of entity types, is often used for developing and testing deep learning models. The DenseNet model was trained and tested on ImageNet.
The image module is imported from TensorFlow, which helps load the image from a specific file path and convert it into an array of pixels. The preprocess_input() method from densenet is used to preprocess the image array before sending it to the model to classify. At the same time, the decode_predictions() method is used to decode the model’s output into human-readable classes. DenseNet is trained to predict 1000 classes. Hence this decode_predictions() method maps the output to one of these classes. The input shape for the DenseNet121 model is (1,224,224,3).
To better understand how to use these modules, let’s take a dog image and pass it to the model so it can predict
img_path = 'dog.jpg'
img = image.load_img(img_path, target_size=(224, 224))
img_array = image.img_to_array(img)
img_expanded = np.expand_dims(img_array, axis=0)
img_processed = preprocess_input(img_expanded)

preds = model.predict(img_processed)
results = decode_predictions(preds, top=1)[0]
Now we can see how the load_img() method is used to load the image into python from the path we have given. The next step converts the image into an array of pixels. Now the image is of the size (224, 224, 3). Deep learning models take inputs in batches of images. So we need to convert this image array into a batch of single image arrays. This is done using the expand_dims() method from the NumPy library which converts the size of the image array from (224,224,3) to (1,224,224,3).
Finally, we preprocess the input image array and give it to the model for prediction. The output returned from the model is the score that is the prob. (probability) of the 1000 classes. As we need only the label with the highest prob. score, we use the decode_predictions() method to do this.
As I have taken a pre-trained model here, I’m using these methods. When creating a model from scratch, you can use the appropriate preprocessing steps you have used in place of what I have written above.
Creating the Model’s Front-End: User Interface
Now, it’s time to create a UI for our model. So in this section, we will create a simple UI so that the user can interact with it and provide the image path for its prediction. For this, first, you need to download the Tkinter library and can do this by using the pip command:
pip install tk
This installs the Tkinter library, and now we can start creating the UI. Let’s go through the following code to create a simple UI.
import tkinter
app = tkinter.Tk()

app.geometry("250x325")

app.title("Image Classifier")

upload = tkinter.Button(text="Upload")

upload.place(relx=0.5, rely=0.5, anchor='center')

app.mainloop()
This creates a minimal UI for us, which includes a button named Upload and keeps it in the middle of the window. The application title will be set to “Image Classifier,” and the UI size will be 250×325. The output of the code can be inferred below:
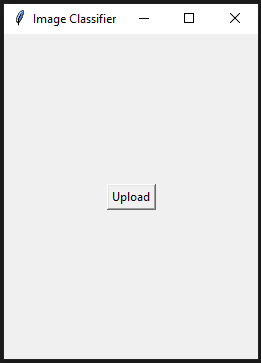
The Basic UI for the Application
Clicking on the Upload button does nothing. Here, we need to add a functionality that, when a user interacts with the upload button, the user must be able to choose an image path.
For this, we use the filedialog module from the Tkinter library. This module allows a user to open a file path, whenever the user interacts with the upload button. This can be implemented in our code as follows:
def getImage():
    path = filedialog.askopenfilename()
    return path
upload_button = tkinter.Button(text="Upload",command=getImage)
Here we have imported fileddialog from Tkinter and used one of its methods askopenfilename(). This askopenfilename() method allows the Tkinter application to open a file explorer, and now the user can select an image from it. And when the user selects an image, the image path will be saved in the path variable.
Now for all this to be worked, the getImage() function needs to be passed like a command to the upload so that when the user clicks on the Upload button, a window will open. The user will be able to navigate to the image, and the respective image path will be passed to the path variable.
In the next step, we will create a function that takes the image path and return the preprocess image array into an output. The function will look as follows:
def preprocess(path):
    img = image.load_img(path, target_size=(224, 224))
    img_array = image.img_to_array(img)
    img_expanded = numpy.expand_dims(img_array, axis=0)
    img_processed = preprocess_input(img_expanded)
    return img_processed
The function preprocess() will take the file path, then loads it from the load_img() method and, at the same time, resize it to a shape of (224, 224, 3), where the 3 indicates 3 dims(dimensions), one each for R, G, and B. Then it gets converted it into an array of pixels.
Now, the expand_dims() expands by the image array to a higher dim(dimension). The shape of the image array goes from (224, 224, 3) to (1, 224, 224, 3), because we know that all deep learning models take inputs in batches of images. Here basically, we are creating a batch but with only one image.
Finally, we send it to the preprocess_input() and return the processed image array.
Following this, we will create another function, which takes this processed image array, passes it to the model for prediction, and returns the output.
def classify(processed_img):
    preds = model.predict(processed_img)
    results = decode_predictions(preds, top=1)[0]
    return results
The following function, classify() will take the processed image array and passed to the predict function. The result, the array of probabilities, is stored in the variable preds. Then the class with the highest prob. (probability) score is taken and sent to the decode_predictions() function, which then outputs an array containing the respective label and the prob. score of the highest prob. class.
Wrapping Up Everything – Creating a Main Function
In this article, we will now have to define a main function that calls these three functions one by one, from generating the file path to getting the results and then displaying them in the UI.
def image_prediction():
    path = getImage()
    input_img = preprocess(path)
    results = classify(input_img)
    result_label.config(text="")
    result_label.config(text=results[0][1] + ": " + str(results[0][2])
)
upload_button = tkinter.Button(text="Upload", command=image_prediction)
upload_button.place(relx=0.5, rely=0.5, anchor='center')
result_label = tkinter.Label(text="")
The main function image_prediction() is the command to the Upload button. So when the user clicks on the upload button, the image_prediction() function will get called. When this function gets called, even the getImage() function will be called, and this function is responsible for opening a window when the Upload button is pressed so that the user can select the Image.
Then after the user selects the image, the path gets stored with the image path. Then, this image path acts like an argument to the preprocess() function which preprocesses the image, and then finally, after classify() function, we get the output label.
Here we created a variable called result_label. Through this function, we will display the output label. We can do this by calling the config() function and sending it the text we want to display. Before displaying the label, we want to ensure that no output is displayed before this, so send an empty string to the config() method. Then finally, we pass the label having the highest prediction along with its prediction score.
The entire code for this article can be found below:
import numpy
import tkinter
from tkinter import filedialog
from tensorflow.keras.applications.densenet import DenseNet121
from tensorflow.keras.preprocessing import image
from tensorflow.keras.applications.densenet import  preprocess_input,decode_predictions

model = DenseNet121(weights='imagenet')

app = tkinter.Tk()
app.geometry("250x325")
app.title("Image Classifier")

def getImage():
    path = filedialog.askopenfilename()
    return path

def preprocess(path):
    img = image.load_img(path, target_size=(224, 224))
    img_array = image.img_to_array(img)
    img_expanded = numpy.expand_dims(img_array, axis=0)
    img_processed = preprocess_input(img_expanded)
    return img_processed

def classify(processed_img):
    preds = model.predict(processed_img)
    results = decode_predictions(preds, top=5)[0]
    return results

def image_prediction():
    path = getImage()
    input_img = preprocess(path)
    results = classify(input_img)
    result_label.config(text="")
    result_label.config(text=results[0][1] + ": " + str(results[0][2]))

upload_button = tkinter.Button(text="Upload", command=image_prediction)
upload_button.place(relx=0.5, rely=0.5, anchor='center')

result_label = tkinter.Label(text="")
result_label.place(relx=0.5, rely=0.6, anchor='center')

app.mainloop()
Packaging the Application: Wrapping Up Your Model
Finally, we are done with creating a model and a UI through which one can send the image and get the prediction for that Image. This section will discuss how to package this entire script and make it an application. By the end of this section, you will be able to learn how to convert python scripts into executable files.
The first thing you have to do is make sure you have the pyinstaller module installed. If you haven’t, then you can do it by using the pip command:
pip install pyinstaller
This will install the PyInstaller library. To convert the python code file into an executable, you must open CMD and navigate to the folder where you have written this file. Then you have to enter the following commands:
pyinstaller --onefile classifier.py
My python code is written under a file named classifier.py, so I have used that in the above command. You can even run the pyinstaller without the –onefile command. But what –onefile command does is creates your script into a single executable file. At the same time, calling pyinstaller without –onefile, an executable file is created along with other files.

End part after running the command
Above, you can see that at the end, it’s showing that the exe was completed successfully. Two folders dist and build are created and a .spec file is created. The executable file for our model can be found in the dist folder.
Let’s test our application by running it.
.png)
Testing the Final Application
The above images show the running of our application. A golden retriever image is passed to the classifier, and the application correctly classifies and returns the label along with the prediction score.
Conclusion
To summarise, converting deep learning projects into windows apps is a hectic process, but it is achievable with the right approaches and tools. This post covered building a deep learning model into a Standalone executable using the PyInstaller and Tkinter packages. We have described how to develop the application with Tkinter, add the pre-trained Densenet model to the application, and package the code with PyInstaller.
The following are some key takeaways from the article:
- Tkinter can be used to develop a UI for an application in which a user can upload a pic and receive an image forecast.
- Pyinstaller is a library that allows the Tkinter application and the deep learning model to be packaged together.
- These executables can be easily shared with others.
Overall, this post has presented a practical approach to deploying deep learning projects into executables, allowing developers to share their models with a larger audience easily and users to employ the models’ capabilities.
The media shown in this article is not owned by Analytics Vidhya and is used at the Author’s discretion.
I work as a Developer in the field of Data Science. I constantly spend time learning new things be it related to AI, DataSceine, and CyberSecurity. Deep learning and machine learning are two topics that I find particularly fascinating, and Python is my preferred language for programming. Cyber Security is another field that I'm touching upon recently. I have experience with large-scale data analysis, and I have a solid grasp of a variety of deep learning and machine learning approaches, including neural networks, regression models, and natural language processing. I'm eager to take on new challenges and make a meaningful contribution to the industry, so I'm constantly seeking for ways to enlarge and deepen my knowledge and skills in the subject.


