Introduction
Chatbots, which offer automated support and individualised experiences, have revolutionised the way that businesses connect with their customers. Recent developments in artificial intelligence (AI) have raised the bar for chatbot functionality. In-depth instructions on creating a custom chatbot using OpenAI, a leading AI platform renowned for its potent language models, are provided in this detailed book.
This article was published as a part of the Data Science Blogathon.
What are Chatbots?
Chatbots are computer programmes that mimic human conversations. They employ natural language processing (NLP) techniques to comprehend what users are saying and answer in a relevant and helpful manner.

Because of the availability of massive datasets and excellent machine learning algorithms, chatbots have gotten increasingly intelligent in recent years. These capabilities enable chatbots to better grasp user intent and deliver replies that sound more genuine.
Some concrete instances of how chatbots are now being used:
- Chatbots in customer service may answer commonly asked inquiries and give help to consumers around the clock.
- Chatbots in marketing may assist firms in qualifying leads, generating leads, and answering queries about products or services.
- Chatbots in education can give personalised coaching and allow students to study at their own speed.
- Chatbots in healthcare can give information about health concerns, answer drug inquiries, and link patients with physicians or other healthcare professionals.
Introduction to OpenAI
OpenAI is at the forefront of artificial intelligence research and development. It has led the way in the creation of cutting-edge language models that excel at interpreting and creating natural language.
OpenAI provides sophisticated language models such as GPT-4, GPT-3, Text-davinci which is extensively used for NLP activities such as chatbot building and many more.
Advantages of Using Chatbots
Let’s first comprehend some benefits of using chatbots before getting into the coding and implementation:
- 24/7 Availability: Chatbots may offer users round-the-clock assistance, doing away with the limits of human customer service representatives and allowing businesses to meet their clients’ demands whenever they arise.
- Improved Customer Service: Chatbots may respond to frequently requested inquiries in a timely manner by providing accurate and rapid answers. This improves the overall quality of client service.
- Cost Savings: Companies can save a lot of money over time by automating customer support chores and reducing the need for a big support staff.
- Increased Efficiency: Chatbots can manage several conversations at once, guaranteeing rapid responses and cutting down on user wait times.
- Data Collection and Analysis: Chatbots may gather useful information from user interactions, giving companies an understanding of client preferences, wants, and pain spots. Using this data, improve the products and services.
Let’s go on to the step-by-step breakdown of the code needed to build a bespoke chatbot using OpenAI now that we are aware of the advantages of chatbots.
Steps
Step 1: Importing the Required Libraries
We need to import the necessary libraries. In the provided code, we can see the following import statements:
!pip install langchain
!pip install faiss-cpu
!pip install openai
!pip install llama_index

# or you can use

%pip install langchain
%pip install faiss-cpu
%pip install openai
%pip install llama_index
Make sure you have these libraries installed before moving on.
Step 2: Setting Up the API Key
To interact with the OpenAI API, you need an API key. In the provided code, there is a placeholder indicating where to add your API key:
To find you API Key, go to openai website and create a new open ai key.
import os
os.environ["OPENAI_API_KEY"] = 'Add your API Key here'
Replace ‘Add your API Key here’ with your actual API key obtained from OpenAI.
Step 3: Creating and Indexing the Knowledge Base
In this step, we will create and index the knowledge base that the chatbot will refer to for answering user queries. The provided code demonstrates two approaches: one for loading documents from a directory and another for loading an existing index. Let’s focus on the first approach.
from llama_index import GPTVectorStoreIndex, SimpleDirectoryReader
documents = SimpleDirectoryReader('/Users/tarakram/Documents/Chatbot/data').load_data()
print(documents)
Use the SimpleDirectoryReader class to load the documents from a specific directory.
Replace ‘/Users/tarakram/Documents/Chatbot/data’ with the path to your directory containing the knowledge base documents. The load_data() function loads the documents and returns them.
After loading the documents, we need to create an index using the GPTVectorStoreIndex class:
index = GPTVectorStoreIndex.from_documents(documents)This step creates the index using the loaded documents.
Step 4: Persisting the Index
To avoid the need for rebuilding the index every time the code runs, we can persist the index to disk. In the provided code, the following line is used to save the index:
# Save the index
index.storage_context.persist('/Users/tarakram/Documents/Chatbot')
Make sure to replace ‘/Users/tarakram/Documents/Chatbot’ with the desired directory path where you want to save the index.
By persisting the index, we can load it in subsequent runs without incurring additional token costs.
Step 5: Loading the Index
In case you want to load the previously saved index, you can use the following code:
from llama_index import StorageContext, load_index_from_storage

# rebuild storage context
storage_context = StorageContext.from_defaults
                  (persist_dir='/Users/tarakram/Documents/Chatbot/index')
# load index
index = load_index_from_storage(storage_context)
Ensure that you update ‘/Users/tarakram/Documents/Chatbot/index’ with the correct directory path where you save the index.
Step 6: Creating the Chatbot Class
Now, let’s move on to creating the actual chatbot class that interacts with the user and generates responses. Here’s the provided code:
# Chat Bot

import openai
import json

class Chatbot:
    def __init__(self, api_key, index):
        self.index = index
        openai.api_key = api_key
        self.chat_history = []

    def generate_response(self, user_input):
        prompt = "\n".join([f"{message['role']}: {message['content']}"
                           for message in self.chat_history[-5:]])
        prompt += f"\nUser: {user_input}"
        query_engine = index.as_query_engine()
        response = query_engine.query(user_input)

        message = {"role": "assistant", "content": response.response}
        self.chat_history.append({"role": "user", "content": user_input})
        self.chat_history.append(message)
        return message

    def load_chat_history(self, filename):
        try:
            with open(filename, 'r') as f:
                self.chat_history = json.load(f)
        except FileNotFoundError:
            pass

    def save_chat_history(self, filename):
        with open(filename, 'w') as f:
            json.dump(self.chat_history, f)
The Chatbot class has an __init__ method to initialize the chatbot instance with the provided API key and index.
The generate_response method takes user input, generates a response using the index and OpenAI API, and updates the chat history.
The load_chat_history and save_chat_history methods are used to load and save the chat history, respectively.
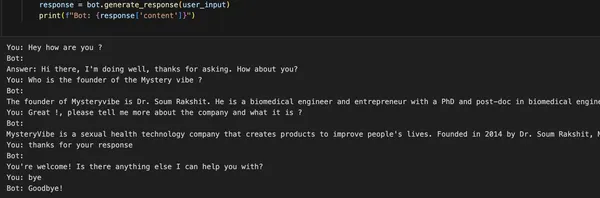
Step 7: Interacting with the Chatbot
The final step is to interact with the chatbot. Here’s the provided code snippet that demonstrates how to use the chatbot:
bot = Chatbot("Add your API Key here ", index=index)
bot.load_chat_history("chat_history.json")

while True:
    user_input = input("You: ")
    if user_input.lower() in ["bye", "goodbye"]:
        print("Bot: Goodbye!")
        bot.save_chat_history("chat_history.json")
        break
    response = bot.generate_response(user_input)
    print(f"Bot: {response['content']}")
To use the chatbot, create an instance of the Chatbot class by passing your OpenAI API key and the loaded index.
Replace “Add your API Key here ” with your actual API key. The load_chat_history method is used to load the chat history from a file (replace “chat_history.json” with the actual file path).
Then, a while loop is used to repeatedly get user input and generate responses until the user enters “bye” or “goodbye.”
The save_chat_history method is used to save the chat history to a file.
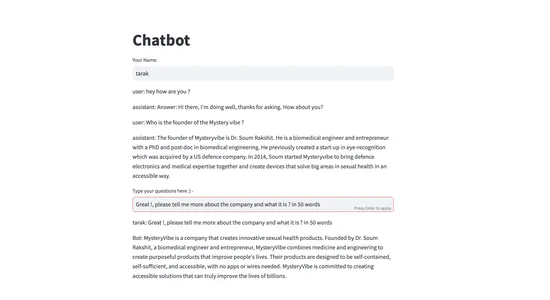
Step 8: Building a Web Application using Streamlit
The code provided also includes a web application built using Streamlit, allowing users to interact with the chatbot through a user interface. Here’s the provided code:
import streamlit as st
import json
import os

from llama_index import StorageContext, load_index_from_storage

os.environ["OPENAI_API_KEY"] = 'Add your API Key here '

# rebuild storage context
storage_context = StorageContext.from_defaults
                 (persist_dir='/Users/tarakram/Documents/Chatbot/index')
# load index
index = load_index_from_storage(storage_context)

# Create the chatbot
# Chat Bot

import openai
import json

class Chatbot:
    def __init__(self, api_key, index, user_id):
        self.index = index
        openai.api_key = api_key
        self.user_id = user_id
        self.chat_history = []
        self.filename = f"{self.user_id}_chat_history.json"

    def generate_response(self, user_input):
        prompt = "\n".join([f"{message['role']}: {message['content']}"
                           for message in self.chat_history[-5:]])
        prompt += f"\nUser: {user_input}"
        query_engine = index.as_query_engine()
        response = query_engine.query(user_input)

        message = {"role": "assistant", "content": response.response}
        self.chat_history.append({"role": "user", "content": user_input})
        self.chat_history.append(message)
        return message

    def load_chat_history(self):
        try:
            with open(self.filename, 'r') as f:
                self.chat_history = json.load(f)
        except FileNotFoundError:
            pass

    def save_chat_history(self):
        with open(self.filename, 'w') as f:
            json.dump(self.chat_history, f)

# Streamlit app
def main():
    st.title("Chatbot")

    # User ID
    user_id = st.text_input("Your Name:")

    # Check if user ID is provided
    if user_id:
        # Create chatbot instance for the user
        bot = Chatbot("Add your API Key here ", index, user_id)

        # Load chat history
        bot.load_chat_history()

        # Display chat history
        for message in bot.chat_history[-6:]:
            st.write(f"{message['role']}: {message['content']}")

        # User input
        user_input = st.text_input("Type your questions here :) - ")

        # Generate response
        if user_input:
            if user_input.lower() in ["bye", "goodbye"]:
                bot_response = "Goodbye!"
            else:
                bot_response = bot.generate_response(user_input)
                bot_response_content = bot_response['content']
                st.write(f"{user_id}: {user_input}")
                st.write(f"Bot: {bot_response_content}")
                bot.save_chat_history()
                bot.chat_history.append
                         ({"role": "user", "content": user_input})
                bot.chat_history.append
                       ({"role": "assistant", "content": bot_response_content})

if __name__ == "__main__":
    main()
To run the web application, ensure you have Streamlit installed (pip install streamlit).
Replace “Add your API Key here ” with your actual OpenAI API key.
Then, you can run the application using the command streamlit run app.py.
The web application will open in your browser, and you can interact with the chatbot through the provided user interface.
Improving the Performance of Chatbots
Consider the following ways to improve chatbot performance:
- Fine-tuning: Continuously enhance the chatbot model’s comprehension and response generating skills by fine-tuning it with more data.
- User Feedback Integration: Integrate user feedback loops to collect insights and enhance chatbot performance based on real-world user interactions.
- Hybrid Techniques: Investigate hybrid techniques that combine rule-based systems with AI models to better effectively handle complicated circumstances.
- Domain-Specific Information: Include domain-specific information and data to increase the chatbot’s expertise and accuracy in certain topic areas.
Conclusion
Congratulations! You have now learned how to create a custom chatbot using OpenAI. In this Guide, we looked at how to use OpenAI to create a bespoke chatbot. We covered the steps involved in setting up the required libraries, obtaining an API key, creating and indexing a knowledge base, creating the chatbot class, and interacting with the chatbot.
You also explored the option of building a web application using Streamlit for a user-friendly interface.Creating a chatbot is an iterative process, and constant refinement is essential for improving its functionality. You can design chatbots that give outstanding user experiences and meaningful support by harnessing the power of OpenAI and staying up to date on the latest breakthroughs in AI. Experiment with different prompts, training data, and fine-tuning techniques to create a chatbot tailored to your specific needs. The possibilities are endless, and OpenAI provides a powerful platform to explore and unleash the potential of chatbot technology.
Key Takeaways
- Setting up the necessary libraries, obtaining an API key, generating and indexing a knowledge base, and implementing the chatbot class are all steps in the process of constructing a bespoke chatbot using OpenAI.
- Chatbots are computer programmes that mimic human interactions by providing help and answering questions in natural language.
- Data collecting is essential for training an efficient chatbot, and it entails acquiring relevant and varied datasets from trustworthy sources.
- Conversational AI applications using OpenAI’s GPT-3.5 language model, a potent tool for natural language processing.
- Using tools like the Llamas library to index and search a knowledge base can considerably improve the chatbot’s capacity to retrieve pertinent data.
- Streamlit offers a practical framework for creating web applications that enable users to communicate with the chatbot via an intuitive user interface.
You can access the code in Github – Link
Connect with me in Linkedin – Link
Frequently Asked Questions
Q1. What is the GPT-3.5 language model from OpenAI?
A. OpenAI created the potent language model GPT-3.5. Based on instructions or conversations, it can comprehend and produce text that looks and sounds human.
Q2. How can I get an OpenAI API key?
A. Create an account on the OpenAI website and follow the on-screen instructions to gain access to the API in order to obtain an API key for OpenAI.
Q3. Describe knowledge base indexing and explain why a chatbot needs it?
A. Knowledge base indexing is structuring and organising a body of data so that it can be found and retrieved quickly. It is crucial for a chatbot since it enables the bot to obtain pertinent data and give precise answers to user inquiries.
Q4. Is it possible to modify the chatbot’s responses to make them more precise?
A. Yes, by adding more training data and changing the prompts used to generate responses, you can fine-tune the chatbot’s responses. By doing this, you may assist the chatbot become more tailored to your targeted use case.
The media shown in this article is not owned by Analytics Vidhya and is used at the Author’s discretion.
I am Tarak Ram, working as Machine Learning Intern at Antern. I am always curious to learn new things and interested in these emerging technologies, which brings me from an arts background to this advanced AI field.
I also teach Machine learning on my youtube channel and always look forward to learning something new.