Introduction
I started my deep learning journey a few years back. I have learnt a lot in this period. But, even after all these efforts, every Neural network I train provides me with a new experience.
If you have tried to train a neural network, you must know my plight!

But, through all this time, I have now made a workflow, which I will share with you today.
I am sharing my learning / experience about building Neural Network with all of you.
I cannot guarantee it will work all the time, but at least it may guide you as to how would you approach to solve the problem. I will also share with you a tool which I find is a useful addition to the deep learning toolbox – TensorBoard.
P.S.: This article assumes that you know the basics of building a neural network and have a fair degree of knowledge about keras. If not, I would recommend going through these articles first and then come back to this article.
- Fundamentals of Deep Learning – Starting with Artificial Neural Network
- Tutorial: Optimizing Neural Networks using Keras (with Image recognition case study)
- Understanding and coding Neural Networks From Scratch in Python and R
Table of Contents
- Training a neural network : a boon or a curse?
- Solving Age Detection Problem with Neural Networks
- Intermission: an overview of Tensorboard
- Back to solving the problem
- Conclusion
- Useful Resources
Training a neural network: a boon or a curse?
Training a neural network is usually a high risk – high reward strategy. If you have tuned it right, you could potentially have a state-of-the-art working model for the task.
Just to give an example, image generation is a recent breakthrough of neural networks. With just a few strokes of artificial brush, you can create an authentic looking image of natural scenes.

But on the other hand, it is extremely difficult to train a generative neural network. You would have to go through a rigorous trial and error phase to get things right.
I had to go through a similar experience of training a neural network few days back when trying to build a working model for Age detection problem. When I made my first model for the problem, it absolutely refused to train. In this article, I will share my approach of how I debugged the neural network. Stay tuned, because there’s a happy ending!
Solving Age Detection Problem with Neural Networks
Before jumping on to solve the problem, let me give an overview of what the problem was.
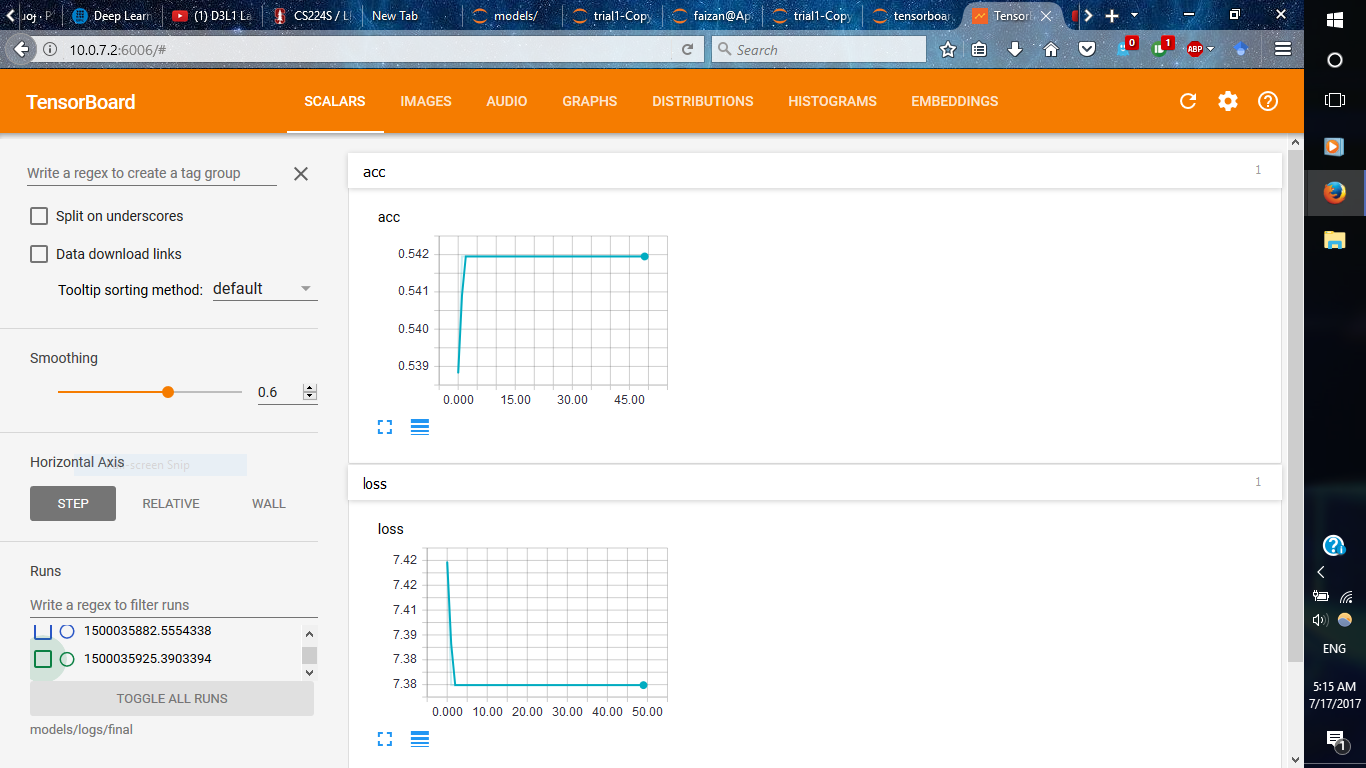
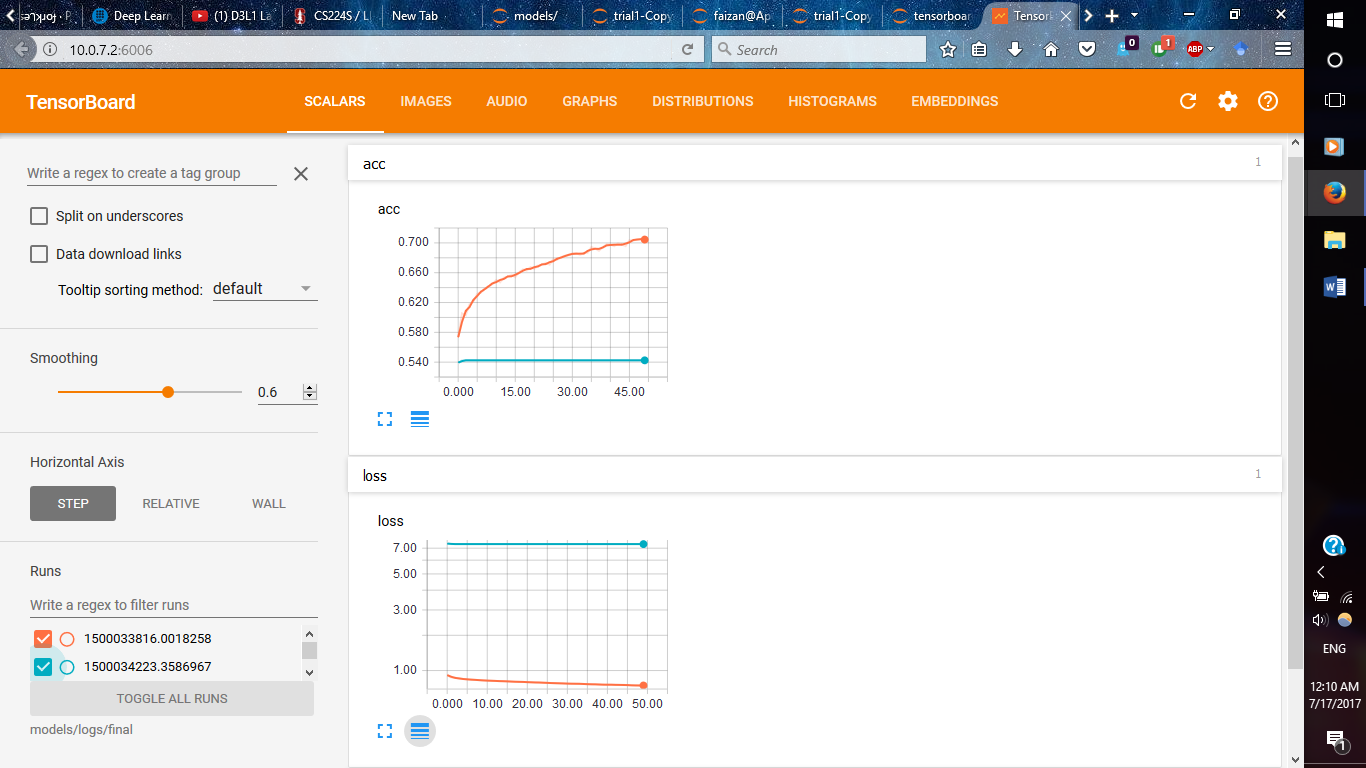
Age Detection of Indian Actors is a recently released practice problem which deals with extracting facial features for age analysis. As this is a image processing problem, I naturally jumped on to picking up neural networks to solve the problem. But as I said earlier, the network would not train. There was no change in the accuracy rates whatsoever, even when I let it train for more than an hour for 200 iterations. Here’s a proof!

Clearly this was not working!
Now, my years of experience came in handy! 🙂 The steps which I mention below are those which I usually follow when I’m stuck with this kind of problem. If you carefully consider, there may be two major reasons by which your neural network may not work correctly –
- Your neural network architecture is incorrect
- There’s something wrong with the data you are giving to the network
Let’s go through these reasons one by one and eliminate the improbable.
Testing the neural network architecture
Step 1: Check the architecture
The first thing you should check when building a neural network is whether you have defined the architecture properly. Here we have a three class problem with varying sizes of images in the dataset. To simplify things, I converted all the images to size 32×32.
temp = []
for img_name in train.ID:
    img_path = os.path.join(data_dir, 'Train', img_name)
    img = imread(img_path)
    img = imresize(img, (32, 32))
    temp.append(img.astype('float32'))

train_x = np.stack(temp)
So according to this, I had defined the architecture as follows
# define vars
input_num_units = 32 * 32 * 3 # image is 3D (RGB) that is why multiply by 3
hidden_num_units = 500
output_num_units = 3

epochs = 50
batch_size = 128
model = Sequential([
    InputLayer(input_shape=(input_num_units,)),

    Dense(units=hidden_num_units, activation='relu'),

    Dense(units=output_num_units, activation='softmax'),
])
I don’t see any issue in the architecture of neural network.
Step 2: Check the hyper-parameters of neural network
According to me, this is the most important step when dealing with neural network. Its because there are so many parameters to tune that it may sometimes be frustrating to try them all. (P.S.: I did a survey of hyper-parameters and how to tune them in this article)
Fortunately, I had used a very simple neural network with only one hidden layer trained with classical gradient descent algorithm (SGD).
model.compile(optimizer='sgd', loss='categorical_crossentropy', metrics=['accuracy'])
Here is a thing to look out for; it is said that when you train a neural network with SGD, it may train slowly. To overcome this, we can use adaptive gradient descent to train the network faster.
model.compile(optimizer='adam', loss='categorical_crossentropy', metrics=['accuracy'])
But the thing was, even on changing the training algorithm from SGD to Adam (aka adaptive gradient descent), the network did not train. This simply meant that something was fundamentally wrong with the network. I had to pull Thor’s hammer to break through this problem!
Intermission: an overview of Tensorboard
Throughout my journey of understanding the neural network, I have gone through a number of tools for building and visualizing a neural network. Of all of them, I have found tensorboard to be an important asset. It can give you useful insight when training a neural network.
Along with this, it gives a nice dashboard like view of the findings, which is very important when explaining your findings to the stakeholders 🙂 The image you saw above of a proof was a dashboard of tensorboard itself.
I will mention the steps for how to install tensorboard in your system. I suggest you to try it out for yourself.
You can install Tensorboard using pip the python package manager
pip install Tensorboard
After installation you can open tensorboard by going to the terminal and typing
tensorboard --logdir=logs/
Here’s a view of how it would look on the browser
The “logs/” folder mentioned above should have the history of how the neural network was trained. You can simply get this by including a tensorboard callback in keras
model.fit(train_x, train_y, batch_size=batch_size,epochs=epochs,verbose=1, validation_split=0.2, callbacks=[keras.callbacks.TensorBoard(log_dir="logs/final/{}".format(time()), histogram_freq=1, write_graph=True, write_images=True)])
In this example, I have passed all the arguments so that everything gets saved. The meaning of the arguments are as follows:
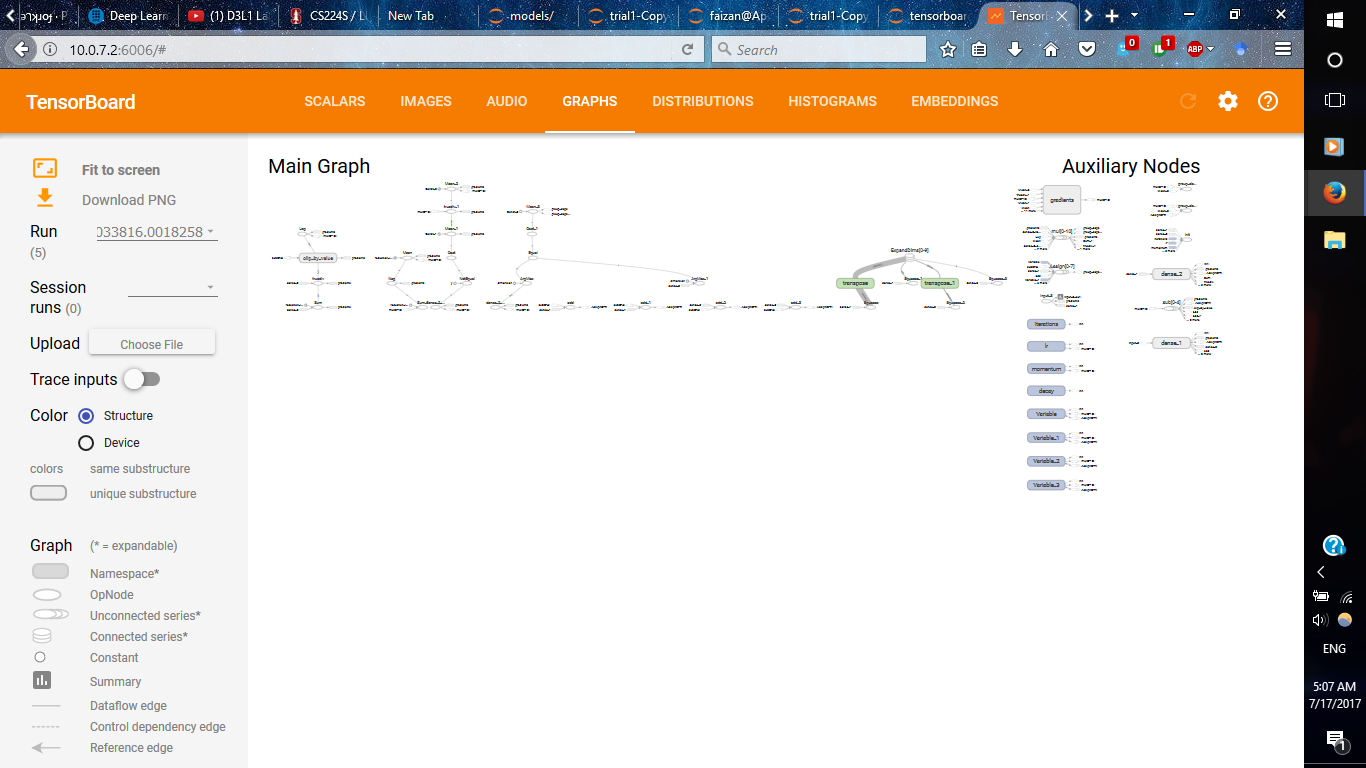
- write_graph: Print the graph of neural network as defined internally.
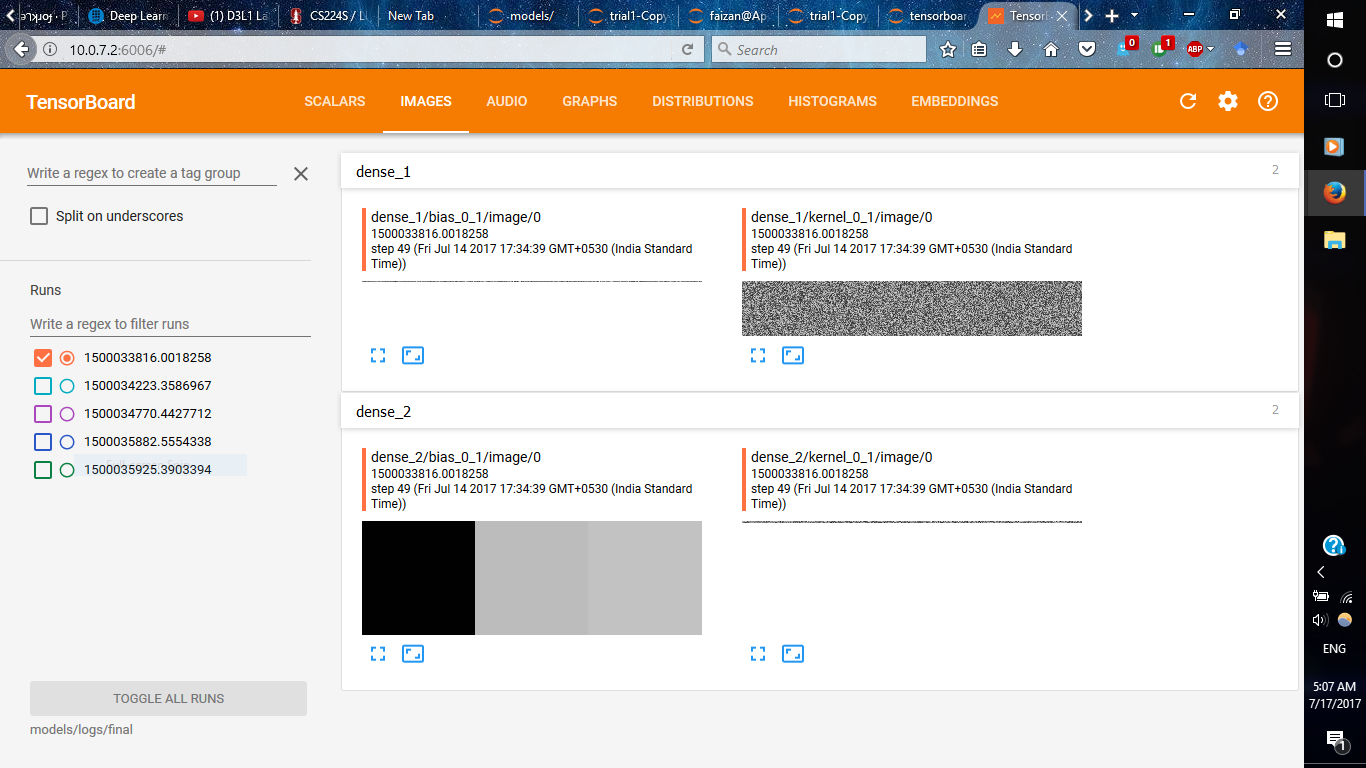
- write_images: Create an image by combining the weight of neural network
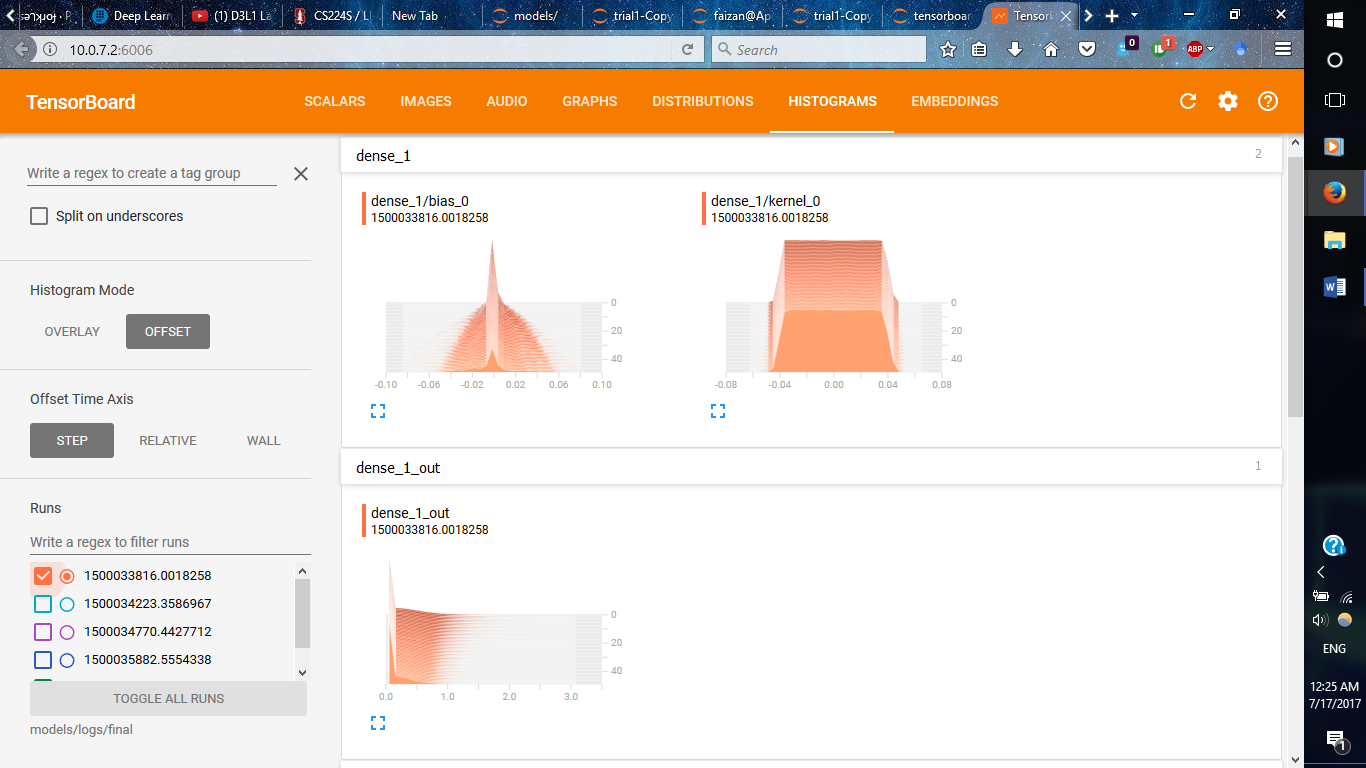
- histogram_freq: Plot the distributions of weights and biases in the neural network
Back to solving the problem
Step 3: Check the Complexity of network
Coming back from our short excursion, the next thing I tried was to check if the network I had built was enough to learn the distributions of the problem or not. For this, instead of a simple neural network I changed the architecture to a convolutional neural network. The effect was that the accuracy increased drastically from the beginning (from 33% to 54%). But still it remained constant even after training.
It seemed that our little experiment failed 🙁
Testing the data
Step 4: Check the Structure of Input data
After thoroughly checking the network architecture, it was time to check if we have the proper dataset itself.
A few things to check are:
- If all the records are of same size?
As discussed in step 1, we have already ensured that the images are of same size before sending it to the network, so that’s out of question.
- If the problem is imbalanced or not?
The dataset is not that imbalanced, as we still have ample amount of images per class
MIDDLE    0.542751
YOUNG     0.336883
OLD       0.120366
- If proper preprocessing is done or not?
Here we should check if we have a properly processed input. For example in an image processing problem, if we processed the image and the resultant input has irregular aspect ratios, the neural network would obviously be flummoxed by it.
Here as it was a simple network, we haven’t really done any preprocessing steps. So that’s out of question too.
Step 5: Check the Distribution of data
Having exhausted most of the problems that we might encounter, I was getting a bit frustrated as to what might be the real problem. Luckily my journey came to an end, as I found a weird bug which I should have caught on much earlier.
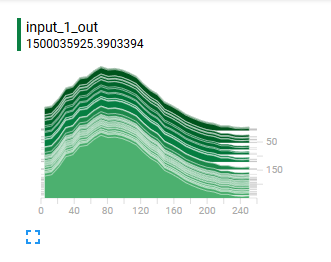
The problem was that the input data I was sending to the network had a range of 0 to 255. Ideally this range should be between 0 and 1. The distribution of input data looked as below:
Let me explain to you why normalizing (setting the range from 0 to 1) is important (as I have personally gone through the trouble of finding what is it so 😛 )
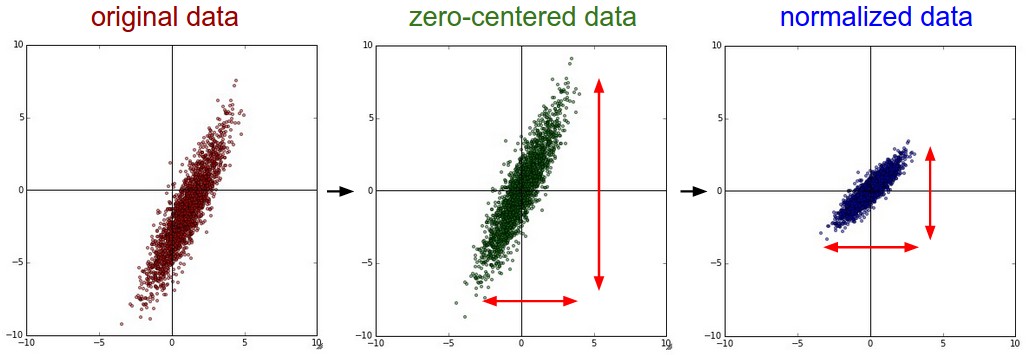
You can see that if your data is does not have a simple distribution, the neural network might find it hard to learn this distribution. It will surely try to converge, but it won’t guarantee complete convergence. An extended version of this concept is batch normalization, which ensures the data is normalized after a layer of neural network. This paper covers in-depth analysis of how batch normalization helps train a neural network better.
Here’s the code I used to read images and normalize them.
temp = []
for img_name in train.ID:
    img_path = os.path.join(data_dir, 'Train', img_name)
    img = imread(img_path)
    img = imresize(img, (32, 32))
    temp.append(img.astype('float32'))

train_x = np.stack(temp)

train_x = train_x / 255. # normalization step
Voila! After I added a simple step of normalization, I saw that the neural network started to train. I was so happy!!
Conclusion
Just to summarize, these are the steps you should look at when debugging a neural network.
Step 1: Check the architecture
Step 2: Check the hyper-parameters of neural network
Step 3: Check the Complexity of network
Step 4: Check the Structure of Input data
Step 5: Check the Distribution of data
Useful Resources
Here are some resources that I would recommend you to go through when you are stuck like me
- Practical Guide to deep learning hyperparameter tuning by Yoshua Bengio
- A great tool in visualizing the inner working of neural network (specifically Convolutional Networks) – DeepViz
- TensorBoard official documentation
- Nuts and Bolts of Applying Deep Learning by Andrew Ng
End Notes
In this article, I have given my personal experience of debugging a neural network and a brief overview of visualization and debugging tool called tensorboard. I hope this will guide you solve the problems you would face in your own incursions. Please feel free to try out tensorboard and share your experiences in the comment below.
Learn, Engage, Compete & Get Hired
Faizan is a Data Science enthusiast and a Deep learning rookie. A recent Comp. Sc. undergrad, he aims to utilize his skills to push the boundaries of AI research.


Very nicely Explained. Thanks Faizan
Thanks Vinit!
Just to clarify, the data you were sending the model was 1 to 255 because of the pixel coloring and you normalized it with np.stack()? If not how did you normalize the image np arrays? Thanks and great article!
Thanks David! You are right that the range of data was from 0-255 because of RGB coloring. To solve this get this in 0-1 range, I just divided the data by 255. I have updated the article to include this. PS: The purpose of np.stack() function is to merge all the individual images to a single numpy array. You can refer the docs https://docs.scipy.org/doc/numpy/reference/generated/numpy.stack.html
This is nice Faizen:)
You are welcome Vivek!