Computer Vision Tutorial: A Step-by-Step Introduction to Image Segmentation Techniques (Part 1)
21 minutes
Introduction
What’s the first thing you do when you’re attempting to cross the road? We typically look left and right, take stock of the vehicles on the road, and make our decision. Our brain is able to analyze, in a matter of milliseconds, what kind of vehicle (car, bus, truck, auto, etc.) is coming towards us. Can machines do that?
The answer was an emphatic ‘no’ till a few years back. But the rise and advancements in computer vision have changed the game. We are able to build computer vision models that can detect objects, determine their shape, predict the direction the objects will go in, and many other things. You might have guessed it – that’s the powerful technology behind self-driving cars!

Now, there are multiple ways of dealing with computer vision challenges. The most popular approach I have come across is based on identifying the objects present in an image, aka, object detection. But what if we want to dive deeper? What if just detecting objects isn’t enough – we want to analyze our image at a much more granular level?
As data scientists, we are always curious to dig deeper into the data. Asking questions like these is why I love working in this field!
In this article, I will introduce you to the concept of image segmentation. It is a powerful computer vision algorithm that builds upon the idea of object detection and takes us to a whole new level of working with image data. This technique opens up so many possibilities – it has blown my mind. Also, In this article you will get to know about image segmentation in image Processing and also its Benefits and How it works . So, you will get complete understanding about image segmentation and image segmentation in image processing.
The Part 2 of this series is also live now: Computer Vision Tutorial: Implementing Mask R-CNN for Image Segmentation (with Python Code)
If you’re new to deep learning and computer vision, I recommend the below resources to get an understanding of the key concepts:
- Computer Vision using Deep Learning 2.0 Course
- Certified Program: Computer Vision for Beginners
- Certified AI & ML Blackbelt+ Program
Table of Contents
What Is Image Segmentation?
Image segmentation is a fundamental technique in computer vision that involves dividing an image into its meaningful parts. It’s like breaking down an image into smaller pieces, like objects, groups of pixels with similar characteristics, or even individual pixels themselves.
Here’s a breakdown of what image segmentation is and what it does:
- Goal: Simplify and analyze images by separating them into different segments. This makes it easier for computers to understand the content of the image.
- Process: Assigns a label to each pixel in the image. Pixels with the same label share certain properties, like color or brightness.
- Benefits:
- Enables object detection and recognition in images.
- Allows for more detailed analysis of specific image regions.
- Simplifies image processing tasks.pen_spark
Let’s understand image segmentation using a simple example. Consider the below image:

There’s only one object here – a dog. We can build a straightforward cat-dog classifier model and predict that there’s a dog in the given image. But what if we have both a cat and a dog in a single image?

We can train a multi-label classifier, in that instance. Now, there’s another caveat – we won’t know the location of either animal/object in the image.
That’s where image localization comes into the picture (no pun intended!). It helps us to identify the location of a single object in the given image. In case we have multiple objects present, we then rely on the concept of object detection (OD). We can predict the location along with the class for each object using OD.

Before detecting the objects and even before classifying the image, we need to understand what the image consists of. Enter – Image Segmentation.
How Does Image Segmentation Work?
We can divide or partition the image into various parts called segments. It’s not a great idea to process the entire image at the same time as there will be regions in the image which do not contain any information. By dividing the image into segments, we can make use of the important segments for processing the image. That, in a nutshell, is how image segmentation works.
An image is a collection or set of different pixels. We group together the pixels that have similar attributes using image segmentation. Take a moment to go through the below visual (it’ll give you a practical idea of image segmentation):

Source : cs231n.stanford.edu
Object detection builds a bounding box corresponding to each class in the image. But it tells us nothing about the shape of the object. We only get the set of bounding box coordinates. We want to get more information – this is too vague for our purposes.
Image segmentation creates a pixel-wise mask for each object in the image. This technique gives us a far more granular understanding of the object(s) in the image.
Why do we need to go this deep? Can’t all image processing tasks be solved using simple bounding box coordinates? Let’s take a real-world example to answer this pertinent question.
What Is Image Segmentation Used For?
Cancer has long been a deadly illness. Even in today’s age of technological advancements, cancer can be fatal if we don’t identify it at an early stage. Detecting cancerous cell(s) as quickly as possible can potentially save millions of lives.
The shape of the cancerous cells plays a vital role in determining the severity of the cancer. You might have put the pieces together – object detection will not be very useful here. We will only generate bounding boxes which will not help us in identifying the shape of the cells.
Image Segmentation techniques make a MASSIVE impact here. They help us approach this problem in a more granular manner and get more meaningful results. A win-win for everyone in the healthcare industry.

Source: Wikipedia
Here, we can clearly see the shapes of all the cancerous cells. There are many other applications where Image segmentation is transforming industries:
- Traffic Control Systems
- Self Driving Cars
- Locating objects in satellite images
There are even more applications where Image Segmentation is very useful. Feel free to share them with me in the comments section below this article – let’s see if we can build something together. 🙂
Different Types of Image Segmentation
We can broadly divide image segmentation techniques into two types. Consider the below images:

Can you identify the difference between these two? Both the images are using image segmentation to identify and locate the people present.
- In image 1, every pixel belongs to a particular class (either background or person). Also, all the pixels belonging to a particular class are represented by the same color (background as black and person as pink). This is an example of semantic segmentation
- Image 2 has also assigned a particular class to each pixel of the image. However, different objects of the same class have different colors (Person 1 as red, Person 2 as green, background as black, etc.). This is an example of instance segmentation

Let me quickly summarize what we’ve learned. If there are 5 people in an image, semantic segmentation will focus on classifying all the people as a single instance. Instance segmentation, on the other hand. will identify each of these people individually.
So far, we have delved into the theoretical concepts of image processing and segmentation. Let’s mix things up a bit – we’ll combine learning concepts with implementing them in Python. I strongly believe that’s the best way to learn and remember any topic.
Region-based Segmentation
One simple way to segment different objects could be to use their pixel values. An important point to note – the pixel values will be different for the objects and the image’s background if there’s a sharp contrast between them.
In this case, we can set a threshold value. The pixel values falling below or above that threshold can be classified accordingly (as an object or the background). This technique is known as Threshold Segmentation.
If we want to divide the image into two regions (object and background), we define a single threshold value. This is known as the global threshold.
If we have multiple objects along with the background, we must define multiple thresholds. These thresholds are collectively known as the local threshold.
Let’s implement what we’ve learned in this section. Download this image and run the below code. It will give you a better understanding of how thresholding works (you can use any image of your choice if you feel like experimenting!).
First, we’ll import the required libraries.
Let’s read the downloaded image and plot it:

It is a three-channel image (RGB). We need to convert it into grayscale so that we only have a single channel. Doing this will also help us get a better understanding of how the algorithm works.
Python Code:

Now, we want to apply a certain threshold to this image. This threshold should separate the image into two parts – the foreground and the background. Before we do that, let’s quickly check the shape of this image:
gray.shape
(192, 263)
The height and width of the image is 192 and 263 respectively. We will take the mean of the pixel values and use that as a threshold. If the pixel value is more than our threshold, we can say that it belongs to an object. If the pixel value is less than the threshold, it will be treated as the background. Let’s code this:

Nice! The darker region (black) represents the background and the brighter (white) region is the foreground. We can define multiple thresholds as well to detect multiple objects:

There are four different segments in the above image. You can set different threshold values and check how the segments are made. Some of the advantages of this method are:
- Calculations are simpler
- Fast operation speed
- When the object and background have high contrast, this method performs really well
But there are some limitations to this approach. When we don’t have significant grayscale difference, or there is an overlap of the grayscale pixel values, it becomes very difficult to get accurate segments.
Edge Detection Segmentation
What divides two objects in an image? There is always an edge between two adjacent regions with different grayscale values (pixel values). The edges can be considered as the discontinuous local features of an image.
We can make use of this discontinuity to detect edges and hence define a boundary of the object. This helps us in detecting the shapes of multiple objects present in a given image. Now the question is how can we detect these edges? This is where we can make use of filters and convolutions. Refer to this article if you need to learn about these concepts.
The below visual will help you understand how a filter colvolves over an image :
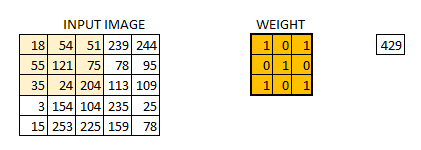
Here’s the step-by-step process of how this works:
- Take the weight matrix
- Put it on top of the image
- Perform element-wise multiplication and get the output
- Move the weight matrix as per the stride chosen
- Convolve until all the pixels of the input are used
The values of the weight matrix define the output of the convolution. My advice – it helps to extract features from the input. Researchers have found that choosing some specific values for these weight matrices helps us to detect horizontal or vertical edges (or even the combination of horizontal and vertical edges).
One such weight matrix is the sobel operator. It is typically used to detect edges. The sobel operator has two weight matrices – one for detecting horizontal edges and the other for detecting vertical edges. Let me show how these operators look and we will then implement them in Python.
Sobel filter (horizontal) =
| 1 | 2 | 1 |
| 0 | 0 | 0 |
| -1 | -2 | -1 |
Sobel filter (vertical) =
| -1 | 0 | 1 |
| -2 | 0 | 2 |
| -1 | 0 | 1 |
Edge detection works by convolving these filters over the given image. Let’s visualize them on this article.

It should be fairly simple for us to understand how the edges are detected in this image. Let’s convert it into grayscale and define the sobel filter (both horizontal and vertical) that will be convolved over this image:

Now, convolve this filter over the image using the convolve function of the ndimage package from scipy.
Let’s plot these results:


Here, we are able to identify the horizontal as well as the vertical edges. There is one more type of filter that can detect both horizontal and vertical edges at the same time. This is called the laplace operator:
| 1 | 1 | 1 |
| 1 | -8 | 1 |
| 1 | 1 | 1 |
Let’s define this filter in Python and convolve it on the same image:

Next, convolve the filter and print the output:

Here, we can see that our method has detected both horizontal as well as vertical edges. I encourage you to try it on different images and share your results with me. Remember, the best way to learn is by practicing!
Clustering-based Image Segmentation
This idea might have come to you while reading about image segmentation. Can’t we use clustering techniques to divide images into segments? We certainly can!
In this section, we’ll get an an intuition of what clustering is (it’s always good to revise certain concepts!) and how we can use of it to segment images.
Clustering is the task of dividing the population (data points) into a number of groups, such that data points in the same groups are more similar to other data points in that same group than those in other groups. These groups are known as clusters.
K-means Clustering
One of the most commonly used clustering algorithms is k-means. Here, the k represents the number of clusters (not to be confused with k-nearest neighbor). Let’s understand how k-means works:
- First, randomly select k initial clusters
- Randomly assign each data point to any one of the k clusters
- Calculate the centers of these clusters
- Calculate the distance of all the points from the center of each cluster
- Depending on this distance, the points are reassigned to the nearest cluster
- Calculate the center of the newly formed clusters
- Finally, repeat steps (4), (5) and (6) until either the center of the clusters does not change or we reach the set number of iterations
The key advantage of using k-means algorithm is that it is simple and easy to understand. We are assigning the points to the clusters which are closest to them.
Let’s put our learning to the test and check how well k-means segments the objects in an image. We will be using this image, so download it, read it and and check its dimensions:

It’s a 3-dimensional image of shape (192, 263, 3). For clustering the image using k-means, we first need to convert it into a 2-dimensional array whose shape will be (length*width, channels). In our example, this will be (192*263, 3).
(50496, 3)
We can see that the image has been converted to a 2-dimensional array. Next, fit the k-means algorithm on this reshaped array and obtain the clusters. The cluster_centers_ function of k-means will return the cluster centers and labels_ function will give us the label for each pixel (it will tell us which pixel of the image belongs to which cluster).
I have chosen 5 clusters for this article but you can play around with this number and check the results. Now, let’s bring back the clusters to their original shape, i.e. 3-dimensional image, and plot the results.

Amazing, isn’t it? We are able to segment the image pretty well using just 5 clusters. I’m sure you’ll be able to improve the segmentation by increasing the number of clusters.
k-means works really well when we have a small dataset. It can segment the objects in the image and give impressive results. But the algorithm hits a roadblock when applied on a large dataset (more number of images).
It looks at all the samples at every iteration, so the time taken is too high. Hence, it’s also too expensive to implement. And since k-means is a distance-based algorithm, it only applies to convex datasets and is unsuitable for clustering non-convex clusters.
Finally, let’s look at a simple, flexible and general approach for image segmentation.
Mask R-CNN
Data scientists and researchers at Facebook AI Research (FAIR) pioneered a deep learning architecture, called Mask R-CNN, that can create a pixel-wise mask for each object in an image. This is a really cool concept so follow along closely!
Mask R-CNN is an extension of the popular Faster R-CNN object detection architecture. Mask R-CNN adds a branch to the already existing Faster R-CNN outputs. The Faster R-CNN method generates two things for each object in the image:
- Its class
- The bounding box coordinates
Mask R-CNN adds a third branch to this which outputs the object mask as well. Take a look at the below image to get an intuition of how Mask R-CNN works on the inside:
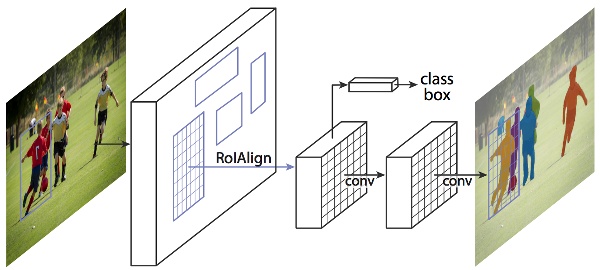
Source: arxiv.org
- We take an image as input and pass it to the ConvNet, which returns the feature map for that image
- Region proposal network (RPN) is applied on these feature maps. This returns the object proposals along with their objectness score
- A RoI pooling layer is applied on these proposals to bring down all the proposals to the same size
- Finally, the proposals are passed to a fully connected layer to classify and output the bounding boxes for objects. It also returns the mask for each proposal
Mask R-CNN is the current state-of-the-art for image segmentation and runs at 5 fps.
Image classification vs. object detection vs. image segmentation
Image classification, object detection, and image segmentation are all fundamental tasks in computer vision that analyze image content, but they answer different questions about the image:
- Image Classification: What’s in the image? This is the most basic task. The model assigns a single label to the entire image, like “cat” or “landscape.” It’s like answering a multiple-choice question with only one answer.
- Object Detection: What objects are in the image, and where are they? This goes beyond classification. The model identifies specific objects (cats, cars, people) and draws bounding boxes around them to indicate their location. It’s like answering a multiple-choice question where you can choose multiple answers and also mark their positions on the image.
- Image Segmentation: What are the exact shapes of the objects in the image? This provides the most detail. The model assigns a label to each individual pixel in the image, creating a kind of digital mask that outlines the shape of each object. It’s like coloring each object in the image with a different color to show their exact boundaries.
Summary of Image Segmentation Techniques
I have summarized the different image segmentation algorithms in the below table.. I suggest keeping this handy next time you’re working on an image segmentation challenge or problem!
| Algorithm | Description | Advantages | Limitations |
| Region-Based Segmentation | Separates the objects into different regions based on some threshold value(s). | a. Simple calculations
b. Fast operation speed c. When the object and background have high contrast, this method performs really well | When there is no significant grayscale difference or an overlap of the grayscale pixel values, it becomes very difficult to get accurate segments. |
| Edge Detection Segmentation | Makes use of discontinuous local features of an image to detect edges and hence define a boundary of the object. | It is good for images having better contrast between objects. | Not suitable when there are too many edges in the image and if there is less contrast between objects. |
| Segmentation based on Clustering | Divides the pixels of the image into homogeneous clusters. | Works really well on small datasets and generates excellent clusters. | a. Computation time is too large and expensive.
b. k-means is a distance-based algorithm. It is not suitable for clustering non-convex clusters. |
| Mask R-CNN | Gives three outputs for each object in the image: its class, bounding box coordinates, and object mask | a. Simple, flexible and general approach
b. It is also the current state-of-the-art for image segmentation | High training time |
Image Segmentation in Image Processing
Image segmentation is a fundamental technique in image processing that deals with dividing a digital image into meaningful parts. It’s like partitioning an image into different regions, each containing pixels with similar characteristics. This simplifies the image and allows for more focused analysis on specific objects or areas of interest.
Here’s a breakdown of what image segmentation is and how it works:
Purpose:
- Simplify complex images: By segmenting an image, you can break it down into smaller, more manageable pieces. This makes it easier to analyze specific regions or objects within the image.
- Extract objects of interest: Image segmentation allows you to isolate specific objects from the background or other foreground elements. This is crucial for tasks like object recognition, counting, and tracking.
- Prepare images for further processing: Segmentation can be a pre-processing step for various image processing tasks. By segmenting the image, you can focus on relevant regions and improve the accuracy of subsequent analysis.
How it Works:
- Grouping pixels: Image segmentation algorithms group pixels in an image based on shared characteristics. These characteristics can include color, intensity, texture, or spatial location.
- Segmenting the image: The segmentation process essentially creates a new image, often called a segmentation mask. This mask assigns a label to each pixel, indicating the segment it belongs to.
Conclusion
This article is just the beginning of our journey to learn all about image segmentation. In the next article of this series, we will deep dive into the implementation of Mask R-CNN. So stay tuned!
I have found image segmentation quite a useful function in my deep learning career. The level of granularity I get from these techniques is astounding. It always amazes me how much detail we are able to extract with a few lines of code. I’ve mentioned a couple of useful resources below to help you out in your computer vision journey:
Frequently Asked Questions
A. There are mainly 4 types of image segmentation: region-based segmentation, edge detection segmentation, clustering-based segmentation, and mask R-CNN.
A. Clustering-based segmentation techniques such as k-means clustering are the most commonly used method for image segmentation.
A. Image segmentation is the process of filtering or categorizing a database of images into classes, subsets, or regions based on certain specific features or characteristics.
My research interests lies in the field of Machine Learning and Deep Learning. Possess an enthusiasm for learning new skills and technologies.


Hello Pulkit, I am looking for an expert in machine learning like you , i have a project to detect missing bolts, screws, nuts, washers.... from an item or a device for example car dynamo. I would like your help in that. can you please contact me [email protected]
Hi Amr, This would be an interesting project. Here you would require a training dataset with labeled pixels. Once you have the dataset with you, you can train an image segmentation model such as Mask R-CNN and use that trained model to get predictions for new images.
iam doing my research on image segmentation for lidar point cloud, can you suggest me which model is better for segmentation
Excellent article!! Explained in very simple way.
Glad you liked it Vijit!
This is exactly what I need! Thank you! When will part II be live?
Hi Libo, Glad you liked the post! I am currently working on Part II and it will be published soon.
Excellent article. Well explained, well detailed with clear examples. Thank you
Glad you liked it Vincente!
segmentation knowledge is so simplified. I learnt a lot. thank you so much. I would like to segment dental x-ray images to extract regions of interest, label and train a system. How do i go about it please.
Hi, To approach this problem, you first need some labelled images. By labelled images, I mean that you must have few images for which you have the region of interest. Once you have the labelled images, you can train a segmentation model like Mask RCNN and once the model is trained, you can give new images to it and it will predict the region of interest for those new set of images.
Hello, Pulkit...Can you show me the codes for comparison of Kmeans and Simple linear iterative clustering( slic) in python using skimage. Also the implementation of region growing in python using Skimage. Thank you so much.
Hi, It's quite simple to understand..! Good job
Glad you liked it Mamatha!
Hello. I am learning Computer Vision and Deep Learning. Can you please advise me how to go about it? I want to learn image segmentation in depth as of now. I really found your article very useful.
Hi Srishti, You can go through the part 2 of this series: https://www.analyticsvidhya.com/blog/2019/07/computer-vision-implementing-mask-r-cnn-image-segmentation/
sir i want to find the count of red and gray cell from a box using opencv can u guide me little bit sir please
Hello Pulkit, Thanks for your article. Very interesting. I understood the article for image segmentation techniques with datasets that include only images. But at the end you add Mask R-CNN, which require labeled pixels or masks, if started the project from scratch (not based on ImageNet, Coco, etc. type of images). Please could you confirm my assumption that Mask R-CNN should have an extra entry in the comparison table with this requirement. Thanks!
Hi Peluso, Yes! If you want to train your own Mask R-CNN model, you have to have a training set which will require the labeled pixels of the masks. But you can also use the pre-trained models to perform image segmentation using Mask R-CNN and in this case you will not require labeled pixels. You can refer to the part 2 of this series here and understand how to use pre-trained weights to perform image segmentation using Mask RCNN.
Hi i am Himanshu, I am trying to create boundry of perticular farm of satelite data of whole gujarat ...i have training data (shp file) but i don't know how to do !
Hello Pulkit, I am new in image segmentation topic, but you tutorial helped me a lot. It is very well explained and easy to understand. Thank you and looking forward more from you.
Hi Mahnaz, Thank you for your response. You can access the Part 2 of this series here: https://www.analyticsvidhya.com/blog/2019/07/computer-vision-implementing-mask-r-cnn-image-segmentation/
Hi, I have used ICnet and Deeplab v3+ for image segmentation, I managed to run them on image sequences but problem is HOW TO SAVE SEGMENTED PNG file for those images? PLT is saving only the last segmented file. I am using plt.savefig. Can you please help?
Great stuff Pulkit! When can we expect the tutorial on implementation of Mask R-CNN?
Glad you liked it kumar. The part 2 of this series is now live. You can access it here: https://www.analyticsvidhya.com/blog/2019/07/computer-vision-implementing-mask-r-cnn-image-segmentation/
Hello, I’m trying for image segmentation using K-Means and I tried the above specified code but my clustered image is not not getting displayed(getting blank white image) .I checked the cluster centers and labels by printing them and there wasn’t any problem in the clustering.I’m not able to display the clustered image.I get this message before cluster_pic gets displayed "Clipping input data to the valid range for imshow with RGB data ([0..1] for floats or [0..255] for integers)." which is blank white image.Can anyone help me out . Thank you
What if i wanna do semantic segmentation to find tic tac toe box in my image, can i use my traning dataset consisting of images which only contain tic tac toe images completely and a set of equal no. of garbage images as other class?
Hi Shivam, You can do that. You have to train your own model first using your data and then use that trained model to make predictions for new images.
Hi Pulkit, Thanks for this insightful article. I am working on a vehicle damage assessment problem using images. I am researching on ideal approach and sample size. Based on this article, one approach came in my mind, I can segment the image in all possible ROIs, but is there a way I can label selected regions out of all ROIs for my selected damage classes (may be 8-10) and then train the model? Please let me know your thoughts on this. Thanks, Ajay
Hi Ajay, As per my understanding, you will label the images as either 8, 9 or 10. This will turn the problem into an image classification problem where your aim will become to classify images into different damage categories. Then you have to use different approach to solve this problem. For image classification, you can refer this article: https://www.analyticsvidhya.com/blog/2019/01/build-image-classification-model-10-minutes/
Hi Pulkit, Its a great article on imge segmentation and easy to underdtand those who are beginers in python based image processing. I am working on the project liver segmentation on CT scan image using Unet architecture. In this regard I need your help to read CT dataset (CT images and Labels/masks) to provide input to my network. I am new to CT images and finding lot of difficulties in reading this the database and preprocessing it for network. Your help will really move my work ahead . Please provide some directions to me. I am Hoping for your postive reply. Please respond me on my email ID [email protected]
Hi, I would like to do image segmentation for quality checking of winding in transformer.in that I done threshold and histogram and get array value of image of winding of transformer mainly autotransformer consist of 200 turns.will u please give more idea.
i want source code for extract multiple text from complex image please help me ...
Superbly written! Very much informative and lot many good new things to learn. Thanks a lot.
Thank you Sandeep!
Great Article, the way you have articulated about pixel level details on R CNN was great. Can you also provide a comparison between RCNN's competitors? Also a step by step guide on training RCNN if possible. Great job! keep writing. Thanks, Arun
Hi Arun, Here is a step by step implementation of Faster RCNN: https://www.analyticsvidhya.com/blog/2018/11/implementation-faster-r-cnn-python-object-detection/ Also, if you wish to look at the step by step implementation of Mask RCNN, here is the guide: https://www.analyticsvidhya.com/blog/2019/07/computer-vision-implementing-mask-r-cnn-image-segmentation/
hi bro, i have a doubt can u please help me, i want to recognize the " bud" of a cotton plant and also want to recognize the "cotton plant", which algorithm is helpful or which method of segmentation is useful
Hy i have a problem of my research i have dataset which based on images and every images there is multi digits but i want to recognize some specific digits. help me plzz
Really useful article. Basic concepts of image segmentation are cleared very well.
Glad you liked it Suchita!
this was very help full thank you very much
Thank you Ahmed!
Hi there I need your help please.. I have to do my project in this feild in mask RCNN ...can you help me please?
Hi Yassmein, I would really be glad to help. Please elaborate your project and then I can guide you.
Hi Pulkit, It is a great article. I am new to this feild. I am doing PhD in machine vision. I would like to know that what should be configuration of laptop so that i can run program.
Hi Manoj, These are the basic techniques and does not require high computation power. You can even run this on CPU. But, if you wish to run Mask R-CNN, then you must have a GPU with more than 32 GB RAM.
Hi Pulkit, I'm doing tests to identify the various parts of a car (fender, bonnet, bumper ...). At the moment I am trying with the fender and I have about fifty training images but the results are not very good. I just want to ask you if you believe you can get good results to decide whether to continue with the tests or give up. Maybe you could give me some indication of the number of images needed to get good results. Fulvio
When doing your own labeling/annotating of a custom dataset, how precise do you have to be with your polygons? I'm looking at labeling images of bricks with cracks or chips in them. If I bound in some of the surrounding good brick (not a lot) is that a problem? Are there any good communities where this kind of stuff is discussed? Thanks, and great post!
gray_r = gray.reshape(gray.shape[0]*gray.shape[1]) for i in range(gray_r.shape[0]): if gray_r[i] > gray_r.mean(): gray_r[i] = 1 else: gray_r[i] = 0 gray = gray_r.reshape(gray.shape[0],gray.shape[1]) plt.imshow(gray, cmap='gray') very good article, congratulations, nevertheless I have a small contribution: I would suggest to calculate the mean of gray_r outside the loop, ie immediately after the reshape function, which will improve the complexity of the algorithm. if not you will observe a slowness of execution when you take a large image Congratulation
Hi, Thank you and that's really a valuable point to reduce the execution time.
Hi there, i would love to focus on segmentation techniques for research. What is being worked on currently.
great article 10x
Thank You!
very interesting and helpful. is there any technique which can merge two segmentation algorithm example region base and edge base and get a single output.
If the image contain text means how did I segment the text from the background image. Is it same like the object detection..
Thanks for sharing this content with us, your content is really helpful for me, you describe it very well about Image Segmentation Techniques and keep posting.
Excellent material for understanding Segmentation of images, also the related materials CNN, Mask RCNN are composed brilliantly.