This article was published as a part of the Data Science Blogathon.
Introduction
In this post, we will see how to use the online available pre-trained Machine Learning model for problems related to Computer Vision from Azure Cognitive services.
Problem Statement
What if we need to analyze this single Image?

We want some information regarding this image, like:-
- Suitable caption for this image.
- Total human faces and their co-ordinates.
- Gender and age of persons present in the image.
- Total objects in the image and their co-ordinates.
We need to take help from pre-trained models. We will discuss how we can achieve this with the help of Microsoft Azure Cognitive Services using API in Python.
Microsoft Azure Cognitive Services provide us to use its pre-trained models for various Business Problems related to Machine Learning.
List of Different Services are:-
- Decision
- Language
- Speech
- Vision
- Web Search
There are also subcategories for each category mentioned above. Please Explore here.
We will focus on Computer Vision and problems related to images and how to use Azure API services. We can use Azure Cognitive services for free for up to 30 days.
Let’s first set up an Azure account.
Azure Account Setup
Sign in to the Azure portal.
If you don’t have a Microsoft account, just create one and sign in.
After that navigate to Documentation on the home page.
.jpg)
Then Choose AI + Machine Learning from the left tab.
.jpg)
Scroll down and then click on Computer Vision.
.jpg)
Scroll down and click on Computer Vision API v3.
.jpg)
You will get this page.
.jpg)
This page contains all information related to API calls. We need to generate a Subscription Key in order to call the API. For this, we need to create a Cognitive Services account. So click on Cognitive Services Account.
4. Creating a cognitive service account
The next page Will have three options:
.jpg)
For the first option start with Azure Free Trial, they will ask for credit card details. They won’t charge anything unless you subscribe or purchase. If you have a credit card you can create an account with the first option.
The one that I want to focus on is Access Student Benefits. This one will not ask for card details. You need to put school/college email details in order to prove that you are a student. They will send a link on that mail and your account will be activated for 30 days with $100 in your account that can be used over the azure portal.
Once you are done with the account setting. Your azure account home page will look like this. Click on Create a resource.
.jpg)
After this choose AI + Machine Learning from the side tab and then click on computer vision.
Don’t click on quickstart + tutorials
.jpg)
You will get this form
.jpg)
You need to create a resource group, click on create new, and just create one. Select your region accordingly. The Name should be unique in my case it is “comp-vi-in”. Choose a price tier and click on Review and create. It will validate and after validation click on create. It will take some time in deployment.
Once done click on the top-left three dashes. Choose All resources and click on the name i.e. in my case it is “comp-vi-in”. then choose keys and endpoints.
.jpg)
Two keys are provided to you KEY1 and KEY2 both are your subscription key, you can use any.
You will also need Endpoint Url to call the API.
API calling with Python
let’s look at the code.
.jpg)
Subscription_key will contain information about your KEYs.
Variable Analyze_url is your endpoint URL, concatenate “/vision/v3.1/analyze” to your endpoint URL.
Image_url is the download link of the image.
Variable headers will contain information about your subscription key.
variable params will have the parameter related to the image that you want to explore in that image, just provide all parameters in a comma-separated manner.
For all possible parameters visit here.
We will send a request, “make sure you have an internet connection and working properly”.
Store the output as JSON, We can now get the faces and objects in the image.
Output Analysis
Let’s visualize the Output.
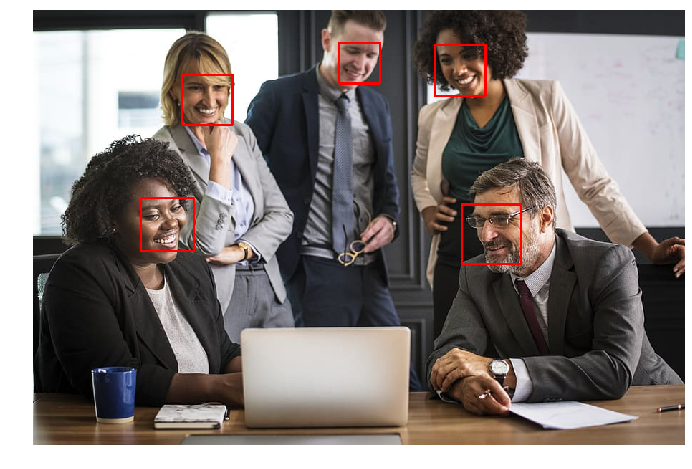
.png)
Thanks a lot for reading. I hope this is helpful.
Get full code on my GitHub page.
Connect with me – LinkedIn.


