Image Classification Using CNN | Step-wise Tutorial
Image classification using Convolutional Neural Networks (CNN) has revolutionized computer vision tasks by enabling automated and accurate recognition of objects within images. CNN-based image classification algorithms have gained immense popularity due to their ability to learn and extract intricate features from raw image data automatically. This article will explore the principles, techniques, and applications of image classification using CNNs. We will delve into the architecture, training process, and CNN image classification evaluation metrics. By understanding the workings of CNNs for image classification, we can unlock many possibilities for object recognition, scene understanding, and visual data analysis.
This article was published as a part of the Data Science Blogathon.
Table of contents
- Why CNN for Image Classification?
- How Are CNN Used Image Classification?
- Tutorial: CNN Image Classification with Keras and CIFAR-10
- Step 1: Choose a Dataset
- Step 2: Prepare Dataset for Training
- Step 3: Create Training Data
- Step 4: Shuffle the Dataset
- Step 5: Assigning Labels and Features
- Step 6: Normalising X and Converting Labels to Categorical Data
- Step 7: Split X and Y for Use in CNN
- Step 8: Define, Compile and Train the CNN Model
- Step 9: Accuracy and Score of Model
- Conclusion
- Frequently Asked Questions
Why CNN for Image Classification?
Image classification using CNN involves the extraction of features from the image to observe some patterns in the dataset. Using an ANN for the purpose of image classification would end up being very costly in terms of computation since the trainable parameters become extremely large.
For example, if we have a 50 X 50 image of a cat, and we want to train our traditional ANN on that image to classify it into a dog or a cat the trainable parameters become –
(50*50) * 100 image pixels multiplied by hidden layer + 100 bias + 2 * 100 output neurons + 2 bias = 2,50,302
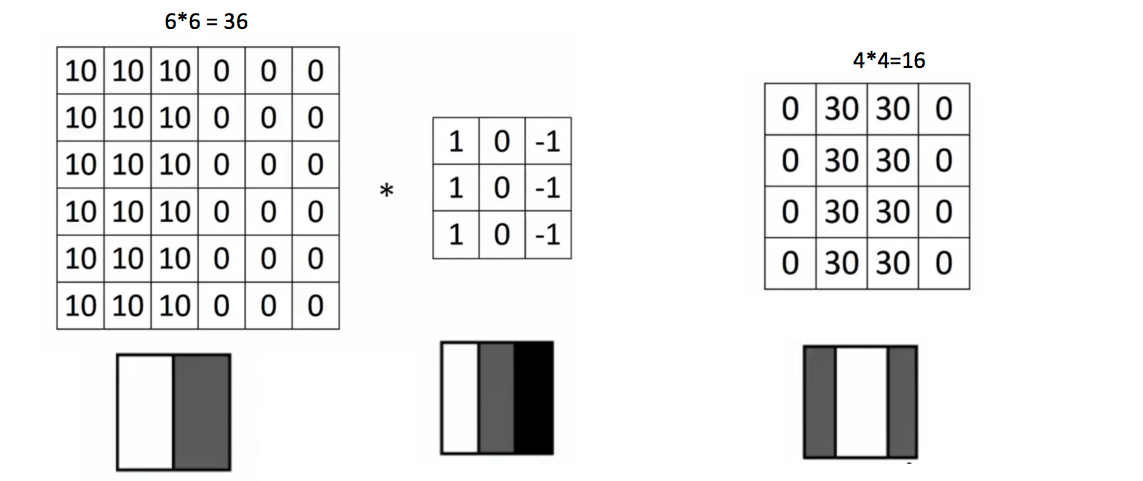
We use filters when using CNNs. Filters exist of many different types according to their purpose.

Filters help us exploit the spatial locality of a particular image by enforcing a local connectivity pattern between neurons.
Convolution basically means a pointwise multiplication of two functions to produce a third function. Here one function is our image pixels matrix and another is our filter. We slide the filter over the image and get the dot product of the two matrices. The resulting matrix is called an “Activation Map” or “Feature Map”.
How Are CNN Used Image Classification?
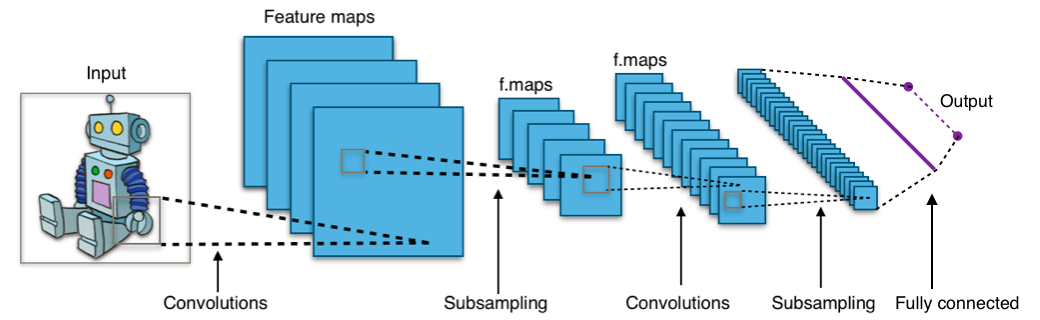
Image classification involves assigning labels or classes to input images. It is a supervised learning task where a model is trained on labeled image data to predict the class of unseen images. CNN are commonly used for image classification as they can learn hierarchical features like edges, textures, and shapes, enabling accurate object recognition in images. CNNs excel in this task because they can automatically extract meaningful spatial features from images. Here are different layers involved in the process:
Input Layer
The input layer of a CNN takes in the raw image data as input. The images are typically represented as matrices of pixel values. The dimensions of the input layer correspond to the size of the input images (e.g., height, width, and color channels).
Convolutional Layers
Convolutional layers are responsible for feature extraction. They consist of filters (also known as kernels) that are convolved with the input images to capture relevant patterns and features. These layers learn to detect edges, textures, shapes, and other important visual elements.
Pooling Layers
Pooling layers reduce the spatial dimensions of the feature maps produced by the convolutional layers. They perform downsampling operations (e.g., max pooling) to retain the most salient information while discarding unnecessary details. This helps in achieving translation invariance and reducing computational complexity.
Fully Connected Layers
The output of the last pooling layer is flattened and connected to one or more fully connected layers. These layers function as traditional neural network layers and classify the extracted features. The fully connected layers learn complex relationships between features and output class probabilities or predictions.
Output Layer
The output layer represents the final layer of the CNN. It consists of neurons equal to the number of distinct classes in the classification task. The output layer provides each class’s classification probabilities or predictions, indicating the likelihood of the input image belonging to a particular class.
Tutorial: CNN Image Classification with Keras and CIFAR-10
I will be working on Google Colab and I have connected the dataset through Google Drive, so the code provided by me should work if the same setup is being used. Remember to make appropriate changes according to your setup.
Step 1: Choose a Dataset
Choose a dataset of your interest or you can also create your own image dataset for solving your own image classification problem. An easy place to choose a dataset is on kaggle.com.
The dataset I’m going with can be found here.
This dataset contains 12,500 augmented images of blood cells (JPEG) with accompanying cell type labels (CSV). There are approximately 3,000 images for each of 4 different cell types grouped into 4 different folders (according to cell type). The cell types are Eosinophil, Lymphocyte, Monocyte, and Neutrophil.
Here are all the libraries that we would require and the code for importing them:
from keras.models import Sequential

import tensorflow as tf

import tensorflow_datasets as tfds

tf.enable_eager_execution()

from keras.layers.core import Dense, Activation, Dropout, Flatten
from keras.layers.convolutional import Convolution2D, MaxPooling2D
from keras.optimizers import SGD, RMSprop, adam
from keras.utils import np_utils
from sklearn.tree import DecisionTreeClassifier # Import Decision Tree Classifier
from sklearn import metricsfrom sklearn.utils import shuffle
from sklearn.model_selection import train_test_splitimport matplotlib.image as mpimg
import matplotlib.pyplot as plt
import numpy as np
import os
import cv2
import randomfrom numpy import *
from PIL import Image
import theano
Step 2: Prepare Dataset for Training
Preparing our dataset for training will involve assigning paths and creating categories(labels), resizing our images.
Resizing images into 200 X 200
path_test = "/content/drive/My Drive/semester 5 - ai ml/datasetHomeAssign/TRAIN"

CATEGORIES = ["EOSINOPHIL", "LYMPHOCYTE", "MONOCYTE", "NEUTROPHIL"]
print(img_array.shape)IMG_SIZE =200
new_array = cv2.resize(img_array, (IMG_SIZE, IMG_SIZE))
Step 3: Create Training Data
Training is an array that will contain image pixel values and the index at which the image in the CATEGORIES list.
training = []def createTrainingData():
  for category in CATEGORIES:
    path = os.path.join(path_test, category)
    class_num = CATEGORIES.index(category)
    for img in os.listdir(path):
      img_array = cv2.imread(os.path.join(path,img))
      new_array = cv2.resize(img_array, (IMG_SIZE, IMG_SIZE))
      training.append([new_array, class_num])createTrainingData()
Step 4: Shuffle the Dataset
random.shuffle(training)Step 5: Assigning Labels and Features
This shape of both the lists will be used in Classification using the NEURAL NETWORKS.
X =[]
y =[]for features, label in training:
  X.append(features)
  y.append(label)
X = np.array(X).reshape(-1, IMG_SIZE, IMG_SIZE, 3)
Step 6: Normalising X and Converting Labels to Categorical Data
X = X.astype('float32')
X /= 255
from keras.utils import np_utils
Y = np_utils.to_categorical(y, 4)
print(Y[100])
print(shape(Y))
Step 7: Split X and Y for Use in CNN
X_train, X_test, y_train, y_test = train_test_split(X, y, test_size = 0.2, random_state = 4)Step 8: Define, Compile and Train the CNN Model
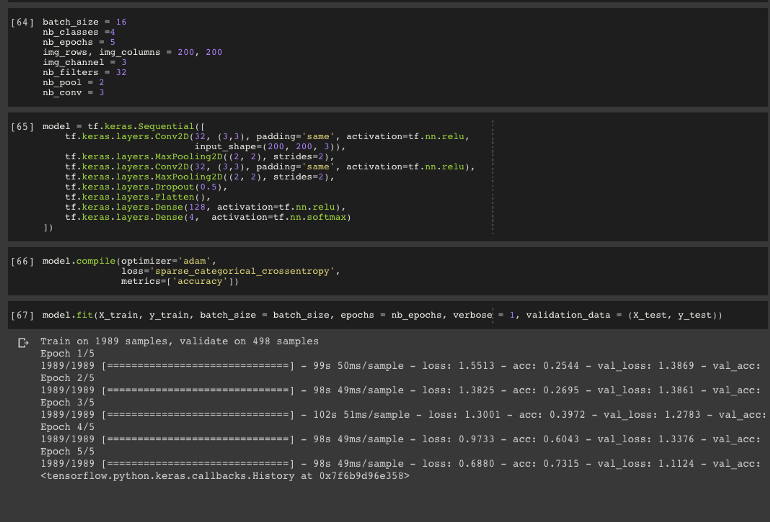
batch_size = 16
nb_classes =4
nb_epochs = 5
img_rows, img_columns = 200, 200
img_channel = 3
nb_filters = 32
nb_pool = 2
nb_conv = 3

model = tf.keras.Sequential([
    tf.keras.layers.Conv2D(32, (3,3), padding='same', activation=tf.nn.relu,
                           input_shape=(200, 200, 3)),
    tf.keras.layers.MaxPooling2D((2, 2), strides=2),
    tf.keras.layers.Conv2D(32, (3,3), padding='same', activation=tf.nn.relu),
    tf.keras.layers.MaxPooling2D((2, 2), strides=2),
    tf.keras.layers.Dropout(0.5),
    tf.keras.layers.Flatten(),
    tf.keras.layers.Dense(128, activation=tf.nn.relu),
    tf.keras.layers.Dense(4,  activation=tf.nn.softmax)
])
model.compile(optimizer='adam',loss='sparse_categorical_crossentropy',metrics=['accuracy'])
model.fit(X_train, y_train, batch_size = batch_size, epochs = nb_epochs, verbose = 1, validation_data = (X_test, y_test))
Step 9: Accuracy and Score of Model
score = model.evaluate(X_test, y_test, verbose = 0 )
print("Test Score: ", score[0])
print("Test accuracy: ", score[1])
In these 9 simple steps, you would be ready to train your own Convolutional Neural Networks model and solve real-world problems using these skills. You can practice these skills on platforms like Analytics Vidhya and Kaggle. You can also play around by changing different parameters and discovering how you would get the best accuracy and score. Try changing the batch_size, the number of epochs or even adding/removing layers in the CNN model, and have fun!
Also Read: 20 Questions to Test your CNN Skills
Conclusion
In conclusion, image classification using CNN has revolutionized the field of computer vision, enabling accurate recognition of objects within images. With its ability to automatically learn and extract complex features, CNNs have become a powerful tool for various applications. To further enhance your understanding and skills in image classification using CNN and other advanced data science techniques, consider enrolling in our Blackbelt Program. This comprehensive program offers in-depth knowledge and practical experience, empowering you to become a proficient data scientist. Ready to take the next step? Explore the possibilities of our Blackbelt Program today!
Frequently Asked Questions
A. To use CNN for image classification, you need to define the architecture of the CNN, preprocess the input images, train the model on labeled data, and assess its performance on test images. Afterward, the trained CNN can classify new images based on the learned features.
A. CNN classifier for image classification is a CNN-based model specifically designed to classify images into different predefined classes. It learns to extract relevant features from input images and map them to the corresponding classes, enabling accurate image classification.
A. CNN in image captioning refers to using Convolutional Neural Networks as a component in the image captioning pipeline. CNNs are employed to extract visual features from input images, combined with text-based models to generate descriptive captions for the images.
A. You can train a CNN-based model on a dataset of noisy and corresponding clean images to denoise an image using CNN. The model learns to map the noisy images to their corresponding denoised versions. Once trained, the CNN can denoise new images by passing them through the network and obtaining the reconstructed clean images.
The media shown in this article are not owned by Analytics Vidhya and is used at the Author’s discretion.


Hello. Thank you so much for the step to step guide to implement this. I have a question to ask. I hope to hear from you soon. I can not understand how was 'img_array' initialized in your work? What does img_array contain and how did you do that?
"print(img_array.shape)" when is try to run this line in colab I get error like "print(img_array.shape)" please help me to rectify this
Hello! I was just wondering, in Step 2: Prepare Dataset for Training, where does the img_array variable come from? Is this just the path_test?
please kindly correct your codes!
Review on code structure would make this post better, imports and declared variables are everywhere, reduces clarity.