This article was published as a part of the Data Science Blogathon
Problem Statement
In this era of technological revolution, where everything is becoming automated, the physical touch between the system and the user is also becoming redundant. The concept of Gesture Recognition using various methods has widely been studied. This article aims to provide comprehensive research on the topic of Hand Recognition using Colour by employing the frameworks of OpenCV libraries.
It works with the concepts of image processing like background subtraction and thresholding which helps in segmenting the object that is used via our hand for gesture recognition. The main aim of this article is to provide the users with a way to operate their system in a more efficient and appealing manner. A hand gesture recognition system that requires the use of a coloured object and only a webcam can give way to many more such works making this more efficient with days to come.
Software and Hardware Required
- Python 3 or above
- OpenCV Libraries
- PC or Laptop with an in-built webcam or external webcam
Implementation (with code)
The project broadly consists of three modules. The first module is the declaration of the grids onto the capturing scene. These grids allow for the demarcation of the boundary of the captured video, thus, helping us to register exactly where the pointer had moved. The second module is the most important module of the project, as this where background subtraction for the pointer takes place and the pointer is brought to the focus. The third and final module is where the code registers the pattern in which the grids were visited and accordingly does the required task.
MODULE 1
OpenCV is one of the most prominently used software libraries focusing on computer vision and machine learning projects. It has inbuilt libraries and algorithms which provide for the implementation of certain computer vision problems. OpenCV also provides the algorithm for creating shapes and such onto the video-captured screen. In our project, we used to same in order to create nine grids onto the screen that captured the live video. Before we can use the package for the shape creation, we need to define the boundaries of the grid. We define the point coordinates of each of the four sides of the quadrilateral, on an estimation basis and then define all the remaining grids with respect to the positioning of the first one.
Using the cv2 package or the binding generators, we can call various functions of OpenCV. We use the cv2.rectangle function to create the grids according to the boundaries provided by us. We give it a descriptive colour (red, in our case) and specify the length of the same.
Once created, we display all the rectangles (grids) onto the live-video capturing screen and use it to create patterns for the tasks to be executed.
import numpy as np
import cv2
import webbrowser
import os
#defining the parameters
global r1
global g1
global b1
global r1p
global g1p
global b1p
global flag
global empty
global block
#defining the grids coordinates
first_block_l=[70,30] first_block_r=[190,150] second_block_l=[260,30] second_block_r=[380,150] third_block_l=[450,30] third_block_r=[570,150] fourth_block_l=[70,180] fourth_block_r=[190,300] fifth_block_l=[260,180] fifth_block_r=[380,300] sixth_block_l=[450,180] sixth_block_r=[570,300] seventh_block_l=[70,330] seventh_block_r=[190,450] eighth_block_l=[260,330] eighth_block_r=[380,450] ninth_block_l=[450,330] ninth_block_r=[570,450] def nothing(x):
pass
MODULE 2
This is the module where the bulk of the gesture recognition process takes place. We have successfully created the grids, now we need to create the pointer for it traverses the grids in a particular pattern.
That’s when the concept of Background subtraction and Thresholding comes into play.
The way that we can train our system in separating the foreground and background can be varied according to the project model. A simple way to do that is to display the background video to the system for, say 30 frames, and then bring the foreground object. We are basically telling the system that what it is seeing initially, for 30 frames, is actually the background that needs to be ignored, and the object that we have introduced in the video after the said number of frames is the one that needs to be taken into consideration. In summary, we will have two visuals, one with the foreground object and without. We find the absolute difference between the two, thus, leaving us with the foreground object.
The concept of Thresholding is very prominent in the field of computer vision. The thresholding of an image basically goes hand-in-hand with the concept of background subtraction. Thresholding allows a particular object to become differentiable from the rest of its background based on the value of its colour. Let’s say we have an image and put a threshold value, say x. Any object, or pixel on the screen that has the value above x, will be given the value of 1 (white) and the rest, below the value of x, will be given the value of 0 (black). Thus, extracting the white foreground object from the white background object. Thus, we can easily partake in background subtraction by providing the system a value, below which it will ignore the pixels. In our case, we use the values of RGB (Red-Green-Blue) of any object. Once the grid is created, we pause until background subtraction is successfully executed, and then we display the said grid. Once we run the project, we get the live video via our webcam and the RGB markers on the systems’ screen. These trackbars allow us to vary the thresholding value until we see our foreground object come into focus. The combination of the three colour values creates the threshold value which allows for that particular object’s colour to come into focus. For example, if we had a perfect red colour object in front of the webcam, then to make that the foreground object, the trackbars would read- Red: 0, Blue: 255, Green: 255. Thus, every other pixel that does not satisfy these values would be changed to black. A small deviation from the perfect, pure colour would mean a slight change in the trackbars, moderating it until the required object is the only thing that is visible, while the rest has changed its pixels value to that of black. Once background subtraction is achieved, we move on to the next part of our algorithm where we use the pointer that we created to traverse through the grids and enter a pattern in order to execute certain tasks.
cap=cv2.VideoCapture(0)
cv2.ocl.setUseOpenCL(False)
cv2.namedWindow(‘test’)
cv2.createTrackbar(‘R’,’test’,0,255,nothing)
cv2.createTrackbar(‘G’,’test’,0,255,nothing)
cv2.createTrackbar(‘B’,’test’,0,255,nothing)
switch=’0:OFF n 1:ON’
cv2.createTrackbar(switch,’test’,0,1,nothing)
fgbg=cv2.createBackgroundSubtractorMOG2() #background subtraction
main_gesture=[[0]] gesture=[0] empty=[] empty1=[0]
while cv2.waitKey(1)!=103 and cap.isOpened:
ret,frame=cap.read()
frame=cv2.flip(frame,1)
hsv=cv2.cvtColor(frame, cv2.COLOR_BGR2HSV)
imgray = cv2.cvtColor(frame,cv2.COLOR_BGR2GRAY)
r=cv2.getTrackbarPos(‘R’,’test’)
g=cv2.getTrackbarPos(‘G’,’test’)
b=cv2.getTrackbarPos(‘B’,’test’)
s=cv2.getTrackbarPos(switch,’test’)
if s==0:
lower=np.array([255,255,255])
higher=np.array([255,255,255])
else:
lower=np.array([r,g,b])
higher=np.array([255,255,255])
mask=cv2.inRange(hsv,lower,higher)
res=cv2.bitwise_and(frame,frame,mask=mask)
cv2.imshow(‘test’,res)while cv2.waitKey(1)!=27:
ret,frame=cap.read()
frame=cv2.flip(frame,1)
first=cv2.rectangle(frame,(first_block_l[0],first_block_l[1]),(first_block_r[0],first_block_r[1]),(0,0,255),1)
second=cv2.rectangle(frame,(second_block_l[0],second_block_l[1]),(second_block_r[0],second_block_r[1]),(0,0,255),1)
third=cv2.rectangle(frame,(third_block_l[0],third_block_l[1]),(third_block_r[0],third_block_r[1]),(0,0,255),1)
fourth=cv2.rectangle(frame,(fourth_block_l[0],fourth_block_l[1]),(fourth_block_r[0],fourth_block_r[1]),(0,0,255),1)
fifth=cv2.rectangle(frame,(fifth_block_l[0],fifth_block_l[1]),(fifth_block_r[0],fifth_block_r[1]),(0,0,255),1)
sixth=cv2.rectangle(frame,(sixth_block_l[0],sixth_block_l[1]),(sixth_block_r[0],sixth_block_r[1]),(0,0,255),1)
seventh=cv2.rectangle(frame,(seventh_block_l[0],seventh_block_l[1]),(seventh_block_r[0],seventh_block_r[1]),(0,0,255),1)
eighth=cv2.rectangle(frame,(eighth_block_l[0],eighth_block_l[1]),(eighth_block_r[0],eighth_block_r[1]),(0,0,255),1)
ninth=cv2.rectangle(frame,(ninth_block_l[0],ninth_block_l[1]),(ninth_block_r[0],ninth_block_r[1]),(0,0,255),1)hsv=cv2.cvtColor(frame, cv2.COLOR_BGR2HSV)
lower=np.array([r,g,b])
higher=np.array([255,255,255])
mask=cv2.inRange(hsv,lower,higher)
res=cv2.bitwise_and(frame,frame,mask=mask)
imgray = cv2.cvtColor(res,cv2.COLOR_BGR2GRAY)
ret,thresh = cv2.threshold(imgray,127,255,0)
fgmask=fgbg.apply(thresh)
blur=cv2.GaussianBlur(fgmask,(5,5),0)
img, contours, hierarchy = cv2.findContours(blur,cv2.RETR_TREE,cv2.CHAIN_APPROX_SIMPLE)
#img=cv2.drawContours(frame, contours, -1,(0,0,255),1)
MODULE 3
This module is the final module of the project where the pointer created in the previous module is used to trace patterns onto the live video. Once the background subtraction is completed, we press the activation key which takes us to another window. This window displays the grids that we created in the first module, along with the pointer (marked by circles and rectangles), which corresponds to the object that we used as the foreground object. Each grid corresponds to a number ranging from 1–9.
If the pointer falls on a particular grid, then the corresponding number is added to the list. 0 is the default or the initial value already added to the list, denoting that the pointer is not pointing to any of the grids. We move the pointer across the grids until a certain sequence is registered. The moment that happens, in our case, 0–1–2–3, a particular task occurs. In this situation, the notepad application opens. If we would have given a sequence like 0–3–2–1, the google website would have opened up in our Google Chrome browser. Hence, the algorithm works successfully.
for i in range(len(contours)):
cnt=np.array(contours[i])
nothing
hull=cv2.convexHull(cnt,returnPoints = False)
defects = cv2.convexityDefects(cnt,hull)(x,y),radius=cv2.minEnclosingCircle(cnt)
center = (int(x),int(y))
radius = int(radius)
rect=cv2.minAreaRect(cnt)
box=cv2.boxPoints(rect)
box=np.int0(box)
final=cv2.circle(frame,center,radius,(0,255,0),2)
final2=cv2.circle(frame,center,10,(255,0,0),2)
final3=cv2.drawContours(frame,[box],0,(0,0,255),2)
img = cv2.circle(img,center,radius,(255,0,0),2)
if contours==empty:
if gesture==empty1:
pass
else:
main_gesture.append(gesture)
gesture=[0] else:
if first_block_l[0]<center[0]<first_block_r[0] and first_block_l[1]<center[1]<first_block_r[1]:
block=1
if gesture[len(gesture)-1] != block:
gesture.append(block)
elif second_block_l[0]<center[0]<second_block_r[0] and second_block_l[1]<center[1]<second_block_r[1]:
block=2
if gesture[len(gesture)-1] != block:
gesture.append(block)
elif third_block_l[0]<center[0]<third_block_r[0] and third_block_l[1]<center[1]<third_block_r[1]:
block=3
if gesture[len(gesture)-1] != block:
gesture.append(block)
elif fourth_block_l[0]<center[0]<fourth_block_r[0] and fourth_block_l[1]<center[1]<fourth_block_r[1]:
block=4
if gesture[len(gesture)-1] != block:
gesture.append(block)
elif fifth_block_l[0]<center[0]<fifth_block_r[0] and fifth_block_l[1]<center[1]<fifth_block_r[1]:
block=5
if gesture[len(gesture)-1] != block:
gesture.append(block)
elif sixth_block_l[0]<center[0]<sixth_block_r[0] and sixth_block_l[1]<center[1]<sixth_block_r[1]:
block=6
if gesture[len(gesture)-1] != block:
gesture.append(block)
elif seventh_block_l[0]<center[0]<seventh_block_r[0] and seventh_block_l[1]<center[1]<seventh_block_r[1]:
block=7
if gesture[len(gesture)-1] != block:
gesture.append(block)
elif eighth_block_l[0]<center[0]<eighth_block_r[0] and eighth_block_l[1]<center[1]<eighth_block_r[1]:
block=8
if gesture[len(gesture)-1] != block:
gesture.append(block)
elif ninth_block_l[0]<center[0]<ninth_block_r[0] and ninth_block_l[1]<center[1]<ninth_block_r[1]:
block=9
if gesture[len(gesture)-1] != block:
gesture.append(block)
else:
pass
print(gesture)
print(main_gesture)
if main_gesture[len(main_gesture)-1]==[0,3,2,1]:
webbrowser.open(‘https://www.google.co.in’)
if main_gesture[len(main_gesture)-1]==[0,1,2,3]:
os.startfile(“notepad.exe”)
break
main_gesture=[0] cv2.imshow(‘test’,res)
cv2.imshow(‘final’,final)
cv2.imshow(‘final’,final2)
cv2.imshow(‘final’,final3)
cv2.imshow(‘final’,first)
cv2.imshow(‘final’,second)
cv2.imshow(‘final’,third)
cv2.imshow(‘final’,fourth)
cv2.imshow(‘final’,fifth)
cv2.imshow(‘final’,sixth)
cv2.imshow(‘final’,seventh)
cv2.imshow(‘final’,eighth)
cv2.imshow(‘final’,ninth)
cv2.resizeWindow(‘final’,640,480)
cap.release()
cv2.destroyAllWindows()
Experimentation Results
The project involves the use of the OpenCV frameworks which allow us to use certain inbuilt functionalities for the algorithms that we are employing. The concept of using the trackbars for the purpose of background subtractions, the creation of grids, and using it to register patterns in order to get on with a task, all of these are facilitated by the libraries and functions provided by OpenCV.
For creating the trackbars, we use the OpenCV function creataeTrackbar() and give it the required parameters like the initial and endpoints (0,255), the colour that it is going to control. These trackbars need to be placed onto a window of some sort, thus, we create a window using the function namedWindow() and give it an appropriate name. This window houses the trackbar, as well as, displays the live video received from the trackbar. Fig. 1 shows the ‘test’ window which shows the three trackbars controlling the three colours (R: Red, G: Green, B: Blue). It also shows a trackbar marked on/off, which has binary values, used for controlling the visual output. 0 would stop the window from displaying the video received from the webcam, whereas, 1 would display the live video received.
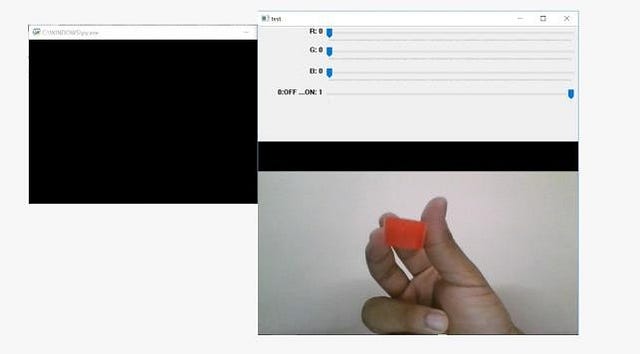
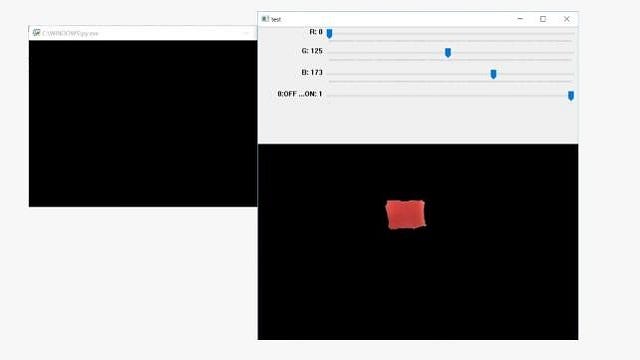
Fig. 2 shows how the background subtraction and thresholding have been successfully performed on the red object that was placed in front of the webcam. It can be seen that the trackbar marked as ‘R’ corresponding to the red colour has been made to 0, signifying that we do not need to mask this color. If the object would have been a perfect red color then the other two markers would have been pointed at the other extreme end that of 255. A little adjustment in the ‘G and ‘B’ trackbar allows the subtraction of all the other pixel values and focuses on our object as the foreground pointer that is required by us. By adjusting the three trackbars, we gave the system a threshold value below which the background is observed, and the pixel value is changed to that of black. Note that we need to remove as much noise as possible from the background so that this object can become a perfect pointer and the device does not detect any other pixel as part of the pointer. The existence of noise would cause the project to misread the patterns in the next step.
Once background subtraction and thresholding are obtained, the activation key triggers another window that displays the live video along with the grids that we created in module 1. It also marks our foreground object as the pointer, as displayed by the green-blue circles and the red rectangle. In Fig. 3, the black window beside the test window and our pointer window show the list of patterns, which is continuously updated by the pointer. 0 is the initial value added to the list. As seen in the figure, we have [0,4] in the list being displayed continuously. If we observe the pointer, it has been placed on grid number 4. Similarly, if we were to move to the 5th grid, the list would read [0.4.5]. In order to clear the value of the list and start with a new pattern, all we need to do is move out of the grids, which would clear the list. The original list with the value of 0 would start getting printed again until the pointer moves to any particular grid. The list takes in input until the value 0 is added once again.

In order to register a particular pattern, we move the pointer out of the grids. If any task is registered to that sequence of numbers, then it is carried out. Fig. 4 shows the launching of the notepad application, once the sequence [0,1,2,3] is registered in the list. We could open up various applications using the ‘webbrowser’ and ‘os’ libraries. A sequence of numbers like [0,3,2,1] would open up Google in the default browser of the system.
These sequences of numbers can easily correspond to a letter or a pattern. A straight line through the first grid of the row opens up a notepad. A straight line in the opposite direction opens up the Google website. A sequence [0,1,4,7,8] would correspond to the letter ‘L’. Thus, various patterns can be encoded into the system providing the users with a wide range of hand gestures to work with their system.
The system-built deals with hand gesture recognition using colours by applying frameworks of OpenCV. It employs the concept of background subtraction and thresholding. It takes a coloured object via the webcam and makes it the foreground pointer by applying thresholding by adjusting the pixel values of RGB (red, Green, Blue). Once a particular threshold is obtained, the coloured object becomes the foreground object, while the background and the noises are reduced to a pixel value of 0 making it black in colour. On moving on to the next window, we get numbered grids, which are traversed by the pointer. A sequence of numbers is registered which correspondingly triggers a task given by the users.
The work can be extended by removing the use of coloured objects and replace them with coloured finger gloves. This would allow the user to create patterns by using the tip of their fingers, making the application easier to use and it would thus appeal to a greater user base.
Software Installation Links:
1) Python 3 or above: https://www.python.org/downloads/
2) OpenCV Library: https://pypi.org/project/opencv-python/
Author:
Rishav Agarwal is a Computer Science undergraduate from VIT, Vellore, India. He will be attending Columbia University for MS in Computer Science in Fall-2021.
To read more articles by the author, check out his Medium page.
The media shown in this article are not owned by Analytics Vidhya and are used at the Author’s discretion.


