As a Data Science Enthusiast, Machine Learning Engineer, or data science practitioner, it’s not just about creating a machine learning model for a specific problem. Presenting your solution to the audience or clients is equally important, as your goal is to impact society. Deploying your solution to the cloud requires the assistance of a web framework, and Flask Python is one such micro web framework that simplifies the process.
This article will guide you through creating a Flask Python web application for Machine Learning and Data Science. We will delve into the following table of contents, providing detailed explanations and practical implementations.
This article was published as a part of the Data Science Blogathon.
Table of contents
- What is Web-Framework, and Micro Web-Framework?
- What is Flask Python?
- Why Use Flask?
- Key Aspects of Flask: WSGI and Jinja2
- What is Web Server Gateway Interface(WSGI)?
- What is Jinja2?
- Setting Up Flask Environment
- Important Flask Python Terminologies
- Implement your First ML Web App Using Flask Python
- Ready to Use Flask Python?
- Frequently Asked Questions
What is Web-Framework, and Micro Web-Framework?
A web application framework is a package of libraries and modules that simplifies the development process by handling protocol details and application maintenance. Python Django is an example of a traditional web framework, an enterprise framework.
On the other hand, a micro-framework offers developers more flexibility and freedom. Unlike traditional frameworks, micro-frameworks do not require extensive setup and are commonly used for small web application development. This approach saves time and reduces maintenance costs.
What is Flask Python?
Flask, a web framework written in Python, enables developers to quickly and rapidly develop web applications, configuring the backend and front end seamlessly. It grants developers complete control over data access and is built on Werkzeug’s WSGI toolkit and Jinja templating engine. Flask offers several key features, including:
- Simplified REST API development: Flask streamlines the creation of REST APIs by providing convenient libraries, tools, and modules for handling user requests, routing, sessions, form validation, and more.
- Versatility for various projects: Flask utilizes various applications, such as blog websites, commercial websites, and other web-based projects.
- Minimal boilerplate code: Flask eliminates the need for excessive boilerplate code, allowing developers to focus on the core functionality of their applications.
- Lightweight and essential components: Flask is a micro-framework that offers only essential components, allowing developers to implement additional functionalities through separate modules or extensions.
- Extensibility through Flask extensions: Flask boasts a vast ecosystem of extensions that can be seamlessly integrated to enhance its functionalities, providing developers with flexibility and the ability to expand its capabilities.
Why Use Flask?
Now you are able to understand why we call flask a micro web framework that is built using WSGI and Jinja templating. A major advantage of using flask is easy setup, and freedom to build a structure of web application as per your rules. It means flask is not bound as Django to use a specific set of rules.
Structure of Flask Web Application
To ensure the smooth execution of your Flask application, it is crucial to maintain the files according to Jinja templating guidelines. Follow these steps to organize your working directory for your Flask project:
- Create a folder for your Flask project: In your working directory, set up a dedicated folder to hold all the files related to your Flask project.
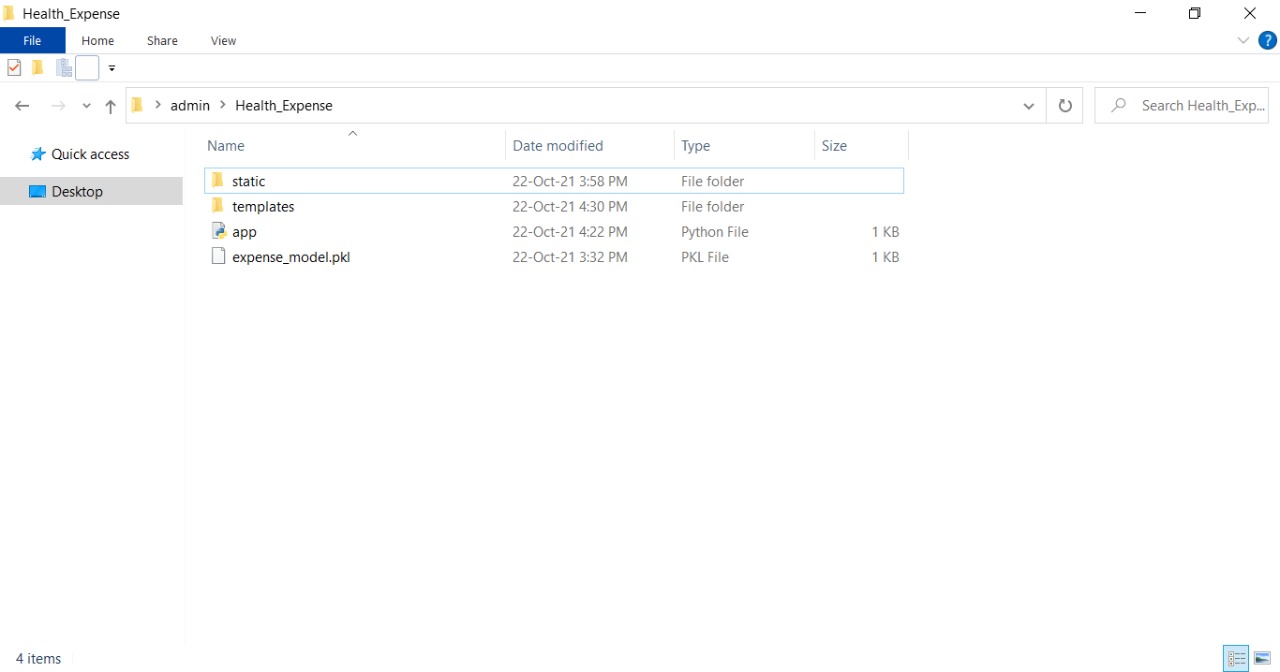
- Maintain the following folder structure:
- Create a folder named “templates”: This folder will store your HTML files. Place all the HTML templates used in your Flask application inside this folder.
- Create a folder named “static”: This folder will contain CSS, JavaScript, and any additional images you utilize in your application.
- Write your Flask code in the main file: Create an app.py or main.py file (or any other preferred name) within your project folder. This file will serve as the main entry point for your Flask application.
Note: The pickle file in the image may not be present in your current setup. It will generate when you implement the Flask application. For now, focus on creating the three components mentioned above: the templates folder, the static folder, and the main Flask file.
Following this standard structure, you can easily organize and maintain your Flask application, ensuring smooth execution and better collaboration with other developers.
Checkout: Develop and Deploy Image Classifier using Flask: Part 1 & Part 2
Key Aspects of Flask: WSGI and Jinja2
Everywhere it is said and written that Flask is WSGI compliant or Flask uses Jinja templating. But what is the actual meaning of these terms and what significance does this play in the flask development lifecycle? Let’s explore one by one each of two terminology.
What is Web Server Gateway Interface(WSGI)?
WSGI is a standard that describes the specifications concerning the communication between a client application and a web server. The benefit of using WSGI is that it helps in the scalability of applications with an increase in traffic, maintains efficiency in terms of speed, and maintains the flexibility of components.
What is Jinja2?
Template means frontend application designed using HTML, CSS, and whose content is displayed to a user in an interactive way. Flask helps to render the web page for the server with some specified custom input. In simple words, Flask helps connect your backend workflow with the frontend part and act as client-side scripting means It helps you to access the data that the user provides on frontend designed application and process the inputs by passing values to backend application and again rendering the output to HTML content is the task of Jinja templating.
Jinja2 has vast functionalities like a template inheritance which means when you create multiple templates (pages) for the application then some code or design is the same on each page so you do not need to write it again. It can be inherited from another template.
Setting Up Flask Environment
Now you have a good understanding of the theory of flask. let us enhance our understanding by making our hands dirty while trying something to implement using a flask.
It is good to create a new virtual environment if you start working on any new project. In your python working directory from anaconda prompt or command prompt create a new environment using the below code.
Install Flask
Now the first thing is to install a flask. use the pip command to install Flask.
pip install Flask
Test Flask Installation
Write the below code in created python app file and run it from the command line in a working directory using the below code.
from flask import Flask
app = Flask(__name__)
@app.route('/')
def hello_world():
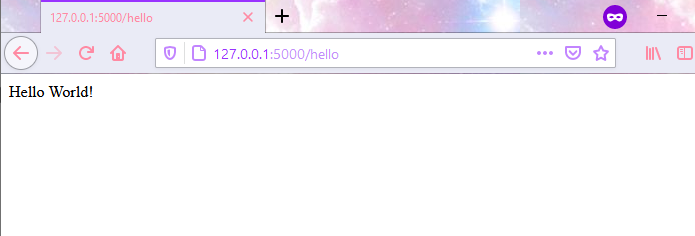
return 'Hello World’
if __name__ == '__main__':
app.run()There are parameters that can be defined in the app run function. the run function basically runs the application on a local development server.
app.run(host, port, debug, options)- host – It defines that on what hostname to listen to. we are running at localhost(default is 127.0.0.1)
- Port – on which port to call the application. The default port is 5000.
- debug – debug default is false. If it is set to true then it provides debug information in the command prompt and when you modify the application and save it then it automatically reloads the server so it is better while implementing to keep debug as True.
- options – The options are forwarded to the werkzeug server.
Also Read: Rest API | Complete Guide on Rest API with Python and Flask
Important Flask Python Terminologies
Routes
The route is a decorator in a python flask. It basically tells the application which function to be run or on which URL the user should be rendered. in a route function, the escape sequence describes the URL. The function after defining the route is created and you can pass parameters as a normal python function.
Flask support dynamic routing as well. you can modify the URL or while rendering you can put various conditions with custom data to send.
HTTP Methods
HTTP methods are the core communication block between various parties on the worldwide web. It helps to get, send, cached data from different websites or files. let us explore the different HTTP methods that Flask support and which method is used for what purpose.
1. GET
It is the most basic form of sending data to websites by concatenating the content to URL. The GET method is most commonly used to fetch the data from files or load a new HTML page. It can be used where you send the non-confidential data which if disclosed is not an issue.
2. POST
POST method is the most used method after the GET request. It is used to send the data to a server using encryption. The data is not appended to URL, it is sent and displayed in a body of HTML using jinja python templating. The POST method is mostly used when we are working with forms to send receive user data and after processing sending output back to display in HTML body.
POST method is the most-trusted method and is used to send confidential data like login credentials.
3. HEAD
The head method is similar to the Get method but it can be cached on the system. The passed data is unencrypted and it must have a response. Suppose if some URL requests for a large file download, now by using HEAD method URL can request to get file size.
4. PUT
The PUT method is similar to the POST method. The only difference lies in when we call POST request multiple times then that many time request is made, and in PUT method it opposes the multiple requests and replaces the new request with an old response.
5. DELETE
delete is a simple HTTP method that is used to delete some particular resource to a server.
Implement your First ML Web App Using Flask Python
Now we have a practical and basic understanding of the flask framework works. Now you must be wondering how can deploy our machine learning model using flask so that the Public can use it and provide new data. So, it is a simple task where the inputs(best features you have chosen) your machine learning model requires is taken from a user in form of HTML form or flask form, and using the flask GET method you access data at the backend. After providing the user data to the model and model gives you an output. Using POST request you render the output to an HTML page and give it to a user. The process is simple and works really very fast. let us implement this on a dataset.
Problem Statement
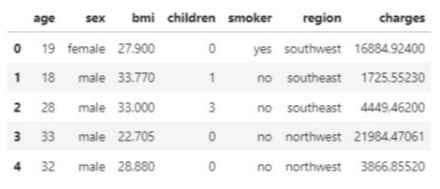
We are using a Healthcare expense dataset from Kaggle. You can find details and the dataset here. The data basically aims to predict the individual healthcare expenses given age, family details, BMI, gender. The particular dataset is chosen because it contains different input variables so you will learn how to access different inputs from the front end using a flask. Our main aim here is not for implementing any generalized machine learning model. our main aim is to understand the development of flask applications for any machine learning model.
Prepare Machine Learning Model
Before implementing the Flask application it is important to have a machine learning model in any form like pickle, h5, etc. so lets us load the data, preprocess the data, and train a linear regression algorithm on it. After modeling, we will save the model using the pickle module. The code snippet of complete model preparation is given below.
import pandas as pd
import numpy as np
from sklearn.model_selection import train_test_split
from sklearn.preprocessing import LabelEncoder
from sklearn.linear_model import LinearRegression
import pickle
data = pd.read_csv("/kaggle/input/insurance/insurance.csv")
le = LabelEncoder()
le.fit(data['sex'])
data['Sex'] = le.transform(data['sex'])
le.fit(data['smoker'])
data['Smoker'] = le.transform(data['smoker'])
le.fit(data['region'])
data['Region'] = le.transform(data['region'])
#independent and dependent columns
x = data[["age", "bmi", "children", "Sex", "Smoker", "Region"]]
y = data['charges']
#split in train and test
x_train, x_test, y_train, y_test = train_test_split(x, y, test_size=0.3, random_state=0)
#model training
linreg = LinearRegression()
linreg.fit(x_train, y_train)
#model testing
predictions = linreg.predict(x_test)
linreg.score(x_test,y_test)
#save the model
file = open("expense_model.pkl", 'wb')
pickle.dump(linreg, file)
Also Read: How to Deploy Machine Learning Models using Flask (with Code!)
Creating a Flask Application
Now it’s time to get ready and build a flask application. we will move in a step-by-step procedure by designing an HTML page, server-side flask application.
Step 1: Create a HTML Page
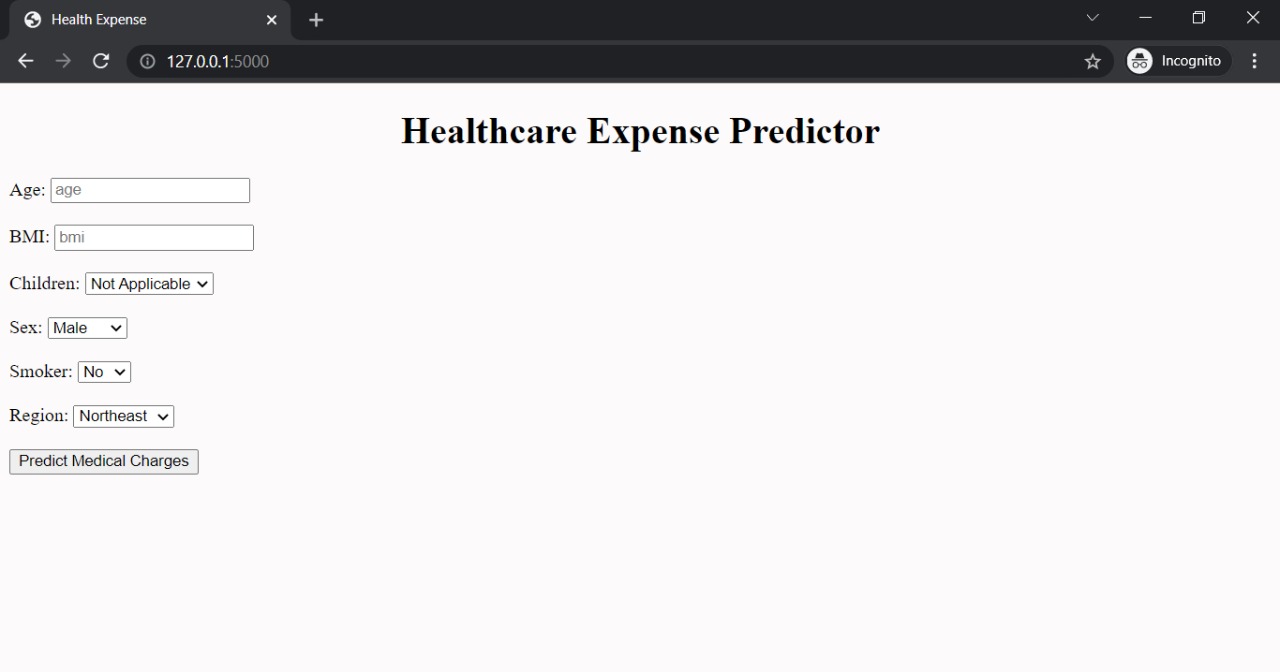
In templates, folders create an HTML file with any name. we have kept it as index.html. In this, we have to design a form that will visible to a user through which the user will provide us a data. I have created a simple web interface to observe everything clearly. you can give design it more and can also add a CSS file from a static folder. The code snippet is below and its explanation is given below code.
<!doctype html>
<html lang="en">
<head>
  <meta charset="UTF-8">
  <title>Health Expense</title>
  <link href='https://fonts.googleapis.com/css?family=Open+Sans+Condensed:300' rel='stylesheet' type='text/css'>
  <link href="{{ url_for('static', filename='style.css') }}" rel="stylesheet">
</head>
<body style="background: rgb(252, 250, 250);">
  <div class="login">
   <h1 style="text-align:center">Healthcare Expense Predictor</h1>
    <form action="{{ url_for('predict')}}" method="post">
      <label for="age" colo>Age:  </label>
      <input type="text" name="age" placeholder="age" required="required">
      <br>
      <br>
      <label for="bmi">BMI:  </label>
      <input type="text" name="bmi" placeholder="bmi" required="required">
      <br>
      <br>
      <label for="children">Children:  </label>
      <select id="children" name="children", placeholder="children", required="required">
        <option value="0">Not Applicable</option>
        <option value="1">1</option>
        <option value="2">2</option>
        <option value="3">3</option>
        <option value="4">4</option>
        <option value="5">5 & above</option>
      </select>
      <br>
      <br>
      <label for="Sex">Sex:  </label>
      <select id="Sex" name="Sex" placeholder="Sex", required="required">
        <option value="0">Male</option>
        <option value="1">Female</option>
      </select>
      <br>
      <br>
      <label for="Smoker">Smoker:  </label>
      <select id="Smoker" name="Smoker", placeholder="Smoker", required="required">
        <option value="0">No</option>
        <option value="1">Yes</option>
      </select>
      <br>
      <br>
      <label for="Region">Region:  </label>
      <select id="Region" name="Region", placeholder="Region", required="required">
        <option value="0">Northeast</option>
        <option value="1">Northwest</option>
        <option value="2">Southeast</option>
        <option value="3">Southwest</option>
      </select>
      <br>
      <br>
      <button type="submit" class="btn btn-primary btn-block btn-large">Predict Medical Charges</button>
    </form>
    <br>
    <br>
    <h2>
    {{ prediction_text }}
    </h2>
  </div>
</body>
</html>
Healthcare Expense Predictor
Not Applicable
1
2
3
4
5 & above
Male
Female
No
Yes
Northeast
Northwest
Southeast
Southwest
{{ prediction_text }}
In HTML form we have used a dynamic URL building of the Jinja template. It means that when a form is submitted then where should a user be redirected. in our form whenever the to submit button will be triggered then it will call to prediction URL and our flask application will capable to access the data.
Dynamic URL Building
It is a method used to dynamically build URLs at run-time. url_for method is used to achieve this. the first parameter is accepted as a folder name or function name and the second is the filename. If you use it in flask then it is used to redirect to some URL after success or failure of some event where URL changes as per input. In simple words means the URL keeps changing based on inputs. Consider the below script as a demo in a flask of how to build a dynamic URL.
@app.route('/user/')
def hello_user(name):
   if name =='admin':
      return redirect(url_for('admin'))
   else:
      return redirect(url_for('guest', guest = name))
In the above code, it accepts the name from the frontend through some form, and on hitting a post request hello user function accepts the name and check that it is admin then redirect to the admin panel else on the guest panel. The same dynamic URL building you can use if you are working on some big project or you want to redirect the user to different HTML pages based on his inputs.
Control Statements in Flask jinja Template
After creating the HTML form, we use the H2 tag with jinja syntax to display our output. In Flask, when you need to display data from the server on the front end, you enclose the variable in double curly braces within the desired tag. You can also use loops and conditions for printing data. Loops and control statements are written in single curly braces followed by a modulo sign. Below is a sample snippet demonstrating how to display an array of numbers and determine if they are even or odd. This code is for reference purposes only and must not be added to your actual code files. It helps you understand how to use control statements in jinja.
<div>
<pre><div>
{% for i in arr%}
{% if i%2 == 0%}
<h4> {{i}} </h4>
<p>Even</p>
{% else %}
<h4> {{i}} </h4>
<p>Odd</p>
{% endif %}
{% endfor %}
</div></pre>
</div>Step 2: Create a Flask Python Application
Now let us edit our python app file. here we will write a complete logic of how our web app routing will happen, and what action to take each time. The complete explanation of each term is described below the code.
from flask import Flask, render_template, request
import pickle
app = Flask(__name__)
model = pickle.load(open('expense_model.pkl','rb')) #read mode
@app.route("/")
def home():
return render_template('index.html')
@app.route("/predict", methods=['GET','POST'])
def predict():
if request.method == 'POST':
#access the data from form
## Age
age = int(request.form["age"])
bmi = int(request.form["bmi"])
children = int(request.form["children"])
Sex = int(request.form["Sex"])
Smoker = int(request.form["Smoker"])
Region = int(request.form["Region"])
#get prediction
input_cols = [[age, bmi, children, Sex, Smoker, Region]]
prediction = model.predict(input_cols)
output = round(prediction[0], 2)
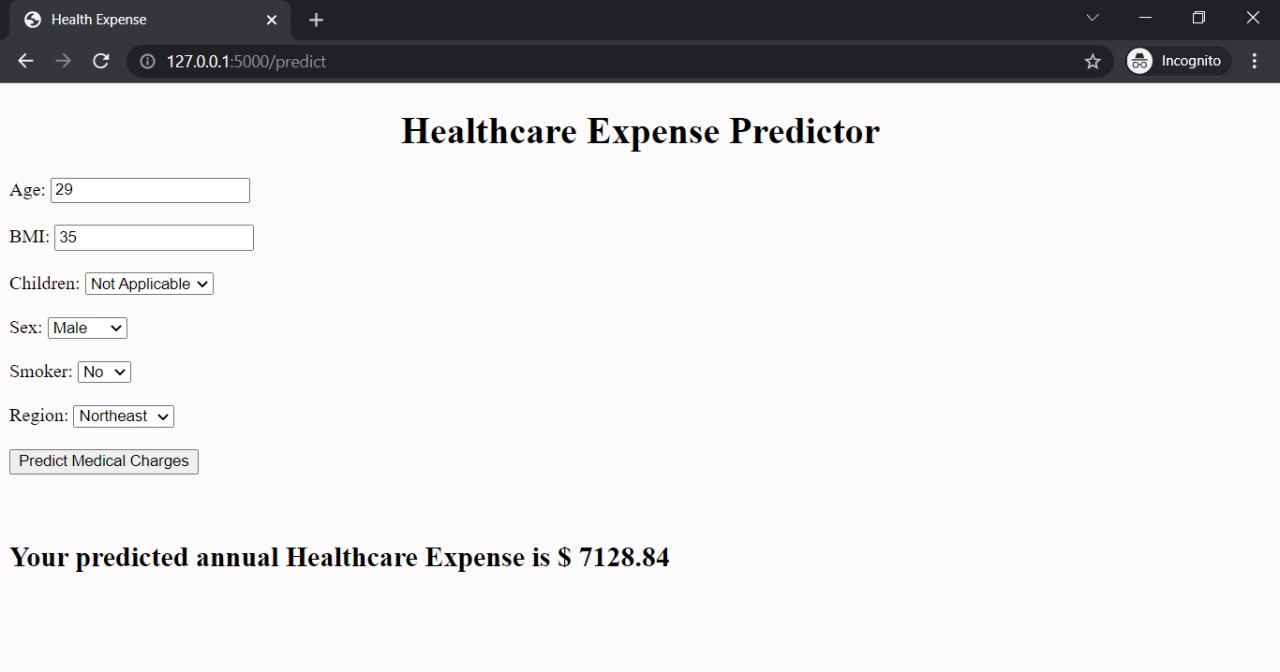
return render_template("index.html", prediction_text='Your predicted annual Healthcare Expense is $ {}'.format(output))
if __name__ == "__main__":
app.run(debug=True)Stage 1
First, we have to import the Flask class and define our app. After that, we have loaded the model that we have saved in our working directory. The first routing is at our home page which is given by a single escape sign. It means that if the user heat at the “/” URL then redirects to our HTML page which is our home application.
Stage 2
After this, the main predict function is there. It means if the user makes a POST request means to hit a submit button then load the site to “/predict”, and the flask will access the data inserted in HTML form. when we have the data we pass it to our loaded model in 2-dimension to get the desired output. As we get an output to redirect the user to the same page with prediction and using jinja templating we have printed output on the HTML page.
Final Stage
The inputs from the flask form are accessed using the name attribute that we have provided to each label while creating an HTML page. the request make a request to that input label and match it with the name and collect the value selected or entered by the user. so when you create an HTML form for a machine learning model do provide each input with an appropriate name so you can access the value easily. And the input variable is categorical then using the value attribute we have encoded it to numeric. so when a request fetches the data it gets the value as specified but when it brings the data, it is always in string format so we typecast it to an integer.
Step 3: Run the Flask application locally
That sits, and by following these simple two to three easy steps you can deploy your machine learning model and make it available for the public to use. Now let’s check this from our command prompt whether everything is running fine or not. open your command prompt and go into the working directory and just run the app file.
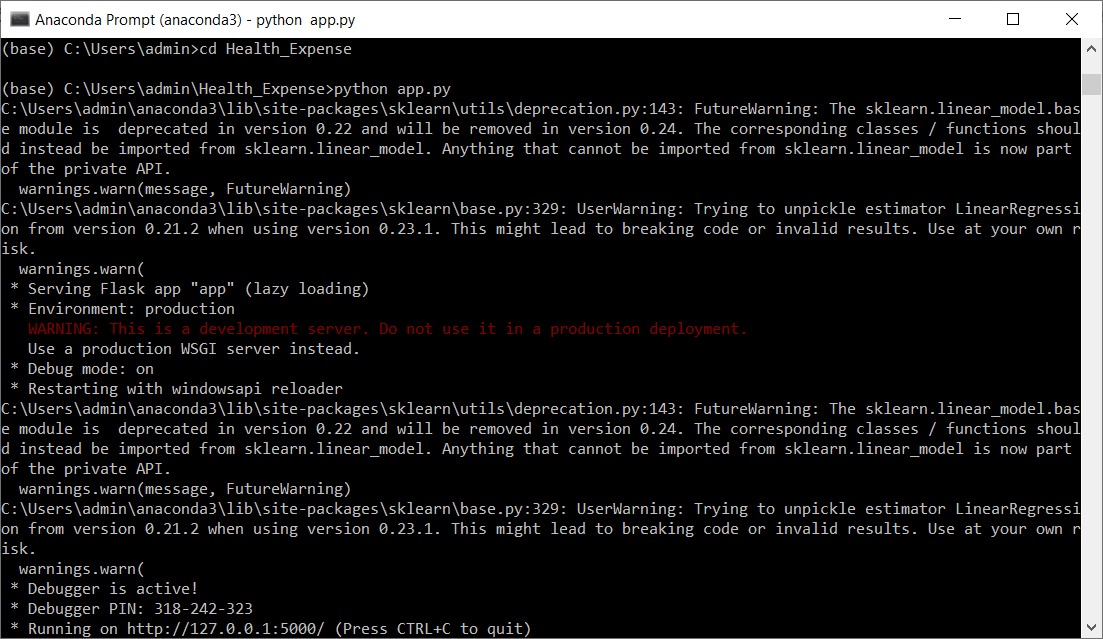
On running the app file you will get a localhost URL, copy the URL and open it in the browser and you will see your web app in your browser.
Now Provide some random data in a form and check whether you are getting predictions or not.
Also Read: Which is Better for Machine Learning: Flask vs Django
Ready to Use Flask Python?
Hence, we have successfully made our first flask application, and we are getting an output. Now you can use any cloud platform to deploy your application and make it available for the audience to use.
Flask is a Python micro web framework used for creating interactive web applications. It is majorly preferred by data science enthusiasts to deploy machine learning models because it gives freedom to implement your own rules and does not require much setup. Flask Python contains various extensions using with you can give a dynamic look and take advantage of many functionalities. With the help of this article, I hope that you hold a good theoretical knowledge of flask and now you can implement your own flask application for your machine learning models.
If you have any doubts or feedback, feel free to share them in the comments section below.
Frequently Asked Questions
Q1. What is Flask Python used for?
A. Flask Python is a web framework used for building web applications in Python. It provides tools and libraries for handling web development tasks efficiently.
Q2. Is Flask Python or Django?
A. Flask and Django are both Python web frameworks but differ in their design philosophies and feature sets. Flask is minimalistic and flexible, while Django is a full-featured framework with batteries included.
Q3. What is Python Django vs Flask?
A. Python Django is a high-level web framework that follows the Model-View-Controller (MVC) architectural pattern. On the other hand, Flask is a microframework that follows a simpler and more lightweight approach.
Q4. Is Python Flask an API?
A. Yes, Python Flask can be used to build APIs. It provides the tools and libraries to handle HTTP requests and responses, making it suitable for building RESTful APIs or web services.
The media shown in this article is not owned by Analytics Vidhya and are used at the Author’s discretion.
I am a software Engineer with a keen passion towards data science. I love to learn and explore different data-related techniques and technologies. Writing articles provide me with the skill of research and the ability to make others understand what I learned. I aspire to grow as a prominent data architect through my profession and technical content writing as a passion.


Worked like a charm. very nice tutorial. Thanks a lot.