HuggingFace Transformer Model Using Amazon Sagemaker
This article was published as a part of the Data Science Blogathon.
Objective
To learn how to use Amazon Sagemaker to Train and Deploy a Hugging Face Transformer Model.
Prerequisites
Basic Knowledge of AWS cloud and Hugging Face Transformers.
Introduction
Hugging Face is the most popular Open Source company providing state-of-the-art NLP technology. Amazon Sagemaker offers high-performance resources to train and use NLP models.
Deep learning containers(DLC) developed with Hugging Face for both training and inference for the Pytorch and Tensorflow frameworks. A Hugging Face estimator in the Sagemaker SDK to launch NLP scripts on scalable, cost-effective Sagemaker training jobs without worrying about Docker.
Benefits of Hugging Face models in Amazon Sagemaker
Cost-effective: Sagemaker optimizes scale, performance, and effectiveness to reduce costs. EC2 spot instances further save costs for non-critical workloads.
MLOps Ready: Includes automated metadata persistence and search in the Sagemaker metastore, log extraction to Amazon CloudWatch, monitoring with Sagemaker Debugger & Profiler, and experiment management.
Scalable: Able to run on clusters of GPUs, with efficient data-parallel and model-parallel distribution provided by Amazon Sagemaker. Ability to launch several concurrent jobs at the same time with the async model of the API.
Secure: High bar on security, with available mechanisms including encryption at rest and in transit, VPC connectivity, and fine-grained IAM permissions.
Top-quality: Directly supported by Hugging Face and AWS, including the latest Hugging Face and AWS innovations.
Less heavy lifting: No Amazon ECR self-management, no custom installation to handle, no extra SDK configuration.
.png)
Source: Amazon Sagemaker
Let’s get our hands working!
First, we need to log in to the AWS console. If you don’t have an account you can create one and use the free credits provided by AWS. Once you logged in, search for Sagemaker and click on the Service.

Source: Author
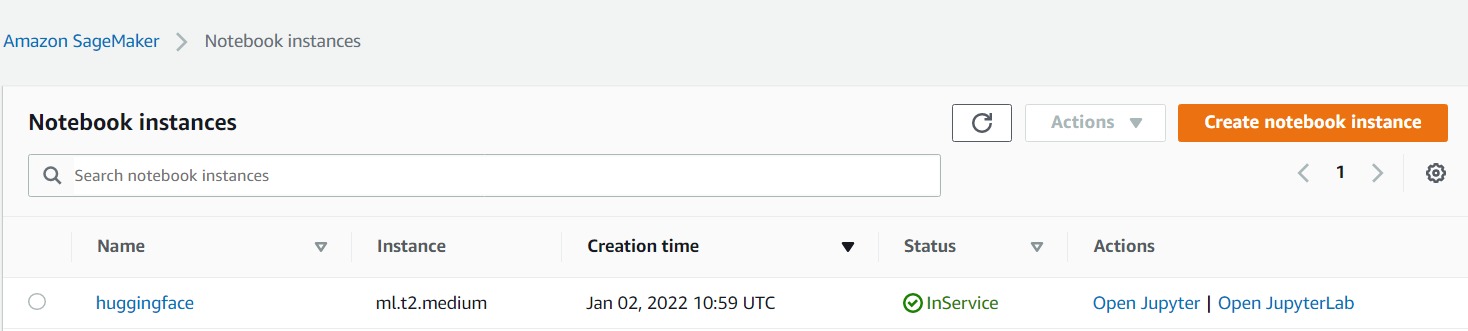
On the landing page, on the left-hand side, you will find the Notebook option, click on that and select Notebook instances, and then click on Create notebook instance.
Give instance name and select the Sagemaker execution role and in the Git option select clone from the public repo and paste the following link https://github.com/philschmid/huggingface-sagemaker-workshop-series.git (This is the official Hugging Face repository) and click create.
Once the instance is ready click on Open Jupyter and head over to the workshop1 folder and open the lab1 notebook and select conda_pytorch_36 kernel if it is not set automatically.
Source: Author
Now, run the first cell to install the required dependencies, and then we need to get the execution role and create a Sagemaker session, for that run the next cells.
import sagemaker
sess = sagemaker.Session()
# sagemaker session bucket -> used for uploading data, models and logs
# sagemaker will automatically create this bucket if it not exists
sagemaker_session_bucket=None
if sagemaker_session_bucket is None and sess is not None:
    # set to default bucket if a bucket name is not given
    sagemaker_session_bucket = sess.default_bucket()
role = sagemaker.get_execution_role()
sess = sagemaker.Session(default_bucket=sagemaker_session_bucket)

As a managed service, Amazon SageMaker performs operations on your behalf on the AWS hardware that is managed by SageMaker. SageMaker can perform only operations that the user permits. A SageMaker user can grant these permissions with an IAM role (referred to as an execution role).
Source: Sagemaker Roles
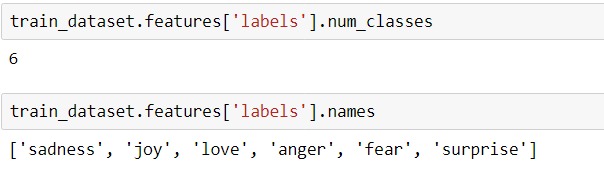
This notebook will perform Multi-class classification. The ’emotion’ dataset is used which has 6 classes, anger, fear, joy, love, sadness, and surprise. We will download the dataset, split into train and test, preprocess it, and push it to the S3 bucket as Sagemaker required data to be in the S3 bucket.
Run the cells under Preprocessing and Upload data section to perform the above steps.
We can check the dataset labels and info using the following code:
train_dataset.features['labels'].num_classes
train_dataset.features['labels'].names
train_dataset.info
Source: Author
If you want to know what all operations we can perform on the datasets object, you can refer to the datasets library page.
Once the dataset is preprocessed and uploaded to S3, we can now run the fine-tuning step. We first need to create and Hugging Face Estimator, which will handle training and deployment, we need to provide the training script as an entry-point and instance configuration such as for instance type and instance count.
We can pass the hyperparameters dictionary to the estimator hyperparameter parameter.
# hyperparameters, which are passed into the training job
hyperparameters={'epochs': 1,                          # number of training epochs
                 'train_batch_size': 32,               # batch size for training
                 'eval_batch_size': 64,                # batch size for evaluation
                 'learning_rate': 3e-5,                # learning rate used during training
                 'model_id':'distilbert-base-uncased', # pre-trained model
                 'fp16': True,                         # Whether to use 16-bit (mixed) precision training
                }
# define Training Job Name
job_name = f'huggingface-workshop-{time.strftime("%Y-%m-%d-%H-%M-%S", time.localtime())}'
# create the Estimator
huggingface_estimator = HuggingFace(
    entry_point          = 'train.py',        # fine-tuning script used in training jon
    source_dir           = './scripts',       # directory where fine-tuning script is stored
    instance_type        = 'ml.p3.2xlarge',   # instances type used for the training job
    instance_count       = 1,                 # the number of instances used for training
    base_job_name        = job_name,          # the name of the training job
    role                 = role,              # Iam role used in training job to access AWS ressources, e.g. S3
    transformers_version = '4.6.1',           # the transformers version used in the training job
    pytorch_version      = '1.7.1',           # the pytorch_version version used in the training job
    py_version           = 'py36',            # the python version used in the training job
    hyperparameters      = hyperparameters,   # the hyperparameter used for running the training job
)
We have used instance type as ‘ml.p3.2xlarge’, which supports GPU.
The training script, train.py contains the code to train and evaluate the model. It uses the Hugging Face Transformer trainer class to train the model.
# create Trainer instance
trainer = Trainer(
    model=model,
    args=training_args,
    compute_metrics=compute_metrics,
    train_dataset=train_dataset,
    eval_dataset=test_dataset,
    tokenizer=tokenizer,
)
def compute_metrics(eval_pred):
    predictions, labels = eval_pred
    predictions = np.argmax(predictions, axis=1)
    return metric.compute(predictions=predictions, references=labels)
Using [dot]train method on Trainer instance to train the model.
trainer.train()
Once the model is trained, it will evaluate the model on test data using [dot]evaluate method.
Finally, it will save the model to the Sagemaker model directory which eventually gets uploaded to the S3 bucket.
trainer.save_model(os.environ["SM_MODEL_DIR"])
Now, back to our notebook, run the estimator fit method to start the fine-tuning task, provide the S3 data path where we have saved the dataset.
# define a data input dictionary with our uploaded s3 uris
data = {
    'train': training_input_path,
    'test': test_input_path
}
# starting the training job with our uploaded datasets as input
huggingface_estimator.fit(data, wait=True)
If you face Resource Limit Exceeded Error, then please follow this link to raise a request to increase the service limit on the required resources.
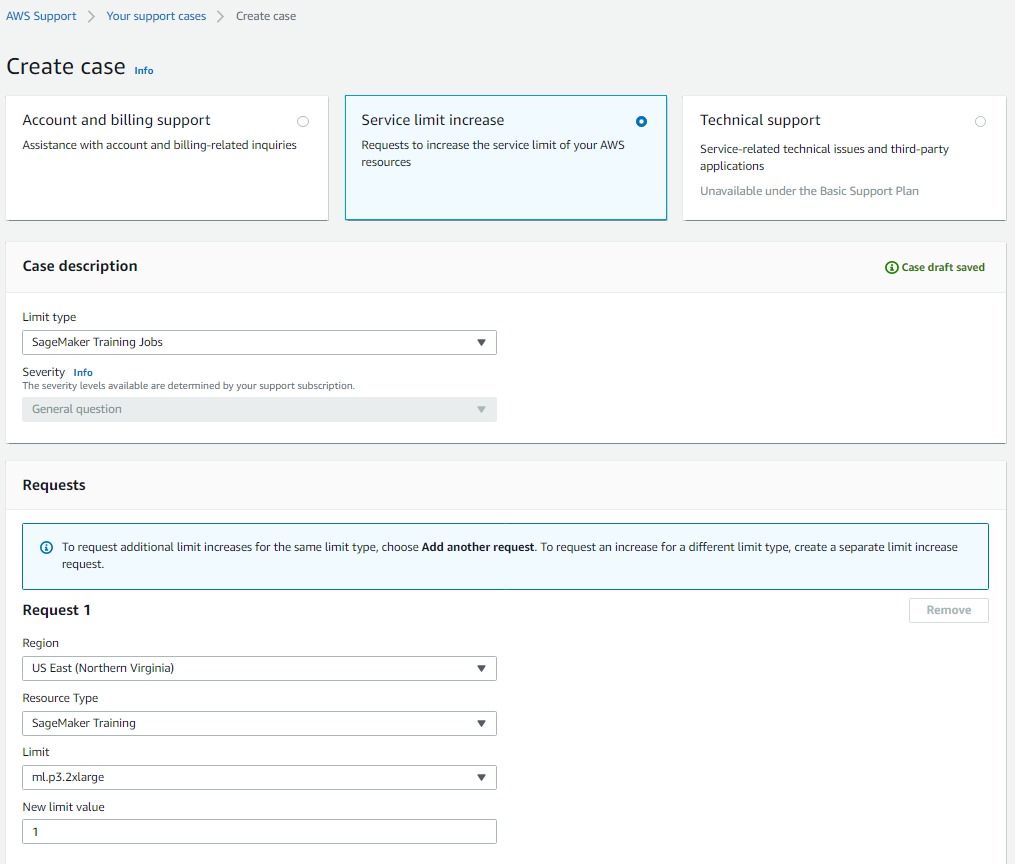
Source: Author
Create another case for Sagemaker hosting instances if you want to host on ‘ml.g4dn.xlarge‘ instance else you can select ‘ml.m4.xlarge‘ instance which has a limit of 2 instances.
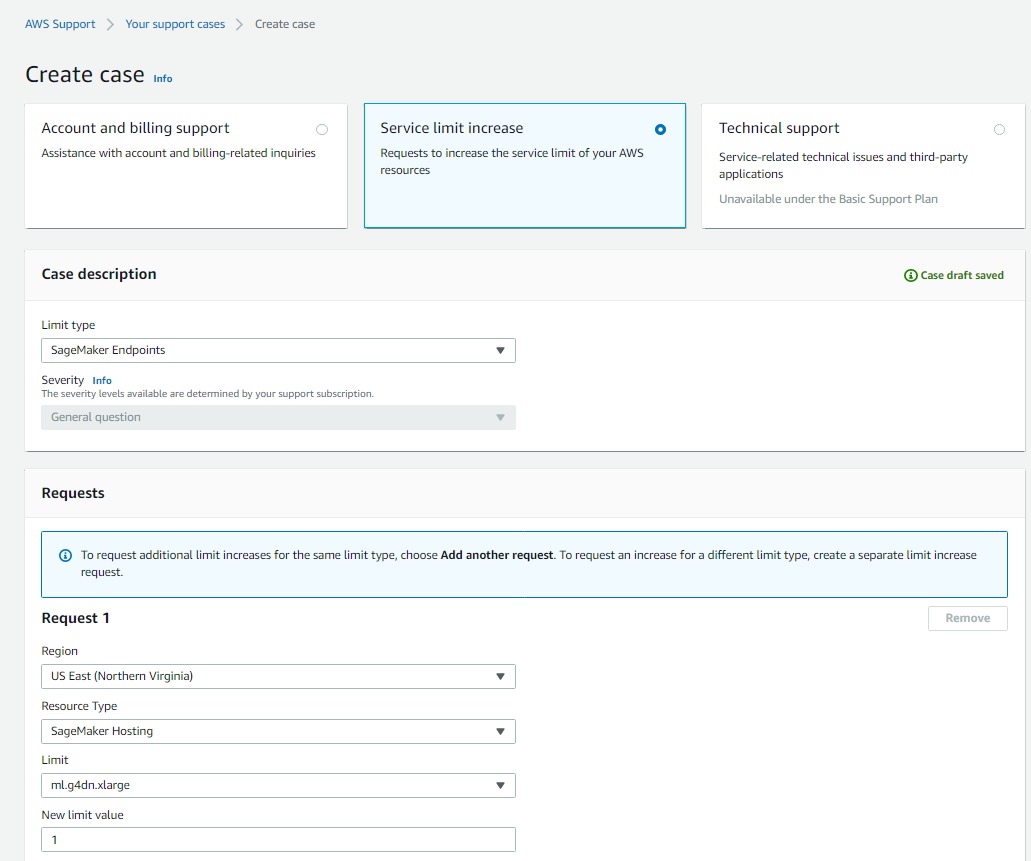
Source: Author
Once the model is trained, we can host the model using the Sagemaker endpoint.
predictor = huggingface_estimator.deploy(1, "ml.g4dn.xlarge") #ml.m4.xlarge
We can submit an inference request to the created predictor object using predict method.
sentiment_input= {"inputs": "I get so nervous before a demo"}
predictor.predict(sentiment_input)

Source: Author
We have successfully fine-tuned and deployed a Hugging Face model on AWS Sagemaker.
Don’t forget to delete the endpoint, so that we don’t incur any additional cost.
predictor.delete_endpoint()
Also, stop the running Sagemaker notebook instance and once it is stopped you can delete it if you want.
For information about Compute instances pricing, check the link to get an idea of how much cost it will incur for the experimentation.
References
- Use Hugging Face with Amazon SageMaker – Amazon SageMaker
- Hugging Face on Amazon SageMaker
- huggingface-sagemaker-workshop-series/workshop_1_getting_started_with_amazon_sagemaker at main · philschmid/huggingface-sagemaker-workshop-series · GitHub
About Author
I am a Machine Learning Engineer, Solving challenging business problems through data and machine learning.
Connect with me on Linkedin 🙂
Read more articles on Hugging Face here.


You call `trainer.train()` inside the training job script which then saves out the fit model to the compute instance then immediately uploads it to an output s3 location. That fit model can then be retrieved and deployed from the notebook. So why are you then also retraining a model using `huggingface_estimator.fit()` to fit another model "locally" on the notebook instance? This seems redundant. Can you explain the reasoning behind the double fitting process?