This article was published as a part of the Data Science Blogathon.
About
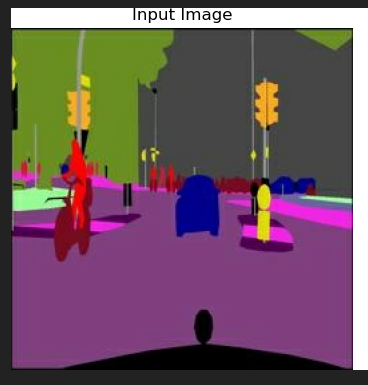
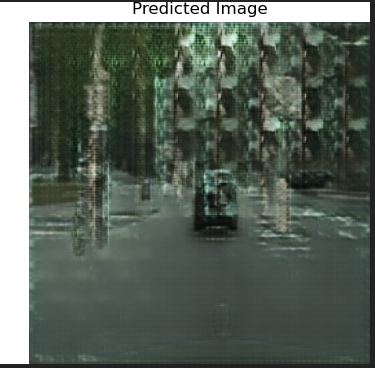
Generative Adversarial Networks (GANs) have been used as a deep learning approach for various image processing, computer vision problems. This article touches on one such task of regenerating images using a conditional Generative Adversarial Networks (cGAN) architecture and applying a special form of cGAN -Pix2Pix model. We will demonstrate and analyze the effectiveness of this approach in converting semantically labelled images to original images and based on training how efficiently the application will learn to translate. We would analyze how close we can predict the output image comparing the ground truth image. We are evaluating the network based on L1, Generator, and Discriminator Losses which will be visualized using Tensorboard.
We would focus on implementing the cGAN architecture, train it with our custom datasets, and create semantic images using python for custom downloaded images which would be training and test set images. We will use this trained model in an application tool that will inherently use the model being trained above and generate real images against hand paint images at runtime
Introduction
Most of the application of Generative Adversarial Networks explores similar work of new image generation, conversion from a random vector z’ into an image. However, we choose to use a modified version of GAN i.e. cGAN. A conventional GAN consists of two competing adversaries’ neural networks, a generator, and a discriminator. The discriminator tries to maximize predicted accuracy associated with predicting real or fake data, while the generator generates fake images or data which tries to fool the discriminator. The generator acts on the latent space using latent variables and seeks to learn the probability distribution of the verifiable data which allows it to generate ‘fake’ samples from the distribution which is learned.
Although we could manage to control the domain of the samples on which Generative Adversarial Networks is getting learned still, we could not command the conventional GAN to generate images with specific characteristics. The traditional methods use pixel-by-pixel classification or regression techniques where predicted pixels are independent of previously generated pixels. This is a limitation with a conventional Generative Adversarial Networks model that it would generate a random image from the domain. It generates the output based on a relationship between latent space and generated images, but this relationship is without any control in the input, and it is difficult to map between these two. Instead, an adversarial network (GAN) can be trained by putting some extra controls on the input class label such that both the generator and the discriminator models are conditioned on some extra [y]. It also suggests when we use this trained generator model as a separate network unit, it will generate images in the domain of a particular kind, type, or class which is based on how we have conditioned it. This is what Conditional Generative Adversarial Networks in which we are using in this project.
Image regeneration, future frame prediction, and such tasks have been exploiting Generative Adversarial Networks but before cGAN, they have applied the Generative Adversarial Networks unconditionally and had to rely on L2 regression to force the output to be conditioned on the output. Contrary to previous work, we are using a generator network that is “U-Net” based and the discriminator is a convolutional “PatchGAN” classifier.
Sample output of the GUI Application
Theoretical Background
The conventional GAN architecture can be modified to include additional inputs, y, on which the models can be conditioned. y can be any type of additional inputs, for example, class labels. The conditioning can be achieved by simply feeding y to both the Generator — G(z|y) and the Discriminator — D(x|y). These networks not only learn the mapping from the input image to the output image but also learn a loss function to train this mapping.
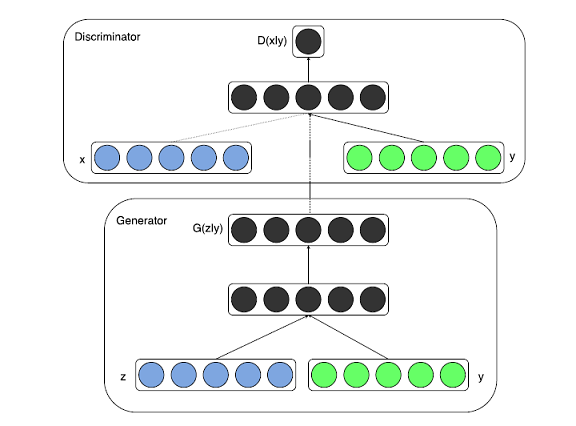
Basic cGAN Network[2]
Objective function[1] of the traditional GAN:
To learn a generator distribution pg over data x, the generator builds a mapping function from a prior noise distribution pz(z) to data space as G(z). The discriminator outputs, a single scalar representing the probability that x came from training data rather than pg. G and D are both trained simultaneously: we adjust parameters for G to minimize log(1 – D(G(z)) and adjust parameters for D to minimize logD(x) as if they are following the two-player min-max game with value function V (G; D):
Objective function for conditional GAN[1] :
we need to adjust parameters for G to minimize log (1 – D(G(z)) given y and adjust parameters for D to minimize logD(x) again given y.
Pix2Pix-cGAN uses U-Net for the generator and the Patch-GAN classifier as the discriminator.
3.1 Architecture
We have implemented the pix2pix model of a conditional GAN (cGAN) where the output image generated is conditioned on input images. The generator is trained via adversarial loss, which encourages the generator to generate plausible images in the target domain. The generator is also updated via L1 loss measured between the generated image and the predicted output image. This additional loss encourages the generator model to create plausible translations of the source image. The discriminator is provided with both a source image and the target image and must determine whether the target is a possible transformation of the source image..
3.1.1 U-Net Generator Model
The network used for generators in conditional GAN is not the same as conventional GAN. This is an encoder-decoder model which uses U-Net architecture.
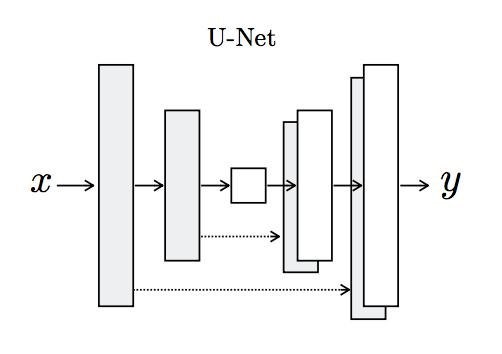
Representation of U-Net Architecture[1]
Schematic Explanation The network shown above is a U-Net network model and it represents that the model first downsamples the input image, to the bottleneck layer and then upsamples it from there to the final output image size. The arrows with a dotted line are called ‘skip connections’ which concatenates the output of the downsampling convolution layers with the feature maps from the upsampling convolution layers at the same dimension. As it is evident, the network is symmetric and hence, each downsampling layer will have a corresponding upsampling one which enables skip connections in between smoothly.
3.1.2 PatchGAN Discriminator Model
In traditional GAN architecture, the discriminator network predicts a particular image as ‘fake’ or ‘real’ when an entire image is fed to the deep convolution network to classify. However, the cGAN-pix2pix model uses a PatchGAN network which classifies the patches of an input image as real or fake instead of the entire image.
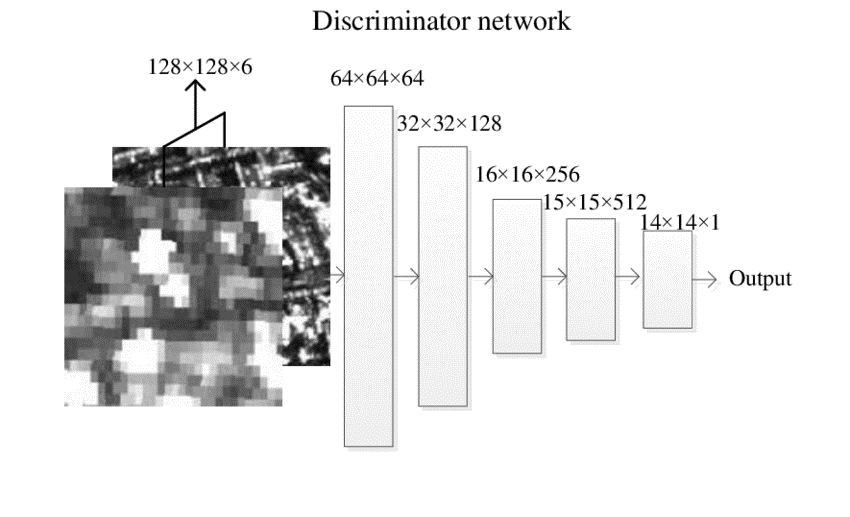
PatchGAN Network [2]
PatchGAN discriminator systemizes each NxN patch in an image as real or fake and then runs convolutionally across the image to return a single feature map of real or fake predictions that can be averaged to give a single score which is the final output D of the discriminator. An advantage of PatchGAN is that a fixed-size patch discriminator can also be applied to arbitrarily large images.
Implementation
Tools used: OpenCV, TensorFlow, cGAN (conditional GAN), Encoder implementation and an interactive tool for visualization the below architecture.
Implementation of the project consists of 3 layers: Data Mining, Modelling and Application layer:
4.1. Data:
1. City site images.[CityScape Image DS]
2. Google Map datasets.
4.1.1 Data Acquisition & Image Segmentation
We are training the model on a combination of original images and converted semantically labelled images. These semantically labelled images will act as conditional input for the GAN network. The logic applied in this is a K means clustering for image segmentation. This algorithm finds the pixels with similar values and clusters them together with similar values.
4.2 Modelling
4.2.1cGAN-Pix2Pix GAN setup and parameters
We have defined our generator and discriminator network in “GAN_model.py” and have set some parameters for efficient output. However, few can be changed as per the capability and system configuration. It is recommended to use a high no of Epochs and train the model with a larger Batch Size if it is going to be trained on GPU. I have trained it for max Epochs of 110 with a batch size of only 1 and use the checkpoints to resume the training from the last saved Epochs.
Batch Size – 1
Buffer Size – 50
Initial Image Width = 512 Image Height = 512
No of Epochs = 50 to 500
Activation Function- In this project, we are exploring two activation functions:
tanh – We are using the tanh function in the generator network. It is used to map the 512×512 image in a range of [-1,1] which amplifies the dissimilarity between light and dark colours and reaches saturation faster.
LeakyRelu – It gives better results for high-resolution images. It significantly reduces the vanishing gradient problem. Since it doesn’t saturate and works better for images that have more details and depths. Hence, it is used in the Discriminator network where we need to generate high-quality images to compare the one with Generator and reduce the loss in each iteration.
4.3 Method
4.3.1 Process
1. Download
the set of images which we want to train, for eg 80-100 images of
different cityscapes and store it in a folder.
2. Execute python script to create semantic images along with original images and store these images
in the training data folder.
3. Check if all images have good and distinguishable semantic labelling because our generator is conditioned on these images of semantic labelling. One of the reasons why this is conditional Generative Adversarial Networks.
4. Make sure images saved in the train and test folder are in “.jpg”.
5. Take some images from the whole set-in train folder to the test folder as a test dataset.
6. Now execute the main script “GAN_model.py”.
7. Once trained for proper epochs like 100-150 or 400-500(if have GPU in the system). Check the result in the output folder.
The motivation behind the GUI:
Various AR applications and games require an imaginary world to travel. This tool is generating real images based on your imagination and hand-drawn paint, With the help of this tool, we can create different cityscapes, google maps, which may look like from the real world but come out as completely from the imagination point of view.
GUI tool has been created to demonstrate how the trained GAN will generate images on the runtime.
It has various features and buttons to create any predefined blocks like buildings, roads, trees, poles, etc, Then it will automatically select the colours for that shape identified during training in the script. For other versions, where we have trained it for different faces or google maps, it will have options in that way.
The idea behind the tool is to explore the use of Deep Learning on a runtime model with a much better application to use as mobile apps.
Results & Analysis
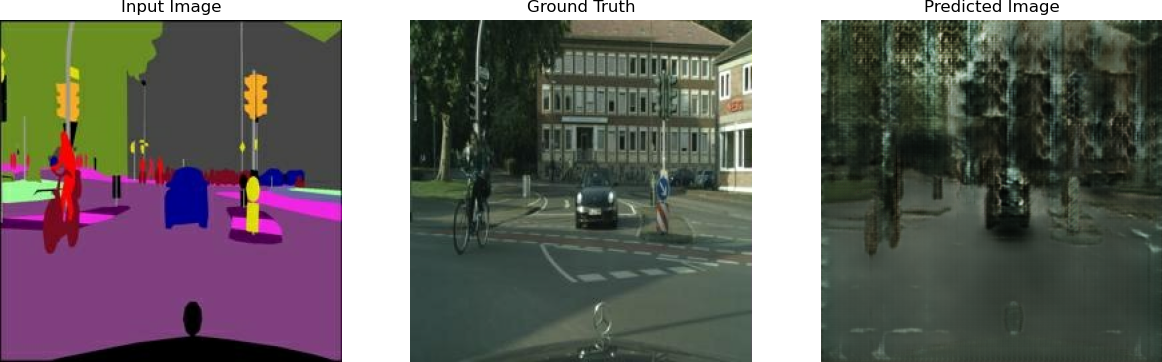
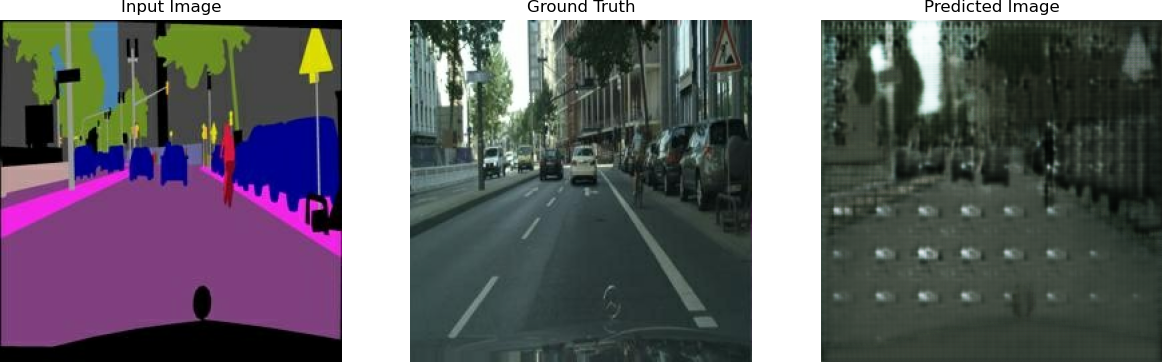
5.1 Results from the test set at different Epochs
1. We have trained the model for 105 epochs for imaginary city segmented data and can analyze the improvement for different layers of epochs.
For Epoch 10 : [D loss: 0.299655, acc: 43%] [G loss: 18.155773]
For Epoch 30 [D loss: 0.274804, acc: 48%] [G loss: 13.047557]
For Epoch 70 [D loss: 0.338973, acc: 63%] [G loss: 7.448901]

We can interpret from the above epochs results is that the quality of the predicted images has been increasing and the object is quite clear with Epoch 70. Also, the Generator Loss is keep on decreasing which is a good indication for the training.
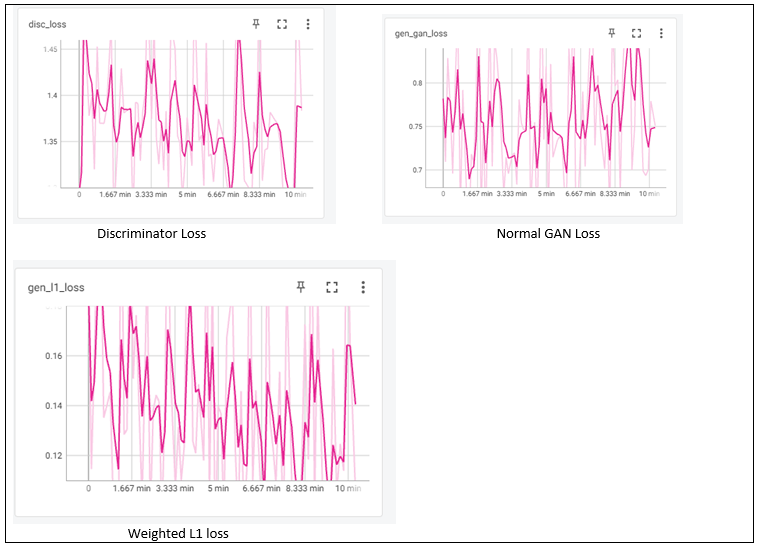
5.2 Analysis of Loss Function
1. Discriminator gets trained in the same manner as a conventional GAN model. It minimizes the negative log-likelihood of discrimination of the original and fake images; however, it is conditioned on the input source image. Since the denominator gets trained relatively faster than a generator. Hence, to slow down this training, loss in the generator is halved.
Discriminator Loss = 0.5 * Discriminator Loss.
2. Generator Loss consists of 2 losses:
1. GAN loss
2. Weighted L1 loss
Loss function Analysis using Tensorboard:
Speed As I have trained all the models on a normal CPU machine, hence it took approximately 10-11 hours for 50 Epochs with 100 images, considering the size (256,512). However, it is recommended to run GANs model on GPU with a maximum number of epochs.
Conclusion
The results from the different validation test’s predicted images show that conditional GAN (Generative Adversarial Networks) is a very promising approach in such projects where it requires a highly structured graphical output with precisions. E.g. in human face regeneration or google map translation from street view to satellite view requires extreme finesse. These networks learn a loss adapted to the task and data at hand, which makes them applicable in a wide variety of settings.
Read more articles about Generative Adversarial Networks (GANs) on our blog.
References
- Phillip Isola Jun-Yan Zhu, et al, Image-to-Image Translation with Conditional Adversarial Networks, Berkeley AI Research (BAIR) Laboratory, UC Berkeley, 1611.07004.pdf (arxiv.org)
- Image-to-Image Translation by Yongfu Hao, 2019 – https://towardsdatascience.com/image-to-image-translation-69c10c18f6ff
- https://www.tensorflow.org/tutorials/images/segmentation
- https://www.tensorflow.org/tutorials/generative/pix2pix#generate_images
Connect me at :
LinkedIn: www.linkedin.com/in/vivek-kumar-4647b817
Github: https://github.com/vivek5559
The media shown in this article is not owned by Analytics Vidhya and are used at the Author’s discretion.


