This article was published as a part of the Data Science Blogathon.
Introduction
Congratulations, you have deployed a model to production; it is an achievement for you and your team! In a normal software engineering development cycle, you would now sit back and relax; however, in the machine learning development cycle, deployment to production is just about 50% of the work. How your model works with the live data in production is your real test. In case you fail to monitor the performance of your model in production, it may lead to degradation in performance, eventually leading to your company facing serious consequences.
Consider an example where a credit card fraud detection system, giving an accuracy of 90% on your test data, degrades to 45% accuracy in production, not detecting actual frauds; your company would probably have to pay a hefty sum monetarily and face a dent in its reputation.
I hope I have made the point that a machine learning project life cycle does not end after deployment to production; it is just the start. As part of this article, we will look into how monitoring models are important and ways in which the same can be achieved, ending the article by taking a real-world example of a machine learning case study and deploying it into production.
Why does Model Performance Degrade Over Time in Production?
To understand this, we would need to understand two concepts: Concept Drift and Data Drift.
Concept 1: Concept Drift
Concept drift is when an idea based on which the model has developed changes. Taking an example, consider how shopping changed post-pandemic; people using their credit cards to buy stuff online increased tremendously, throwing credit card fraud detection systems into a frenzy.
Basically, there would be a shift in the conditional probability of the input(X) on the target (Y), i.e
P(Y|X) changes during concept drift.
Concept 2: Data Drift
Your model is only as good as your data. If the underlying distribution of the test dataset changes from the dataset on which the model was trained, it would naturally not perform as well in production as it did in the development environment.
Let me give you an example; suppose you are monitoring the social media data of your users; all of a sudden, a new app ByteTok goes viral, having millions of users in two days; as the app was not available before, your model has not seen the app and hence cannot make a good prediction.
To monitor data drift, you can check if your input sees any categorical value not seen before or a numerical value out of the range seen during training. You can also monitor the individual distributions of features in the train and test datasets.
In cases of both concept drift and data drift, either the performance of your model will suffer a gradual decrease or a sudden shock.
One way to better manage concept and data drift is to set up alerts when a metric like the standard error of mean crosses a certain threshold.
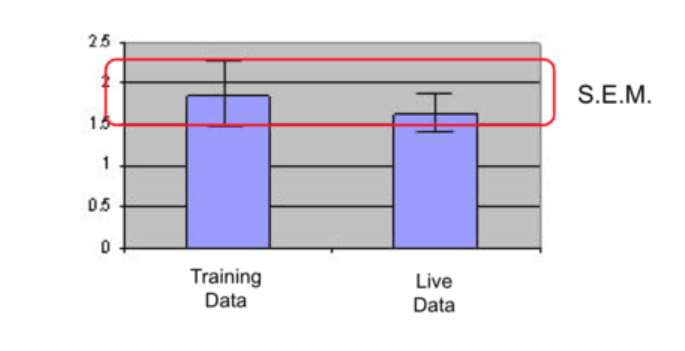
When the standard error of mean drops the red threshold we have determined, an alert would be sent, which would require us to look at the model performance and take necessary action like retraining.
The Different Metrics that You May Want to Track Based on Your Machine Learning Scenario in Production is
1) Software Metrics: Metrics like how many user query requests are received on your web interface, which helps to understand the daily traffic of users.
Keeping a check on the server load and so on.
2) Input Metrics: Input metrics involve keeping a check on the input, whether the input is in a certain range as seen in the train set. Changes in data distributions.
3) Output metrics: Checking if the model is predicting too many null values or it is unable to confidently predict the classes for many data points.
Retraining can be done in two different methods, either manual retraining or automatic retraining; manual retraining is far more common, as most teams are apprehensive about retraining their models without human interference.
Deployment of Machine Learning Model Using Heroku and Flask
Next, we would look at a deployment done by me in Heroku using flask and python.
I worked on a case study project, to provide a demo of the same, I deployed the machine learning model as a web application.
The case study was to predict the abuse category based on the description provided by the victim. It involved text cleaning, text vectorization, and model tuning and training.
As now I have given you an introduction to what the machine learning backend did, let me explain the steps I took to deploy the model.
First, I created an HTML and CSS script to model the front-end of my application.
If you want to check the code, I will link the GitHub repo at the end.
Next, I created a pickle of my machine learning model; you can pickle any object in python; the pickle would serialize the object and write it on a file, which you can then migrate or convert, generally during deep neural network training, which takes up a lot of training time, it is advisable to store the model’s progress in a pickle file and retrain it from that point the next time.
We then create a python script that uses the get method of HTTP to bring in the user’s entered description in English text; using our vectorization and machine learning model pickles, the output is predicted and appropriately displayed to the screen.
Below is the script:
from flask import Flask, jsonify, request import joblib |
import flask |
# https://www.tutorialspoint.com/flask |
app = Flask(__name__) |
@app.route('/')
|
def hello_world(): |
return 'Hello World!' |
@app.route('/index')
|
def index(): |
return flask.render_template('app.html')
|
@app.route('/predict', methods=['POST'])
|
def predict(): |
prediction = [] |
clf = joblib.load('finalized_model.pickle')
|
count_vect = joblib.load('vectorizer.pickle')
|
text = request.form.get('review_text')
|
#print(text) |
pred = clf.predict(count_vect.transform([text])) |
x = pred.toarray() |
print(x) |
if x[0,0]: |
prediction.append('Commenting')
|
if x[0,1]: |
prediction.append('Ogling')
|
if x[0,2]: |
prediction.append('Groping')
|
if len(prediction) == 0: |
return flask.render_template('app.html', prediction_text='It is not an abuse statement')
|
else: |
return flask.render_template('app.html', prediction_text='Predicted categories of abuse are {}'.format(prediction))
|
#return jsonify(prediction) |
if __name__ == '__main__': |
app.run(host='0.0.0.0', port=8080) |
The final deployed version on Heroku looks like this, I know it is a pretty basic front-end UI, but my aim was to create an accurate machine learning model and deploy it for working with live data. As an enhancement to the project, I would definitely work on the front end.

Conclusion
As part of this article, we looked at how deploying your machine learning model to production is not the end for developers, you have to constantly monitor various metrics and set up alerts that go off at certain threshold values, which would help you recognize a scenario requiring retraining.
We discussed concept drift and data drift.
Lastly, we saw an example of a machine learning model deployed on Heroku using the Flask package.
I hope you find this article useful! Link to GitHub repo for the entire project code.
The media shown in this article is not owned by Analytics Vidhya and is used at the Author’s discretion.


Nice article. Learnt a new thing today. Keep it up.
Thank you for the kind words!