This article was published as a part of the Data Science Blogathon.
Introduction to Apache Airflow
“Apache Airflow is the most widely-adopted, open-source workflow management platform for data engineering pipelines. It started at Airbnb in October 2014 as a solution to manage the company’s increasingly complex workflows. Most organizations today with complex data pipelines to be managed leverage Apache Airflow to schedule, sequence, monitor the workflows.”
Airflow provides an easy-to-use, intuitive workflow system where you can declaratively define the sequencing of tasks (also known as DAG or Directed Acyclic Graph). The Airflow workflow scheduler works out the magic and takes care of scheduling, triggering, and retrying the tasks in the correct order.
It helps you to determine and define aspects like:-
- “Start Task4 only after Task1, Task2, and Task3 have been completed….”
- “Retry Task2 upto 3 times with an interval of 1 minute if it fails…”
- “Which task took the longest in the workflow? …”
- “What time did taskN take today vs one week back? …”
- “Take a different flow path if a certain logical condition is met; another flow path…”
- “Email the team when a critical task fails…”
The Use Case for Airflow
So, where does a workflow management system fit? And how do you know you need to use it? Let’s say you are working for the IT division of a health care organization, and you need to run some analytics on patient records that you receive from a vendor hospital. You have developed that awesome Apache Spark-based application, which is working like a charm. You need that application run daily against the data that comes in from the hospital. A further requirement is that the output of that analysis needs to be pushed as input to a time-critical downstream application which determines the composition and quantity of factory production units for a test medicine for that day.
Initially, a simple cron job or a Jenkins-based job might suffice until things get bigger. Let’s say two more upstream hospitals get added to the fray. One pushes data to an S3 bucket; another gives a REST API-based interface from which you need to fetch data, and yet another in-house system dumps data to a database. You need to now run your analytics application against the data from all these upstream systems before running the downstream app. This is where the beauty of Airflow comes into play.
Airflow as a mainstream DevOps tool has been widely adopted since it was launched eight years ago to orchestrate BigData and ETL pipelines. As your systems and processes become bigger, managing the scalability and monitoring using custom scripts or cron-based solutions becomes difficult—this is where it fits in.
Airflow UI
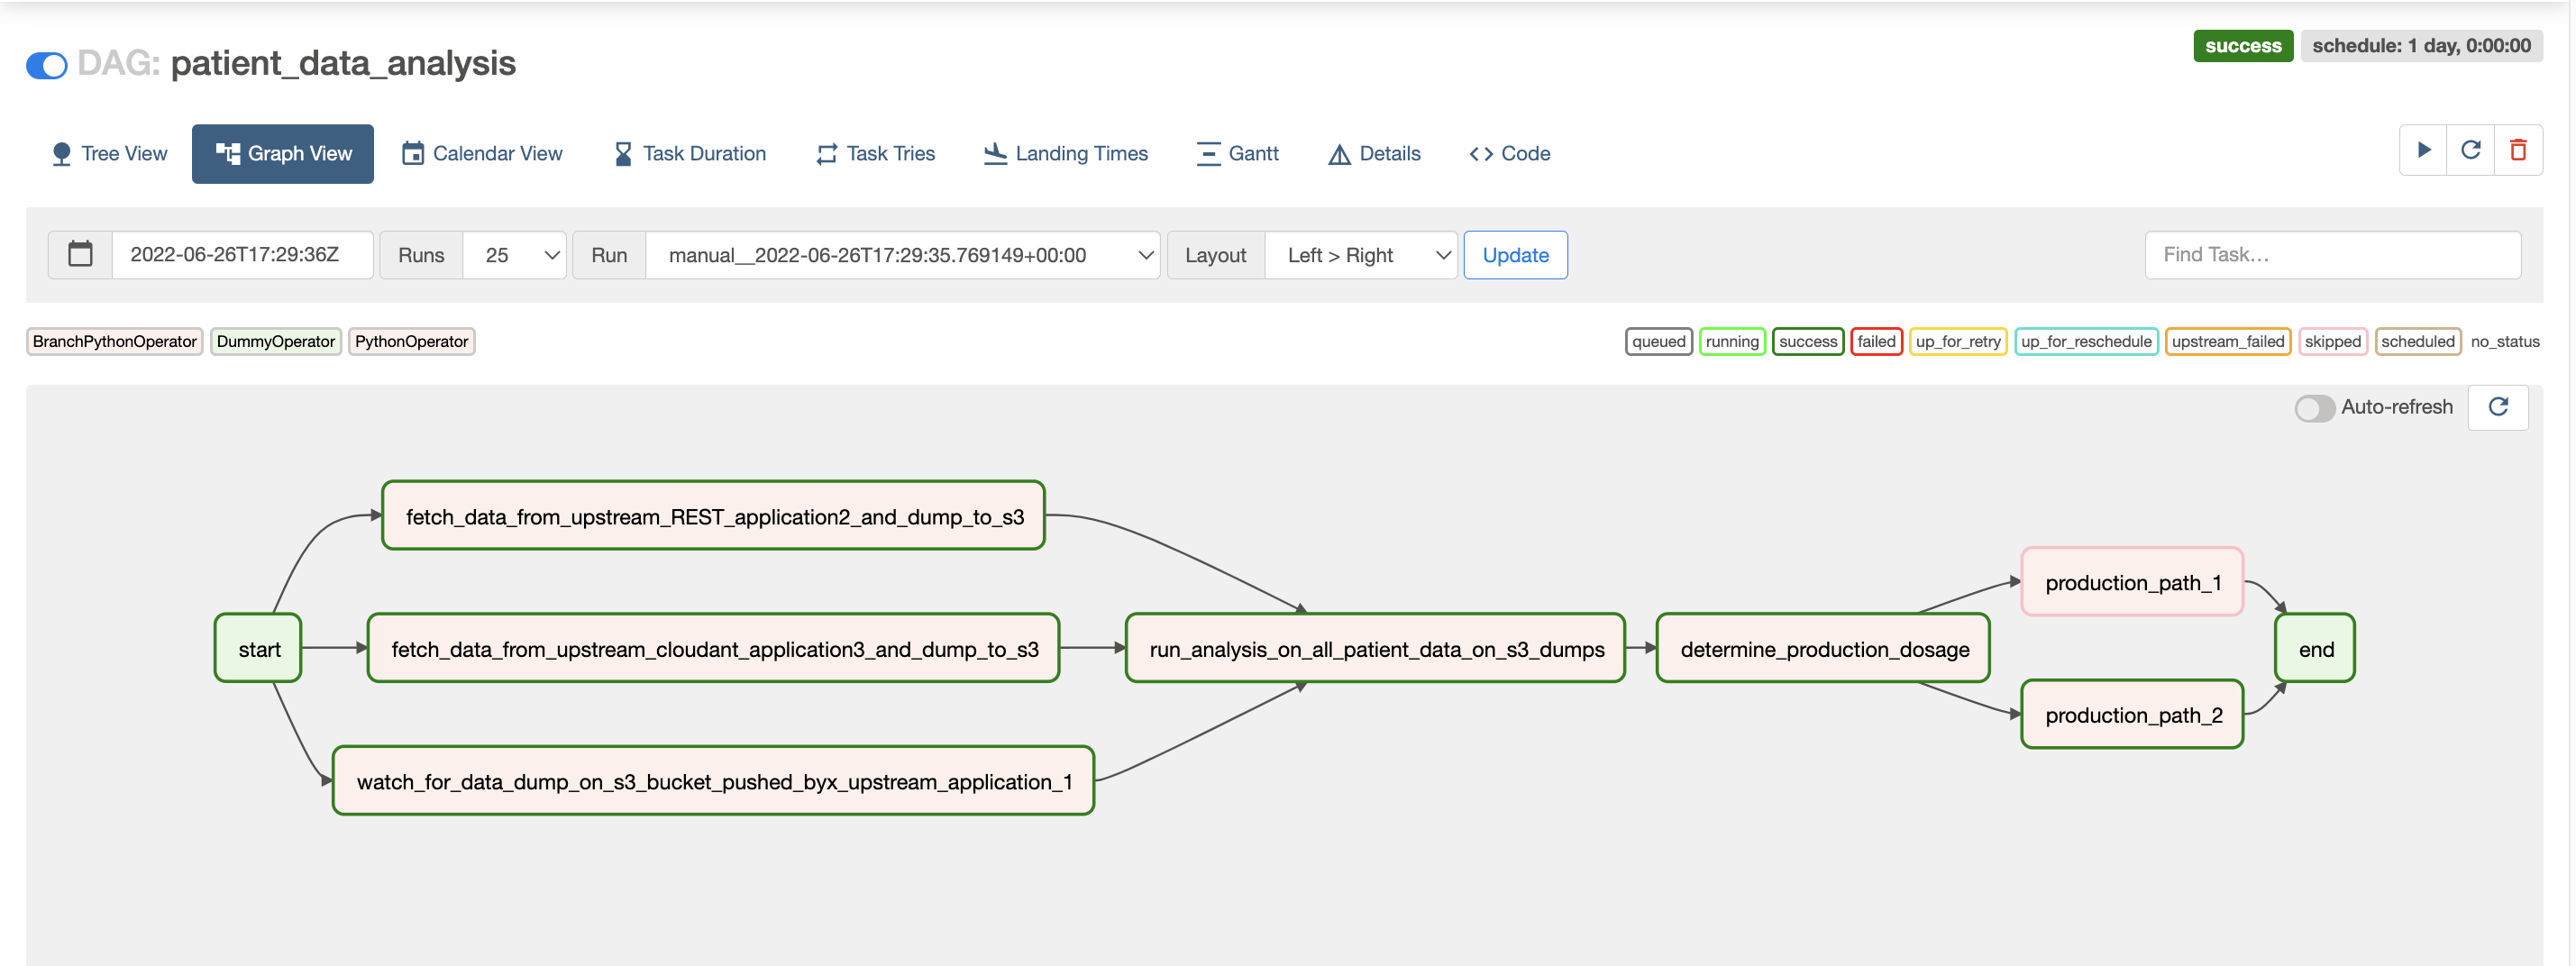
The visually rich Graph View UI shows you your process’s path, where it is stuck, how long it took for each stage or task, and what
times the task started/ended.
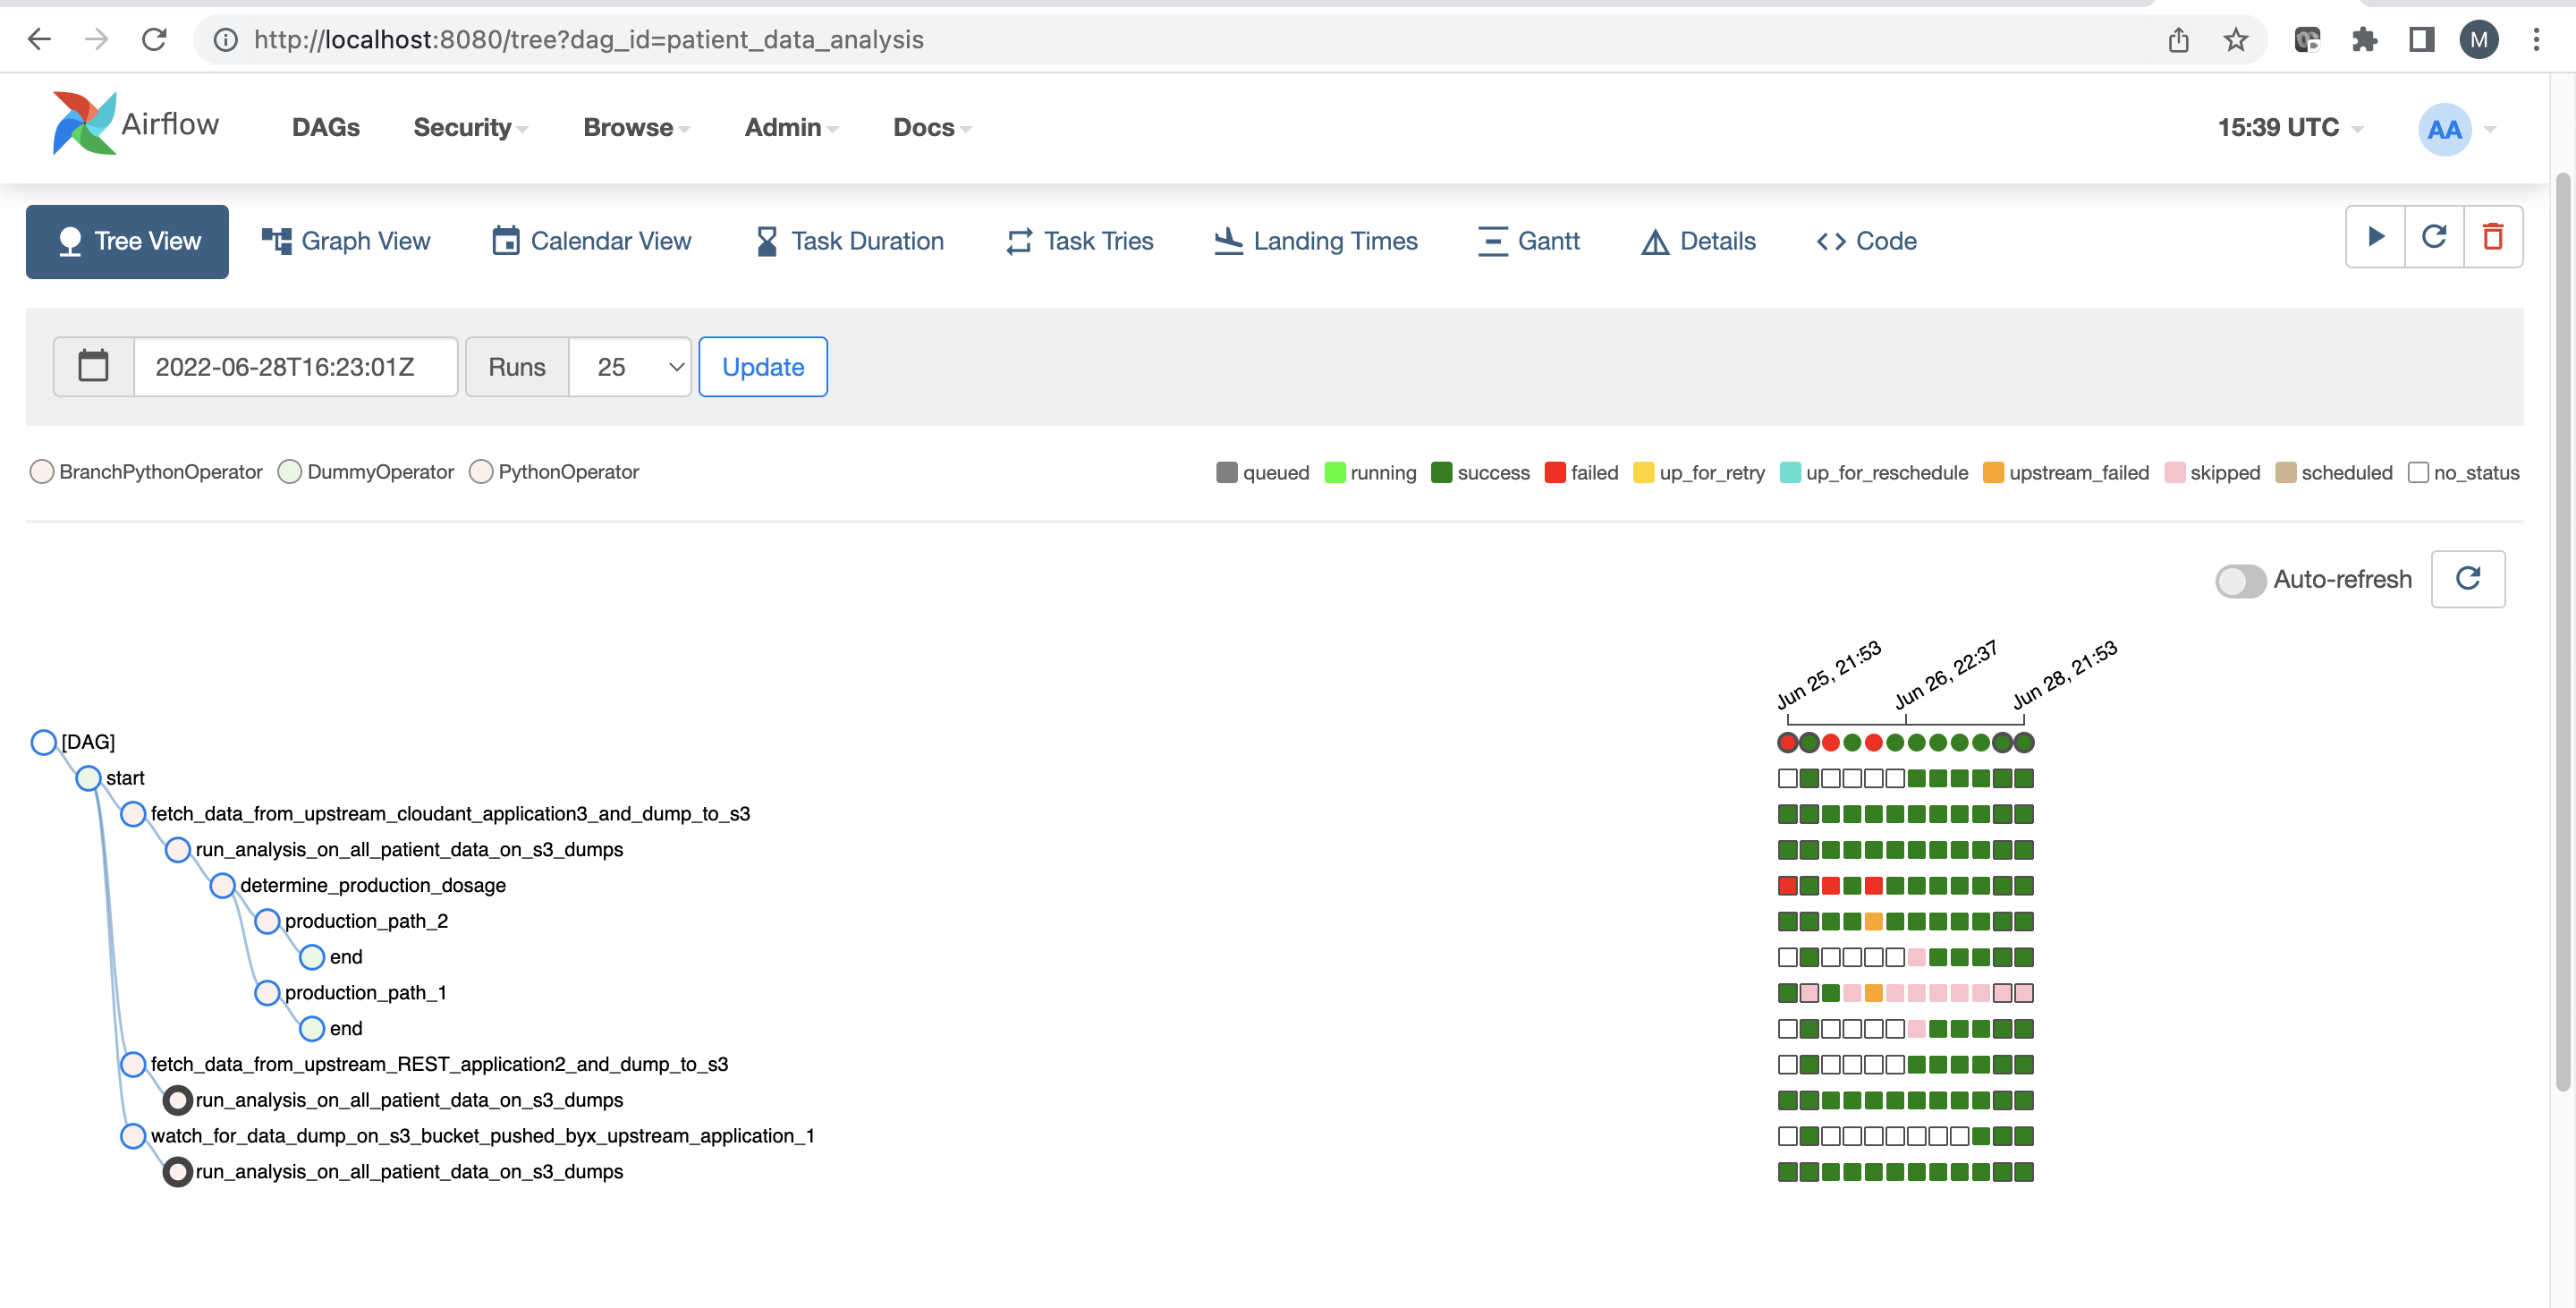
The Tree View UI shows you the historical runs broken down by tasks – this is most useful when you want to compare performance between historical runs.
REST API with Python Operators
There are several operators and provider packages that Apache Airflow supports. Depending on your use case, you get to pick and choose what is most suitable. When I started learning Airflow, what I found most helpful and flexible were the Python-based operators. My applications were running in less than 24 hours with the combination of PythonOperator and PythonSensor
With these two, you should be able to fit in the general use case described above. All you need is basic Python knowledge!
Structure of an Airflow DAG
1. First come the imports:
import json
import requests
from datetime import datetime
from airflow.operators.python import PythonOperator
from airflow.operators.python import BranchPythonOperator
from airflow.sensors.python import PythonSensor
from airflow.operators.dummy import DummyOperator
from airflow import DAG
2. Then comes the definition of the DAG constructor/initialization.
Here’s where you give the name of the workflow process that you want to see in the UI, the default retries for tasks, etc
dag = DAG(
    'patient_data_analysis',
     default_args={'retries': 1},
     start_date=datetime(2021, 1, 1),
     catchup=False,
)
dag.doc_md = __doc__
3. Next comes the Operators
## Operators
start  = DummyOperator(task_id='start', dag=dag)
op1 = PythonOperator(
       task_id='watch_for_data_dump_on_s3_bucket_pushed_byx_upstream_application_1',
       python_callable= _placeholder_function1,
       dag=dag)
op2 = PythonOperator(
       task_id='fetch_data_from_upstream_REST_application2_and_dump_to_s3',
       python_callable= _placeholder_function2,
       dag=dag)
op3 = PythonOperator(
       task_id='fetch_data_from_upstream_cloudant_application3_and_dump_to_s3',
       python_callable= _placeholder_function3,
       dag=dag)
op4 = PythonOperator(
       task_id='run_analysis_on_all_patient_data_on_s3_dumps',
       python_callable= _placeholder_function4,
       dag=dag)
determine_production_dosage = BranchPythonOperator(
        task_id='determine_production_dosage',
        python_callable=_determine_production_dosage,
        dag=dag
    )
production_path_1 = PythonOperator(
       task_id='production_path_1',
       python_callable= _placeholder_function5,
       dag=dag)
production_path_2 = PythonOperator(
       task_id='production_path_2',
       python_callable= _placeholder_function6,
       dag=dag)
end  = DummyOperator(task_id='end',trigger_rule='one_success', dag=dag)
Here is where we have the breakdown of tasks in the flow. We have used three kinds of Operators.
- PythonOperator – which calls the Python callable or function which contains the actual task processing logic
- BranchPythonOperator – which is useful when you want the workflow to take different paths based on some conditional logic.
- DummyOperator – which is a convenience operator to try out some POC flow quickly or in this case- gives a structure to the flow – start and end.
Note that all the operators are connected using the same “dag” object reference.
4. Sequence your tasks
## Flow
start >> [op1, op2, op3]
[op1,op2,op3] >> op4
op4 >> determine_production_dosage
determine_production_dosage >> [production_path_1, production_path_2]
production_path_1 >> end
production_path_2 >> end
The dependencies between your tasks can be declared using this intuitive flow notation.
- The start operator will kick off three tasks in parallel – op1, op2, op3
- Only when op1, op2, and op3 are done the op4 task will get started
- The determine_production_dosage can result in either of the paths production_path_1 or production_path_2
- And finally, execution of either path results in the end.
5. A word on the python callables
def _placeholder_function1():
print('hi1')
def _placeholder_function2():
print('hi2')
def _placeholder_function3():
print('hi3')
def _placeholder_function4():
print('hi4')
def _placeholder_function5():
print('hi5')
def _placeholder_function6():
print('hi6')
def _determine_production_dosage():
efficacy = 0
if efficacy > 1:
return 'production_path_1'
return 'production_path_2'
In this case, I have just given placeholder functions. We’ll get into what it should hold in the next section. Special mention to the _determine_production_dosage(). This is the function called by the branch operator. As the code illustrates, this function’s return value is the operator’s name in the workflow.
PythonOperator and PythonSensor Combo
The following working code covers the following concepts.
- How to use the PythonOperator and callable to make REST API calls to generate a Bearer Token
- And use that Bearer Token in subsequent API calls that call some business logic (in this case, it is calling a Spark application on a cloud provider API)
- Concept of passing data between tasks using xcom
- How to use PythonSensor operator to poll/wait for asynchronous task completion
- How to dynamically construct the REST API endpoint based on the value returned from a previous task ( NOTE: This is one use case where I found the power and simplicity of PythonOperator come into play. I had initially tried the SimpleHttpOperator – but found the PythonOperator to be more flexible! )
Source code for serverless_spark_pipeline.py
## Import statements and DAG definition
import json
import requests
from datetime import datetime
from airflow import DAG
from airflow.operators.python import PythonOperator
from airflow.sensors.python import PythonSensor

dag = DAG(
    'serverless_spark_pipeline',
    default_args={'retries': 1},
    start_date=datetime(2021, 1, 1),
    catchup=False,
)
dag.doc_md = __doc__
## Python callable for getting a Bearer Token
api_key='CHANGEME'
iam_end_point='https://CHANGEME/'
def _get_iam_token(ti):
        headers={"Authorization": "Basic Yng6Yng=",
                "Content-Type": "application/x-www-form-urlencoded"}
        data="grant_type=urn:ibm:params:oauth:grant-type:apikey&apikey="+api_key
        res = requests.post(url=iam_end_point,headers=headers,data=data)
        access_token= json.loads(res.text)['access_token']
        ## Push the token using key, value
        ti.xcom_push(key='access_token', value= access_token)
## Python Operator for getting the Bearer Token; It calls the Python callable _get_iam_token
generate_iam_token = PythonOperator(
        task_id = 'get_iam_token',
        python_callable= _get_iam_token,
        dag=dag)
## Python callable for calling a REST API
url = 'https://CHANGEME/'
instance_id='CHANGEME'
def _submit_spark_application(ti):
    # Pull the bearer token and use it to submit to REST API
    access_token=ti.xcom_pull(key='access_token')
    headers = {"Authorization": "Bearer " + access_token,
              "Content-type": "application/json"}
    finalurl = url+instance_id+'/spark_applications'
    data=json.dumps({"application_details":
          {"application": "/opt/ibm/spark/examples/src/main/python/wordcount.py",
          "arguments": ["/opt/ibm/spark/examples/src/main/resources/people.txt"]}})
    res = requests.post(finalurl,headers=headers,data=data)
    application_id = json.loads(res.text)['id']
    # Push the application id - to be used on a downstream task
    ti.xcom_push(key='application_id', value= application_id)
## Python Operator for submitting the Spark Application; It calls the Python callable _submit_spark_application
  submit_spark_application = PythonOperator(
        task_id = 'submit_spark_application',
        python_callable= _submit_spark_application,
        dag=dag)
def _track_application(ti):
    # Pull the application id from an upstream task and use it..
    application_id=ti.xcom_pull(key='application_id')
    access_token=ti.xcom_pull(key='access_token')
    headers = {'Authorization': 'Bearer ' + access_token}
    # Construct the REST API endpoint dynamically based on the data
    # from a previous API call
    finalurl = ae_url+instance_id+'/spark_applications/'+application_id+'/state'
    res = requests.get(finalurl,headers=headers)
    state = json.loads(res.text)['state']
    # Keep polling the REST API to check state of application submission until a
    # terminal state is reached
    if state == 'finished' or state == 'failed':
       # Push the value of state as xcom key, value pair.
       # It can be later used for example in a BranchPythonOperator
       t1.xcom_push(key='state',value=state)
       return True
    else:
       return False
## Python Sensor for tracking a REST APU. It calls the Python callable _track_application
  track_application = PythonSensor(
        task_id = 'track_application',
        python_callable= _track_application,
        dag=dag)
## Operator flow
generate_iam_token >> submit_spark_application >> track_application
This example is based on a REST API call to a cloud provider API that submits a spark application, gets the application ID, and keeps polling for the application’s state based on that application ID. And finally, when the application either finishes or fails, it ends the workflow execution.
The Python callable functions make use of the standard requests module. In the example above, POST and GET. You can use the same approach for other REST API calls, PATCH, PUT, DELETE, etc.
End Notes
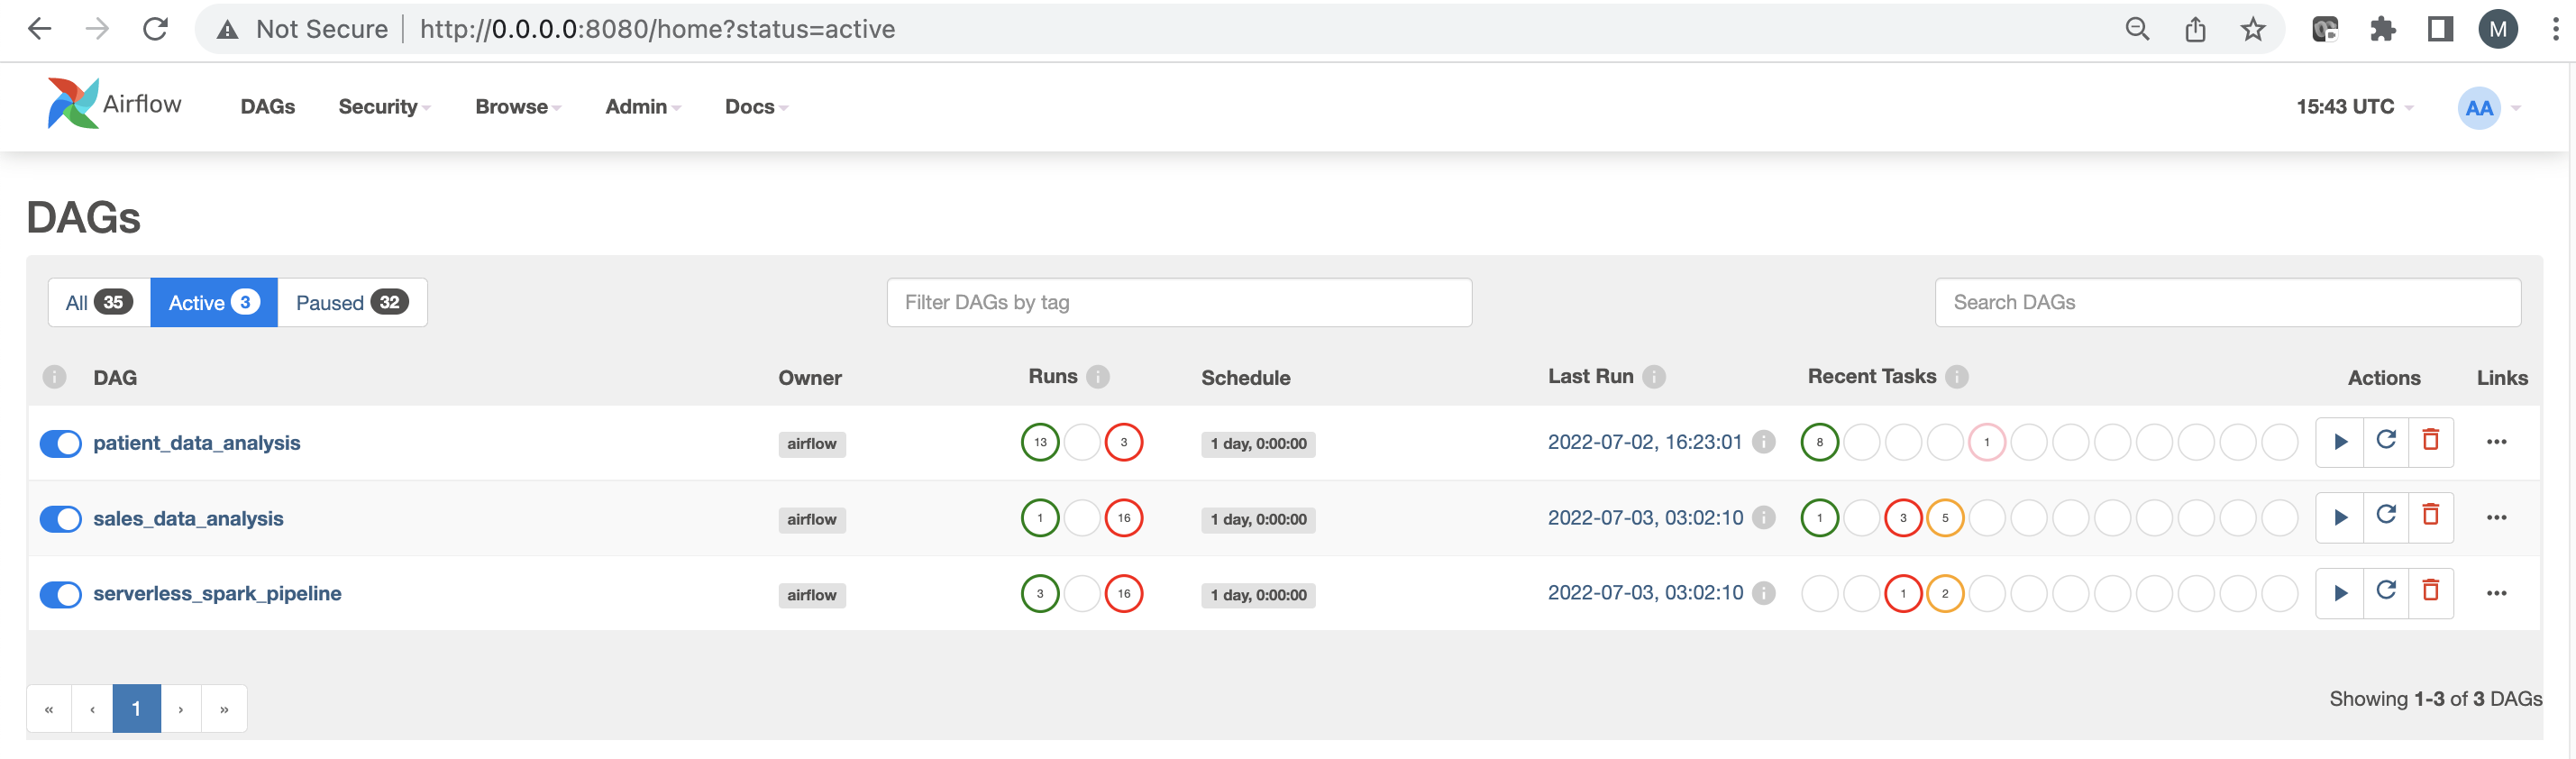
Here’s a snapshot of the main DAG UI page. If you are starting Airflow, here are some newbie tips.
- You need to toggle and enable the DAG to make it active and execute automatically through the tasks.
- Also, be aware that whenever you make a change in the DAG file, it takes about 1 minute to refresh your code and reflect it in the DAG Code tab in the UI. (The DAG files, which are nothing but python files, are located in the airflow/dags folder of your installation)
Conclusion
This article showed you how to get quickly started with
- A simple working DAG that you can get it up and running by defining the sequencing of tasks
- Introduction to Python-based operators and sensors that can be easily adapted to call any backend REST API services/applications
- How to orchestrate various asynchronous REST API services by polling and passing the relevant data between tasks for further processing
Depending on the use case, your tasks’ data source and data sink. You will need to evaluate what Airflow operators are suitable. Many tuning knobs for airflow can be further configured as you get deeper into real-life production use cases.
The media shown in this article is not owned by Analytics Vidhya and is used at the Author’s discretion.


