How to Train a Custom Object Detection Model with YOLOv7?
Introduction
One of the most common jobs in computer vision is object detection. It is the foundation for comprehending and interacting with the scene. Object detection is used in everything from simple applications like detecting items to complicated jobs like self-driving automobiles to understand diverse scenarios and make judgments based on them. Security cameras and even current cell phones have similar features built-in for a variety of functions. In this article, we will explore the fastest object detection algorithm YOLOv7, and learn how to use it on a custom dataset.

Learning Objectives:
- Understand the YOLO object detection model.
- Know the differences between the various models of YOLO and their use cases.
- Learn to use YOLO for object detection on a custom dataset.
This article was published as a part of the Data Science Blogathon.
Table of Contents
What is YOLO?
Nowadays, YOLO (You Only Look Once) is the better object detection model framework, and this model is the latest addition to the YOLO family of models. YOLO was the first object detection model to incorporate bounding box prediction and object classification into a single end-to-end differentiable network. YOLO algorithm was created and is maintained under the Darknet framework.
YOLOv4 has been adapted to TensorFlow by the community. While the original implementation of YOLOv4 is in the Darknet framework, TensorFlow implementations have been created to allow users who prefer TensorFlow to utilize the YOLOv4 architecture. YOLOv5 is the first YOLO model written on the PyTorch framework, and it is much lighter and easier to use. However, YOLOv7 does not outperform YOLOv6 on a standard benchmark, the COCO dataset, because it did not make fundamental architectural improvements to the network in YOLOv6.
Yolo v6 has a few flaws, such as poor performance on tiny items and poor generalization when the dimensions of the objects are not equal.
.png)
This is a picture from the original YOLO paper demonstrating the YOLO operation. It’s come a long way since then, and we’re now on version 5. Despite the fact that it was not written by any of the original authors or contributors, it follows the same basic strategy. It is written in PyTorch, which is a plus. In this version of Yolo mosaic, augmentation is used, and augmentation and different scaling approaches provide numerous enhancements.
YOLO Step-by-Step Procedure
Now that we understand what the YOLO operation is, here’s a step-by-step guide on how to use it for object detection on a custom dataset.
Step 1: Prepare the Dataset
To get your object detector up and running, you must first collect training photographs. You should think carefully about the activity you are attempting to complete and plan ahead of time for the components of the task that your model may find difficult. To improve the accuracy of your final model, I recommend reducing the domain that your model must handle as much as feasible.
For YOLOv7 custom training, we need to develop a dataset. If you don’t have any data, you can use the openimages database. Alternatively, you can also download the data from the Roboflow platform, which offers a convenient source of diverse datasets for training purposes.
Step 2: Annotate the Dataset
Use LabelImg or any annotation tool to annotate the dataset. Create a file with the same name as the image and the annotation text.
Prepare a set, for example, corresponding to
- images_0.jpg
- images_0.txt
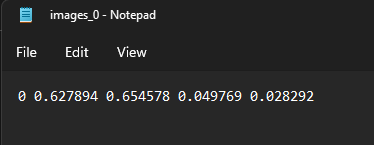
YOLOv7 accepts label data in text (.txt) files in the following format:
Step 3: Split the Dataset
After you’ve tagged your data, we’ll divide it into train and test folders. The split ratio will be determined by the user. However, the most common split is (80-20) percent, which implies that 80 percent of the data is utilized for training and 20 percent for testing. *The images and labels are stored in the stated folder architecture.
*For data splitting, look into python library – Split Folder, which will randomly divide your data into train, test, and validation.
The following pip command to install the data splitting library
pip install split-folders
The input folder should be formatted as follows:

In order to provide you with this:
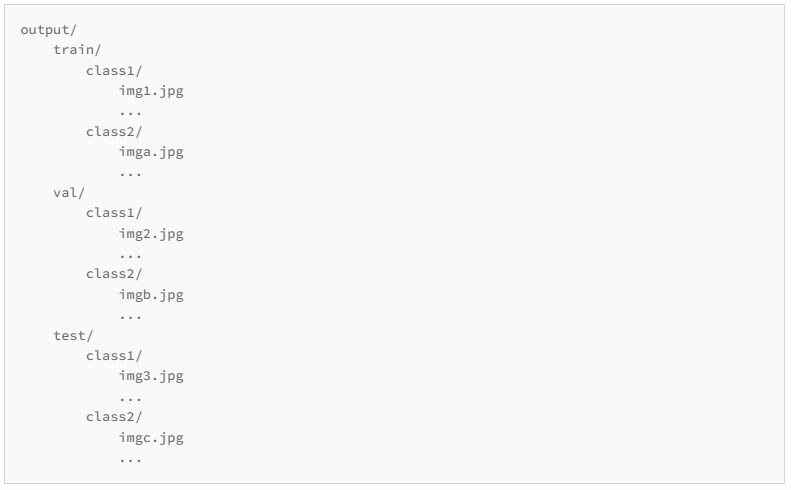
Separate the files into a training and a validation set (and optionally a test set). The final dataset folder looks as shown below before we get into YOLOv7 training:
├── yolov7
## └── train
####└── images (folder including all training images)
####└── labels (folder including all training labels)
## └── test
####└── images (folder including all testing images)
####└── labels (folder including all testing labels)
## └── valid
####└── images (folder including all valid images)
####└── labels (folder including all valid labels)
Step 4: Create a Custom Configuration File for Training
We must now develop a customized configuration file. (Be sure to specify the proper directory), as the training process will be entirely dependent on that file.
Create a file with the name “custom.yaml” in the (yolov7/data) folder. In that file, paste the code below. Set the correct path to the dataset folder, alter the number of classes and their names, and then save it.
Make a file that specifies the training configuration. In custom.yaml file, write the following:
- Image_path
- Number_of_classes
- Classes_names_array
train: (Complete path to dataset train folder)
test: (Complete path to dataset test folder)
valid: (Complete path to dataset valid folder)
#Classes
nc: 1 # replace classes count
#classes names
#replace all class names list with your custom classes
namesnames: ['person', 'bicycle', 'car', 'motorcycle', 'airplane', 'bus', 'train', 'truck', 'boat', 'traffic light',
        'fire hydrant', 'stop sign', 'parking meter', 'bench', 'bird', 'cat', 'dog', 'horse', 'sheep', 'cow',
        'elephant', 'bear', 'zebra', 'giraffe', 'backpack', 'umbrella', 'handbag', 'tie', 'suitcase', 'frisbee',
        'skis', 'snowboard', 'sports ball', 'kite', 'baseball bat', 'baseball glove', 'skateboard', 'surfboard',
        'tennis racket', 'bottle', 'wine glass', 'cup', 'fork', 'knife', 'spoon', 'bowl', 'banana', 'apple',
        'sandwich', 'orange', 'broccoli', 'carrot', 'hot dog', 'pizza', 'donut', 'cake', 'chair', 'couch',
        'potted plant', 'bed', 'dining table', 'toilet', 'tv', 'laptop', 'mouse', 'remote', 'keyboard', 'cell phone',
        'microwave', 'oven', 'toaster', 'sink', 'refrigerator', 'book', 'clock', 'vase', 'scissors', 'teddy bear']
After all the preprocessing procedures have been completed, it is ready to begin training. Launch the terminal in the main “yolov7“, activate the virtual environment, and execute the commands listed below.
git clone https://github.com/WongKinYiu/yolov7.git       # clone
cd yolov7
pip install -r requirements.txt      # install modules
wget https://github.com/WongKinYiu/yolov7/releases/download/v0.1/yolov7.pt # download pretrained weight
The official repository contains pre-trained weights for your model.
Remarks:
Depending on the usage context, such as Google Colab, GPU memory may be insufficient. You can learn by reducing the batch size in that situation.
Step 5: Train the Model
python train.py --weights yolov7.pt --data "data/custom.yaml" --workers 4 --batch-size 4 --img 416 --cfg cfg/training/yolov7.yaml --name yolov7 --hyp data/hyp.scratch.p5.yaml
— img = size of images on which model will train; the default value is 640.
— batch-size = batch size used for custom dataset training.
— epochs = number of training epochs to get the best model
— data = custom config file path
— weights = pre trained yolov7 weights (yolov7.pt)
Note: If any image is corrupted, training will not begin. If any label file is corrupted, training will not begin because yolov7 will ignore that image and label files.
Wait for training to finish before performing inference with freshly formed weights. Custom-trained weights will be saved in the following folder path.
[yolov7/runs/train/yolov7/weights/best.pt]
Step 6: Perform Custom Weights Inference
When training is over, go to the terminal and perform the below command for detection on custom weights.
python detect.py --weights runs/train/yolov7/weights/best.pt --source "path to your testing image"
Conclusion
Yolo v7 is a significant advance in terms of speed and accuracy, and it matches or even outperforms RPN-based models. The model is fast and dependable, and it can be used for anything. YOLO v7 trains quickly, makes good conclusions, and performs well.
In this article, we have gained knowledge about what YOLO is and how it works. We also learned which YOLO version model to use to get the desired output in each use case. You may now use YOLO to design your own custom detection model for anything you desire.
Key Takeaways:
- YOLO was the first object detection model to incorporate bounding box prediction and object classification into a single end-to-end differentiable network.
- The main distinction between YOLO v7 and the earlier versions from v1–v6, which were developed in C, is that v7 was written in PyTorch / Python.
- By itself, this greatly increases accessibility for those involved in deep learning as well as businesses.
Frequently Asked Questions
A. YOLO v7 can be easily trained for object detection on a custom dataset by following our step-by-step guide. The procedure involves the following processes:
1. Preparing the dataset
2. Annotating the dataset
3. Splitting the dataset
4. Creating a custom configuration file
5. Training the model
6. Performing a custom weights inference
A. Yolo v6 has a few flaws, such as poor performance on tiny items and poor generalization when the dimensions of the objects are not equal. These issues have been resolved in YOLO v7, making it a better model. Also, v7 is written in Python/PyTorch, which makes it better.
The media shown in this article is not owned by Analytics Vidhya and is used at the Author’s discretion.


