Introduction
With the changing world, it is important for companies to transform accordingly. One of the most widely used technologies used these days is cloud computing.
The adoption of cloud computing has been increasing rapidly. Either company has already adopted it or is moving towards adopting it. The advantages that cloud computing provides are immaculate.
One of the most important services provided by Amazon AWS is Amazon EC2.
What is Amazon EC2?
EC2 stands for Elastic Compute Cloud. It is an on-demand computing service on the AWS cloud platform. Here computing means all the services provided by a computing device like a computer which includes an operating system, storage, memory, number of GPUs etc. It eliminates the need for hardware, so EC2 can be considered the rented virtual computer in which we can create virtual computers according to our required configuration.
EC2 includes launching EC2 instances. An EC2 instance is a virtual server of Amazon EC2 that provides computing services to the users. The concept of classes and objects in Object-Oriented Programming could better understand this. An EC2 can be considered as a class that has different properties like operating systems, memory, storage, etc., and an EC2 instance can be considered as an object of this class which, when initialized, has specific properties likze which operating system to be used, how much memory and storage is required, number of virtual CPUs required, etc.
Using EC2, we can launch EC2 instances of our required operating system, storage, memory, etc. to develop and deploy applications. We can create as many EC2 instances as we want and once the work of an EC2 gets completed, then we can also stop and remove it. EC2 also provides security and networking options.
Features and Pricing of Amazon EC2:
- We can select pre-configured instances known as Amazon Machine Images (AMIs), which gives us choices of operating system and additional software and run it instantly.
- With a single click, we can start or pause our instances
- Various configurations of CPUs, memory, storage etc. are available called as instance types.
- We can choose a location from the Regions and Availability Zones and run our instance from anywhere.
- Key pair for the security of EC2 instance, which ensures that people having the key pair have the access to the instance.
- Powerful GPUs are also available for ML and graphical purposes.
Pricing of Amazon EC2:
Pricing depends upon the instance type we choose and for how long we are using that EC2 instance.
In this article we will be focusing on launching an EC2 instance of free-tier.
Getting Started with Amazon EC2 Linux Instances
Now that you have an idea of EC2 and its features, let’s look at the steps required to get started with it.
Step-1: Launching an instance of our requirement
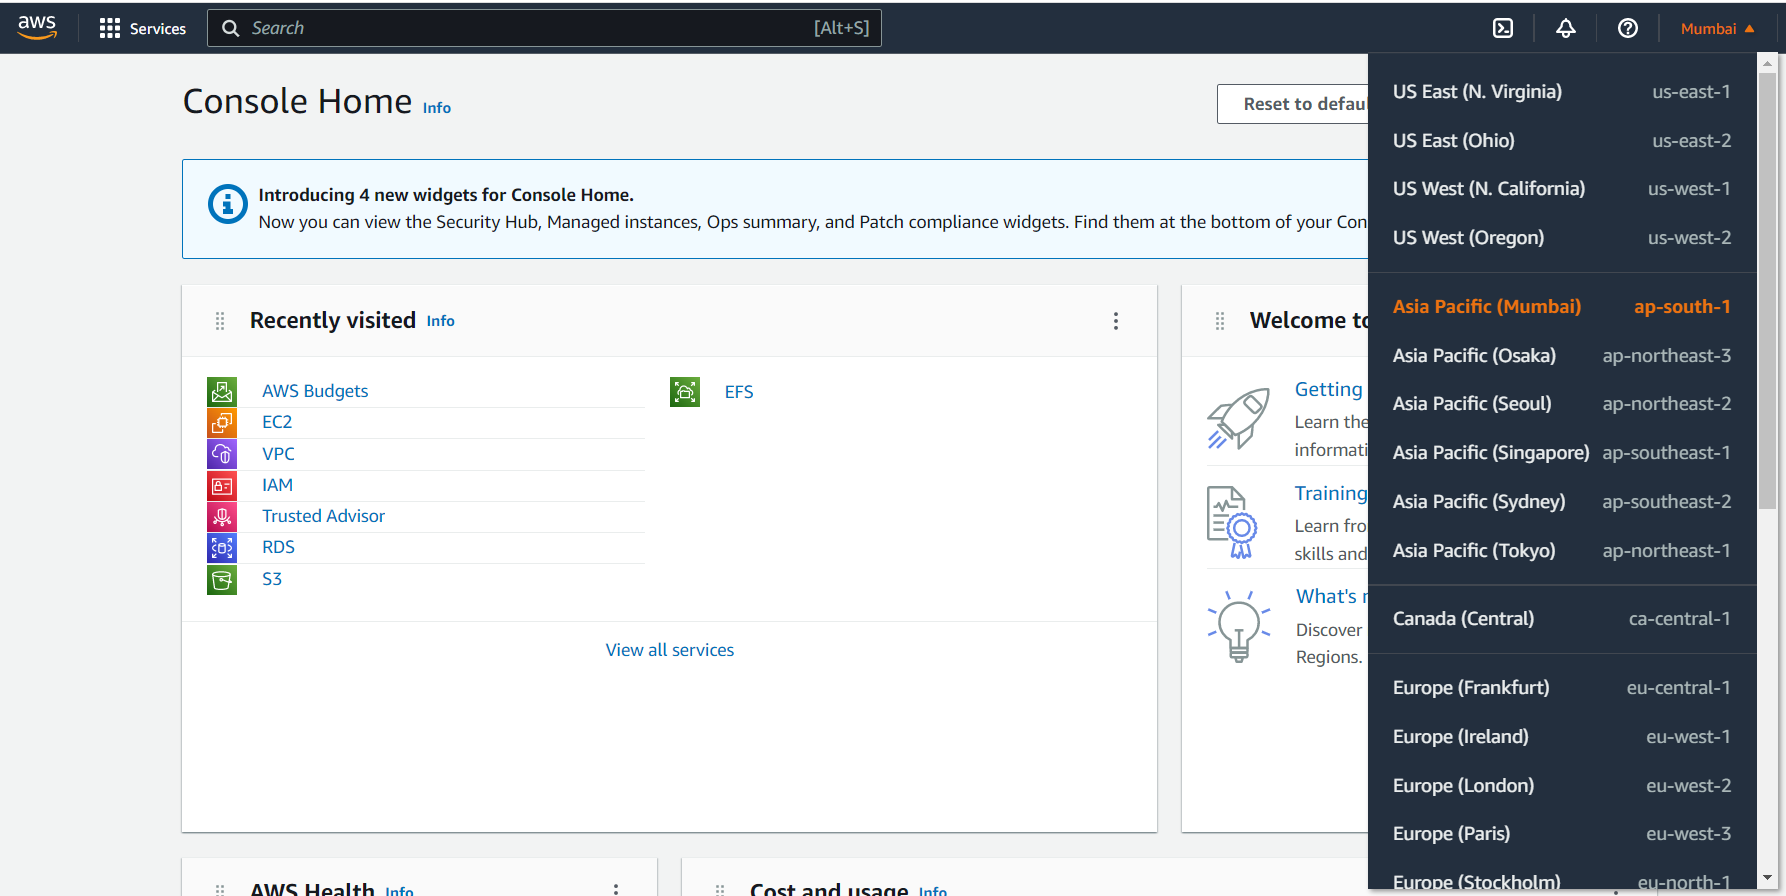
- Select the region where you want to launch the EC2 instance. For this article, we will be selecting Mumbai as our region to launch our EC2; you can select any region of your choice.
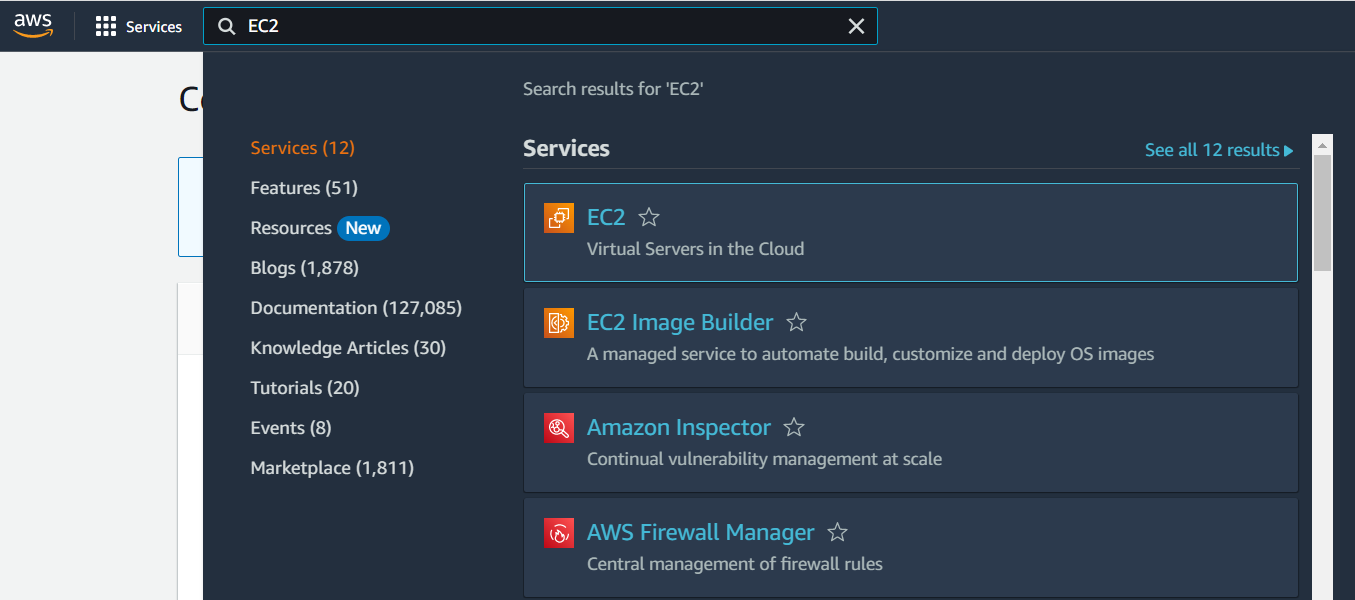
- In the search bar of the AWS management console, search EC2 and click on the first search as EC2 which will take you to the EC2 Dashboard.
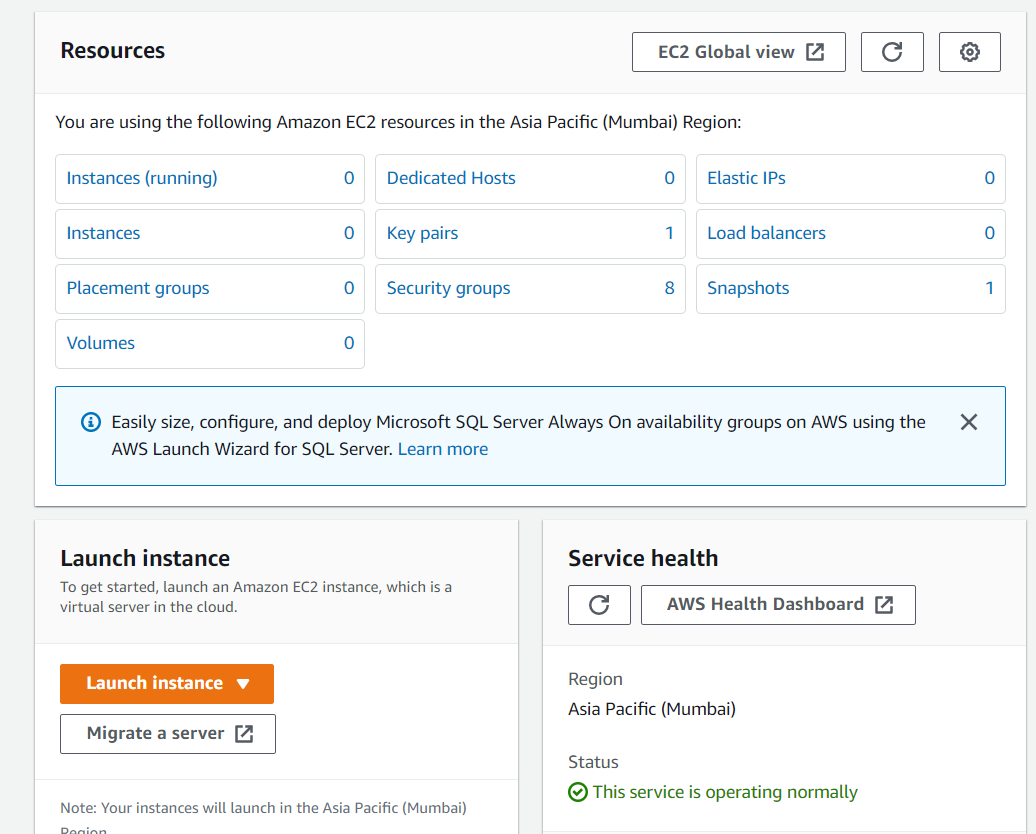
- On the EC2 Dashboard, to launch an instance, click on the launch instance.
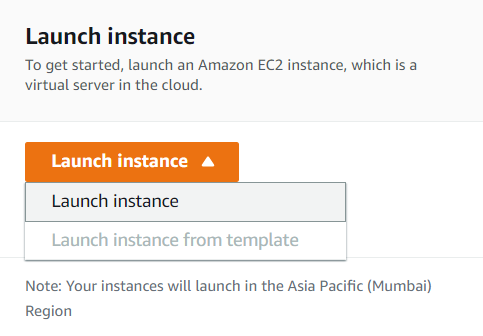
- After clicking on Launch Instance, from the drop-down options, click on Launch Instance. This opens a new window from where we can select the required configuration for our instance.
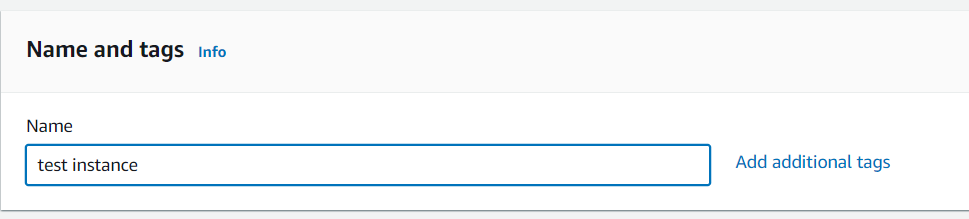
- The first step includes naming our instance.In our case, the name of our instance is the test instanceThere is no constraint on the naming of instances. We can give any name to an instance, even the name already in use to name an instance earlier. Instances are uniquely identified through their instance id.
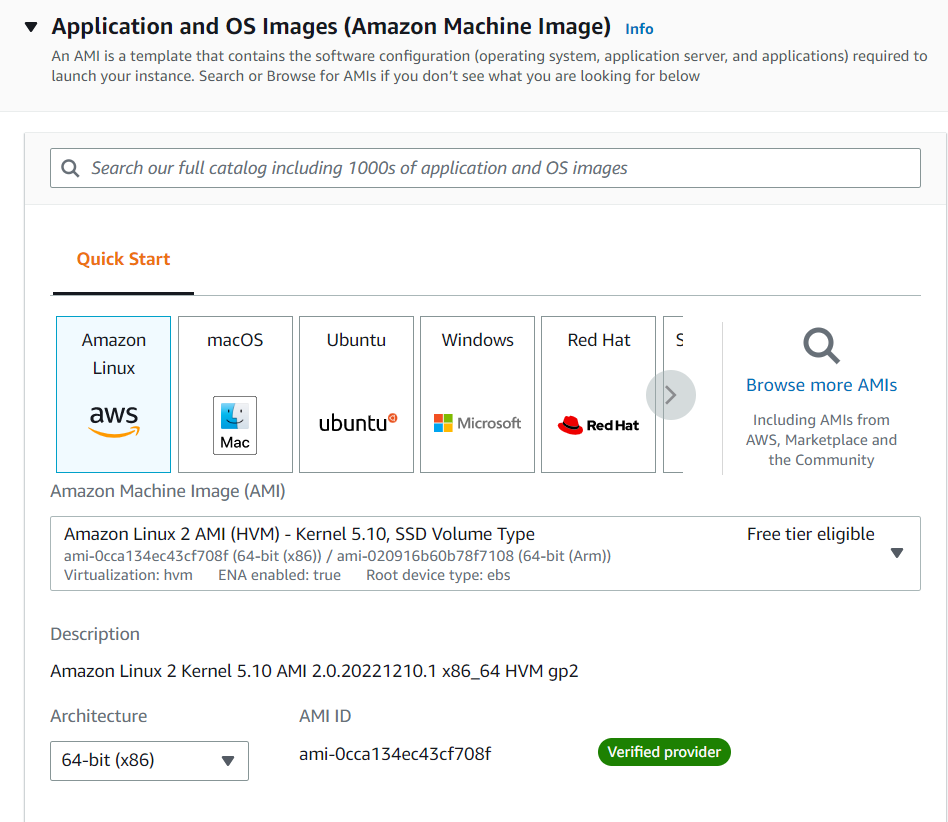
- After naming, we will select the Operating system of the instance, which in our case is Linux and then from all the AMIs corresponding to Linux, we will select the AMI we want for our instance. AMI includes an operating system with some additional software. In our case, we will select the AMI of free cost; you can select the AMI of your corresponding requirement.
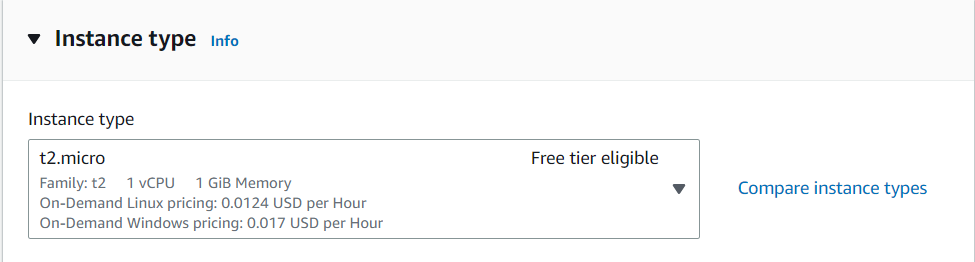
- We will select the required instance type. Instance types include varying CPU, memory, storage, and networking capacity combinations, etc.We can also compare various instance types by clicking on Compare instance types.We will select the instance type best suited to our requirements. Some instance types are available for free.
- The next step includes the naming of the key pair of our instance. Using a key pair, for instance, is always recommended as it acts as an authentication token to access the instance and allows us to connect to our instance securely.
Either we will create a new key pair or use the already created one.An instance can only have one key pair at max, whereas multiple key pairs can be used by different instances. If the key is lost, we can AMI of the existing instance and launch a new one.To create a new key pair, we will click on Create new key pair, which opens a dialog box.
Enter the key pair name, which should be unique within the region and should not contain any spaces in between.
After this, we will select the key pair type. For this, we have two options:
a. RSA- It contains a public and private key. The public key is used to verify the private key, which is passed via terminal while connecting to the instance
b. ED25519- It is also private and public key pair authentication generally used for SSH authentication. It is not used for Windows instances.After this, we will select the private key file format.
a.pem – It is used for connecting with openSSH. It uses SSH protocol which is a network communication protocol that enables computers to communicate with each other.
b. .ppk – It is used with PuTTY. PuTTY also uses SSH protocol, but it is used for Windows operating system instances.
Since we are using Linux and openSSH, we will select RSA and .pem format and click on Create key pair.
As soon as we click on create new key pair, it gets downloaded on our system. We can use this key pair to connect to our instance.
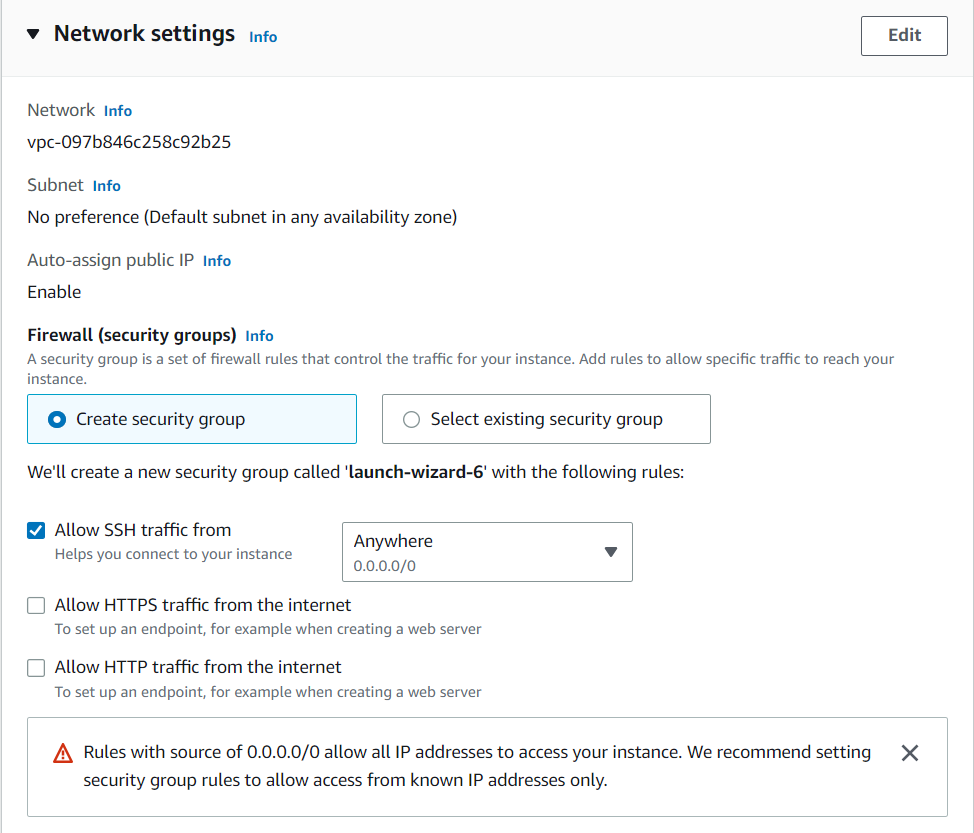
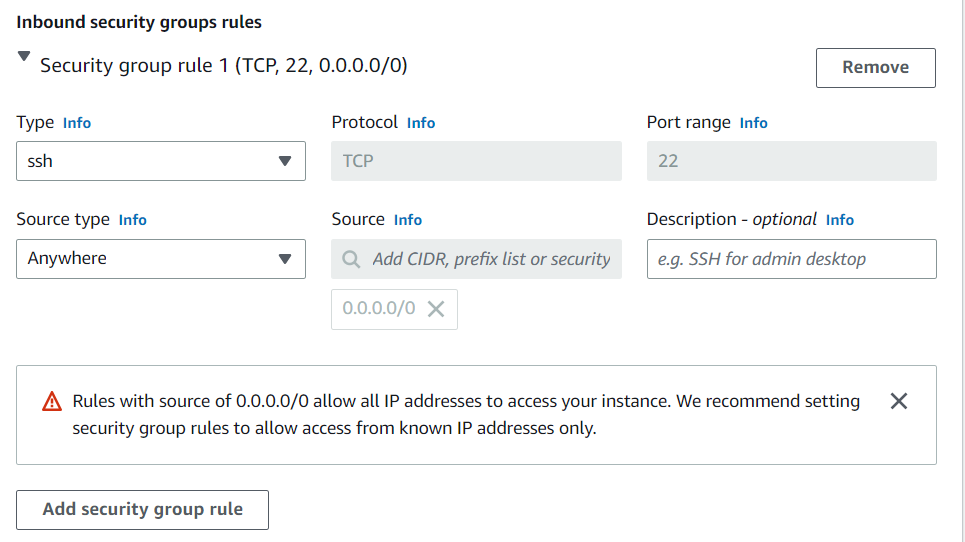
- Next is setting up the network settings. We can set up existing security groups or can even create new security groups. Security groups is a set of firewall rules that control the traffic of our instance.
We also have three rules for our security groups, and we can also have the option that from where we want to access our instance. We can access it from-Anywhere – From any sourceCustom – Only from a given sourceMy IP – Only from the user’s IP
We can also add or remove security group rules. To add security group rules, click on Edit and then on add security rule.
To remove the security group rules click on remove.
- After this, we can also configure the storage we want and change the advanced details as we want. In this article, we will keep these settings as default.
- In this way, we have configured our instance according to our needs and we can see the configuration of our instance in the Summary box.
- After checking that we have created the instance of our choice we will click on Launch instance.
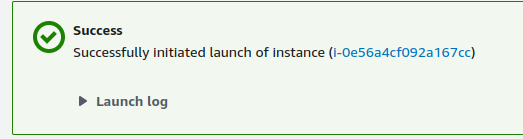
This launches our instance and displays the message Success that our instance was launched successfully.
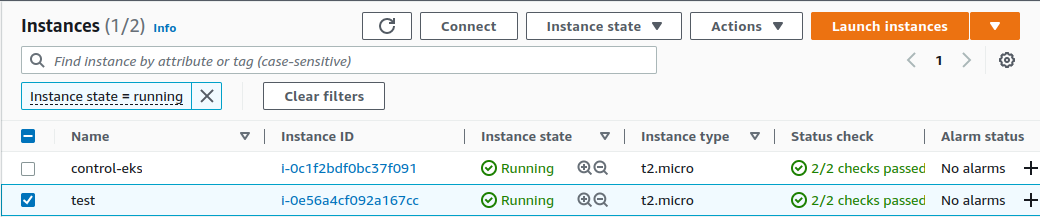
Now when we go to the EC2 dashboard and click on Instances(running), it shows our instance.
The instance is in a pending state initially, and it takes a minute or two to get into a running state.
In this way, we launched our EC2 instance; now, it is time to connect to our EC2 instance.
Step 2: Connecting to our Instance
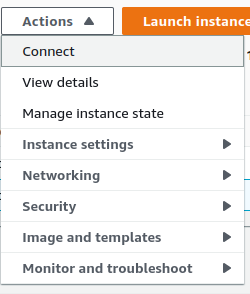
- To connect to our instance, we will select the instance and will click on the Actions button.
- From the drop-down options, we will select Connect option.
- It opens a new window, connect to Instance; since we have configured our instance to connect through an SSH client, we will select the SSH client in the window.

- After selecting SSH client shows the process to connect to our instance.

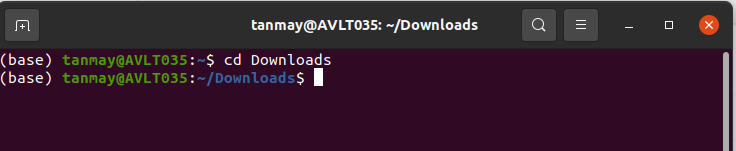
- We will open our terminal and change the directory to the location where we have downloaded our key pair. In our case, the directory is Downloads, so changing the directory to Downloads.
- In the next step, we will execute the commands shown. Firstly we will run the command: chmod 400 testingkey.pem(name of our key pair) to ensure that our key is not publicly viewable.

After this we will execute the command shown in the example.
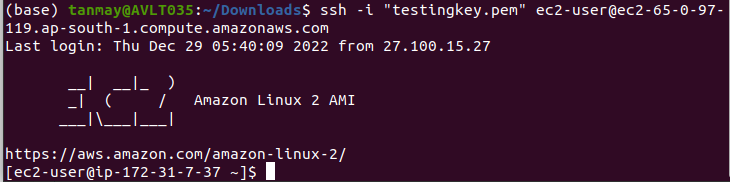
Here ssh means the protocol through which we will access our instance. testingkey.pem is our private key pair, and the rest of the command is the Public DNS of our instance.
- This way, we connected to our EC2 instance from our local machine via the terminal.
Step 3: Stopping the instance and terminating if needed
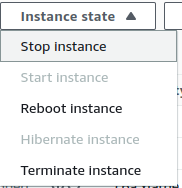
If our instance’s work is completed, it is advisable to stop or terminate it. If the instance is not required for future use, then we will terminate the instance, and if it is required in the future but not currently, then we will stop it
- To stop or terminate the instance select the instance first.
- Then click on the instance state and select the stop or terminate instance according to your needs.
Conclusion
I hope through this article; you got the basic idea of how to launch an instance of our requirements and connect to that instance through our local machine.
If you liked reading our article, don’t forget to tell us in the comments below. Also, Mention what will you like to read in the coming days.


