Introduction
When we hear data science, the first thing that comes to mind is building a model on notebooks and training the data. But this is not the situation in real-world data science. In the real world, data scientists build models and put them into production. The production environment has a gap between the development, deployment, and reliability of the model and to facilitate efficient and scalable operations This is where data scientists use MLOps (Machine Learning Operations) to build and deploy ML applications in a production environment. In this article, we will build and deploy a customer churn prediction project using MLOps.

Learning Objectives
In this article, you will learn:
- Overview of the project
- We will introduce ZenML and MLOPS fundamentals.
- Learn how to deploy the model locally for prediction
- Get into data preprocessing and engineering, training, and evaluating the model
This article was published as a part of the Data Science Blogathon.
Table of contents
Overview of the Project
First of all, we need to understand what our project is. For this project, we have a dataset from a telecom company. Now, to build a model to predict if the user is likely to continue the service of the company or not. We will build this ML application by using the help of ZenmML and MLFlow. This is the workflow of our project.
The Workflow of Our Project
- Data Collection
- Data preprocessing
- Training Model
- Evaluate model
- Deployment
What is MLOps?
MLOps is an end-to-end machine learning lifecycle, from development to deployment and ongoing maintenance. MLOps is the practice of streamlining and automating the entire lifecycle of machine learning models, all while ensuring scalability, reliability, and efficiency.
Let’s explain it with a simple example:
Imagine you’re constructing a skyscraper in your city. The construction of the building is completed. But it lacks electricity, water, drainage system, etc. The skyscraper will be non-functional and impractical.
The same applies to machine learning models. If these models are designed without taking into the deployment of the model, scalability, and long-term maintenance, they can become ineffective and impractical. This poses a major hurdle for data scientists when constructing machine learning models for use in production environments.
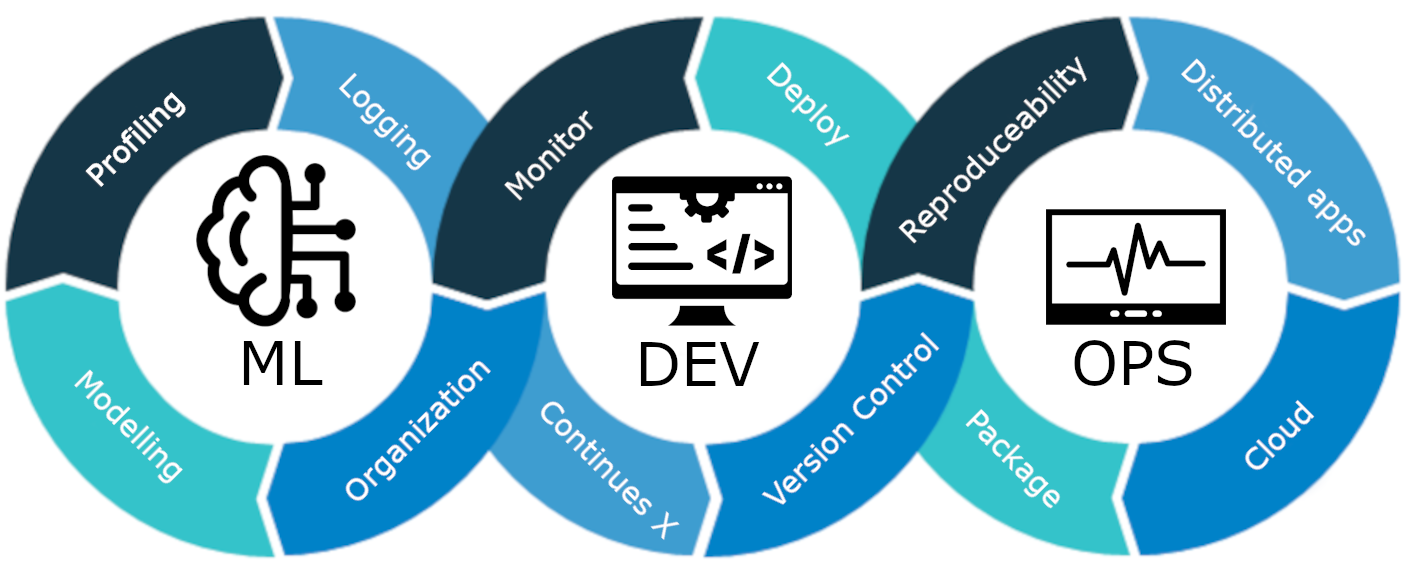
MLOps is a set of best practices and strategies that guide the production, deployment, and long-term maintenance of machine learning models. It ensures that these models not only deliver accurate predictions but also remain robust, scalable, and valuable assets for companies. So, without MLOps, it will be a nightmare to do all these tasks efficiently, which is challenging. In this project, we will explain how MLOps works, different stages, and an end-to-end project on how to build a Customer churn prediction model.
Introducing ZenML
ZenML is an open-source MLOPS Framework that helps to build portable and production-ready pipelines. The ZenML Framework will help us do this project using MLOPS.
⚠️ If you are a Windows user, try to install wsl on a PC. Zenml is not supported in Windows.
Before we move on to the projects.
Fundamental Concepts of MLOPS
- Steps: Steps are single units of tasks in a pipeline or workflow. Each step represents a specific action or operation that needs to be performed to develop a machine-learning workflow. For example, data cleaning, data preprocessing, training models, etc., are certain steps in developing a machine learning model.
- Pipelines: They connect multiple steps together to create a structured and automated process for machine learning tasks. for, e.g., the data processing pipeline, the model evaluation pipeline, and the model training pipeline.
Getting Started
Create a virtual environment for the project:
conda create -n churn_prediction python=3.9Then install these libraries:
pip install numpy pandas matplotlib scikit-learnAfter installing this, install ZenML:
pip install zenml["server"]Then initialize ZenML repository.
zenml init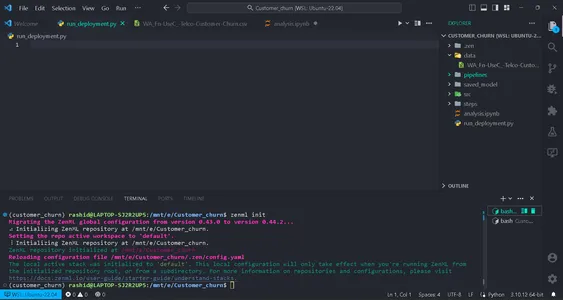
You will get a green flag to move on if your screen shows this. After initializing a folder .zenml will be created in your directory.
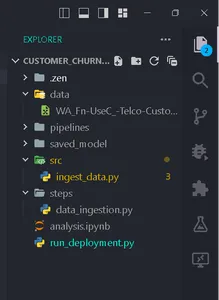
Create a folder for data in the directory. Get the data at this link:
Create folders according to this structure.
Data Collection
In this step, we are going to import data from our csv file. This data will be used for training the model after cleaning and encoding.
Create a file ingest_data.py inside the folder steps.
import pandas as pd
import numpy as np
import logging
from zenml import step


class IngestData:
    """
    Ingesting data to the workflow.
    """
    def __init__(self, path:str) -> None:
        """
        Args:
            data_path(str): path of the datafile
        """
        self.path = path

    def get_data(self):
        df = pd.read_csv(self.path)
        logging.info("Reading csv file successfully completed.")
        return df


@step(enable_cache = False)
def ingest_df(data_path:str) -> pd.DataFrame:
    """
    ZenML step for ingesting data from a CSV file.

    """
    try:
        #Creating an instance of IngestData class and ingest the data
        ingest_data = IngestData(data_path)
        df = ingest_data.get_data()
        logging.info("Ingesting data completed")
        return df
    except Exception as e:
        #Log an error message if data ingestion fails and raise the exception
        logging.error("Error while ingesting data")
        raise e
Here is the project link.
In this code, we first created the class IngestData to encapsulate the data ingestion logic. Then we created a ZenML step, ingest_df, which is an individual unit of the data collection pipeline.
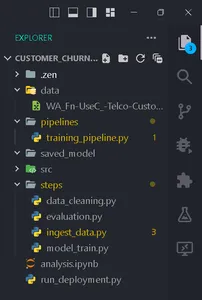
Creating a file training_pipeline.py inside the folder pipeline.
Write the Code
from zenml import pipeline

from steps.ingest_data import ingest_df

#Define a ZenML pipeline called training_pipeline.

@pipeline(enable_cache=False)
def train_pipeline(data_path:str):
    '''
    Data pipeline for training the model.

    Args:
        data_path (str): The path to the data to be ingested.
    '''
    df = ingest_df(data_path=data_path)
Here, we are creating a training pipeline for training a machine learning model using a series of steps.
Then create a file named run_pipeline.py in the base directory to run the pipeline.
from pipelines.training_pipeline import train_pipeline

if __name__ == '__main__':
    #Run the pipeline
    train_pipeline(data_path="/mnt/e/Customer_churn/data/WA_Fn-UseC_-Telco-Customer-Churn.csv")
This code is used for running the pipeline.
So now we have finished the Data ingestion pipeline. Let’s run it.
Run the command in your terminal:
python run_pipeline.py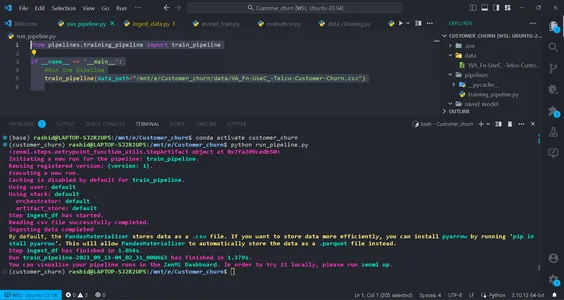
Then, you can see the commands, which indicate that training_pipeline has been successfully completed.
Data Preprocessing
In this step, we will create different strategies for cleaning data. The unwanted columns are dropped, and categorical columns will be encoded using Label encoding. Finally, the data will be split into training and testing data.
Create a file called clean_data.py in the src Folder.
In this file, we will create classes of strategies for cleaning the data.
import pandas as pd
import numpy as np
import logging
from sklearn.model_selection import train_test_split
from abc import abstractmethod, ABC
from typing import Union
from sklearn.preprocessing import LabelEncoder

class DataStrategy(ABC):
    @abstractmethod
    def handle_data(self, df:pd.DataFrame) -> Union[pd.DataFrame,pd.Series]:
        pass


# Data Preprocessing strategy
class DataPreprocessing(DataStrategy):
    def handle_data(self, df: pd.DataFrame) -> Union[pd.DataFrame, pd.Series]:
        try:
            df['TotalCharges'] = df['TotalCharges'].replace(' ', 0).astype(float)
            df.drop('customerID', axis=1, inplace=True)
            df['Churn'] = df['Churn'].replace({'Yes': 1, 'No': 0}).astype(int)
            service = ['PhoneService', 'MultipleLines', 'InternetService', 'OnlineSecurity',
                       'OnlineBackup', 'DeviceProtection', 'TechSupport', 'StreamingTV',
                       'StreamingMovies']
            for col in service:
                df[col] = df[col].replace({'No phone service': 'No', 'No internet service': 'No'})
            logging.info("Length of df: ", len(df.columns))
            return df
        except Exception as e:
            logging.error("Error in Preprocessing", e)
            raise e

# Feature Encoding Strategy
class LabelEncoding(DataStrategy):
    def handle_data(self, df: pd.DataFrame) -> Union[pd.DataFrame, pd.Series]:
        try:
            df_cat = ['gender', 'Partner', 'Dependents', 'PhoneService', 'MultipleLines',
                      'InternetService', 'OnlineSecurity', 'OnlineBackup', 'DeviceProtection',
                      'TechSupport', 'StreamingTV',  'StreamingMovies', 'Contract',
                      'PaperlessBilling', 'PaymentMethod']
            lencod = LabelEncoder()
            for col in df_cat:
                df[col] = lencod.fit_transform(df[col])
            logging.info(df.head())
            return df
        except Exception as e:
            logging.error(e)
            raise e

# Data splitting Strategy
class DataDivideStrategy(DataStrategy):
    def handle_data(self, df:pd.DataFrame) -> Union[pd.DataFrame, pd.Series]:
        try:
            X = df.drop('Churn', axis=1)
            y = df['Churn']
            X_train, X_test, y_train, y_test = train_test_split(X, y, test_size=0.2, random_state=1)
            return X_train, X_test, y_train, y_test
        except Exception as e:
            logging.error("Error in DataDividing", e)
            raise e
This code implements a modular data preprocessing pipeline for machine learning. It includes strategies for data preprocessing, feature encoding, and Data Encoding steps of data cleaning for predictive modeling.
1. DataPreprocessing: This class is responsible for removing unwanted columns and handling missing values (NA values) in the dataset.
2. LabelEncoding: The LabelEncoding class is designed to encode categorical variables into a numerical format that machine learning algorithms can work with effectively. It transforms text-based categories into numeric values.
3. DataDivideStrategy: This class separates the dataset into independent variables(X) and dependent variables (y). Then, it splits the data into training and testing sets.
We will implement them step by step to prepare our data for machine learning tasks.
These strategies ensure the data is structured and formatted correctly for model training and evaluation.
Create data_cleaning.py in the steps folder.
import pandas as pd
import numpy as np
from src.clean_data import DataPreprocessing, DataDivideStrategy, LabelEncoding
import logging
from typing_extensions import Annotated
from typing import Tuple
from zenml import step

# Define a ZenML step for cleaning and preprocessing data
@step(enable_cache=False)
def cleaning_data(df: pd.DataFrame) -> Tuple[
    Annotated[pd.DataFrame, "X_train"],
    Annotated[pd.DataFrame, "X_test"],
    Annotated[pd.Series, "y_train"],
    Annotated[pd.Series, "y_test"],
]:
    try:
        # Instantiate the DataPreprocessing strategy
        data_preprocessing = DataPreprocessing()

        # Apply data preprocessing to the input DataFrame
        data = data_preprocessing.handle_data(df)

        # Instantiate the LabelEncoding strategy
        feature_encode = LabelEncoding()

        # Apply label encoding to the preprocessed data
        df_encoded = feature_encode.handle_data(data)

        # Log information about the DataFrame columns
        logging.info(df_encoded.columns)
        logging.info("Columns:", len(df_encoded))

        # Instantiate the DataDivideStrategy strategy
        split_data = DataDivideStrategy()

        # Split the encoded data into training and testing sets
        X_train, X_test, y_train, y_test = split_data.handle_data(df_encoded)

        # Return the split data as a tuple
        return X_train, X_test, y_train, y_test
    except Exception as e:
        # Handle and log any errors that occur during data cleaning
        logging.error("Error in step cleaning data", e)
        raise e
In this step, we implemented the strategies we created in clean_data.py
Let’s implement this step in training_pipeline.py
from zenml import pipeline

#importing steps
from steps.ingest_data import ingest_df
from steps.data_cleaning import cleaning_data
import logging

#Define a ZenML pipeline called training_pipeline.
@pipeline(enable_cache=False)
def train_pipeline(data_path:str):
    '''
    Data pipeline for training the model.
    '''
    df = ingest_df(data_path=data_path)

    X_train, X_test, y_train, y_test = cleaning_data(df=df)
That’s it; we have completed our data preprocessing step in the training pipeline.
Model Training
Now, we are going to build the model for this project. Here, we are predicting a binary classification problem. We can use logistic regression. Our focus will not be on the accuracy of the model. It will be based on the MLOps part.
For those who don’t know about logistic regression, you can read about it here. We will implement the same steps we did in the data preprocessing step. First, we will create a file training_model.py in the src folder.
import pandas as pd
from sklearn.linear_model import LogisticRegression
from abc import ABC, abstractmethod
import logging


#Abstract model
class Model(ABC):
    @abstractmethod
    def train(self,X_train:pd.DataFrame,y_train:pd.Series):
        """
        Trains the model on given data
        """
        pass


class LogisticReg(Model):
    """
    Implementing the Logistic Regression model.
    """
    def train(self, X_train: pd.DataFrame, y_train: pd.Series):
        """
        Training the model

        Args:
            X_train: pd.DataFrame,
            y_train: pd.Series
        """
        logistic_reg = LogisticRegression()
        logistic_reg.fit(X_train,y_train)
        return logistic_reg
We define an abstract Model class with a ‘train’ method that all models must implement. The LogisticReg class is a specific implementation using logistic regression. The next step involves configuring a file named config.py in the steps folder. Create a file named config.py in the steps folder.
Configuring Model Parameters
from zenml.steps import BaseParameters


"""
This file is used for used for configuring
and specifying various parameters related to
your machine learning models and training process
"""

class ModelName(BaseParameters):
    """
    Model configurations
    """
    model_name: str = "logistic regression"
In the file named config.py, inside the steps folder, you’re configuring parameters related to your machine-learning model. You create a ModelName class that inherits from BaseParameters to specify the model name. This makes it easy to change the model type.
import logging

import pandas as pd
from src.training_model import LogisticReg
from zenml import step
from .config import ModelName


#Define a step called train_model
@step(enable_cache=False)
def train_model(X_train:pd.DataFrame,y_train:pd.Series,config:ModelName):
    """
    Trains the data based on the configured model

    """
    try:
        model = None
        if config == "logistic regression":
            model = LogisticReg()
        else:
            raise ValueError("Model name is not supported")

        trained_model = model.train(X_train=X_train,y_train=y_train)
        return trained_model

    except Exception as e:
        logging.error("Error in step training model",e)
        raise e
In the file named model_train.py in the steps folder, define a step called train_model using ZenML. The purpose of this step is to train a machine-learning model based on the name of the model in ModelName.
In the program
Check the configured model name. If it’s “logistic regression,” we created an instance of the LogisticReg model and trained it with the provided training data (X_train and y_train). If the model name is not supported, you raise an error. Any errors during this process are logged, and the error is raised.
After this, we are going to implement this step in training_pipeline.py
from zenml import pipeline


from steps.ingest_data import ingest_df
from steps.data_cleaning import cleaning_data
from steps.model_train import train_model
import logging

#Define a ZenML pipeline called training_pipeline.
@pipeline(enable_cache=False)
def train_pipeline(data_path:str):
    '''
    Data pipeline for training the model.
    '''
    #step ingesting data: returns the data.
    df = ingest_df(data_path=data_path)
    #step to clean the data.
    X_train, X_test, y_train, y_test = cleaning_data(df=df)
    #training the model
    model = train_model(X_train=X_train,y_train=y_train)
Now, we have implemented the train_model step in the pipeline. So, the model_train.py step is completed.
Evaluating Model
In this step, we will evaluate how efficient our model is. For that, we will check the accuracy score in predicting the testing data. So first, we are going to create the strategies we are going to use in the pipeline.
Create a file named evaluate_model.py in folder src.
import logging
from sklearn.metrics import confusion_matrix, classification_report, accuracy_score
from abc import ABC, abstractmethod
import numpy as np

# Abstract class for model evaluation
class Evaluate(ABC):
    @abstractmethod
    def evaluate_model(self, y_true: np.ndarray, y_pred: np.ndarray) -> float:
        """
        Abstract method to evaluate a machine learning model's performance.

        Args:
            y_true (np.ndarray): True labels.
            y_pred (np.ndarray): Predicted labels.

        Returns:
            float: Evaluation result.
        """
        pass


#Class to calculate accuracy score
class Accuracy_score(Evaluate):
    """
        Calculates and returns the accuracy score for a model's predictions.

    """

    def evaluate_model(self, y_true: np.ndarray, y_pred: np.ndarray) -> float:
        try:
            accuracy_scr = accuracy_score(y_true=y_true, y_pred=y_pred) * 100
            logging.info("Accuracy_score:", accuracy_scr)
            return accuracy_scr
        except Exception as e:
            logging.error("Error in evaluating the accuracy of the model",e)
            raise e
#Class to calculate Precision score
class Precision_Score(Evaluate):
    def evaluate_model(self, y_true: np.ndarray, y_pred: np.ndarray) -> float:
        """
        Generates and returns a precision score for a model's predictions.

        """
        try:
            precision = precision_score(y_true=y_true,y_pred=y_pred)
            logging.info("Precision score: ",precision)
            return float(precision)
        except Exception as e:
            logging.error("Error in calculation of precision_score",e)
            raise e

class F1_Score(Evaluate):
    def evaluate_model(self, y_true: np.ndarray, y_pred: np.ndarray):
        """
        Generates and returns an F1 score for a model's predictions.

        """
        try:
            f1_scr = f1_score(y_pred=y_pred, y_true=y_true)
            logging.info("F1 score: ", f1_scr)
            return f1_scr
        except Exception as e:
            logging.error("Error in calculating F1 score", e)
            raise e
Now that we have built the evaluation strategies, we will use them to evaluate the model. Let’s implement the code in step evaluate_model.py in the steps folder. Here, recall score, accuracy score, and precision score are the strategies we are using as metrics for evaluating the model.
Let’s implement these in steps. Create a file named evaluation.py in steps:
import logging
import pandas as pd
import numpy as np
from zenml import step
from src.evaluate_model import ClassificationReport, ConfusionMatrix, Accuracy_score
from typing import Tuple
from typing_extensions import Annotated
from sklearn.base import ClassifierMixin

@step(enable_cache=False)
def evaluate_model(
    model: ClassifierMixin,
    X_test: pd.DataFrame,
    y_test: pd.Series
) -> Tuple[
    Annotated[np.ndarray,"confusion_matix"],
    Annotated[str,"classification_report"],
    Annotated[float,"accuracy_score"],
    Annotated[float,"precision_score"],
    Annotated[float,"recall_score"]
    ]:
    """
    Evaluate a machine learning model's performance using common metrics.
    """
    try:
        y_pred =  model.predict(X_test)


        precision_score_class = Precision_Score()
        precision_score = precision_score_class.evaluate_model(y_pred=y_pred,y_true=y_test)
        mlflow.log_metric("Precision_score ",precision_score)


        accuracy_score_class = Accuracy_score()
        accuracy_score = accuracy_score_class.evaluate_model(y_true=y_test, y_pred=y_pred)
        logging.info("accuracy_score:",accuracy_score)

        return accuracy_score, precision_score

    except Exception as e:
        logging.error("Error in evaluating model",e)
        raise e
Now, let’s implement this step in the pipeline. Update the training_pipeline.py:
This code defines an evaluate_model step in a machine-learning pipeline. It takes a trained classification model (model), independent test data (X_test), and true labels for the test data (y_test) as input. It then evaluates the model’s performance using common classification metrics and returns the results, such as the precision_score, and accuracy_score.
Now, let’s implement this step in the pipeline. Update the training_pipeline.py:
from zenml import pipeline
from steps.ingest_data import ingest_df
from steps.data_cleaning import cleaning_data
from steps.model_train import train_model
from steps.evaluation import evaluate_model
import logging
#Define a ZenML pipeline called training_pipeline.
@pipeline(enable_cache=False)
def train_pipeline(data_path:str):
'''
Data pipeline for training the model.
Args:
data_path (str): The path to the data to be ingested.
'''
#step ingesting data: returns the data.
df = ingest_df(data_path=data_path)
#step to clean the data.
X_train, X_test, y_train, y_test = cleaning_data(df=df)
#training the model
model = train_model(X_train=X_train,y_train=y_train)
#Evaluation metrics of data
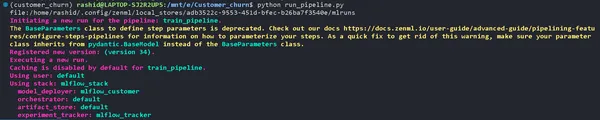
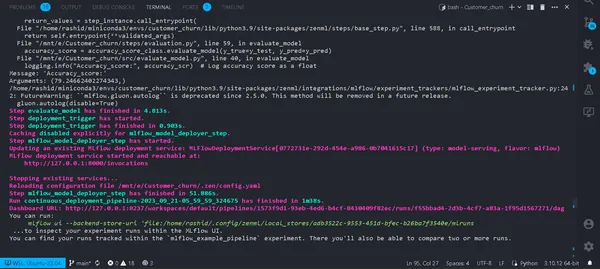
accuracy_score, precision_score = evaluate_model(model=model,X_test=X_test, y_test=y_test)That’s it. Now, we have completed the training pipeline. Run
python run_pipeline.py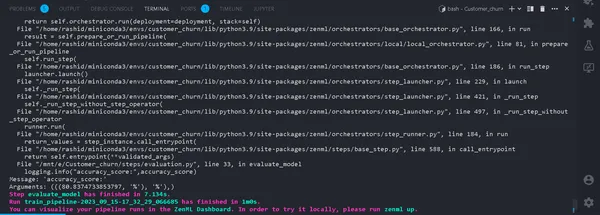
In the Terminal. If it runs successfully. Now that we have completed running a training pipeline locally, it will look like this:
What is an Experiment Tracker?
An experiment tracker is a tool in machine learning used to record, monitor, and manage various experiments in the machine learning development process.
Data scientists experiment with different models to get the best results. So, they need to keep tracking data and using different models. It will be very hard for them if they record it manually using an Excel sheet.
MLflow
MLflow is a valuable tool for efficiently tracking and managing experiments in machine learning. It automates experiment tracking, monitoring model iterations, and associated data. This streamlines the model development process and provides a user-friendly interface for visualizing results.
Integrating MLflow with ZenML enhances experiment robustness and management within the machine learning operations framework.
To set up MLflow with ZenML, follow these steps:
- Install MLflow integration:
- Use the following command to install the MLflow integration:
zenml integration install mlflow -y2. Register the MLflow experiment tracker:
Register an experiment tracker in MLflow using this command:
zenml experiment-tracker register mlflow_tracker --flavor=mlflow3. Register a Stack:
In ZenML, a Stack is a collection of components that define tasks within your ML workflow. It helps organize and manage ML pipeline steps efficiently. Register a Stack with:
You can find more details in the documentation.
zenml model-deployer register mlflow --flavor=mlflow
zenml stack register mlflow_stack -a default -o default -d mlflow -e mlflow_tracker --set
This associates your Stack with specific settings for artifact storage, orchestrators, deployment targets, and experiment tracking.
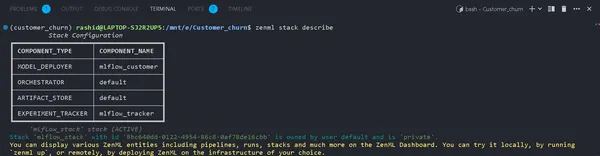
4. View Stack Details:
You can view the components of your Stack using:
zenml stack describeThis displays the components associated with the “mlflow_tracker” Stack.
Now, let’s implement an experiment tracker in the training model and evaluate the model:
You can see the name of the components as mlflow_tracker.
Setting Up ZenML Experiment Tracker
First, start updating the train_model.py:
import logging
import mlflow
import pandas as pd
from src.training_model import LogisticReg
from sklearn.base import ClassifierMixin
from zenml import step
from .config import ModelName
#import
from zenml.client import Client


# Obtain the active stack's experiment tracker
experiment_tracker = Client().active_stack.experiment_tracker


#Define a step called train_model
@step(experiment_tracker = experiment_tracker.name,enable_cache=False)
def train_model(
    X_train:pd.DataFrame,
    y_train:pd.Series,
    config:ModelName
    ) -> ClassifierMixin:
    """
    Trains the data based on the configured model
    Args:
        X_train: pd.DataFrame = Independent training data,
        y_train: pd.Series = Dependent training data.

    """
    try:
        model = None
        if config.model_name == "logistic regression":
            #Automatically logging scores, model etc..
            mlflow.sklearn.autolog()
            model = LogisticReg()
        else:
            raise ValueError("Model name is not supported")

        trained_model = model.train(X_train=X_train,y_train=y_train)
        logging.info("Training model completed.")
        return trained_model

    except Exception as e:
        logging.error("Error in step training model",e)
        raise e
In this code, we set up the experiment tracker using mlflow.sklearn.autolog(), which automatically logs all the details about the model, making it easier to track and analyze experiments.
In the evaluation.py
from zenml.client import Client

experiment_tracker = Client().active_stack.experiment_tracker


@step(experiment_tracker=experiment_tracker.name, enable_cache = False)
Running the Pipeline
Update your run_pipeline.py script as follows:
from pipelines.training_pipeline import train_pipeline
from zenml.client import Client
if __name__ == '__main__':
    #printimg the experiment tracking uri
    print(Client().active_stack.experiment_tracker.get_tracking_uri())
    #Run the pipeline
    train_pipeline(data_path="/mnt/e/Customer_churn/data/WA_Fn-UseC_-Telco-Customer-Churn.csv")
Copy it and paste in this command.
mlflow ui --backend-store-uri "--uri on the top of "file:/home/ "Explore Your Experiments
Click the link generated by the above command to open the MLflow UI. Here, you’ll find a treasure trove of insights:
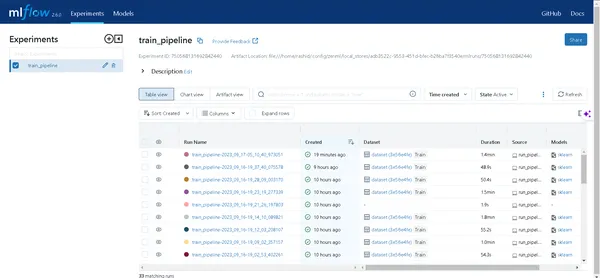
- Pipelines: Easily access all the pipelines you’ve run.
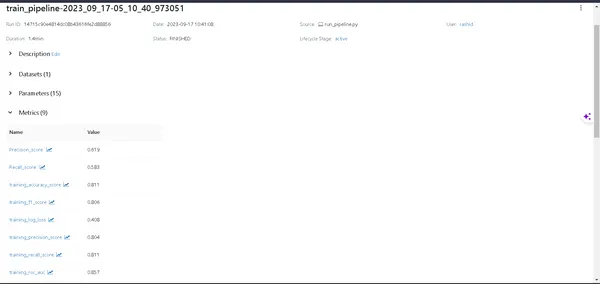
- Model Details: Click on a pipeline to uncover every detail about your model.
- Metrics: Dive into the metrics section to visualize your model’s performance.
Now, you can conquer your machine learning experiment tracking with ZenML and MLflow!
Deployment
In the next section, we are going to deploy this model. You need to know these concepts:
a). Continuous Deployment Pipeline
This pipeline will automate the model deployment process. Once a model passes evaluation criteria, it’s automatically deployed to a production environment. For example, it starts with data preprocessing, data cleaning, training the data, model evaluation, etc.
b). Inference Deployment Pipeline
The Inference Deployment Pipeline focuses on deploying machine learning models for real-time or batch inference. The Inference Deployment Pipeline specializes in deploying models for making predictions in a production environment. For example, it sets up an API endpoint where users can send text. It ensures the model’s availability and scalability and monitors its real-time performance. These pipelines are important for maintaining the efficiency and effectiveness of machine-learning systems. Now, we are going to implement the continuous pipeline.
Create a file called deployment_pipeline.py in the pipelines folder.
import numpy as np
import json
import logging
import pandas as pd
from zenml import pipeline, step
from zenml.config import DockerSettings
from zenml.constants import DEFAULT_SERVICE_START_STOP_TIMEOUT
from zenml.integrations.constants import MLFLOW
from zenml.integrations.mlflow.model_deployers.mlflow_model_deployer import (
    MLFlowModelDeployer,
)
from zenml.integrations.mlflow.services import MLFlowDeploymentService
from zenml.integrations.mlflow.steps import mlflow_model_deployer_step
from zenml.steps import BaseParameters, Output
from src.clean_data import FeatureEncoding
from .utils import get_data_for_test
from steps.data_cleaning import cleaning_data
from steps.evaluation import evaluate_model
from steps.ingest_data import ingest_df


# Define Docker settings with MLflow integration
docker_settings = DockerSettings(required_integrations = {MLFLOW})


#Define class for deployment pipeline configuration
class DeploymentTriggerConfig(BaseParameters):
    min_accuracy:float = 0.92

@step
def deployment_trigger(
    accuracy: float,
    config: DeploymentTriggerConfig,
):
    """
    It trigger the deployment only if accuracy is greater than min accuracy.
    Args:
        accuracy: accuracy of the model.
        config: Minimum accuracy thereshold.
    """
    try:
        return accuracy >= config.min_accuracy
    except Exception as e:
        logging.error("Error in deployment trigger",e)
        raise e

# Define a continuous pipeline
@pipeline(enable_cache=False,settings={"docker":docker_settings})
def continuous_deployment_pipeline(
    data_path:str,
    min_accuracy:float = 0.92,
    workers: int = 1,
    timeout: int = DEFAULT_SERVICE_START_STOP_TIMEOUT
):

    df = ingest_df(data_path=data_path)
    X_train, X_test, y_train, y_test = cleaning_data(df=df)
    model = train_model(X_train=X_train, y_train=y_train)
    accuracy_score, precision_score = evaluate_model(model=model, X_test=X_test, y_test=y_test)
    deployment_decision = deployment_trigger(accuracy=accuracy_score)
    mlflow_model_deployer_step(
        model=model,
        deploy_decision = deployment_decision,
        workers = workers,
        timeout = timeout
    )
ZenML Framework for Machine Learning Project
This code defines a continuous deployment for a machine learning project using the ZenML Framework.
1. Import Necessary libraries: Importing the necessary libraries for deployment of the model.
2. Docker Settings: By configuring Docker settings to use with MLflow, Docker helps package and run these models consistently.
3. DeploymentTriggerConfig: It is the class where the minimum accuracy threshold is configured for a model to deploy.
4. deployment_trigger: This step will return if the model accuracy exceeds the minimum accuracy.
5. continuous_deployment_pipeline: This pipeline consists of several steps: ingesting data, cleaning data, training the model, and evaluating the model. And the model will only deploy if it meets the minimum accuracy threshold.
Next, we are going to implement the inference pipeline in deployment_pipeline.py
import logging
import pandas as pd
from zenml.steps import BaseParameters, Output
from zenml.integrations.mlflow.model_deployers.mlflow_model_deployer
import MLFlowModelDeployer
from zenml.integrations.mlflow.services import MLFlowDeploymentService

class MLFlowDeploymentLoaderStepParameters(BaseParameters):
    pipeline_name: str
    step_name: str
    running: bool = True

@step(enable_cache=False)
def dynamic_importer() -> str:
    data = get_data_for_test()
    return data

@step(enable_cache=False)
def prediction_service_loader(
    pipeline_name: str,
    pipeline_step_name: str,
    running: bool = True,
    model_name: str = "model",
) -> MLFlowDeploymentService:
    model_deployer = MLFlowModelDeployer.get_active_model_deployer()
    existing_services = model_deployer.find_model_server(
        pipeline_name=pipeline_name,
        pipeline_step_name=pipeline_step_name,
        model_name=model_name,
        running=running,
    )
    if not existing_services:
        raise RuntimeError(
            f"No MLflow prediction service deployed by the "
            f"{pipeline_step_name} step in the {pipeline_name} "
            f"pipeline for the '{model_name}' model is currently "
            f"running."
        )
    return existing_services[0]

@step
def predictor(service: MLFlowDeploymentService, data: str) -> np.ndarray:
    service.start(timeout=10)
    data = json.loads(data)
    prediction = service.predict(data)
    return prediction

@pipeline(enable_cache=False, settings={"docker": docker_settings})
def inference_pipeline(pipeline_name: str, pipeline_step_name: str):
    batch_data = dynamic_importer()
    model_deployment_service = prediction_service_loader(
        pipeline_name=pipeline_name,
        pipeline_step_name=pipeline_step_name,
        running=False,
    )
    prediction = predictor(service=model_deployment_service, data=batch_data)
    return prediction
This code sets up a pipeline for making predictions using a deployed machine learning model through MLflow. It imports data, loads the deployed model, and uses it to make predictions.
We need to create the function get_data_for_test() in utils.py on the pipelines folder. So we can manage our code more efficiently.
import logging

import pandas as pd
from src.clean_data import DataPreprocessing, LabelEncoding


# Function to get data for testing purposes
def get_data_for_test():
    try:
        df = pd.read_csv('./data/WA_Fn-UseC_-Telco-Customer-Churn.csv')
        df = df.sample(n=100)
        data_preprocessing = DataPreprocessing()
        data = data_preprocessing.handle_data(df)

        # Instantiate the FeatureEncoding strategy
        label_encode = LabelEncoding()
        df_encoded = label_encode.handle_data(data)
        df_encoded.drop(['Churn'],axis=1,inplace=True)
        logging.info(df_encoded.columns)
        result = df_encoded.to_json(orient="split")
        return result
    except Exception as e:
        logging.error("e")
        raise e
Now, let’s implement the pipeline we created to deploy the model and predict on the deployed model.
Create the run_deployment.py file in project directory:
import click  # For handling command-line arguments
import logging
from typing import cast
from rich import print  # For console output formatting

# Import pipelines for deployment and inference
from pipelines.deployment_pipeline import (
continuous_deployment_pipeline, inference_pipeline
)
# Import MLflow utilities and components
from zenml.integrations.mlflow.mlflow_utils import get_tracking_uri
from zenml.integrations.mlflow.model_deployers.mlflow_model_deployer import (
MLFlowModelDeployer
)
from zenml.integrations.mlflow.services import MLFlowDeploymentService

# Define constants for different configurations: DEPLOY, PREDICT, DEPLOY_AND_PREDICT
DEPLOY = "deploy"
PREDICT = "predict"
DEPLOY_AND_PREDICT = "deploy_and_predict"

# Define a main function that uses Click to handle command-line arguments
@click.command()
@click.option(
    "--config",
    "-c",
    type=click.Choice([DEPLOY, PREDICT, DEPLOY_AND_PREDICT]),
    default=DEPLOY_AND_PREDICT,
    help="Optionally you can choose to only run the deployment "
    "pipeline to train and deploy a model (`deploy`), or to "
    "only run a prediction against the deployed model "
    "(`predict`). By default both will be run "
    "(`deploy_and_predict`).",
)
@click.option(
    "--min-accuracy",
    default=0.92,
    help="Minimum accuracy required to deploy the model",
)
def run_main(config:str, min_accuracy:float ):
    # Get the active MLFlow model deployer component
    mlflow_model_deployer_component = MLFlowModelDeployer.get_active_model_deployer()

    # Determine if the user wants to deploy a model (deploy), make predictions (predict), or both (deploy_and_predict)
    deploy = config == DEPLOY or config == DEPLOY_AND_PREDICT
    predict = config == PREDICT or config == DEPLOY_AND_PREDICT

    # If deploying a model is requested:
    if deploy:
        continuous_deployment_pipeline(
            data_path='/mnt/e/Customer_churn/data/WA_Fn-UseC_-Telco-Customer-Churn.csv',
            min_accuracy=min_accuracy,
            workers=3,
            timeout=60
        )

    # If making predictions is requested:
    if predict:
        # Initialize an inference pipeline run
        inference_pipeline(
            pipeline_name="continuous_deployment_pipeline",
            pipeline_step_name="mlflow_model_deployer_step",
        )

    # Print instructions for viewing experiment runs in the MLflow UI
    print(
        "You can run:\n "
        f"[italic green]    mlflow ui --backend-store-uri '{get_tracking_uri()}"
        "[/italic green]\n ...to inspect your experiment runs within the MLflow"
        " UI.\nYou can find your runs tracked within the "
        "`mlflow_example_pipeline` experiment. There you'll also be able to "
        "compare two or more runs.\n\n"
    )

    # Fetch existing services with the same pipeline name, step name, and model name
    existing_services = mlflow_model_deployer_component.find_model_server(
        pipeline_name = "continuous_deployment_pipeline",
        pipeline_step_name = "mlflow_model_deployer_step",
    )

    # Check the status of the prediction server:
    if existing_services:
        service = cast(MLFlowDeploymentService, existing_services[0])
        if service.is_running:
            print(
                f"The MLflow prediciton server is running locally as a daemon"
                f"process service and accepts inference requests at: \n"
                f"     {service.prediction_url}\n"
                f"To stop the service, run"
                f"[italic green] zenml model-deployer models delete"
                f"{str(service.uuid)}'[/italic green]."
            )
        elif service.is_failed:
            print(
                f"The MLflow prediciton server is in a failed state: \n"
                f" Last state: '{service.status.state.value}'\n"
                f" Last error: '{service.status.last_error}'"
            )
    else:
        print(
            "No MLflow prediction server is currently running. The deployment"
            "pipeline must run first to train a model and deploy it. Execute"
            "the same command with the '--deploy' argument to deploy a model."
        )

# Entry point: If this script is executed directly, run the main function
if __name__ == "__main__":
    run_main()
This code is a command line script for managing and deploying the machine learning model using MLFlow and ZenMl.
Now, let’s deploy the model.
Run this command on your terminal.
python run_deployment.py --config deploy
Now, we have deployed our model. Your pipeline will be successfully run, and you can view them in the zenml dashboard.
python run_deployment.py --config predictInitiating the Prediction Process
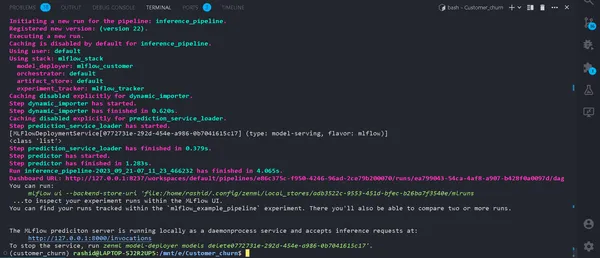
Now, our MLFlow prediction server is running.
We need a web app to input the data and see the results. You must be wondering why we have to create a webapp from scratch.
Not really. We are going to use Streamlit, which is an open-source frontend framework that helps in building fast and easy frontend webapp for our machine learning model.
Install the Library
pip install streamlitCreate a file named streamlit_app.py in your project directory.
import json
import logging
import numpy as np
import pandas as pd
import streamlit as st
from PIL import Image
from pipelines.deployment_pipeline import prediction_service_loader
from run_deployment import main
def main():
st.title("End to End Customer Satisfaction Pipeline with ZenML")
st.markdown(
"""
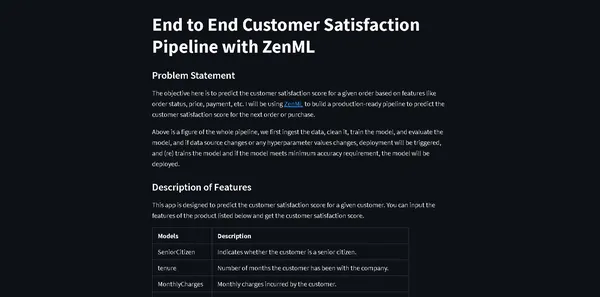
#### Problem Statement
The objective here is to predict the customer satisfaction score for a given order based on features like order status, price, payment, etc. I will be using [ZenML](https://zenml.io/) to build a production-ready pipeline to predict the customer satisfaction score for the next order or purchase. """
)
st.markdown(
"""
Above is a figure of the whole pipeline, we first ingest the data, clean it, train the model, and evaluate the model, and if data source changes or any hyperparameter values changes, deployment will be triggered, and (re) trains the model and if the model meets minimum accuracy requirement, the model will be deployed.
"""
)
st.markdown(
"""
#### Description of Features
This app is designed to predict the customer satisfaction score for a given customer. You can input the features of the product listed below and get the customer satisfaction score.
| Models | Description |
| ------------- | - |
| SeniorCitizen | Indicates whether the customer is a senior citizen. |
| tenure | Number of months the customer has been with the company. |
| MonthlyCharges | Monthly charges incurred by the customer. |
| TotalCharges | Total charges incurred by the customer. |
| gender | Gender of the customer (Male: 1, Female: 0). |
| Partner | Whether the customer has a partner (Yes: 1, No: 0). |
| Dependents | Whether the customer has dependents (Yes: 1, No: 0). |
| PhoneService | Whether the customer has dependents (Yes: 1, No: 0). |
| MultipleLines | Whether the customer has multiple lines (Yes: 1, No: 0). |
| InternetService | Type of internet service (No: 1, Other: 0). |
| OnlineSecurity | Whether the customer has online security service (Yes: 1, No: 0). |
| OnlineBackup | Whether the customer has online backup service (Yes: 1, No: 0). |
| DeviceProtection | Whether the customer has device protection service (Yes: 1, No: 0). |
| TechSupport | Whether the customer has tech support service (Yes: 1, No: 0). |
| StreamingTV | Whether the customer has streaming TV service (Yes: 1, No: 0). |
| StreamingMovies | Whether the customer has streaming movies service (Yes: 1, No: 0). |
| Contract | Type of contract (One year: 1, Other: 0). |
| PaperlessBilling | Whether the customer has paperless billing (Yes: 1, No: 0). |
| PaymentMethod | Payment method (Credit card: 1, Other: 0). |
| Churn | Whether the customer has churned (Yes: 1, No: 0). |
"""
)
payment_options = {
2: "Electronic check",
3: "Mailed check",
1: "Bank transfer (automatic)",
0: "Credit card (automatic)"
}
contract = {
0: "Month-to-month",
2: "Two year",
1: "One year"
}
def format_func(PaymentMethod):
return payment_options[PaymentMethod]
def format_func_contract(Contract):
return contract[Contract]
display = ("male", "female")
options = list(range(len(display)))
# Define the data columns with their respective values
SeniorCitizen = st.selectbox("Are you senior citizen?",
options=[True, False],)
tenure = st.number_input("Tenure")
MonthlyCharges = st.number_input("Monthly Charges: ")
TotalCharges = st.number_input("Total Charges: ")
gender = st.radio("gender:", options, format_func=lambda x: display[x])
Partner = st.radio("Do you have a partner? ", options=[True, False])
Dependents = st.radio("Dependents: ", options=[True, False])
PhoneService = st.radio("Do you have phone service? : ", options=[True, False])
MultipleLines = st.radio("Do you Multiplines? ", options=[True, False])
InternetService = st.radio("Did you subscribe for Internet service? ", options=[True, False])
OnlineSecurity = st.radio("Did you subscribe for OnlineSecurity? ", options=[True, False])
OnlineBackup = st.radio("Did you subscribe for Online Backup service? ", options=[True, False])
DeviceProtection = st.radio("Did you subscribe for device protection only?", options=[True, False])
TechSupport =st.radio("Did you subscribe for tech support? ", options=[True, False])
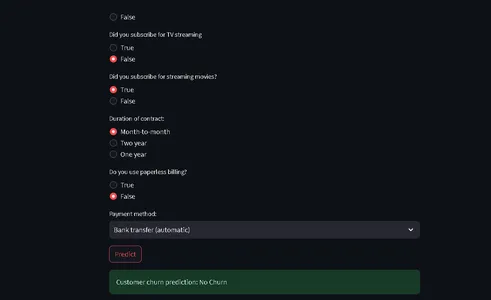
StreamingTV = st.radio("Did you subscribe for TV streaming", options=[True, False])
StreamingMovies = st.radio("Did you subscribe for streaming movies? ", options=[True, False])
Contract = st.radio("Duration of contract: ", options=list(contract.keys()), format_func=format_func_contract)
PaperlessBilling = st.radio("Do you use paperless billing? ", options=[True, False])
PaymentMethod = st.selectbox("Payment method:", options=list(payment_options.keys()), format_func=format_func)
# You can use PaymentMethod to get the selected payment method's numeric value
if st.button("Predict"):
service = prediction_service_loader(
pipeline_name="continuous_deployment_pipeline",
pipeline_step_name="mlflow_model_deployer_step",
running=False,
)
if service is None:
st.write(
"No service could be found. The pipeline will be run first to create a service."
)
run_main()
try:
data_point = {
'SeniorCitizen': int(SeniorCitizen),
'tenure': tenure,
'MonthlyCharges': MonthlyCharges,
'TotalCharges': TotalCharges,
'gender': int(gender),
'Partner': int(Partner),
'Dependents': int(Dependents),
'PhoneService': int(PhoneService),
'MultipleLines': int(MultipleLines),
'InternetService': int(InternetService),
'OnlineSecurity': int(OnlineSecurity),
'OnlineBackup': int(OnlineBackup),
'DeviceProtection': int(DeviceProtection),
'TechSupport': int(TechSupport),
'StreamingTV': int(StreamingTV),
'StreamingMovies': int(StreamingMovies),
'Contract': int(Contract),
'PaperlessBilling': int(PaperlessBilling),
'PaymentMethod': int(PaymentMethod)
}
# Convert the data point to a Series and then to a DataFrame
data_point_series = pd.Series(data_point)
data_point_df = pd.DataFrame(data_point_series).T
# Convert the DataFrame to a JSON list
json_list = json.loads(data_point_df.to_json(orient="records"))
data = np.array(json_list)
for i in range(len(data)):
logging.info(data[i])
pred = service.predict(data)
logging.info(pred)
st.success(f"Customer churn prediction: {'Churn' if pred == 1 else 'No Churn'}")
except Exception as e:
logging.error(e)
raise e
if __name__ == "__main__":
main()This code defines a StreamLit will provide frontend for predicting customer churn in a telecom company based on customer data and demographic details.
Users can input their information through a user-friendly Interface, and the code uses a trained machine learning model (deployed with ZenML and MLflow) to make predictions.
The predicted result is then displayed to the user.
Now run this command:
⚠️ make sure your prediction model is running
streamlit run streamlit_app.pyClick on the link.
That’s it; we have completed our project.
That’s it; we’ve successfully wrapped up our end-to-end machine learning project, how professionals approach the entire process.
Conclusion
In this comprehensive exploration of machine learning operations (MLOps) through the development and deployment of a customer churn prediction model, we have witnessed the transformational power of MLOps in streamlining the machine learning lifecycle. From data collection and preprocessing to model training, evaluation, and deployment, our project showcases the essential role of MLOps in bridging the gap between development and production. As organizations increasingly rely on data-driven decision-making, the efficient and scalable practices demonstrated here highlight the critical importance of MLOps in ensuring the success of machine learning applications.
Key Takeaways
- MLOps (Machine Learning Operations) is pivotal in streamlining the end-to-end machine learning lifecycle, ensuring efficient, reliable, and scalable operations.
- ZenML and MLflow are powerful frameworks that facilitate the development, tracking, and deployment of machine learning models in real-world applications.
- Proper data preprocessing, including cleaning, encoding, and splitting, is foundational to building robust machine-learning models.
- Evaluation metrics like accuracy, precision, recall, and F1 score provide a comprehensive understanding of model performance.
- Experiment tracking tools like MLflow enhance collaboration and experimentation management in data science projects.
- Continuous and inference deployment pipelines are critical for maintaining model efficiency and availability in production environments.
Frequently Asked Questions
Q1. What is MLOps?
MLOPS means Machine Learning Operations is an end-to-end machine learning life cycle from development to Data Collection. It is a set of practices for designing and automating the entire machine-learning cycle. It encompasses every stage, from the development and training of machine learning models to their deployment, monitoring, and ongoing maintenance. MLOps is crucial because it ensures the scalability, reliability, and efficiency of machine learning applications. It helps data scientists to create robust machine-learning applications that deliver accurate predictions.
Q2. How is MLOps different from DevOps?
MLOps and DevOps have similar goals of streamlining and automating processes within their respective domains. DevOps primarily centers on software development, the software delivery pipeline. It aims to accelerate software development, enhance code quality, and improve deployment reliability. MLOps caters to the specialized needs of machine learning projects, making it a crucial practice to leverage AI and data science.
Q3. How do we debug that the server daemon is not running?
This is a common error you will face in the project. Just run
‘zenml down’
then
‘zenml disconnect’
again run the pipeline. It will be resolved.
The media shown in this article is not owned by Analytics Vidhya and is used at the Author’s discretion.
I am Muhammed Rashid. I am a machine learning engineer. I love to build real world AI applications which people can use in their daily life. Die hard fan of Steve Jobs.
I also love to write about technology.


