This article was published as a part of the Data Science Blogathon
Table of Content
The below topics will be covered in this article. The aim is to familiarize the reader with mlflow and provide a foundation to start using it.
- What is mlflow?
- Why is it needed?
- Key concepts in mlfow tracking.
- Hands-on with mlflow.
-
Comparing Models Using MLFOW UI.
-
Basic MLFLOW function.
-
ML runs folder.
What is mlflow?
MLflow is an open-source platform for managing the end-to-end machine learning lifecycle. Simply put, mlflow helps track hundreds of models, container environments, datasets, model parameters and hyperparameters, and reproduce them when needed. There are major business use cases of mlflow and azure has integrated mlflow into its standard library, this speaks volumes as to why mlflow is important, and why it makes sense to put some effort into understanding it and deploying it.
Why is it needed?
Let’s consider scenario one: During hackathons on Analytics Vidya, it’s common to try out various types of data preprocessing, built models using boosted trees, GLMnets, or Deep learning methods, each model has a different parameter and resultant metric. Keeping track of all this is tedious or looks something like v001.pkl to v030.pkl. With MLflow tracking, each experiment/metrics/parameter is logged and can be rendered as a pandas dataframe, and the best model can be chosen based on RSME or RMSLE etc. Using the run_id, the model can be fetched and used for prediction.
Scenario two: In a large firm where models mean revenue in most of the cases, a slight drift in data or unexplainable output means losses. For example – Insurers collect customer/patient data from hospitals and utilize it to charge the optimal premium per customer based on risk factors and also keeping in mind the bottom line(margin). If low premiums are charged, it’s a business loss and high premium leads to customer attrition. Data scientists and engineers are tasked with building/fixing these models. In such cases, if training/testing/deployment configs aren’t logged and saved, it becomes an impossible task to reproduce the erroneous model. With mlfow, the config, dataset, script, environment(conda.yml) are logged and the run_id/experiment_id used for deployment in a scoring script, in a matter of minutes the model is reproducible.
This article will focus on scenario one, which will help budding data scientists/engineers alike start using mlflow in their data science pipeline. Mlflow has 4 components, tracking, models, registry and projects. This article focuses on mlflow-tracking for hackathon use cases.
MLflow sessions from the creators of mlfow on YouTube.
Key concepts in MLFLOW tracking
- Parameters – key-value inputs in the code.
- Metrics – Numeric values.
- Tags and notes – information about a run, the purpose of the model, or team name perhaps.
- Artifacts – Files, data and models.
- Source – which script to run?
- Version – Script version.
- Run – Instance of the code that runs on mlflow.
- Experiment – Collection of runs.
Hands-on with MLFOW
- Install MLFLOW
- Write a class/method using mlflow(See below).
- Log metrics, model.
- Return experiment id and run id and model comparison.
- Fetch the best model using logged metrics.
- Use the prediction model
- Additionally, for deployment purposes, the models are registered and these registered models are served using a REST endpoint.
1. Install Mflow using pip :
pip install mlflow
2. Start mlflow using the below code, r_name is the run name:
Each model run is called an experiment, the run_name attribute can be used to identify particular runs for example – xgboost-exp, or catboost-exp. This instructs mlflow to create a folder with a new run_id, and sub-folders are also created. Mlruns folder has been discussed in a later section below.
with mlflow.start_run(run_name=r_name) as run:
3. Logging parameters/metrics/artifacts/models:
Any number of metrics, parameters, images can be logged using the below code. For each experiment tracking folder is assigned.
mlflow.log_param("l1_ratio", l1_ratio)

mlflow.log_metric("rmse", rmse)

mlflow.sklearn.log_model(lr, "model", registered_model_name="ElasticnetWineModel01")

mlflow.log_artifact(temp_name, "rmse_estimators_plots")
4. Fetch experiment details using the below command. filter_string can be any parameter or metric:
Once the experiments execute, users have the option to use one particular or multiple metrics to filter and choose the top model. For example, metrics.rmse < 60, results in models which are less than 60 RSME. Similarly, MAE, MSE or any other metric can be used for regression.
df = mlflow.search_runs(filter_string="metrics.rmse < 60")
df.head()

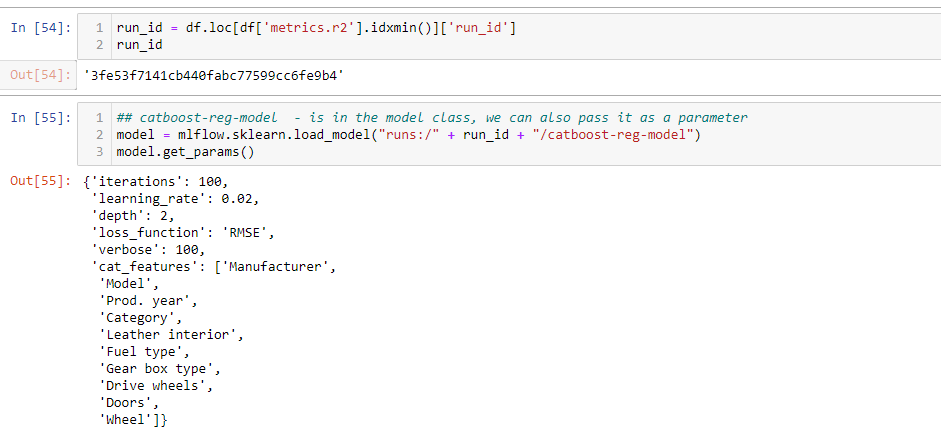
5. Fetch the best model using logged metrics:
The top model, in this case, is fetched using the R2_score. The load_model method retrieves the model from the saved mlruns folder. The output of the method is the run_id, using the run_id, the model can fetch as well.
run_id = df.loc[df['metrics.r2'].idxmin()]['run_id']
## catboost-reg-model  - is in the model class, we can also pass it as a parameter
model = mlflow.sklearn.load_model("runs:/" + run_id + "/catboost-reg-model")
model.get_params()
6. Use the prediction model:
Once the model is retrieved, it can be used for prediction.
columns_to_keep = ["Manufacturer","Model","Prod. year","Category","Leather interior","Fuel type", "Cylinders","Gear box type",
 "Drive wheels", "Doors", "Wheel", "Airbags"]
cat_features = ["Manufacturer","Model","Prod. year","Category","Leather interior","Fuel type", "Gear box type",
 "Drive wheels", "Doors", "Wheel"]
features_to_predict_df = test[columns_to_keep]
features_to_predict_df[cat_features] = features_to_predict_df[cat_features].astype(str)
y_pred_log = model.predict(features_to_predict_df)
features_to_predict_df.head()

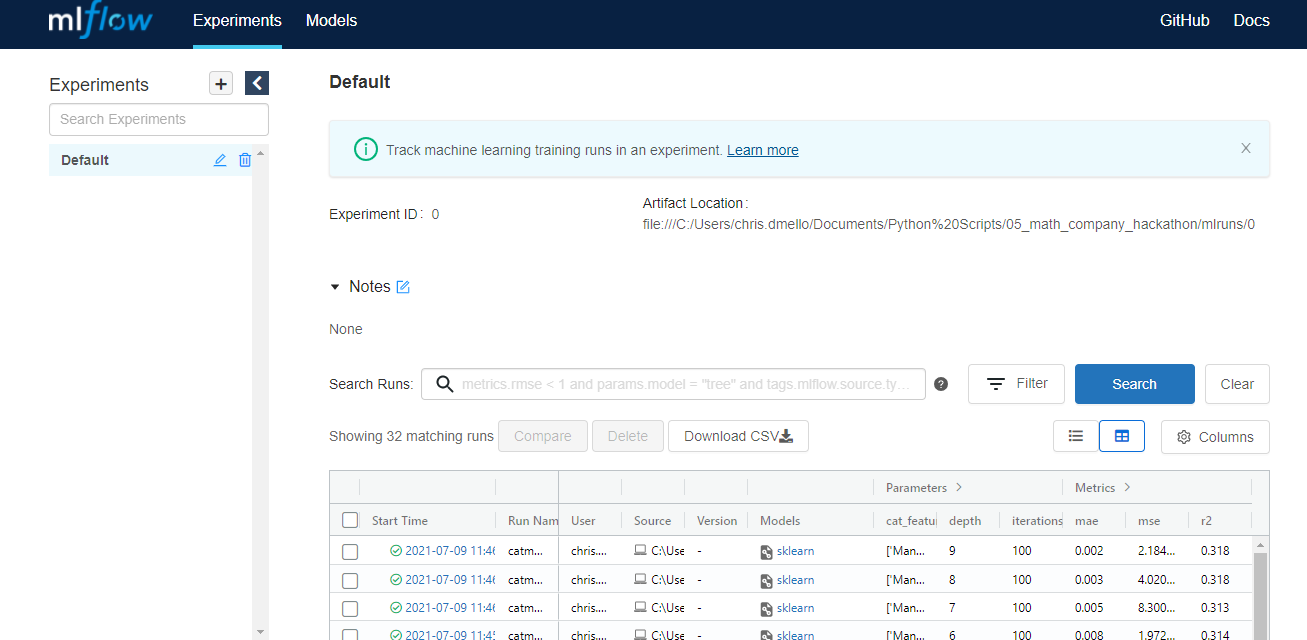
Comparing Models Using MLFOW UI
Mlflow provides a UI to track experiments as well, using http://localhost:5000/ Comparing different models that meet the minimum threshold and validating each model is made easy using this mlflow UI. The UI can also be used to do the following:
- Every trained model can be accessed downloaded.
- Model metrics and parameters can be viewed, sorted.
- It gives an option to understand which parameters have consistently performed well and this helps reduce the grid search window or time confused to train via grid search. Though a manual task to sort and filter through many iterations, dashboard feel makes it easy.
- Options to choose and select columns, such as only keep parameter and metrics.
- It gives an option to download all the runs information into a CSV for those excel wizards to play around
- Metrics can be plotted.
- Once the final model is selected, it can be registered and served for predictions.
# Once mlruns are complete, use this comamnd.
!mlflow ui
Basic MLFLOW function
The problem at hand is a regression problem. Train data and test data can be downloaded from the attached links. The function calls mlflow, splits data into train and test, trains the model, logs metrics, parameters and returns experiment id and run id.
- mlflow.start_run to trigger mlflow run.
- Assign run_id and experiment_id to respective variables.
- Use train_test_split to split the dataset.
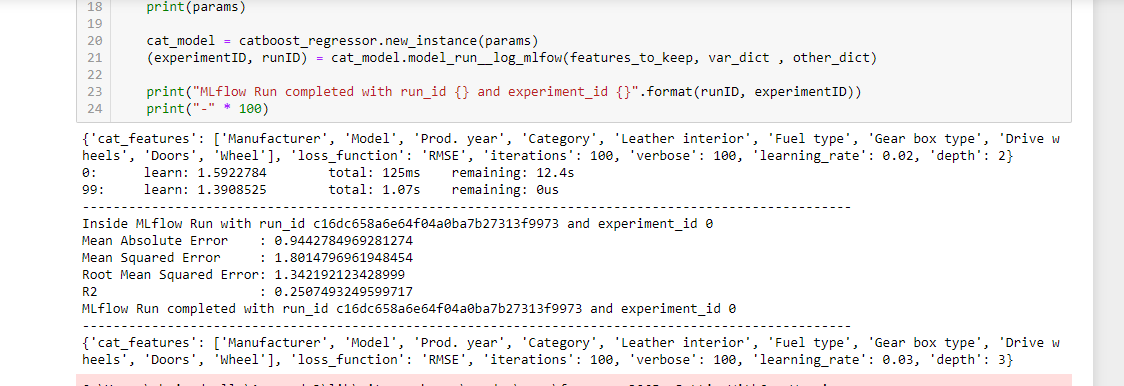
- Use catboost regressor to train the data and predict(Or any other regression model). Parameters used are:
-
{‘iterations’: 100,‘learning_rate’: 0.02,‘depth’: 2,‘loss_function’: ‘RMSE’,‘verbose’: 100,‘cat_features’: [‘Manufacturer’,‘Model’,‘Prod. year’,‘Category’,‘Leather interior’,‘Fuel type’,‘Gear box type’,‘Drive wheels’,‘Doors’,‘Wheel’]}
-
- Log all relevant regression evaluation metrics using mlflow.log_metric.
- Print training status, so as to get an update on the training status and previous model results.
- Return experiment id and run id.
def model_run__log_mlfow(self, df, var_dict, other_dict = {}):
    '''
    self : rf regressor model
    df   : dataframe
    var_dict : model variables dict - var_dict["independant"], var_dict["dependant"]
    other_dict : other dict if needed, set to {} default
    '''
    r_name = other_dict["run_name"]
    with mlflow.start_run(run_name=r_name) as run:
        # get current run and experiment id
        runID = run.info.run_uuid
        experimentID = run.info.experiment_id
        feature = var_dict["independant"]
        label   = var_dict["dependant"]
        ## log of predictions
        df[label] = np.log(df[label]+1)
        X = df[feature]
        y = df[label]
        X_train, X_test, y_train, y_test = train_test_split(X, y, test_size = 0.25,random_state = 42)
        self._rfr.fit(X_train, y_train)
        y_pred = self._rfr.predict(X_test)
        ## self.model is a getter for the model
        mlflow.sklearn.log_model(self.model, "catboost-reg-model")
        mlflow.log_params(self.params)
        model_score = self._rfr.score(X_test , y_test)
        mae = metrics.mean_absolute_error(y_test, y_pred)
        mse = metrics.mean_squared_error(y_test, y_pred)
        rmse = np.sqrt(mse)
        r2 = metrics.r2_score(y_test, y_pred)
        # Log metrics
        mlflow.log_metric("mae", mae)
        mlflow.log_metric("mse", mse)
        mlflow.log_metric("rmse", rmse)
        mlflow.log_metric("r2", r2)
        print("-" * 100)
        print("Inside MLflow Run with run_id {} and experiment_id {}".format(runID, experimentID))
        print('Mean Absolute Error    :', mae)
        print('Mean Squared Error     :', mse)
        print('Root Mean Squared Error:', rmse)
        print('R2                     :', r2)
        return (experimentID, runID)
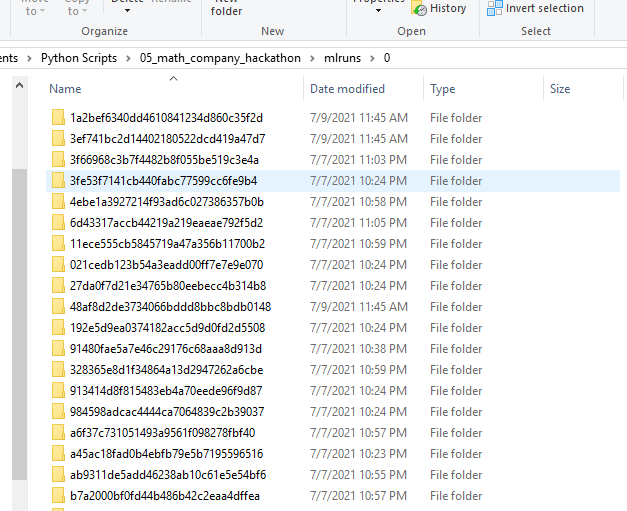
ML runs Folder
A brief understanding of what goes on under the hood. When mlflow is used, it creates a folder mlruns, which is a repository of the project.
-
- The mlruns folder contains run_ids, for each run separate folder is created.
- Each folder has 4 subfolders
- artifacts
- metrics
- params
- tags
- Artifacts have the conda environment used in the model, the model pkl file. Sample conda.yml file from artifacts.
-
channels:
- defaults
- conda-forge
dependencies:
- python=3.8.5
- pip
- pip:
  - mlflow
  - scikit-learn==0.23.2
  - cloudpickle==1.6.0
name: mlflow-env
-
- Metrics folder logs metrics such as RSME/MAE, customer metric etc.
- Params folder logs – features, model paramters(max_depth, max_iter, learning_rate, verbose etc)
- Tags track history and use details.
- [{“run_id”: “1a2bef6340dd4610841234d860c35f2d”, “artifact_path”: “catboost-reg-model”, “utc_time_created”: “2021-07-09 06:15:51.956861”, “flavors”: {“python_function”: {“model_path”: “model.pkl”, “loader_module”: “mlflow.sklearn”, “python_version”: “3.8.5”, “env”: “conda.yaml”}, “sklearn”: {“pickled_model”: “model.pkl”, “sklearn_version”: “0.23.2”, “serialization_format”: “cloudpickle”}}}]
Conclusion
Equipped with the basics of mlflow tracking, hackathons or work, it’s time to implement this useful model lifecycle management tool.
Good luck! Here is my Linkedin profile in case you want to connect with me. I’ll be happy to be connected with you.
Data scientist. Extensively using data mining, data processing algorithms, visualization, statistics, and predictive modeling to solve challenging business problems and generate insights. My responsibilities as a Data Scientist include but are not limited to developing analytical models, data cleaning, explorations, feature engineering, feature selection, modeling, building prototype, documentation of an algorithm, and insights for projects such as pricing analytics for a craft retailer, promotion analytics for a fortune 500 wholesale club, inventory management/demand forecasting for a jewelry retailer and collaborating with on-site teams to deliver highly accurate results on time.


