Introduction
When we’re shown an image, our brain instantly recognizes the objects contained in it. On the other hand, it takes a lot of time and training data for a machine to identify these objects. But with the recent advances in hardware and deep learning, this computer vision field has become a whole lot easier and more intuitive.
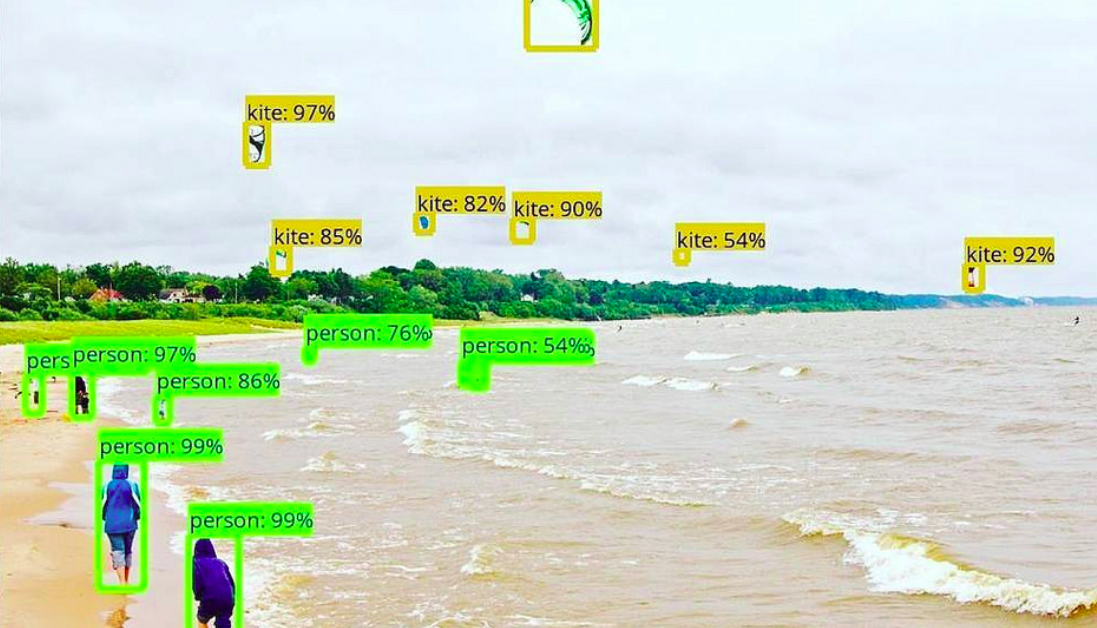
Check out the below image as an example. The system is able to identify different objects in the image with incredible accuracy.
Object detection technology has seen a rapid adoption rate in various and diverse industries. It helps self-driving cars safely navigate through traffic, spots violent behavior in a crowded place, assists sports teams analyze and build scouting reports, ensures proper quality control of parts in manufacturing, among many, many other things. And these are just scratching the surface of what object detection technology can do!
In this article, we will understand what object detection is and look at a few different approaches one can take to solve problems in this space. Then we will deep dive into building our own object detection system in Python. By the end of the article, you will have enough knowledge to take on different object detection challenges on your own!
Note: This tutorial assumes that you know the basics of deep learning and have solved simple image processing problems before. In case you haven’t, or need a refresher, I recommend reading the following articles first:
- Fundamentals of Deep Learning – Starting with Artificial Neural Network
- Deep Learning for Computer Vision – Introduction to Convolution Neural Networks
- Tutorial: Optimizing Neural Networks using Keras (with Image recognition case study)
Table of Contents
- What is Object Detection?
- The Different Approaches we can use to Solve an Object Detection Problem
- Approach 1: Naive way (Divide and Conquer)
- Approach 2: Increase the number of divisions
- Approach 3: Performing structured divisions
- Approach 4: Becoming more efficient
- Approach 5: Using Deep Learning for feature selection and to build an end-to-end approach
- Getting Technical: How to build an Object Detection model using the ImageAI library
What is Object Detection?
Before we dive into build a state-of-the-art model, let us first try to understand what object detection is. Let’s (hypothetically) build a pedestrian detection system for a self-driving car. Suppose your car captures an image like the one below. How would you describe this image?

The image essentially depicts that our car is near a square, and a handful of people are crossing the road in front of our car. As the traffic sign is not clearly visible, the car’s pedestrian detection system should identify exactly where the people are walking so that we can steer clear of them.
So what can the car’s system do to ensure this happens? What it can do is create a bounding box around these people, so that the system can pinpoint where in the image the people are, and then accordingly make a decision as to which path to take, in order to avoid any mishaps.

Our objective behind doing object detection is two folds:
- To identify what all objects are present in the image and where they’re located
- Filter out the object of attention
Different Approaches to Solve an Object Detection Problem
Now that we know what our problem statement is, what can be a possible approach (or multiple approaches) to solve it? In this section, we’ll look at a few techniques that can be used to detect objects in images. We will start from the simplest approach and find our way up from there. If you have any suggestions or alternate approaches to the ones we will see below, do let me know in the comments section!
Approach 1: Naive way (Divide and Conquer)
The simplest approach we can take is to divide the image into four parts:
- Upper left hand side corner

- Upper right hand side corner

- Lower left hand side corner

- Lower right hand side corner

Now the next step is to feed each of these parts into an image classifier. This will give us an output of whether that part of the image has a pedestrian or not. If yes, mark that patch in the original image. The output will be somewhat like this:

This is a good approach to try out first, but we are looking for a much more accurate and precise system. It needs to identify the entire object (or a person in this case) because only locating parts of an object could lead to catastrophic results.
Approach 2: Increase the number of divisions
The previous system worked well but what else can we do? We can improve upon it by exponentially increasing the number of patches we input into the system. This is how our output should look like:

This ended up being a boon and a curse. Of course our solution seems a bit better than the naive approach, but it is riddled with so many bounding boxes which approximate the same thing. This is an issue, and we need a more structured way to solve our problem.
Approach 3: Performing structured divisions
In order to build our object detection system in a more structured way, we can follow the below steps:
Step 1: Divide the image into a 10×10 grid like this:

Step 2: Define the centroids for each patch
Step 3: For each centroid, take three different patches of different heights and aspect ratio:

Step 4: Pass all of the patches created through the image classifier to get predictions
So how does the final output look like? A bit more structured and disciplined for sure – take a look below:

But we can further improve on this! Read on to see yet another approach that will produce even better results.
Approach 4: Becoming more efficient
The previous approach we saw is acceptable to quite a good degree, but we can build a system a little more efficient than that. Can you suggest how? Off the top of my mind, I can propose an optimization. If we think about approach #3, we can do two things to make our model better.
- Increase the grid size: So instead of taking the grid size as 10, we can increase it to, say, 20:

- Instead of three patches, take more patches with various heights and aspect ratios: Here, we can take 9 shapes off of a single anchor, namely three square patches of different heights and 6 vertical and horizontal rectangle patches of different heights. This will provide us with different aspect ratios of the patches.

This again, has its pros and cons. Sure both of the methods will help us go to a more granular level. But it will again create an explosion of all the patches that we have to pass through our image classification model.
What we can do is, take selective patches instead of taking all of them. For example, we could build an intermediate classifier which tries to predict if the patch actually has background, or potentially contains an object. This would exponentially decrease the patches that our image classification model has to see.
One more optimization that we can do, is to decrease the predictions which say the “same thing”. Let’s take the output of approach 3 again:
As you can see, both the bounding box predictions are basically of the same person. We have an option to choose any one of them. So to make predictions, we consider all the boxes which “say the same thing” and then pick whichever one has the most probability of detecting a person.
All of these optimizations have so far given us pretty decent predictions. We almost have all the cards in our hands, but can you guess what is missing? Deep Learning of course!
Approach 5: Using Deep Learning for feature selection and to build an end-to-end approach
Deep learning has so much potential in the object detection space. Can you recommend where and how can we leverage it for our problem? I have listed a couple of methodologies below:
- Instead of taking patches from the original image, we can pass the original image through a neural network to reduce the dimensions
- We could also use a neural network to suggest selective patches
- We can reinforce a deep learning algorithm to give predictions as close to the original bounding box as possible. This will ensure that the algorithm gives more tighter and finer bounding box predictions
Now instead of training different neural networks for solving each individual problem, we can take a single deep neural network model which will attempt to solve all the problems by itself. The advantage of doing this, is that each of the smaller components of a neural network will help in optimizing the other parts of the same neural network. This will help us in jointly training the entire deep model.
Our output would give us the best performance out of all the approaches we have seen so far, somewhat similar to the image below. We will see how to create this using Python in the next section.

Getting Technical: How to build an Object Detection model using the ImageAI library
Now that we know what object detection is and the best approach to solve the problem, let’s build our own object detection system! We will be using ImageAI, a python library which supports state-of-the-art machine learning algorithms for computer vision tasks.
Running an object detection model to get predictions is fairly simple. We don’t have to go through complex installation scripts to get started. We don’t even need a GPU to generate predictions! We will use this ImageAI library to get the output prediction we saw above in approach #5. I highly recommend following along with the code below (on your own machine) as this will enable you to gain the maximum knowledge out of this section.
Please note that you need to set up your system before creating the object detection model. Once you have Anaconda installed in your local system, you can get started with the below steps.
Step 1: Create an Anaconda environment with python version 3.6.
conda create -n retinanet python=3.6 anaconda
Step 2: Activate the environment and install the necessary packages.
source activate retinanet
conda install tensorflow numpy scipy opencv pillow matplotlib h5py keras
Step 3: Then install the ImageAI library.
pip install https://github.com/OlafenwaMoses/ImageAI/releases/download/2.0.1/imageai-2.0.1-py3-none-any.whl
Step 4: Now download the pretrained model required to generate predictions. This model is based on RetinaNet (a subject of a future article). Click on the link to download – RetinaNet Pretrained model
Step 5: Copy the downloaded file to your current working folder
Step 6: Download the image from this link. Name the image as image.png
Step 7: Open jupyter notebook (type jupyter notebook in your terminal) and run the following codes:
from imageai.Detection import ObjectDetection
import os

execution_path = os.getcwd()

detector = ObjectDetection()
detector.setModelTypeAsRetinaNet()
detector.setModelPath( os.path.join(execution_path , "resnet50_coco_best_v2.0.1.h5"))
detector.loadModel()
custom_objects = detector.CustomObjects(person=True, car=False)
detections = detector.detectCustomObjectsFromImage(input_image=os.path.join(execution_path , "image.png"), output_image_path=os.path.join(execution_path , "image_new.png"), custom_objects=custom_objects, minimum_percentage_probability=65)


for eachObject in detections:
   print(eachObject["name"] + " : " + eachObject["percentage_probability"] )
   print("--------------------------------")
This will create a modified image file named image_new.png, which contains the bounding box for your image.
Step 8: To print the image use the following code:
from IPython.display import Image
Image("image_new.png")

Congratulations! You have created your own object detection model for pedestrian detection. How awesome is that?
End Notes
In this article, we learned what is object detection, and the intuition behind creating an object detection model. We also saw how to build this object detection model for pedestrian detection using the ImageAI library.
By just tweaking the code a bit, you can easily transform the model to solve your own object detection challenges. If you do solve such a problem using the approach above, especially for a social cause, do let me know in the comments below!
JalFaizy Shaikh
26 Aug, 2021
Faizan is a Data Science enthusiast and a Deep learning rookie. A recent Comp. Sc. undergrad, he aims to utilize his skills to push the boundaries of AI research.


Really nice article wanted this and its is simple.. Keep doing the great work
The second and the third link before the table of contents are pointing to the same page.
Hi Vaibhav, Thanks for bringing this to our notice. The links have been updated.
you didnt tell about other packages using in that code ,many errors are coming for it
Hi Abhihek, Can you please tell us what error are you getting? That would help us to clarify your doubt in a better way.
Hi , As above mentioned i have done with every when i executing getting " No Module Named imageai" Kindly give me the solutions
Hi Suryam, The steps have been updated. Please go through them and run the steps again.
hey, i am getting this error: TypeError Traceback (most recent call last) in () 7 detector.setModelTypeAsRetinaNet() 8 detector.setModelPath( os.path.join(execution_path , "F:\Recomender System\resnet50_coco_best_v2.0.1.h5")) ----> 9 detector.loadModel() 10 custom_objects = detector.CustomObjects(person=True, car=False) 11 detections = detector.detectCustomObjectsFromImage(input_image=os.path.join(execution_path , "F:\Recomender System\image.png"), output_image_path=os.path.join(execution_path , "F:\Recomender System\image_new.png"), custom_objects=custom_objects, minimum_percentage_probability=65) e:\python\lib\site-packages\imageai\Detection\__init__.py in loadModel(self, detection_speed) 119 raise ValueError("You must set a valid model type before loading the model.") 120 elif(self.__modelType == "retinanet"): --> 121 model = resnet50_retinanet(num_classes=80) 122 model.load_weights(self.modelPath) 123 self.__model_collection.append(model) e:\python\lib\site-packages\imageai\Detection\keras_retinanet\models\resnet.py in resnet50_retinanet(num_classes, inputs, **kwargs) 84 85 def resnet50_retinanet(num_classes, inputs=None, **kwargs): ---> 86 return resnet_retinanet(num_classes=num_classes, backbone='resnet50', inputs=inputs, **kwargs) 87 88 e:\python\lib\site-packages\imageai\Detection\keras_retinanet\models\resnet.py in resnet_retinanet(num_classes, backbone, inputs, modifier, **kwargs) 78 79 # create the full model ---> 80 model = retinanet.retinanet_bbox(inputs=inputs, num_classes=num_classes, backbone=resnet, **kwargs) 81 82 return model e:\python\lib\site-packages\imageai\Detection\keras_retinanet\models\retinanet.py in retinanet_bbox(inputs, num_classes, nms, name, **kwargs) 345 ``` 346 """ --> 347 model = retinanet(inputs=inputs, num_classes=num_classes, **kwargs) 348 349 # we expect the anchors, regression and classification values as first output e:\python\lib\site-packages\imageai\Detection\keras_retinanet\models\retinanet.py in retinanet(inputs, backbone, num_classes, anchor_parameters, create_pyramid_features, submodels, name) 300 """ 301 if submodels is None: --> 302 submodels = default_submodels(num_classes, anchor_parameters) 303 304 _, C3, C4, C5 = backbone.outputs # we ignore C2 e:\python\lib\site-packages\imageai\Detection\keras_retinanet\models\retinanet.py in default_submodels(num_classes, anchor_parameters) 208 """ 209 return [ --> 210 ('regression', default_regression_model(anchor_parameters.num_anchors())), 211 ('classification', default_classification_model(num_classes, anchor_parameters.num_anchors())) 212 ] e:\python\lib\site-packages\imageai\Detection\keras_retinanet\models\retinanet.py in default_regression_model(num_anchors, pyramid_feature_size, regression_feature_size, name) 123 124 outputs = keras.layers.Conv2D(num_anchors * 4, name='pyramid_regression', **options)(outputs) --> 125 outputs = keras.layers.Reshape((-1, 4), name='pyramid_regression_reshape')(outputs) 126 127 return keras.models.Model(inputs=inputs, outputs=outputs, name=name) e:\python\lib\site-packages\keras\engine\topology.py in __call__(self, inputs, **kwargs) 600 601 # Actually call the layer, collecting output(s), mask(s), and shape(s). --> 602 output = self.call(inputs, **kwargs) 603 output_mask = self.compute_mask(inputs, previous_mask) 604 e:\python\lib\site-packages\keras\layers\core.py in call(self, inputs) 389 pass 390 if input_shape is not None: --> 391 target_shape = self.compute_output_shape(input_shape)[1:] 392 return K.reshape(inputs, (-1,) + target_shape) 393 e:\python\lib\site-packages\keras\layers\core.py in compute_output_shape(self, input_shape) 374 def compute_output_shape(self, input_shape): 375 return (input_shape[0],) + self._fix_unknown_dimension( --> 376 input_shape[1:], self.target_shape) 377 378 def call(self, inputs): e:\python\lib\site-packages\keras\layers\core.py in _fix_unknown_dimension(self, input_shape, output_shape) 362 known *= dim 363 --> 364 original = np.prod(input_shape, dtype=int) 365 if unknown is not None: 366 if known == 0 or original % known != 0: e:\python\lib\site-packages\numpy\core\fromnumeric.py in prod(a, axis, dtype, out, keepdims) 2564 2565 return _methods._prod(a, axis=axis, dtype=dtype, -> 2566 out=out, **kwargs) 2567 2568 e:\python\lib\site-packages\numpy\core\_methods.py in _prod(a, axis, dtype, out, keepdims) 33 34 def _prod(a, axis=None, dtype=None, out=None, keepdims=False): ---> 35 return umr_prod(a, axis, dtype, out, keepdims) 36 37 def _any(a, axis=None, dtype=None, out=None, keepdims=False): TypeError: int() argument must be a string, a bytes-like object or a number, not 'NoneType'
Hi, Can you please write another blog that explains how we can build our own model for object detection without using any pre-trained model in python ?
How to change the custom object method to make it detect new objects? like tree house etc.
I trained a model of detection on several images containing several equipments telecoms. By cons, when I perform the test I realize that my algorithm can not recognize some objects with other positions. for example in my training data, I have objects that are seen from the front, while in my test samples they are seen from profiles. How to do when the training of my algorithm does not take into account certain positions of objects in an image.
Hi, We are looking at experienced Data Scientist(8-10 years) to solve complex problems in Deep Learning, Image Processing, Predictive Modelling. If interested, please reply to my email id mentioned below. Remuneration is far above industry standards
hai I have completed the whole. It's working perfectly. can u say how can I use in videos rather than in images?
Hi, You might find this post useful : Calculate screen time of actors in a video
I have completed the whole. It’s working perfectly. I am a beginner, Can u explain what resnet50_coco_best_v2.0.1.h5 contains....
Hi Ponnu, It contains the weights which were obtained while training the resnet50 model on coco dataset. Instead of training the model again for hours, we can use these weights to make predictions.
How can we convert a image classifier model to object detection model with our own coding?
Hi Nikhil, Yes! you can give the coordinates of the object in the image for training. That will make it an object detection problem instead of classification.
Hii....i am a student of final year b.tech in computer science..i was wishing to work on a project based on object detection basically cars,roads and buildings...i am a beginner in machine learning...can u plzz help me to give an idea how to start???
Hi Manisha, First try to collect some training data, i.e. labeled images having classes of objects as well as their corresponding bounding boxes. Once you have the training data, you can use any of the object detection techniques like Faster RCNN, YOLO, SSD to train your model and get predictions on new images.
Hi, Is there a way to get the x,y coordinates of the bounding box in an array instead of saving the image with bounding boxes. I don't want to save images because it eats up a lot of time, instead, I just want to collect the location of the bounding box. If Yes, how will it return that x,y coordinates and what if there are multiple objects whose x,y we need?
Thank you sir...bt the problem is that as i have no idea of machine lerning.. it's getting really difficult.can you plzz share a small sample of code for illustration??....
Hi Manisha, You can go through these articles to get a better understanding: A step by step introduction to the Basic Object Detection Algorithms (Part-1) A practical implementation of Faster-RCNN algorithm for Object Detection (Part 2 with Python code)
the instruction given above , mention that copying that downloaded file into working folder working folder ????? what is working folder? and when i run it in jupter notebook gives error : ModuleNotFoundError Traceback (most recent call last) in () ----> 1 from imageai.Detection import ObjectDetection 2 import os 3 4 execution_path = os.getcwd() 5 ~\anaconda\lib\site-packages\imageai\Detection\__init__.py in () ----> 1 import cv2 2 3 from imageai.Detection.keras_retinanet.models.resnet import resnet50_retinanet 4 from imageai.Detection.keras_retinanet.utils.image import read_image_bgr, read_image_array, read_image_stream, preprocess_image, resize_image 5 from imageai.Detection.keras_retinanet.utils.visualization import draw_box, draw_caption ModuleNotFoundError: No module named 'cv2' please tell me what i have to do to correct this
Hi gagan, The working folder is where your jupyter notebook is. Copy the data in that folder. ModuleNotFoundError: No module named ‘cv2’ To remove this error, you have to install open cv in your system.
Hi Pulkit, I would like to know how a particular image like a fire extinguisher could be detected by using object detection and labelled as risk free or safe. Can you give me an outline on what all things to be done and how to train the model using Haar classifier in openCV?
Hi Divya, In order to make the model effective to detect fire extinguisher, the model should learn how a fire extinguisher looks like. So, you first have to train the model on fire extinguisher images. Once the model has learned how it looks, then you can pass new images to the model and it will predict whether the image has a fire extinguisher or not.
Hi Pulkit, How to train the HAAR classifier using openCV ? If suppose an extinguisher images needs to be detected, and the room needs to be declared as safe. Could you please give me an outline on how to do object detection using openCV?
Hello Sir, This was a pretty cool demonstration. But what if I wanted to make things from scratch giving my own dataset and creating my own trained mode. How tough it is going to be. Is there any post which can take me through the whole process of training the mode.?
The code works perfectly, but can you tell me how can I make my own custom objects which I want to analyze (here it was the car and people......if there are more please let me know)... and can you please elaborate about how the model was trained (RetinaNet Pretrained model, please elaborate more about it) and how can i execute it on any image that I want.
When I try activating retinanet, my Anaconda Prompt window closes. I piped the output to a log file and it looks like it exits with "Did not find VS in registry or in VS140COMNTOOLS env var - exiting" I have installed Visual Studio 2017 and tried reinstalling Anaconda 3. Any suggestions on how to get around this problem?
Could you tell me which dataset the mentioned picture belongs to, and the input picture should be 768x223 in size?
Hi michael, This is just a sample image. It does not belong to any specific dataset. You can also try your own sample image for testing purpose.
I just get an idea about approach what if the net is just learn the background of the picture from image or videos and if there are different things from the background image that is absolutely an object. I just wonder if this can work, sorry for my bad sentence but i hope you can understand
Hi pulkit, How can i use the same model to detect different objects for example i have to detect feet (Human feets) in an image. should i use transfer learning? If yes, then how?
[…] general, RetinaNet is a good choice to start an object detection project, in particular, if you need to quickly get […]
Hello, When I try downloading the RetinaNet I get a message saying "there is no application to open the document". When I go ahead and open it on PyCharm I simply get a notification at the top of the screen saying how this file is too large. Any suggestions on how to resolve the issue? I am using a Mac by the way. Thanks