Introduction
Python word clouds came out to be a game-changer visualization technique for understanding and determining patterns and evolving trends. Whether to discover the political agendas of aspiring election candidates of a country or to analyze the customer reviews on the recently launched product, one can get a visual representation by plotting the Word Cloud. In the next few lines, we will learn about the word clouds, their applications, and how to create word cloud in Python.
This article was published as a part of the Data Science Blogathon.
Table of contents
What is Word Cloud in Python?
A python word cloud or Tag Cloud is a visualization technique commonly used to display tags or keywords from websites. These single words reflect the webpage’s context and are clustered together in the Word Cloud. Words in the cloud vary in font size and color, indicating their prominence. Larger font size implies higher importance relative to other words. Word Clouds can take various shapes and sizes based on the creator’s vision. However, the number of words is crucial; too many can make it cluttered and hard to read.
Although, there are different ways by which python word cloud can be created but the most widely used type is by using the Frequency of Words in our corpus. And thus, we will be creating our Word Cloud by using the Frequency type.

When to Use Python Word Cloud?
Word clouds are best used in specific scenarios where visualizing word frequency or prominence is essential. Here are some situations when using a word cloud is appropriate:
- Word clouds quickly overview the most frequently occurring words in a text corpus, helping researchers identify patterns and key themes.
- When summarizing a large amount of text, a python word cloud can effectively highlight the most relevant and important terms, making the information more accessible to the audience.
- Word clouds are valuable for analyzing sentiments, hashtags, or trending topics on social media platforms, offering a concise representation of popular themes.
- They add visual appeal and engagement to reports, presentations, or dashboards, making it easier for viewers to grasp important insights from the data.
- Word clouds can help identify similarities or differences in word frequencies when comparing multiple text sources or documents.
Applications
Word Cloud finds its way in numerous applications among several domains. A few of the popular applications of Word Clouds are:
Customer’s Feedback
Word Clouds are widely being used in industries by stakeholders to analyze the feedback received from end-users. Assume that a business launches a product and wants to know customer’s feedback. Say the firm received 1000 feedbacks from different users. It would be very difficult for the stakeholders to read and make note of every feedback. Thus, Word Cloud would play a key role in getting top keywords among the feedback. This would help the firm determine if the feedback is positives or negatives and respective areas of improvement. For example, A firm ‘ABC’ released a new Television, and based on the feedback received, the firm can make changes accordingly in the next series of Televisions.
Political Agenda of Candidates
Often the candidates of elections keep a checklist of agenda to talk about during the campaigns. Thus, the candidate’s support team would analyze the candidate’s speech and create a Python Word Cloud to select words for the next speech to keep a balance of agenda checklist. Analysts often create a Word Cloud of candidate’s speeches from different parties to analyze and produce results to let people know which candidate is focusing on what areas of improvisation. For example, in the 2021 U.S. Elections, the word Clouds of both the Republican Party and Democratic Party candidate speeches were readily available by analysts to let people decide.
Also Read: The Role of AI in Political Campaigns: Revolutionizing the Game
Trending Topics
Advertising Agencies would often need to know what is trending to create the next advertisement in context with trending topics. For example, Amul comes up with a creative advertisement based on the current issue or trend.
How To Create Word Cloud in Python?
A Word Cloud in Python can be created in the following steps:
Step 1: Import Necessary Libraries
Import the following libraries which are required to create a Python Word Cloud:
import pandas as pd
import matplotlib.pyplot as plt
from wordcloud import WordCloud
Step 2: Selecting the Dataset
For this example, we are using Popular Dataset Top Games on Google Play Store from Kaggle.
Download the Dataset and save it in your current working directory for hassle-free code implementation.
Import the dataset into a variable of your choice. Here our data is imported to variable df.
Text for the Word Cloud does not need to be from a Dataset. To get a meaningful text with fewer efforts, we are using the Dataset for our example.
df = pd.read_csv("android-games.csv")Step 3: Selecting the Text and Amount of Text for Word Cloud
Selecting text for creating a Python Word Cloud is an important task. One must check for various factors for the selection of Text such as:
- Do we have Problem Statement?
- Does the Selected Text have meaning in it?
- Can we conclude the created Word Cloud?
- Does our Text have an adequate amount of Text?
Word Cloud requires text in an adequate amount. A large number of words would hinder the visual appearance of Word Cloud and a lesser number of words would make no sense.
We can use the .head() method of DataFrame to check the Columns and the type of data present in them. In our example, we have taken the column category as Text.
Since the columns category has a prefix of GAME before each category game, our wordcloud in python would end up creating GAME as the most frequent word and wordcloud in python will have no meaning in int. Thus, we will perform filtering while adding the category column to the Text.
Step 4: Check for NULL values
It is required to check for the null values in our dataset as while creating the Word Cloud, it would not accept text with nan values.
df.isna().sum()If our dataset had any NaN values, we need to treat the missing values accordingly. Fortunately, this dataset has no NaN values, thus we can move to the next step.
If there are very few NaN values, it is always advisable to remove such rows as it would not affect the wordcloud in python to a larger extent.
Step 5. Adding Text to a Variable
Based on the parameters from Step 3, add the Text Data to a variable of your choice. Here, we are adding the data into variable text.
text = " ".join(cat.split()[1] for cat in df.category)Since we need to filter the GAME from the category, we have split each row value and took the 2nd item, i.e. the category name from the category column.
Step 6: Creating the Word Cloud
Create an object of class WordCloud with the name of your choice and call the generate() method. Here we have created the object with the name word_cloud.
WordCloud() takes several arguments as per the need. Here we are adding two arguments:
- collocations = False, which will ignore the collocation words from the Text
- background_color = ‘White’, which will make the words look clearer
The .generate() method takes one argument of the text we created. In our case, we will give the text variable as an argument to .generate().
word_cloud = WordCloud(collocations = False, background_color = 'white').generate(text)Step 7: Plotting the Word Cloud
Using the .imshow() method of matplotlib.pyplot to display the Word Cloud as an image.
.imshow() takes several arguments, but in our example, we are taking two arguments:
- word_cloud created in Step 5
- interpolation = ‘bilinear’
Since we are creating an image with .imshow(), the resampling of the image is done as the image pixel size and screen resolution doesn’t not match. This resampling is controlled with the interpolation argument to produce softer or crisper images as per our need. There are several types of interpolation available such as gaussian, quadric, bicubic. Here we are using bilinear interpolation.
Plotting the image with axis off as we don’t want axis ticks in our image.
plt.imshow(wordcloud, interpolation='bilinear')
plt.axis("off")
plt.show()
Step 8: The Complete Code
#Importing Libraries
import pandas as pd
import matplotlib.pyplot as plt
%matplotlib inline
from wordcloud import WordCloud
#Importing Dataset
df = pd.read_csv("android-games.csv")
#Checking the Data
df.head()
#Checking for NaN values
df.isna().sum()
#Removing NaN Values
#df.dropna(inplace = True)
#Creating the text variable
text = " ".join(cat.split()[1] for cat in df.category)
# Creating word_cloud with text as argument in .generate() method
word_cloud = WordCloud(collocations = False, background_color = 'white').generate(text)
# Display the generated Word Cloud
plt.imshow(wordcloud, interpolation='bilinear')
plt.axis("off")
plt.show()
Wordcloud in python of category column (Image Source – Personal Computer) *The attached image size is irrespective of output image size
Similarly, let’s create Word Cloud for the title column from the imported dataset.
#Importing Libraries

import pandas as pd

import matplotlib.pyplot as plt

%matplotlib inline

from wordcloud import WordCloud

#Importing Dataset

df = pd.read_csv("1.csv")

#Checking the Data

df.head()

#Creating the text variable

text2 = " ".join(title for title in df.title)

# Creating word_cloud with text as argument in .generate() method

word_cloud2 = WordCloud(collocations = False, background_color = 'white').generate(text2)

# Display the generated Word Cloud

plt.imshow(word_cloud2, interpolation='bilinear')

plt.axis("off")

plt.show()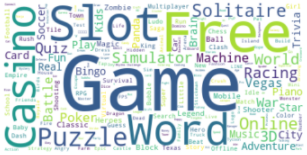
Word Cloud of title column (Image Source – Personal Computer) *The attached image size is irrespective of the output image size
Frequently Asked Questions
Q1. What is word cloud in Python?
A. A word cloud in Python is a graphical representation of text data, where words from a text document are displayed in varying sizes, with the most frequently occurring words appearing larger. Python libraries like matplotlib and wordcloud can be used to create word clouds. It’s often used for visualizing and gaining insights from text data, such as identifying key terms in a document, website, or social media content.
Q2. Can you make a word cloud in Python?
A. Yes, you can create a word cloud in Python using libraries like matplotlib and wordcloud. Here’s a basic example of how to generate a word cloud from text data:
1. Install the necessary libraries if you haven’t already:
Python Codepip install matplotlib wordcloud
2. Import the libraries in your Python script:
Python Codeimport matplotlib.pyplot as plt from wordcloud import WordCloud # Sample text data text_data = "This is a sample text data for creating a word cloud in Python. Word clouds are a fun way to visualize text!" # Generate the word cloud wordcloud = WordCloud(width=800, height=400, background_color='white').generate(text_data) # Display the word cloud plt.figure(figsize=(10, 5)) plt.imshow(wordcloud, interpolation='bilinear') plt.axis("off") plt.show()
This code will produce a word cloud visualization of the input text, with word frequencies determining word size and placement.
Conclusion
Word Clouds offer customization options like masking, contouring, and size adjustments to enhance their visual appeal and make them more informative. Besides Python, wordcloud in python supports Microsoft Word and Business Intelligence platforms like Tableau. Numerous online tools also generate Word Clouds from input text, reflecting the increasing popularity and diversity of options.
The media shown in this article are not owned by Analytics Vidhya and is used at the Author’s discretion.
Rahul Shah
04 Jun, 2024
IT Engineering Graduate currently pursuing Post Graduate Diploma in Data Science.


