Ever wondered what stories an image holds? Images contain valuable information, but can machines interpret them like humans? This post explores Computer Vision (CV), a branch of AI that helps machines analyze images and videos. If you’re ready to start, make sure you have Python set up in a tool like Jupyter Notebook, PyCharm, or VS Code. We’ll begin by installing OpenCV and running code in Jupyter Notebook.
This article was published as a part of the Data Science Blogathon.
Table of contents
Installing OpenCV Package for Image Preprocessing
OpenCV, a widely utilized pre-built open-source CPU-only library, plays a crucial role in computer vision, machine learning, and image processing applications. It boasts compatibility with several programming languages, including Python.
Install the OpenCV package using:
pip install opencv-pythonOR
pip install opencv-contrib-pythonRun any of these commands on your terminal or if you are using Anaconda Navigator – Jupyter Notebook, you can change “pip” with the “conda” command and install the same.
Importing the Package
What is a package in Python? A package in Python is a collection of modules that contain pre-written scripts. These packages help us to import modules entirely or even individually. We can import the package by calling the “cv2” module like this:
import cv2Reading an Image
Digital images could be classified into; colour images, grey-scale images, binary images, and multispectral images. A color image includes the color information for each pixel. Images having shades of grey as their only color are grayscale images while a binary image has exactly two colors, mostly black and white pixels. Multispectral images are images that capture image data ranging across the electromagnetic spectrum within some specific wavelength.
Let’s get back to the coding part and read an image, for example, the image is shown below:

This is an image of a mandrill. I am currently reading the image from my local directory.
# cv2.imread(path_to_image_with_file_extension, flag)The usage code look likes this:
img = cv2.imread("mandrill.jpg", 1)Here we are using the “imread” method of the cv2 package to read the image and the first parameter corresponds to the path of the image with its filename and extension, and the second one is the flag that you can set which tells the way, how to read in the image. If you like, you can replace the absolute path to the image here and try reading it from your local computer or even from the internet! If the image is present in your current working directory, you only need to specify the image name with its extension type.
As far as the second parameter is concerned, if you like to read it as a grayscale image, you can specify the parameter to 0, -1 for reading the image as unchanged (reads the image as alpha or transparency channel if it is there) and by default, it is 1, as a color image. You can also try other parameters from this link under the ImreadModes.
Properties of an Image
Shape
Every image has a shape. The length of boundaries exhibited by the picture might be referred to as the shape i.e, the height and width. Now that you know how to read an image, how about we check the shape of the image?
print(img.shape)is the basic way to print the shape of the image, but we can extract the shape using:
h, w, c = img.shape
print("Dimensions of the image is:nnHeight:", h, "pixelsnWidth:", w, "pixelsnNumber of Channels:", c)
to get a better understanding.
For the color and unchanged mode, it would return 3 values including the height, width, and the number of channels present in the image. If you have used the grayscale mode, the shape would be 2, which will return the height and width of the image, but then you just have to use h and w variables only (exclude using “c” ), else you might be getting a value error saying “not enough values to unpack (expected 3, got 2)”.
Type
We can know the type of the image using the “type” method. Using this method helps us to know how the image data is represented. Run the code as follows:
print(type(img))The result might be like this:
as the image type. It is a multidimensional container of items of the same type and size. You can refer more to the N-dimensional array at this link.
Data type of the image you have just read
Since the image is an N-dimensional array, we can check the data type of the image:
print(img.dtype)Image pixel values
We can think of an image as a set of small samples. These samples are called pixels. For a better understanding, try zoom in on an image as much as possible. We can see the same divided into different squares. These are the pixels and when they are combined together they form an image.
One of the simple ways to represent an image is, in the form of a matrix. We can even create an image using a matrix and save it! Will show you how, later in this post. Take a look at this picture below:

This picture is rather an example of how the matrix representation of an image looks like. On the left, is an image of Lincoln, in the middle, the pixel values are labeled with numbers from 0 to 255, denoting their intensity or brightness and on the right, the numbers in matrix form themselves. Each value in the matrix corresponds to a pixel, which is the smallest element of information present in an image. Check out the image pixel values by just printing the variable that you loaded the image!
print(img)Image Resolution
Image resolution could be defined as the number of pixels present in an image. The quality of the image increases when the number of pixels increases. We have seen earlier, the shape of the image which gives the number of rows and columns. This could be said as the resolution of that image.
Common Image Resolutions:
- 320 × 240 pixels – Suitable for small-screen devices.
- 1024 × 768 pixels – Standard computer monitors.
- 720 × 576 pixels – Used in standard-definition (SD) TVs (4:3 aspect ratio).
- 1280 × 720 pixels – Ideal for widescreen monitors (HD).
- 1280 × 1024 pixels – Fits full-screen LCD monitors (5:4 aspect ratio).
- 1920 × 1080 pixels – Common for HD TVs.
- 4K (3840 × 2160 pixels) – Supported by ultra HD monitors and TVs.
- 5K (5120 × 2880 pixels) – Found in high-end displays.
- 8K (7680 × 4320 pixels) – Used in ultra high-definition screens.
Total Pixels Calculation:
- Multiply rows × columns to find the total number of pixels in an image.
- Example: 320 × 240 = 76,800 pixels in total.
Viewing the Image
Let us see how to display the image in a window. For that, we have to create a GUI window to display the image on the screen. The first parameter has to be the title of the GUI window screen, specified in string format. We can show the image in a pop-up window using the cv2.imshow() method. But, when you try to close it, you might feel stuck with its window. So to combat that, we can use a simple “waitKey” method. Try out this code part in new a cell:
cv2.imshow('Mandrill', img)
k = cv2.waitKey(0)
if k == 27 or k == ord('q'):
    cv2.destroyAllWindows()
Here, we have specified the parameter ‘0’ in the “waitKey” to keep the window open until we close it. (You can also give the time in milliseconds, instead of 0, specifying how much time it should be opened.) After that, we can assign the variable to act for closing the window when we press the ‘ESC’ key or the key ‘q’. The cv2.destroAllWindows() method is used for closing or deleting the GUI windows from the screen/memory.
Saving the Image
Before saving the image, how about converting the image to grayscale and then save it? Convert the image to grayscale using:
gray = cv2.cvtColor(img, cv2.COLOR_BGR2GRAY)Now we can save the image:
cv2.imwrite('Mandrill_grey.jpg', gray)and check the image being saved in the current working directory. The first parameter corresponds to the name of the file in which the image is to be saved and the second parameter is the variable that contains the image (pixel information).
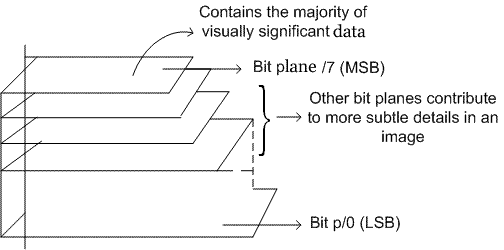
Extracting the image bit planes and reconstructing them
We can divide an image into different levels of bit planes. For example, divide an image into 8-bit (0-7) planes, where the last few planes contain the majority of information for an image.
For doing this, we can import two more packages:
import matplotlib.pyplot as plt
import numpy as np
If you get an error while importing any of the packages, you can install them using:
conda install -c conda-forge matplotlib
conda install -c anaconda numpy
Now we are defining a function to extract each of the 8 level bit planes of the image.
def extract_bit_plane(cd):
    #  extracting all bit one by one
    # from 1st to 8th in variable
    # from c1 to c8 respectively
    c1 = np.mod(cd, 2)
    c2 = np.mod(np.floor(cd/2), 2)
    c3 = np.mod(np.floor(cd/4), 2)
    c4 = np.mod(np.floor(cd/8), 2)
    c5 = np.mod(np.floor(cd/16), 2)
    c6 = np.mod(np.floor(cd/32), 2)
    c7 = np.mod(np.floor(cd/64), 2)
    c8 = np.mod(np.floor(cd/128), 2)
    # combining image again to form equivalent to original grayscale image
    cc = 2 * (2 * (2 * c8 + c7) + c6) # reconstructing image  with 3 most significant bit planes
    to_plot = [cd, c1, c2, c3, c4, c5, c6, c7, c8, cc]
    fig, axes = plt.subplots(nrows=2, ncols=5,figsize=(10, 8), subplot_kw={'xticks': [], 'yticks': []})
    fig.subplots_adjust(hspace=0.05, wspace=0.05)
    for ax, i in zip(axes.flat, to_plot):
        ax.imshow(i, cmap='gray')
    plt.tight_layout()
    plt.show()
    return cc
Now we are ready to call the function.
reconstructed_image = extract_bit_plane(gray)We have reconstructed the image (almost similar) using the last three bit planes i.e, the sixth, seventh, and eighth planes. And the result looks like this:

How about we construct a small image on our own? Let’s try it now!
Constructing a Small Synthetic Image
We can try to generate a synthetic image containing four concentric squares with four different pixel intensity values,
40, 80, 160, and 220
con_img = np.zeros([256, 256])
con_img[0:32, :] = 40 # upper row
con_img[:, :32] = 40 #left column
con_img[:, 224:256] = 40 # right column
con_img[224:, :] = 40 # lower row
con_img[32:64, 32:224] = 80 # upper row
con_img[64:224, 32:64] = 80 # left column
con_img[64:224, 192:224] = 80 # right column
con_img[192:224, 32:224] = 80 # lower row
con_img[64:96, 64:192] = 160 # upper row
con_img[96:192, 64:96] = 160 # left column
con_img[96:192, 160:192] = 160 # right column
con_img[160:192, 64:192] = 160 # lower row
con_img[96:160, 96:160] = 220
plt.imshow(con_img)
The resulting image would be looking like this:

We can take look at using various filters and transformations on images in another article.
Thank you for reading the article.
Feel free to add your suggestions under the comments and do share if you like this article. The complete Python programming code in Jupyter Notebook, mentioned in this article is available on my Github repository.
Frequently Asked Questions
Q1. Can OpenCV do image processing?
A. Yes, OpenCV is adept at image processing, offering a robust set of tools and functions for various tasks like filtering, transformation, and feature extraction.
Q2. Which module in OpenCV is used for image processing?
A. The image processing module in OpenCV is crucially used for tasks related to manipulating and analyzing images. It encompasses functions for filtering, transforming, and enhancing images.
Q3. Can we do image processing with Python?
A. Absolutely, Python is a versatile language for image processing, and OpenCV provides a powerful library in Python for this purpose.
Q4. Why is OpenCV package used for image video processing?
A. OpenCV is preferred for image and video processing due to its comprehensive set of functions, efficiency, and versatility. It supports various programming languages, with Python being popular for its ease of use and readability.
I started as a data enthusiast but like everyone else on the internet, eventually evolved into an AI enthusiast. I enjoy finding patterns, asking too many questions, keeping up with tech and making things happen.
My primary source of AI education is Twitter, now X. I believe I can do almost everything, except drive a car.
Thanks for stopping by. I hope you found something useful, interesting, or at least worth a smile :)


Very well explain...