Most data science projects deploy machine learning models as an on-demand prediction service or in batch prediction mode. Some modern applications deploy embedded models in edge and mobile devices. ML web app Model creation is easy but the ML model that you have been working on is of no use until and unless it is used in the real world and ready for production.
We’ll start with Model Deployment and why we should deploy the ML web app model on AWS. The article is chopped into parts this is because I’m trying to explain as simply as I can in order to make model deployment in AWS accessible for as many people as possible. So now let’s go!
What is Model Deployment?
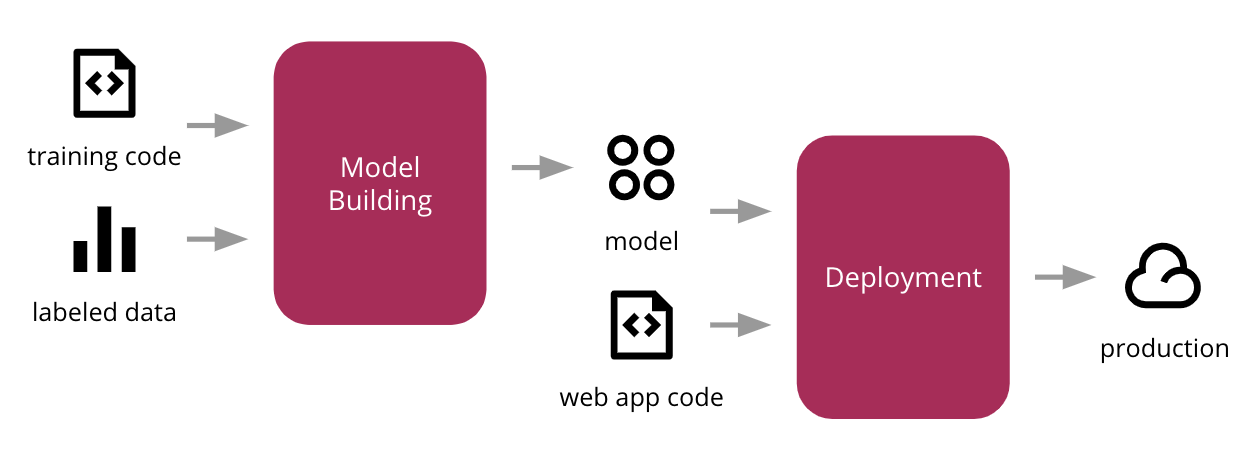
Deployment is the method by which you integrate a machine learning model into an existing production environment to make practical business decisions based on data. It is one of the last stages in the machine learning life cycle and can be one of the most cumbersome.
What is AWS?

Amazon Web Services, Inc. is a subsidiary of Amazon providing on-demand cloud computing platforms and APIs to individuals, companies, and governments, on a metered pay-as-you-go basis. The pay-as-you-go means they are going to charge when you use their services at that time only they charge.
Services Provided by the AWS:-
Compute, Storage, Databases, Analytics, Networking, Mobile, Developer tools, Management tools, IoT, Security, and enterprise applications.
Now as we have some basic understanding of Model deployment and AWS so now let’s dive into creating a website using ‘Streamlit library in Python.
Why Deploy your App on AWS?
Suppose that you have created an ML web app or any other app, that predicts the salary based upon the year of experience. But in order to reach that app to users/world so that users can use that app, you need a server(a server is nothing that provides services). In order to run any program/app, you need an OS. So in the server, an OS is running on which we deploy our code/app so that it can keep on running without having an actual computer/OS.
For getting a server we use multiple cloud services like AWS, GCP, AZURE, and many more. What these services do is that it provides us with a server for it is EC2 (Amazon Elastic Compute). EC2 provides an entirely new PC/server. A PC contains OS, network card, storage, and many types of things. In EC2 we just deploy our code so that our app will be running.
What is Streamlit?
Streamlit is a library in python that helps data scientist to deploy their models on websites. In simple terms, it is specifically made for data scientists as It helps them to create web apps for data science and machine learning in a short time.
Why use Streamlit?
With streamlit you can easily deploy your models and you don’t need to have knowledge of Flask. With this, you can easily create a website with python in a few lines of code. As well you don’t need to have front-end knowledge like HTML, CSS, and JavaScript
Now let’s create a website using streamlit.
The model is trained, so I have created the pickle file of the model so that I don’t have to, again and again, train the model. With the pickle file, your trained model is loaded and you will be using that model.
Let’s install streamlit library before creating a website:-
pip install streamlit
or
conda install -c conda-forge streamlit
Here is the code for the website
import joblib
import matplotlib.pyplot as plt
import pandas as pd
import streamlit as st
model = joblib.load('cancer.pkl')
def web_app():
st.write("""
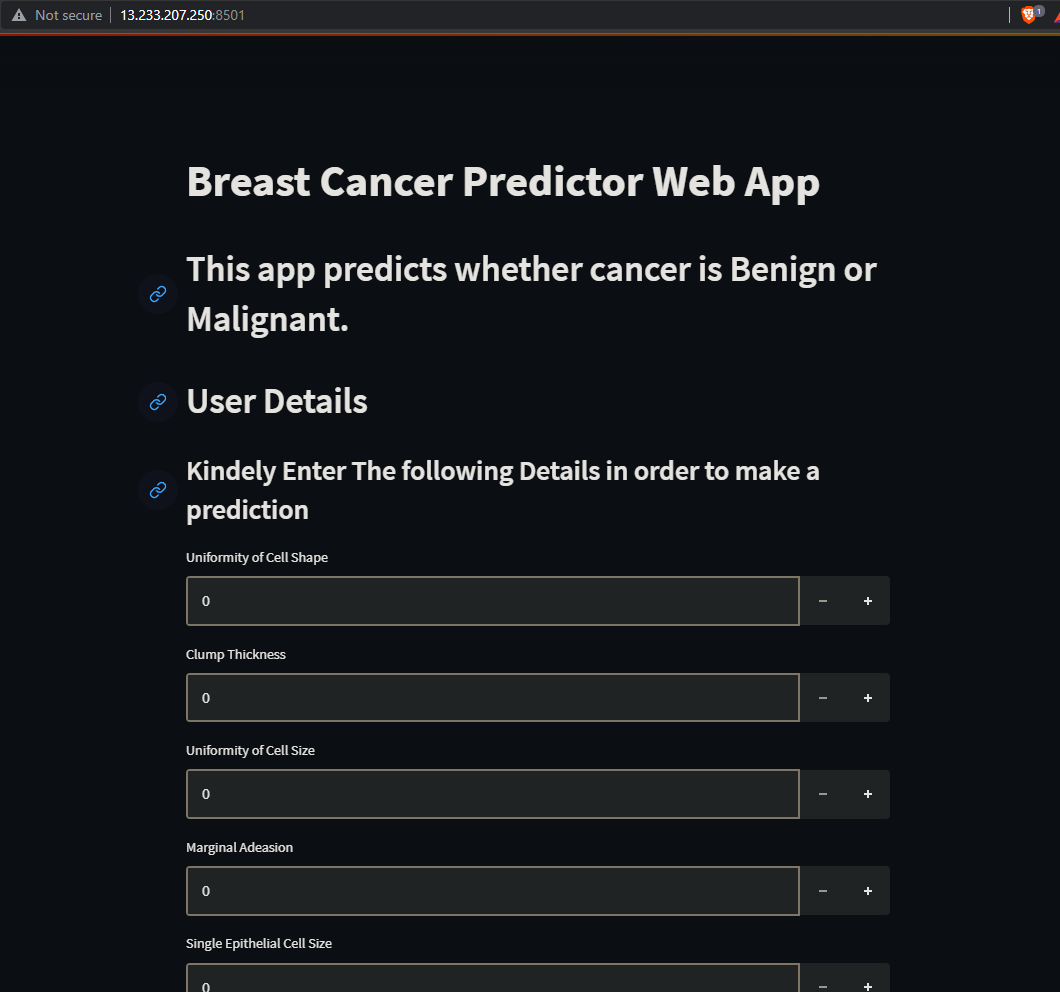
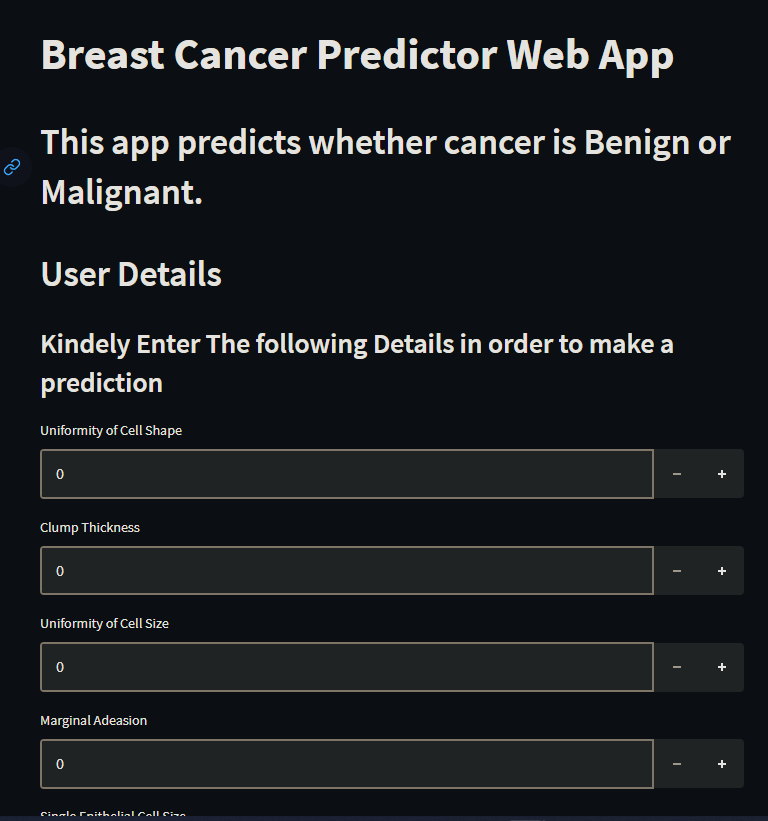
# Breast Cancer Predictor Web App
## This app predicts whether cancer is Benign or Malignant.
""")
st.header("User Details")
st.subheader("Kindely Enter The following Details in order to make a prediction")
cell_shape = st.number_input("Uniformity of Cell Shape",0,10)
clump_thickness = st.number_input("Clump Thickness",0,10)
cell_size = st.number_input("Uniformity of Cell Size",0,10)
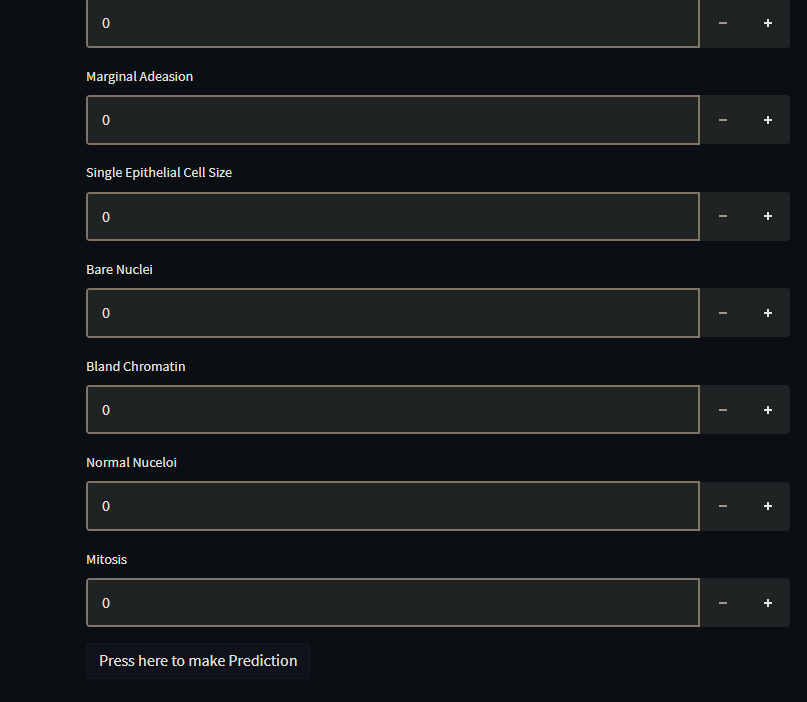
marginal_adheasian = st.number_input("Marginal Adeasion",0,10)
single_epithelial_cell_size = st.number_input("Single Epithelial Cell Size",0,10)
bare_nuclei = st.number_input("Bare Nuclei",0,10)
bland_chromatin = st.number_input("Bland Chromatin",0,10)
normal_nucleoli = st.number_input("Normal Nuceloi",0,10)
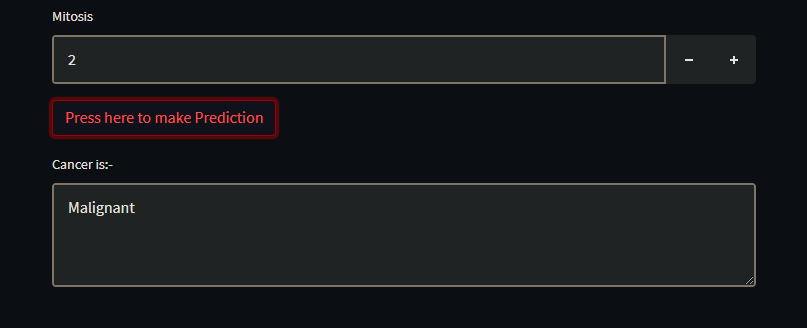
mitosis = st.number_input("Mitosis",0,10)
result = model.predict([[cell_shape,clump_thickness,cell_size,marginal_adheasian,
single_epithelial_cell_size,bare_nuclei,bland_chromatin,
normal_nucleoli,mitosis]])
if result == 2:
result = "Benign"
else:
result = "Malignant"
st.text_area(label='Cancer is:- ',value=result , height= 100)
if st.button("Press here to make Prediction"):
run = web_app()
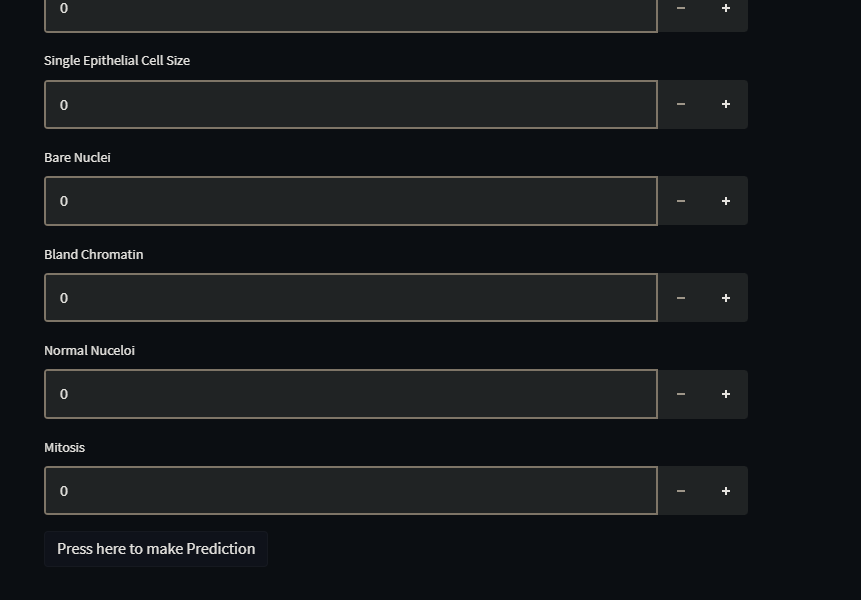
That’s how our website looks:
Down below I will be attaching the link to the GITHUB repo.
As we have checked our website is running perfectly time to deploy it on AWS EC2.
How to Deploy your APP on AWS EC2?
Before deploying the website make sure you have an account on AWS. If not, first register and create your account after that follow these steps.
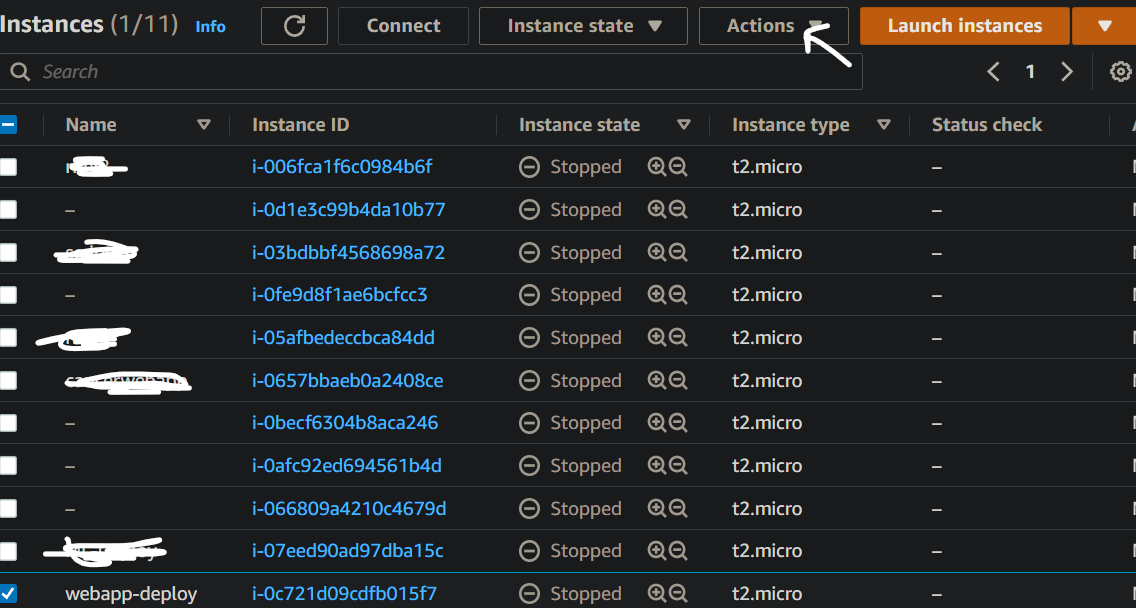
1. Search for EC2 on the search bar and then select EC2 and then click on Instances on the left side. A new window will open that will going to show how many instances running. Like this
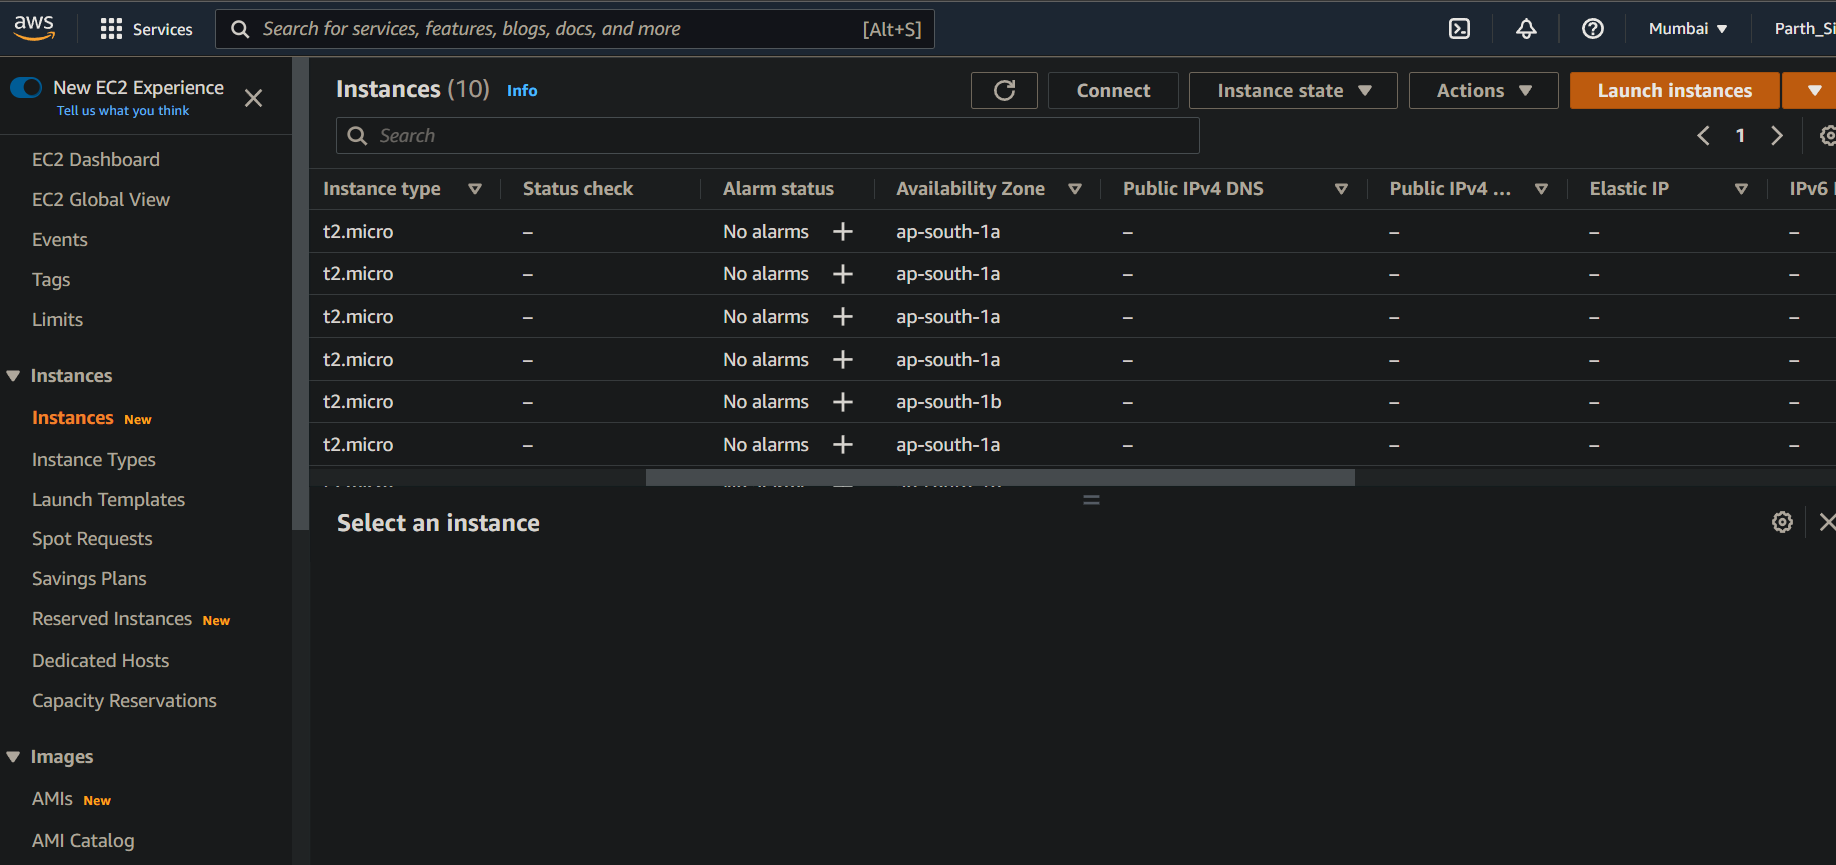
2. Once you are on this page click on launch instance. After that do this
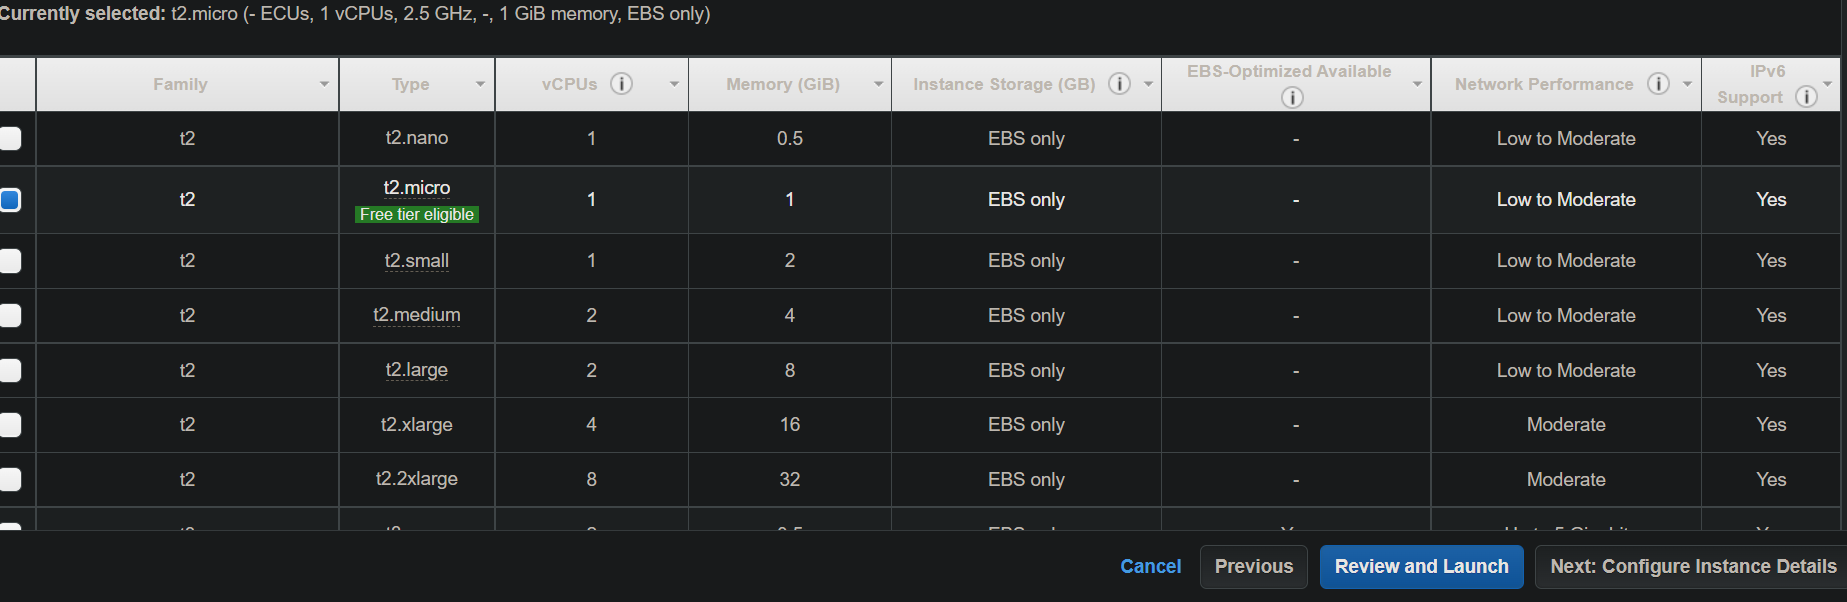
-> Select the Amazon Linux 2 AMI (HVM) this is the OS we are selecting for creating our server so that we can run our application

-> Click on Next: Configure Instance Details. Don’t touch anything else keep the option on t2.micro.
-> Click on Next: Configure Instances Details
-> Click on Next:Add storage
-> Click on Next: Add Tags
-> Click on Next: Configure Security Group
This step is very important because through this step only users from the public world will be able to access it.
Click on Add Rule and do these:
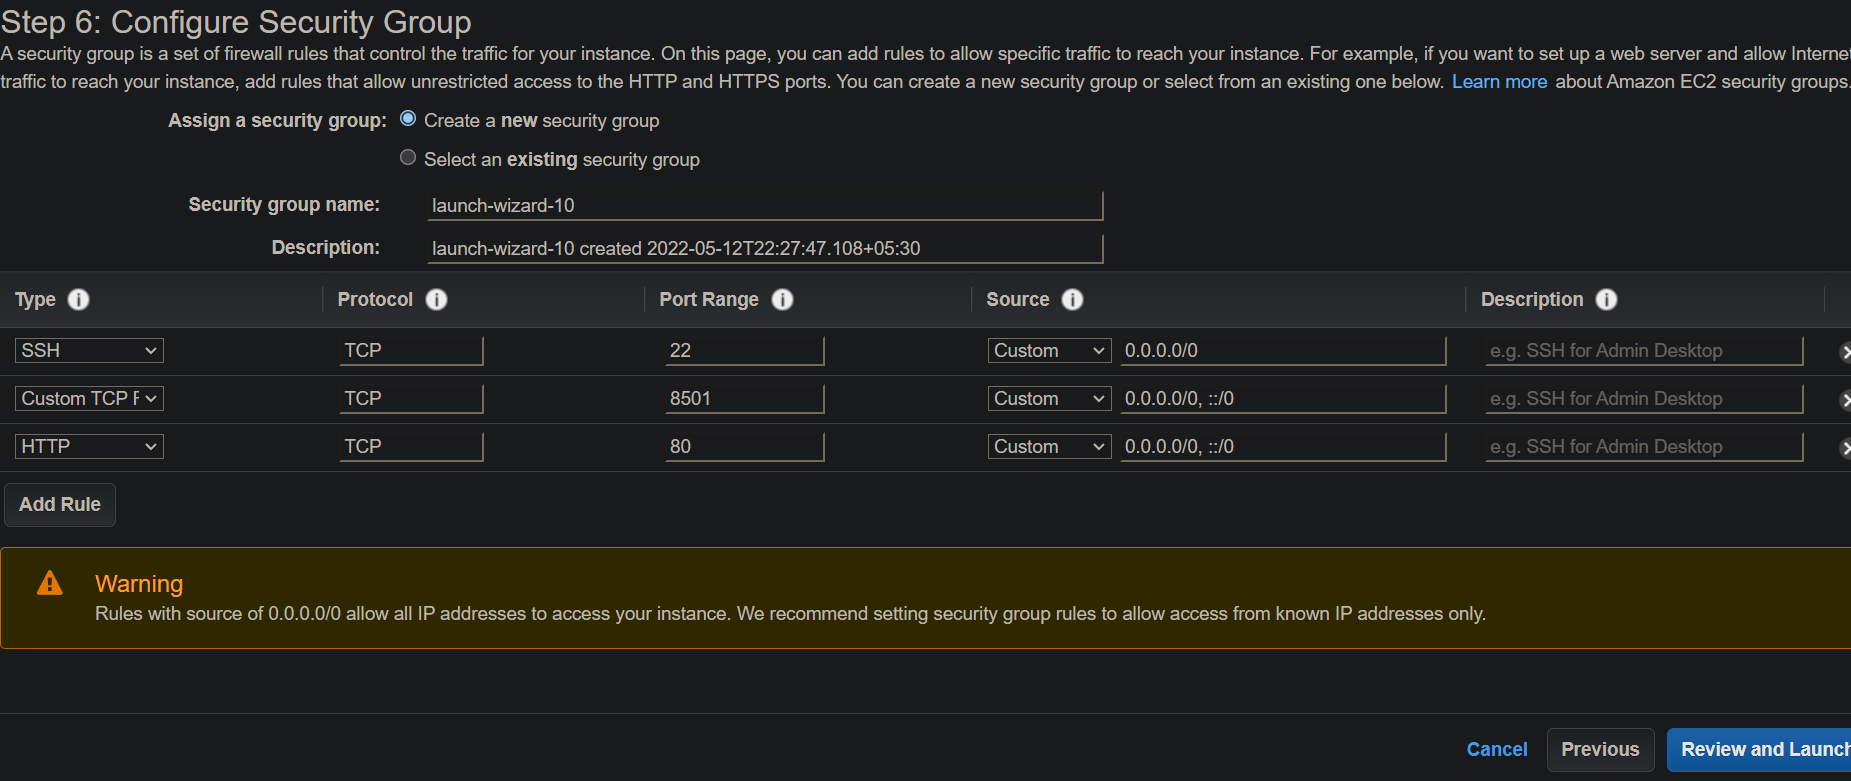
1> Click on Add Rule and select custom TCP Rule and in Port range enter 8501
2> Again click on Add Rule and select HTTP.
Done and now click on Review and Launch
-> Now click on Launch and after that, it will ask you for a key pair ( this acts as a login password for accessing the server).
-> Now click on Choose an existing key pair and select create a new key pair and enter any key pair name of your choice.
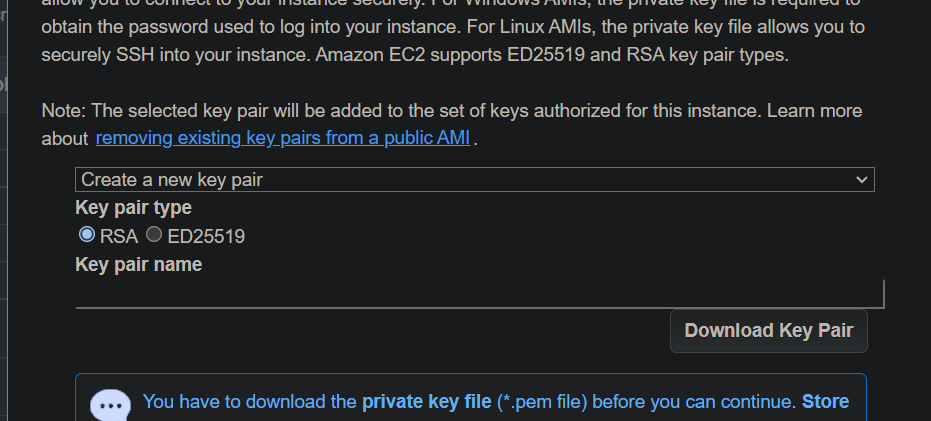
After entering the Key pair name, click on Download key pair. After that click on launch.
Note: Keep this file stored in a folder with this file within your cmd prompt you can also access the server.
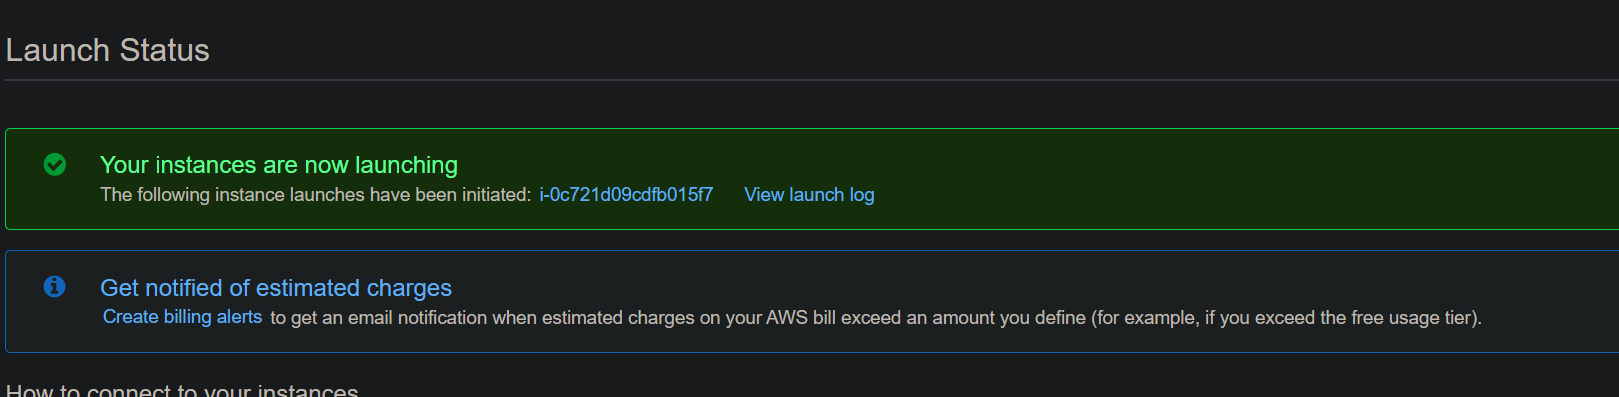
Congrats you have created your first EC2 instance.
3. Before entering the EC2 instance, we first need to create a new IAM policy ( IAM stands for Identity Access Management with IAM you can write a policy/role so that one AWS service can access another AWS service). By default, AWS doesn’t allow one AWS service to access another service this is because to avoid any security conflict.
For accessing IAM again click on the search bar at the top or press Alt+S. Now type IAM and select it and click on Roles from the left window. A new window will open like this.
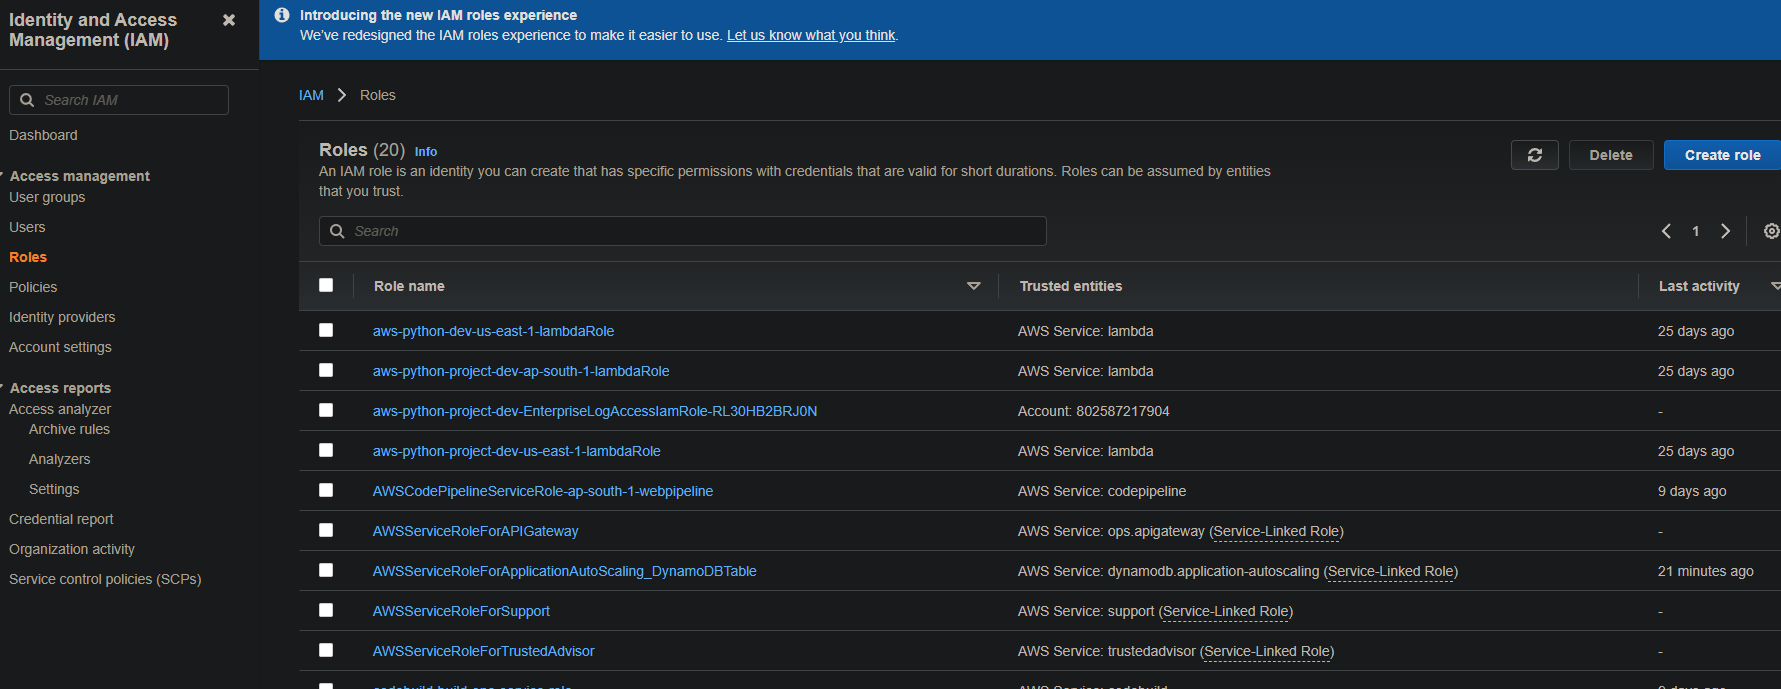
-> Now Click on Create role and under Use case click on EC2 and then press next
-> On Filter policies search for s3 and select the AmazonS3FullAccess and click next
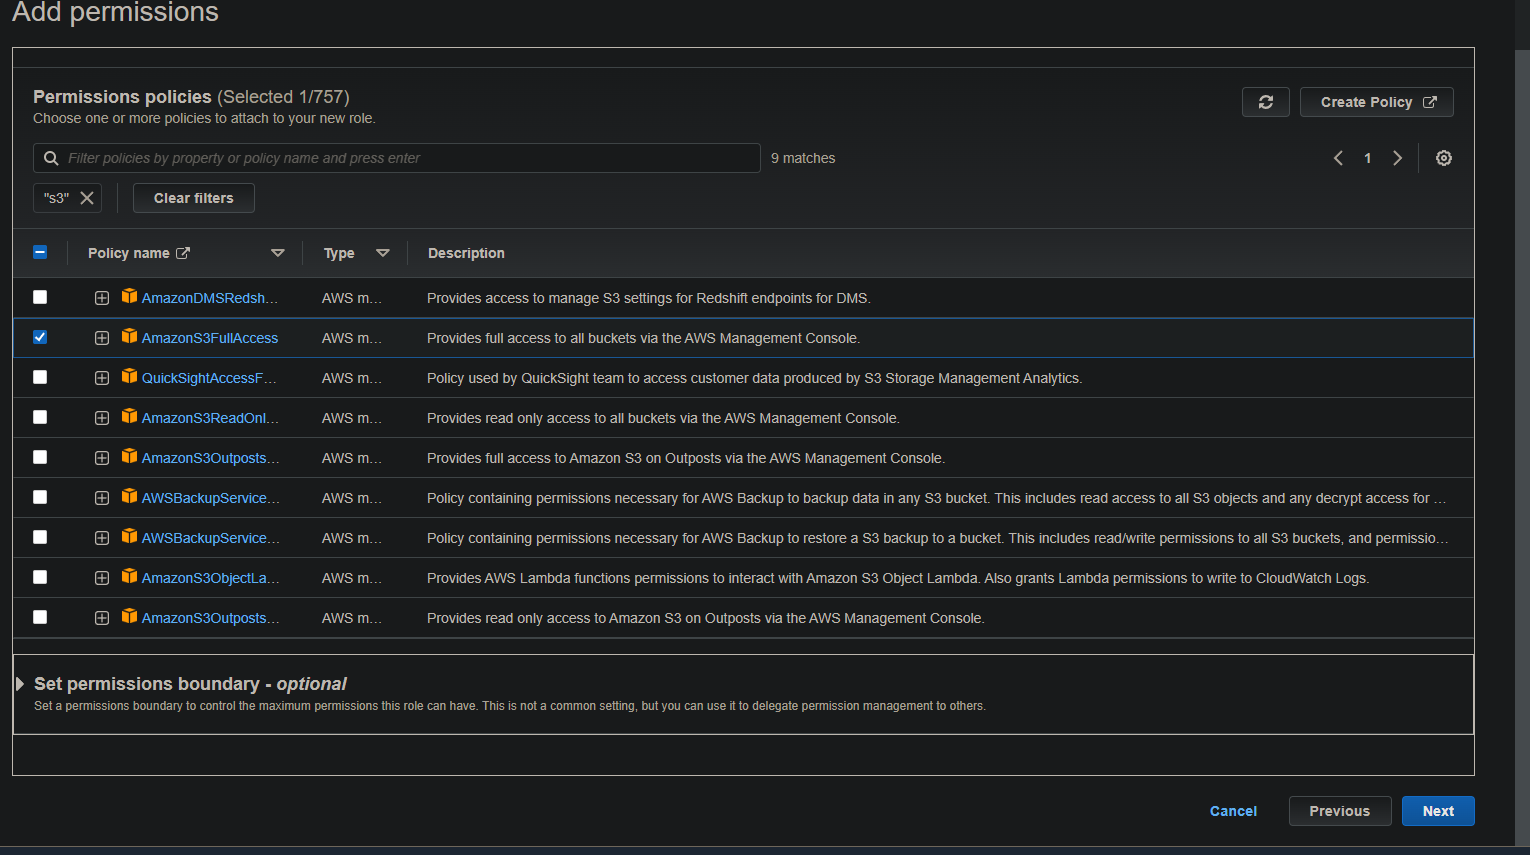
-> Now enter your Role name as per your choice. Once Entered click on Create role. This will be going to create a new role that allows EC2 access to the S3 services.
Important Note!! :– We created this new role because in S3 we will be storing our pickle file of the model and in order to get that file inside the EC2 instance we must put the file in S3. S3 stands for Simple Storage Services with these services you can store your data files and later you can use them with various AWS services.
4. Now search for S3 press Alt+F4
-> Now click on Create Bucket
-> Enter your S3 bucket name as of your choice.
-> Deselect Block all public access. This will be going to allow the EC2 to access S3 without any error.
5. Now head back to the EC2 instances you just created and click the Instance ID. If not able to find the instances you just created try to look at Launch time through this you able to find which instance was created.
6. Now click on Actions, then go to Security, and then select Modify IAM role
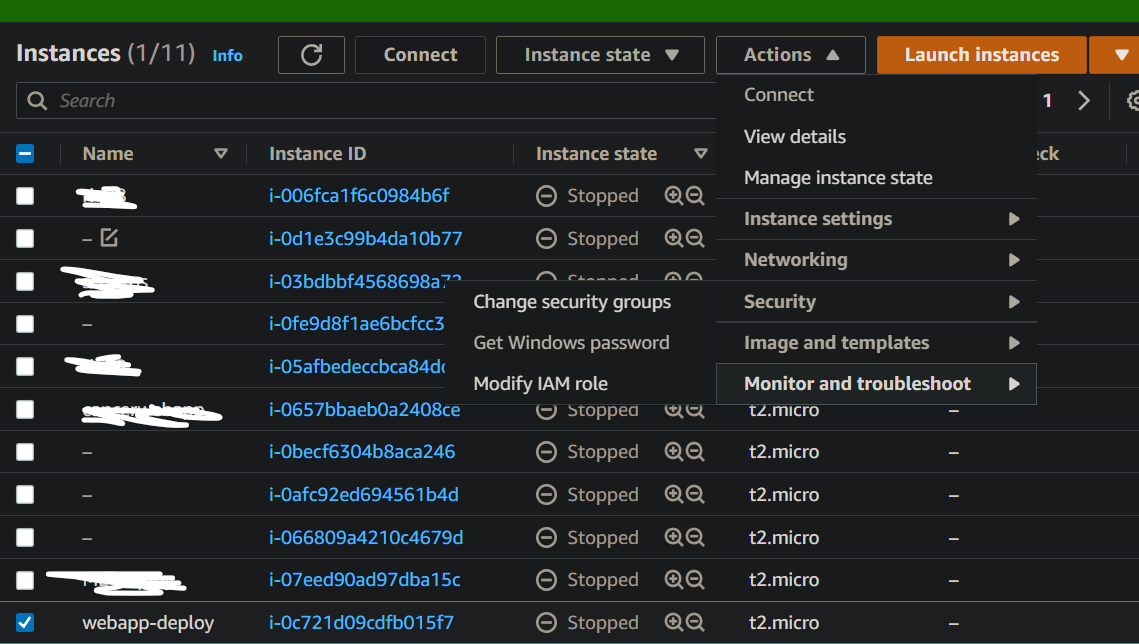
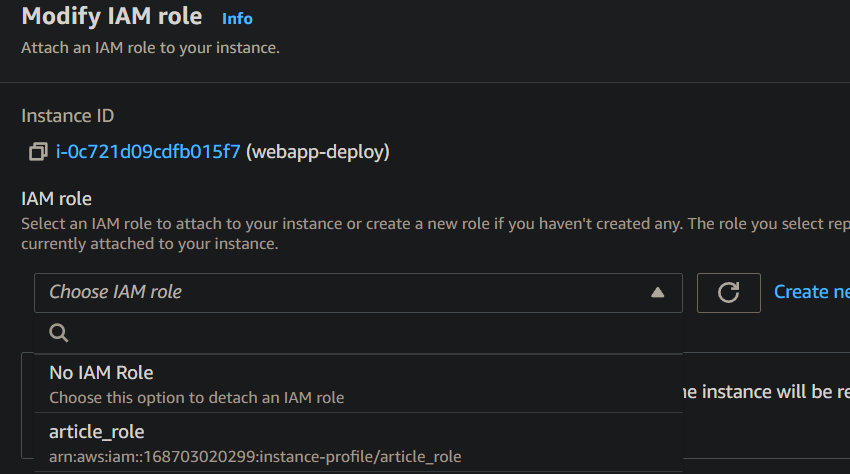
7. Click on Choose IAM role and select the IAM role you just created. I have selected the article_role as this is the IAM policy that I created.
8. Now we have configured the changes in AWS EC2. Now it’s time to launch the Instance.
9. Now select the instance we just configured, click on Instance state, and select Start Instance. This will go to launch the instance.
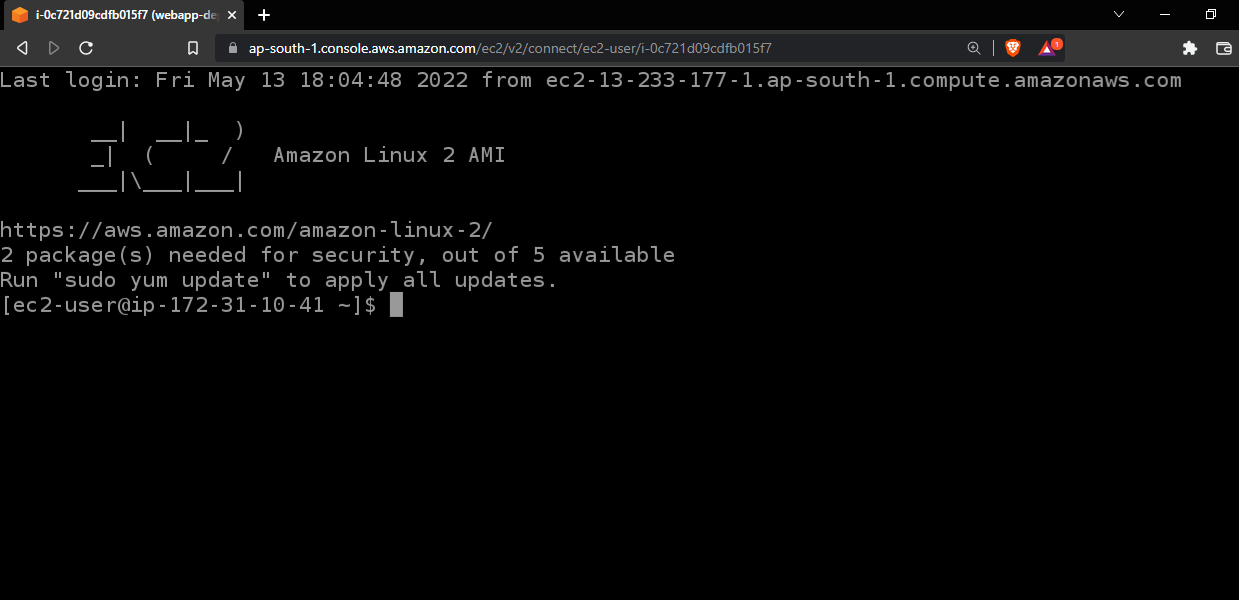
10. In order to connect the instance click on connect. This window will pop up.
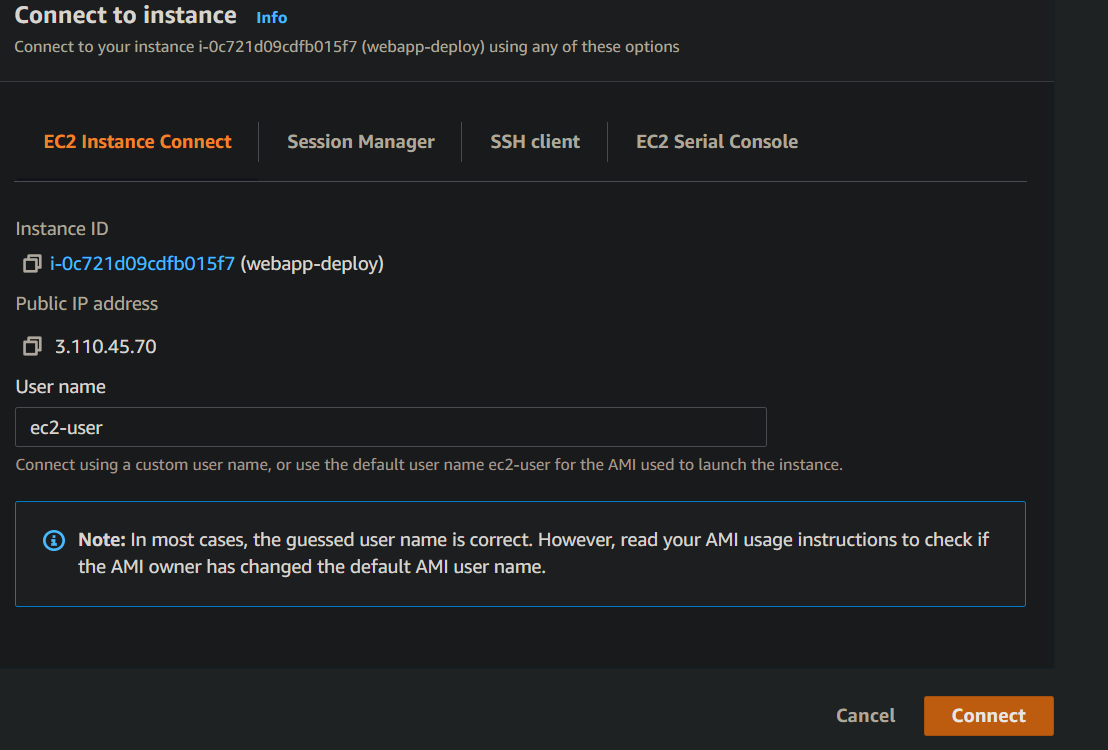
11. Click on Connect and now boom a new window will open and now we will be inside the instance, OS is running.
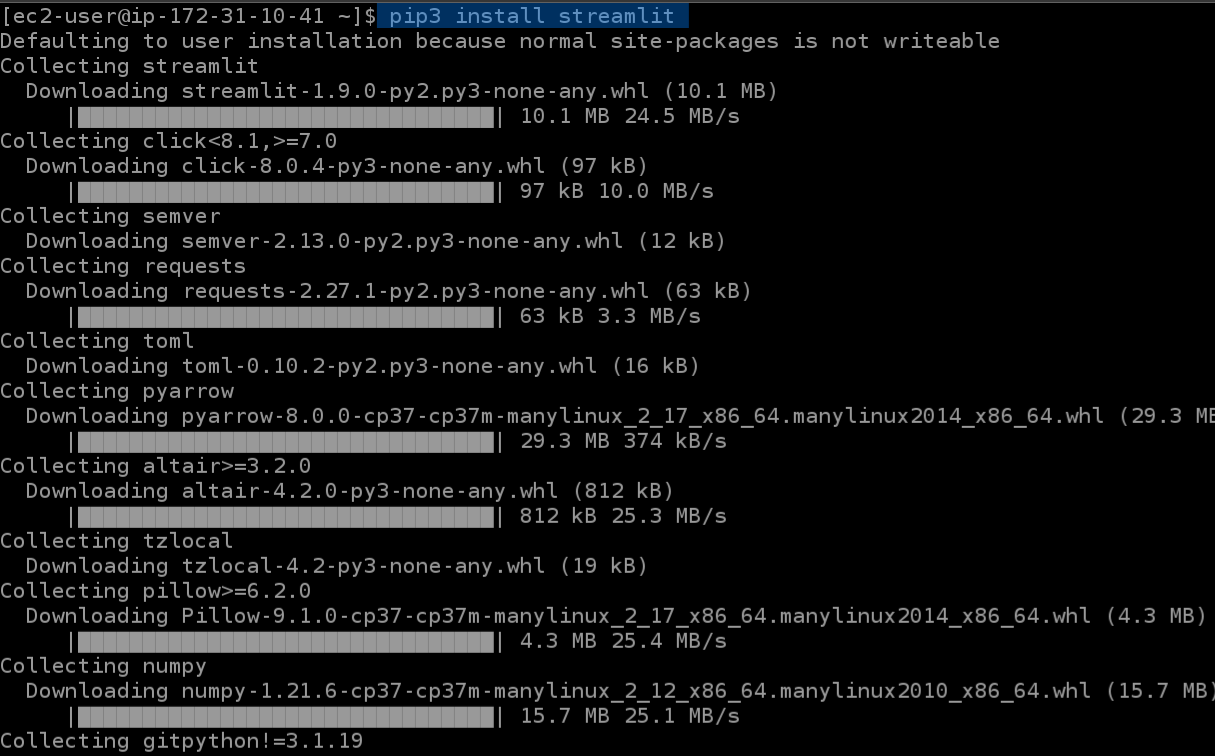
Now install streamlit inside the EC2 using this command:
pip3 install streamlitS
You are currently login as ec2-user. In order to get access to s3, we need to log in as root users. To log in with the root user use this command.
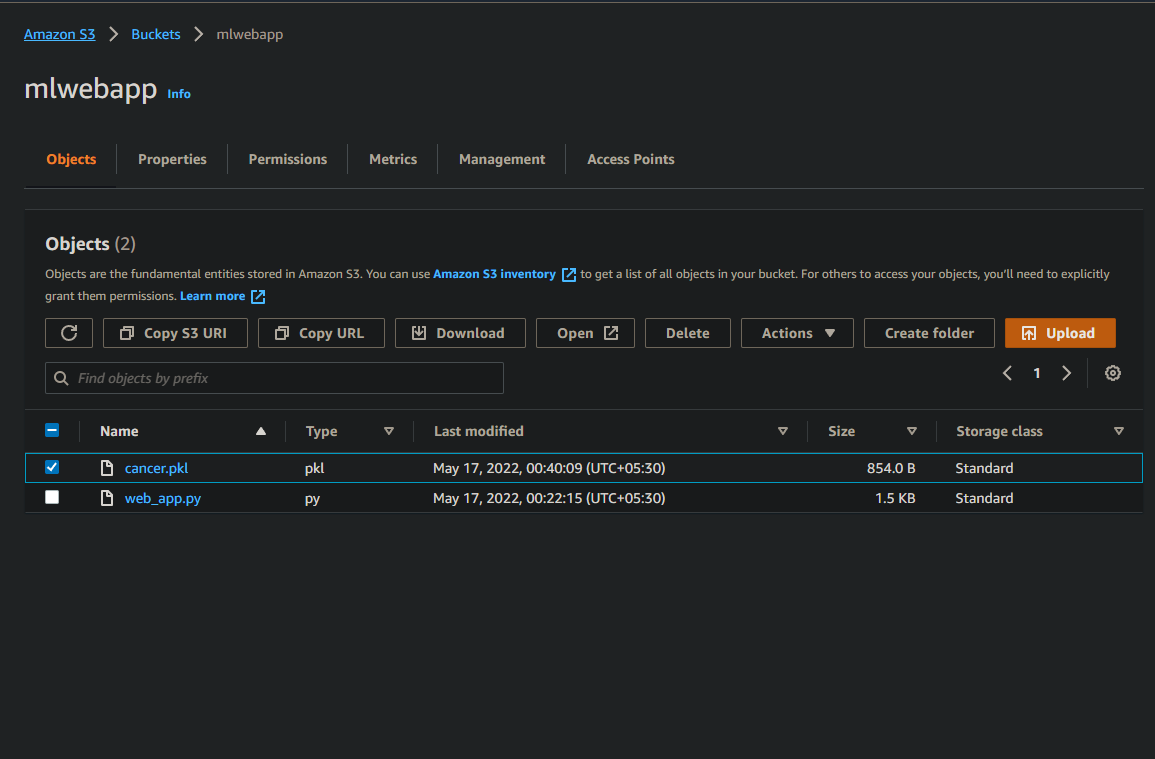
After that now search for S3 and find the S3 bucket that you created recently and after that click on Upload and upload the files 1.web_app.py 2.Cancer.pkl from your PC:-
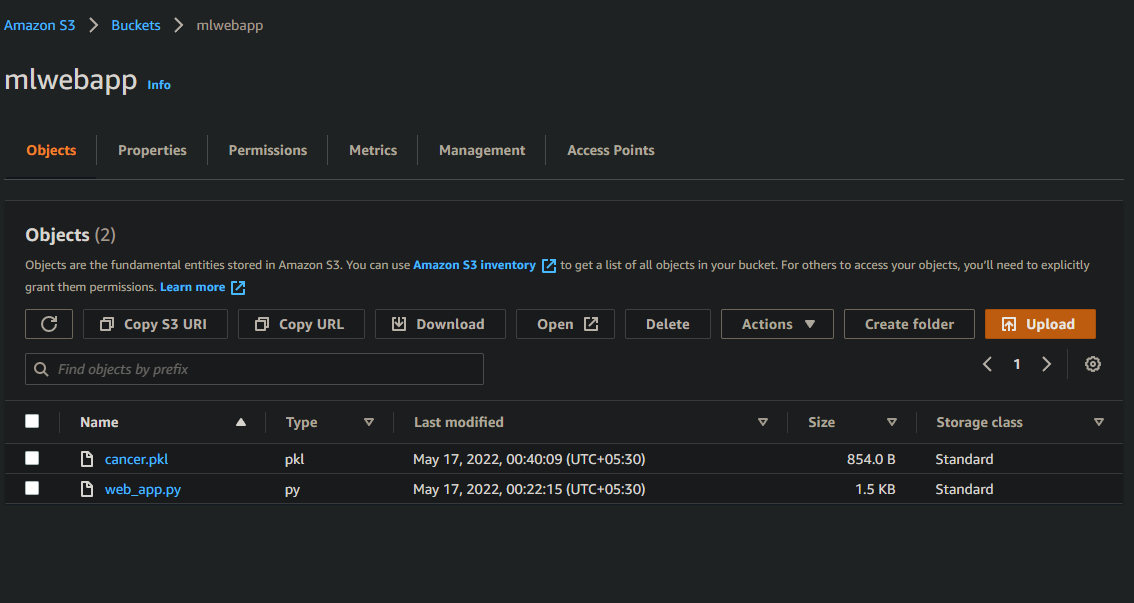
After that click on Upload to upload those files inside the S3 bucket.
Now go inside your EC2 and follow the below Steps:
1. Once you have installed streamlit and login as the root user. Now select the S3 URL of the file that we have uploaded recently inside S3, for doing that go to S3 then select the bucket that we created and select the files like this and then click Copy S3 URL.
2. Go to the EC2 instance then paste the S3 URL inside your EC2
aws s3 cp Your S3 URL/name_of_file name_of_file
aws s3 cp s3://mlwebapp/cancer.pklcCancer.pkl
3. In order to check whether the file is uploaded or not use this command. This command tells the contents inside your directory. This is a Linux command.
ls

4. Now do the same for web_app.py
5. We also need to install joblib as through the library we are able to load the model that we have trained that is cancer.pkl file. And also install the sklearn library as this library contains all the models so install this also
pip3 install joblib
pip3 install sklearn
The final and last step is to run the web-app use this command to run the app.
streamlit run web_app.py

Copy any of the URLs, for the public world to connect to this app we give External URL, but if we want to check how the app looks then we use the Network URL i.e the private network. After URL has been copied paste that into your new tab.
Now fill in those details to make a prediction
Congratulations on creating an ML web app and deploying it on AWS. Now anyone in the world can use your app.
Here is the GitHub repo for the same, in here I have uploaded all the files including cancer.pkl, web_app.py, and the file in which I have trained the model using Logistic Regression. Link to the GitHub repo.
Conclusion
I hope now you have some understanding of how to create web app using streamlit and how to deploy your app on AWS. Still, we’ve only scratched the surface when it comes to all of the benefits AWS has to offer. In this article, you were able to create an ML web app and it must have been a great experience for you to deploy it on AWS. How was it? Share with me in the comments below. You could connect with me on Linkedin.
The media shown in this article is not owned by Analytics Vidhya and is used at the Author’s discretion.
Parth Singh
26 May, 2022


HI ' To log in with the root user use this command.' - what is the command here? Thanks!