Hello!, techies, I am sure this article will help you understand how to use Azure Databricks notebook to perform data-related operations in it. Let’s go!
Databricks
Databricks Data Science & Engineering (sometimes called simply “Workspace“) is an analytics platform based on Apache Spark. It is integrated with Azure, AWS, and GCP to provide a one-click setup, streamlined workflows, and an interactive workspace that enables collaboration between data engineers, data scientists, and machine learning engineers.
Azure Databricks is a data analytics platform optimized for the Microsoft Azure cloud services platform. Azure Databricks offers two environments for developing data-intensive applications: Databricks Data Science & Engineering, and Databricks Machine Learning. Azure is the first-party service provider of Databricks(meaning all the support services for databricks will be provided by Azure on its cloud). You can see the databricks workspace below:-
Steps to Create Azure Databricks Service
Pre-Requisite
Need to have at least an Azure free tier subscription.
Step 1: – Open the Azure portal (portal.azure.com)
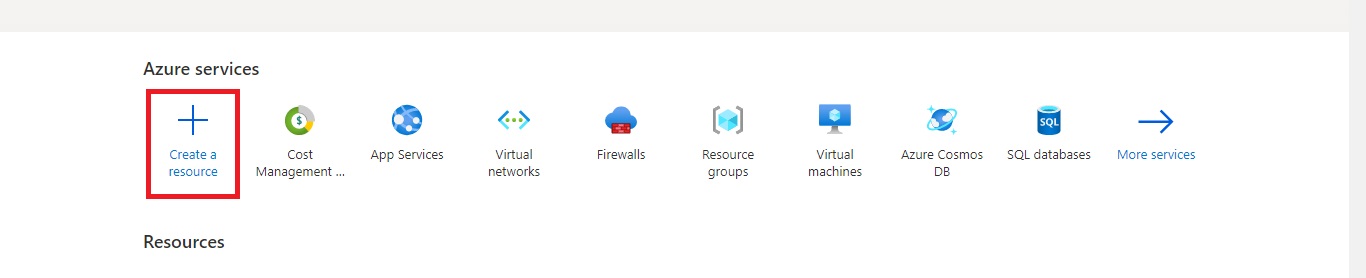
Step 2:- To create the Databricks service you need to click on the “Create a Resource” icon.
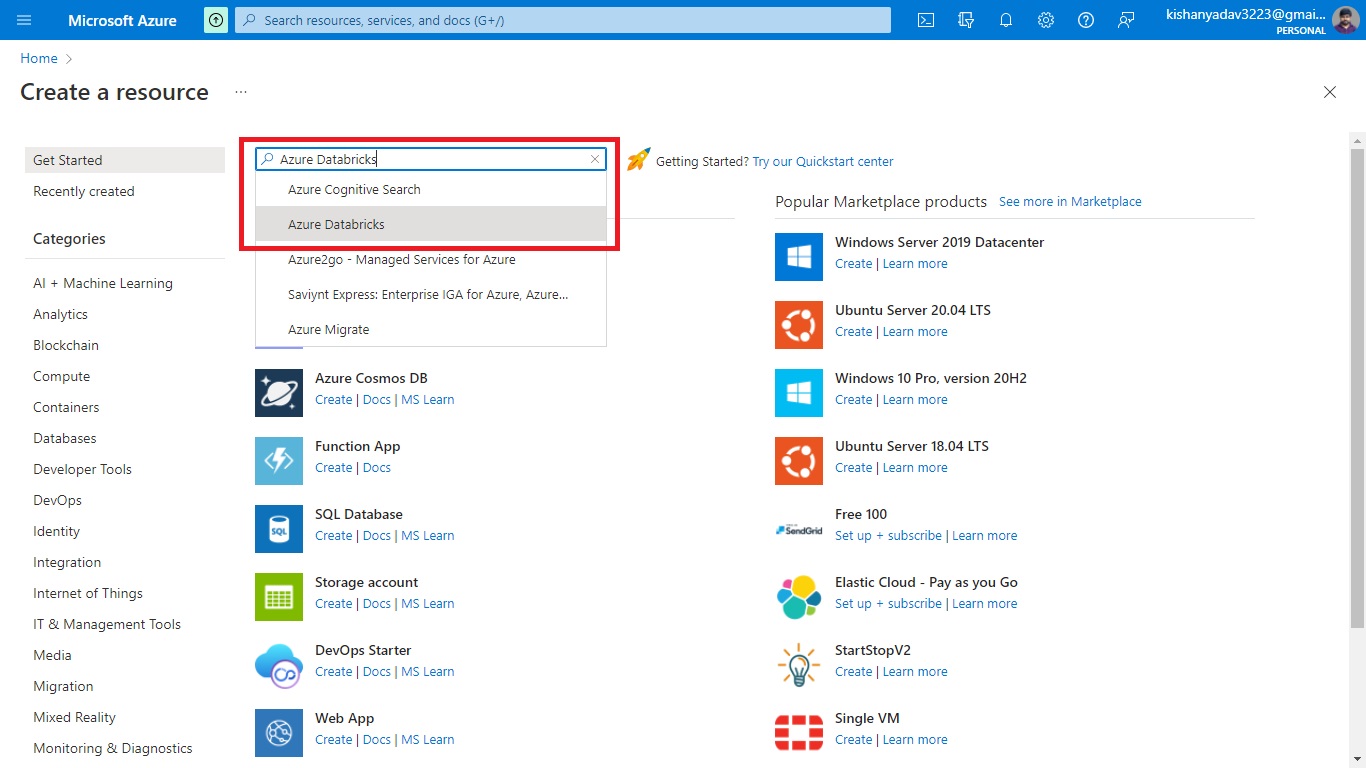
Step 2.1:- Now search for the “Azure Databricks” service and then click on create button option.
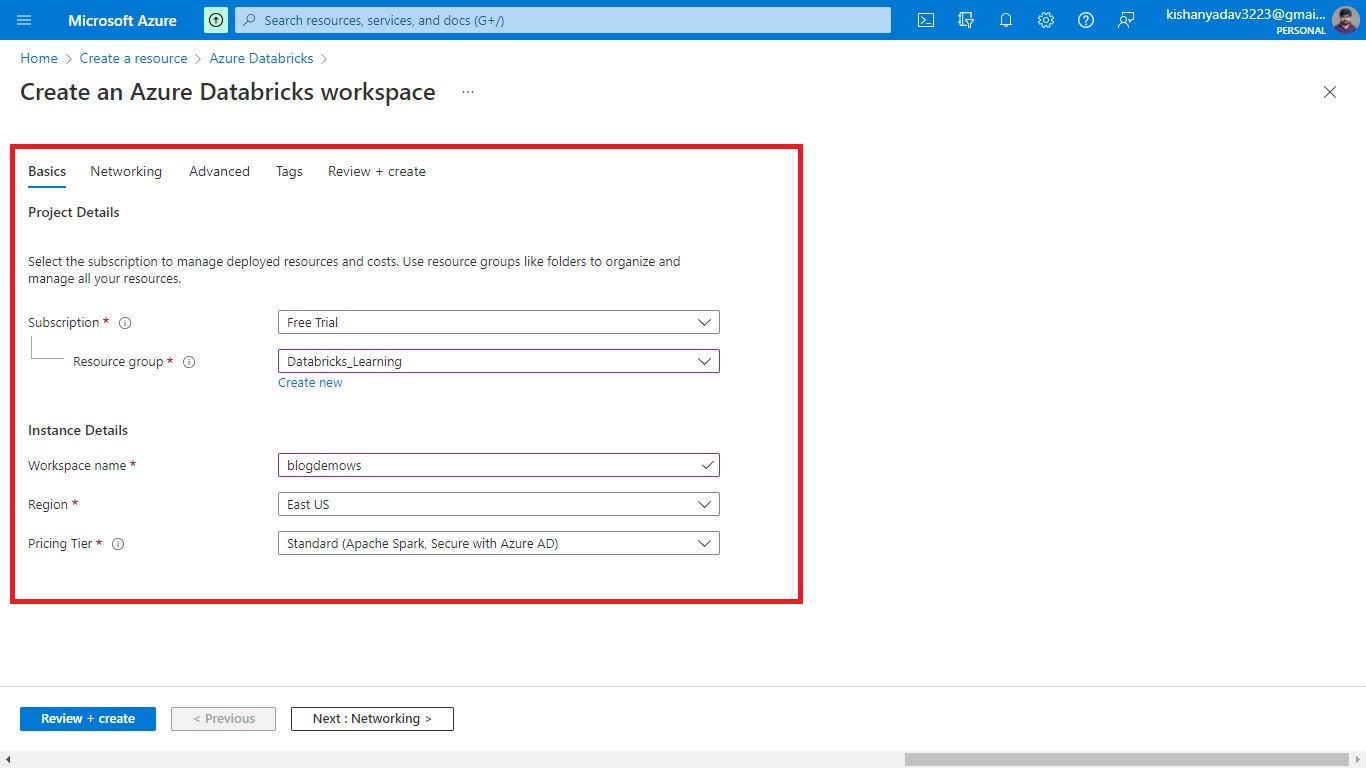
Step 2.2:- Now fill up the details that are needed for the service creation in the project details section.
Select the proper subscription from the dropdown, for me, I am using a free trial so I will choose the default option that is provided.
Now you have to create a resource group, just click on create new if you don’t have otherwise choose one from the dropdown options.
Now you have to fill the Instance Details sections provide below
Workspace name:- provide the name for your workspace
Region:- select the region that is suitable for you. I will choose the default one.
Pricing Tier:- I will choose the standard one.
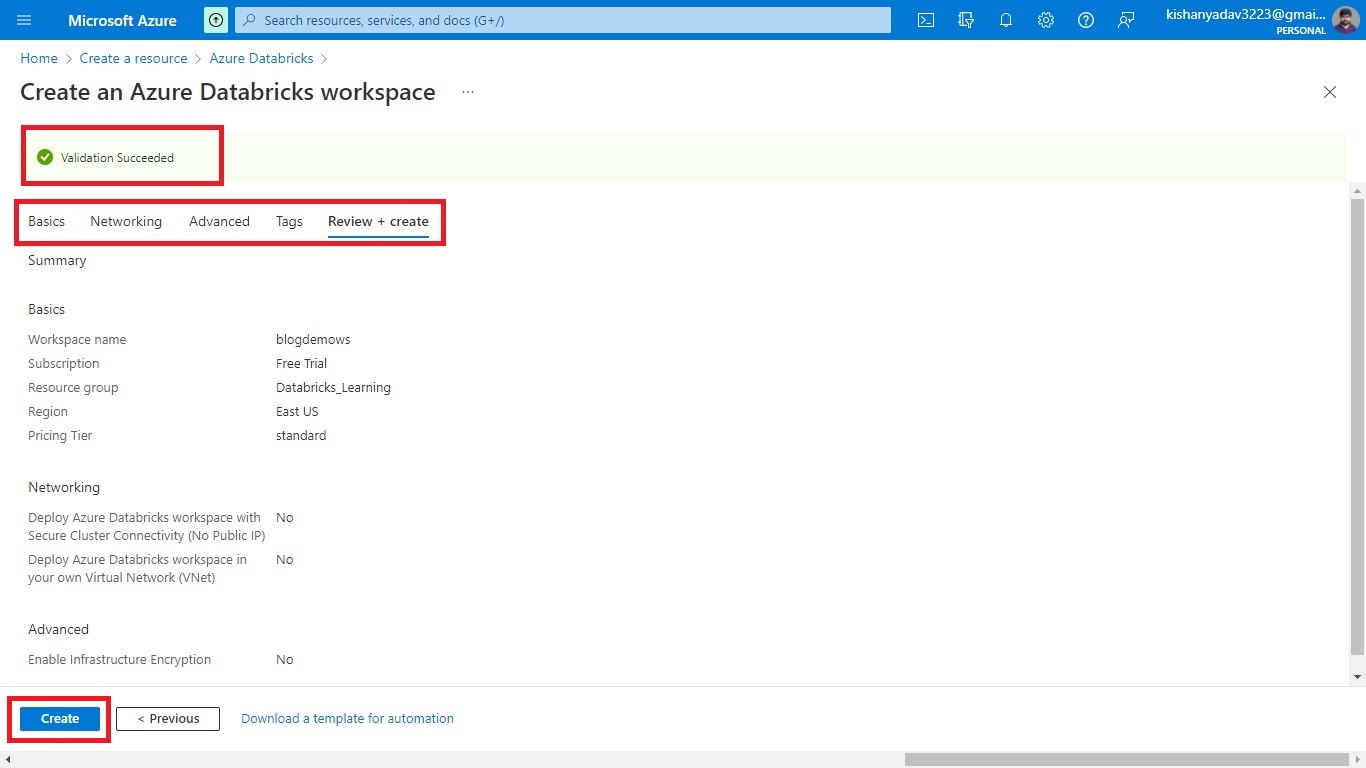
Step 2.3:- Now other things I will keep default and click on next in Networking, Advance, and Tag sections.
Step 2.4:- Finally, click on the “Review + Create” button.
step 2.5:- Once the message “Validation passed” is displayed, click on the “create” button.
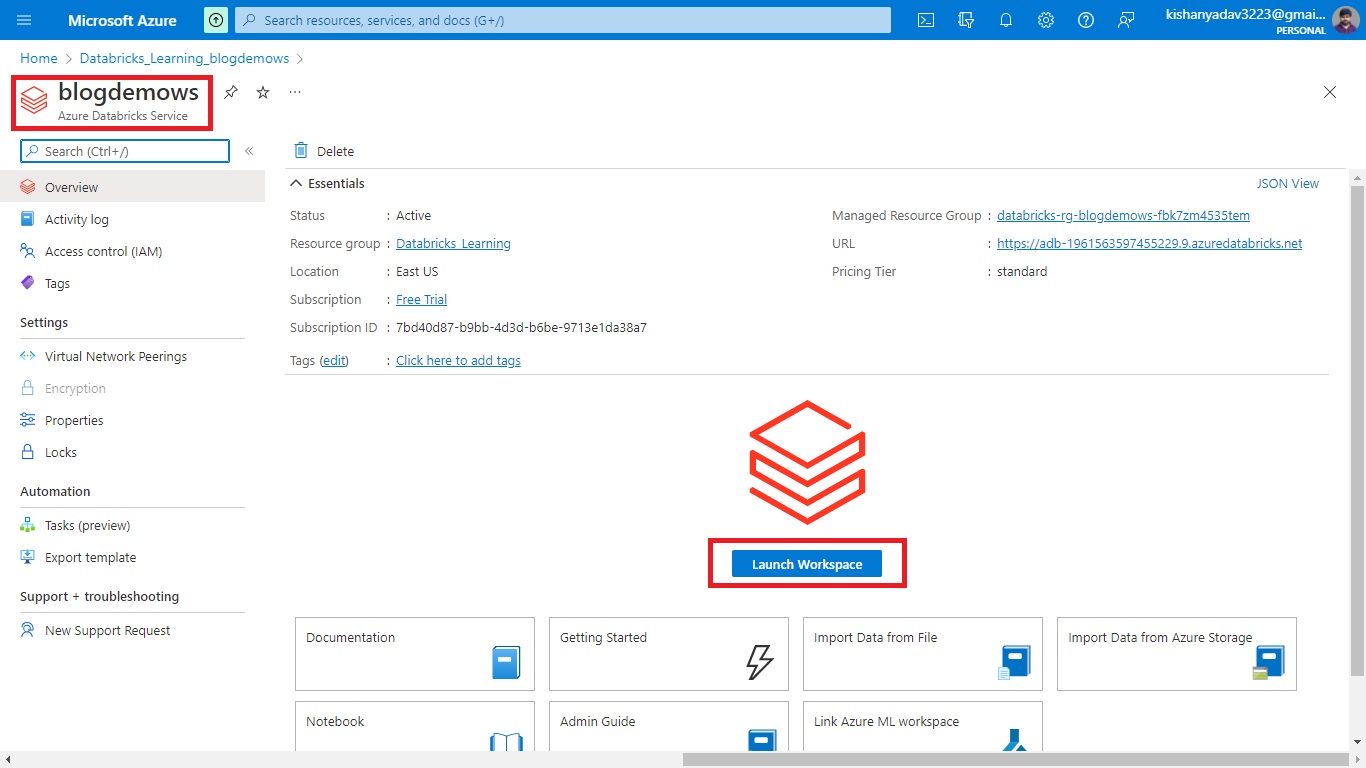
step 2.6:- Now click on go to service and you will be redirected to your azure databricks service page click on “Launch Workspace” and you will be redirected to your workspace.
Now our azure databricks service has been created. It’s time to create a cluster to run the notebook. Let’s create…
Cluster Creation in Databricks
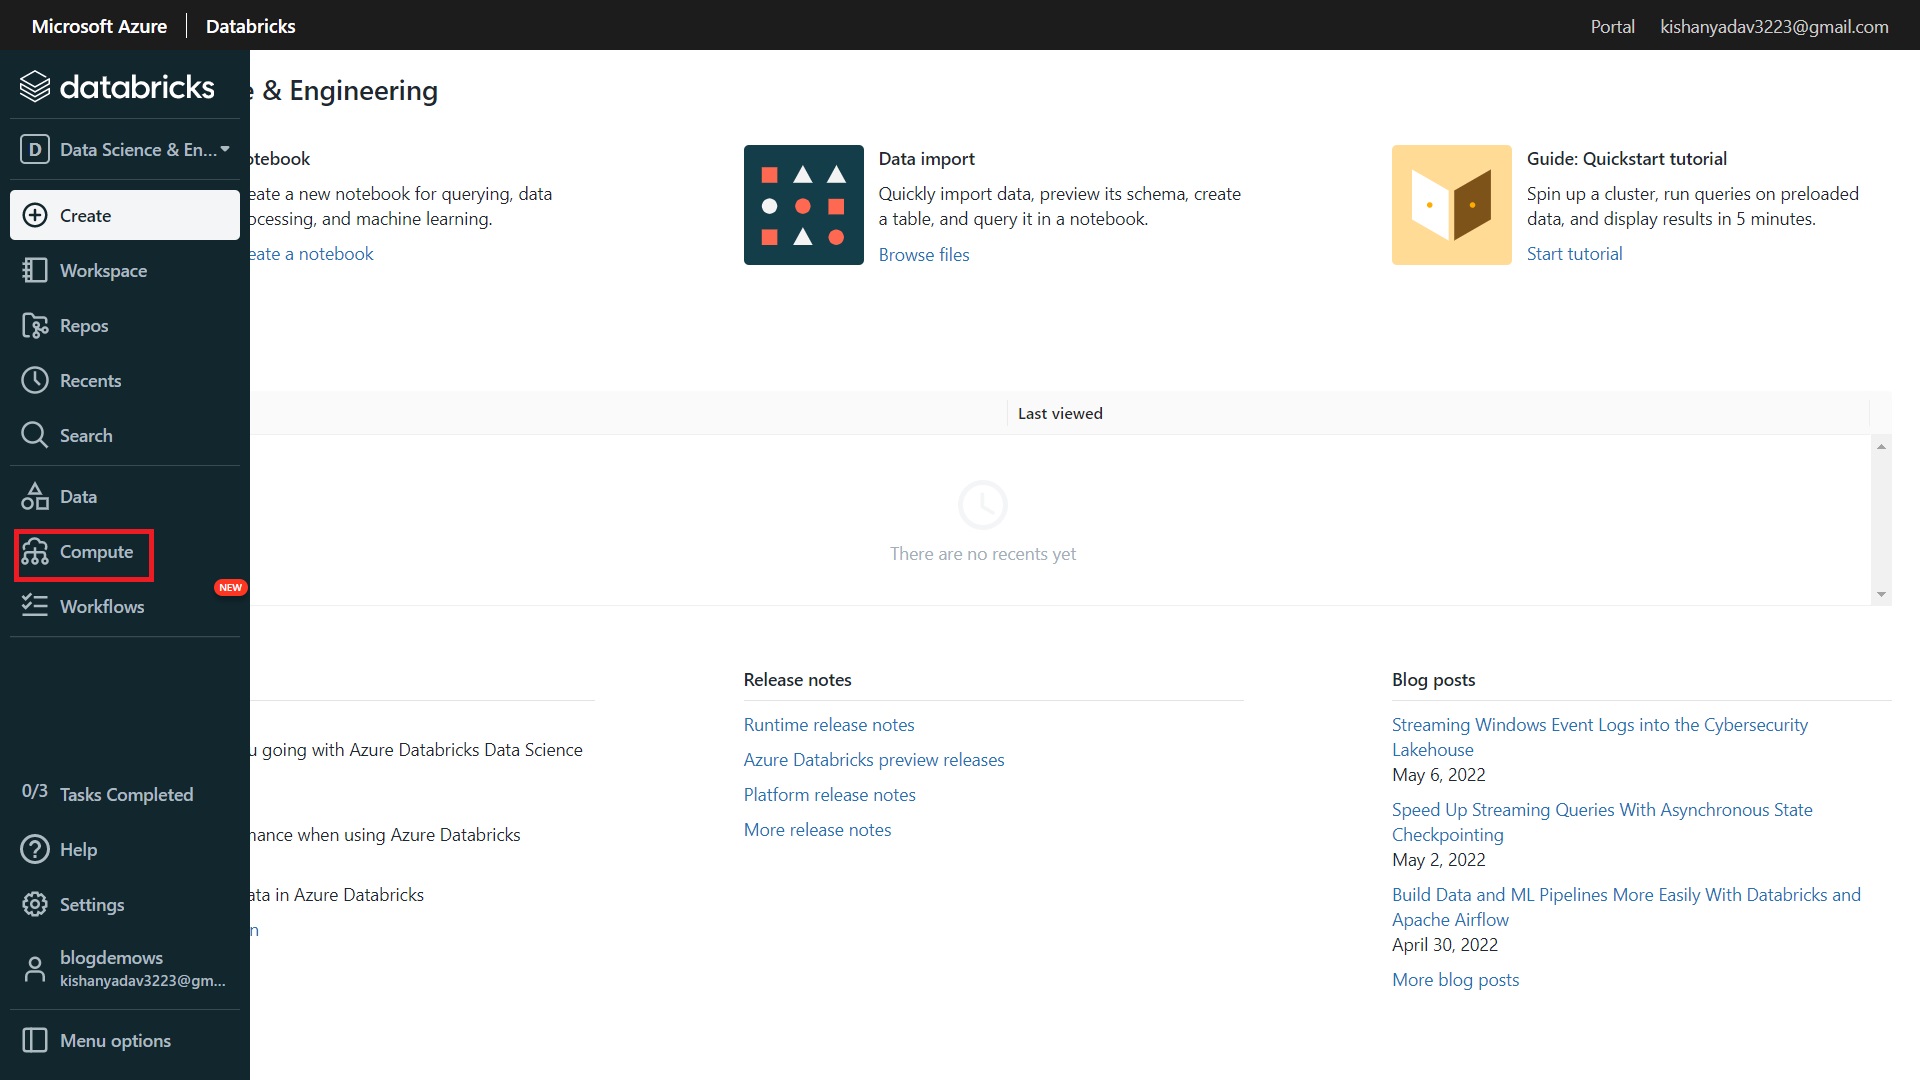
Step-1:- From the provide databricks menu options, click on “Compute” to create a cluster.
Step-2:- You will be redirected to compute page, here you will get 2 types of cluster creation options, one is “All-purpose clusters” and the other one is “Job cluster”.
All-Purpose cluster:- They are used for data analysis using notebooks and perform data ingestion and transformation works using notebooks.
Job cluster:- They are used for executing the job or scheduling purpose of notebooks to perform the operations written inside the notebooks.
Here we are going to create All-purpose clusters, now click on create cluster button.
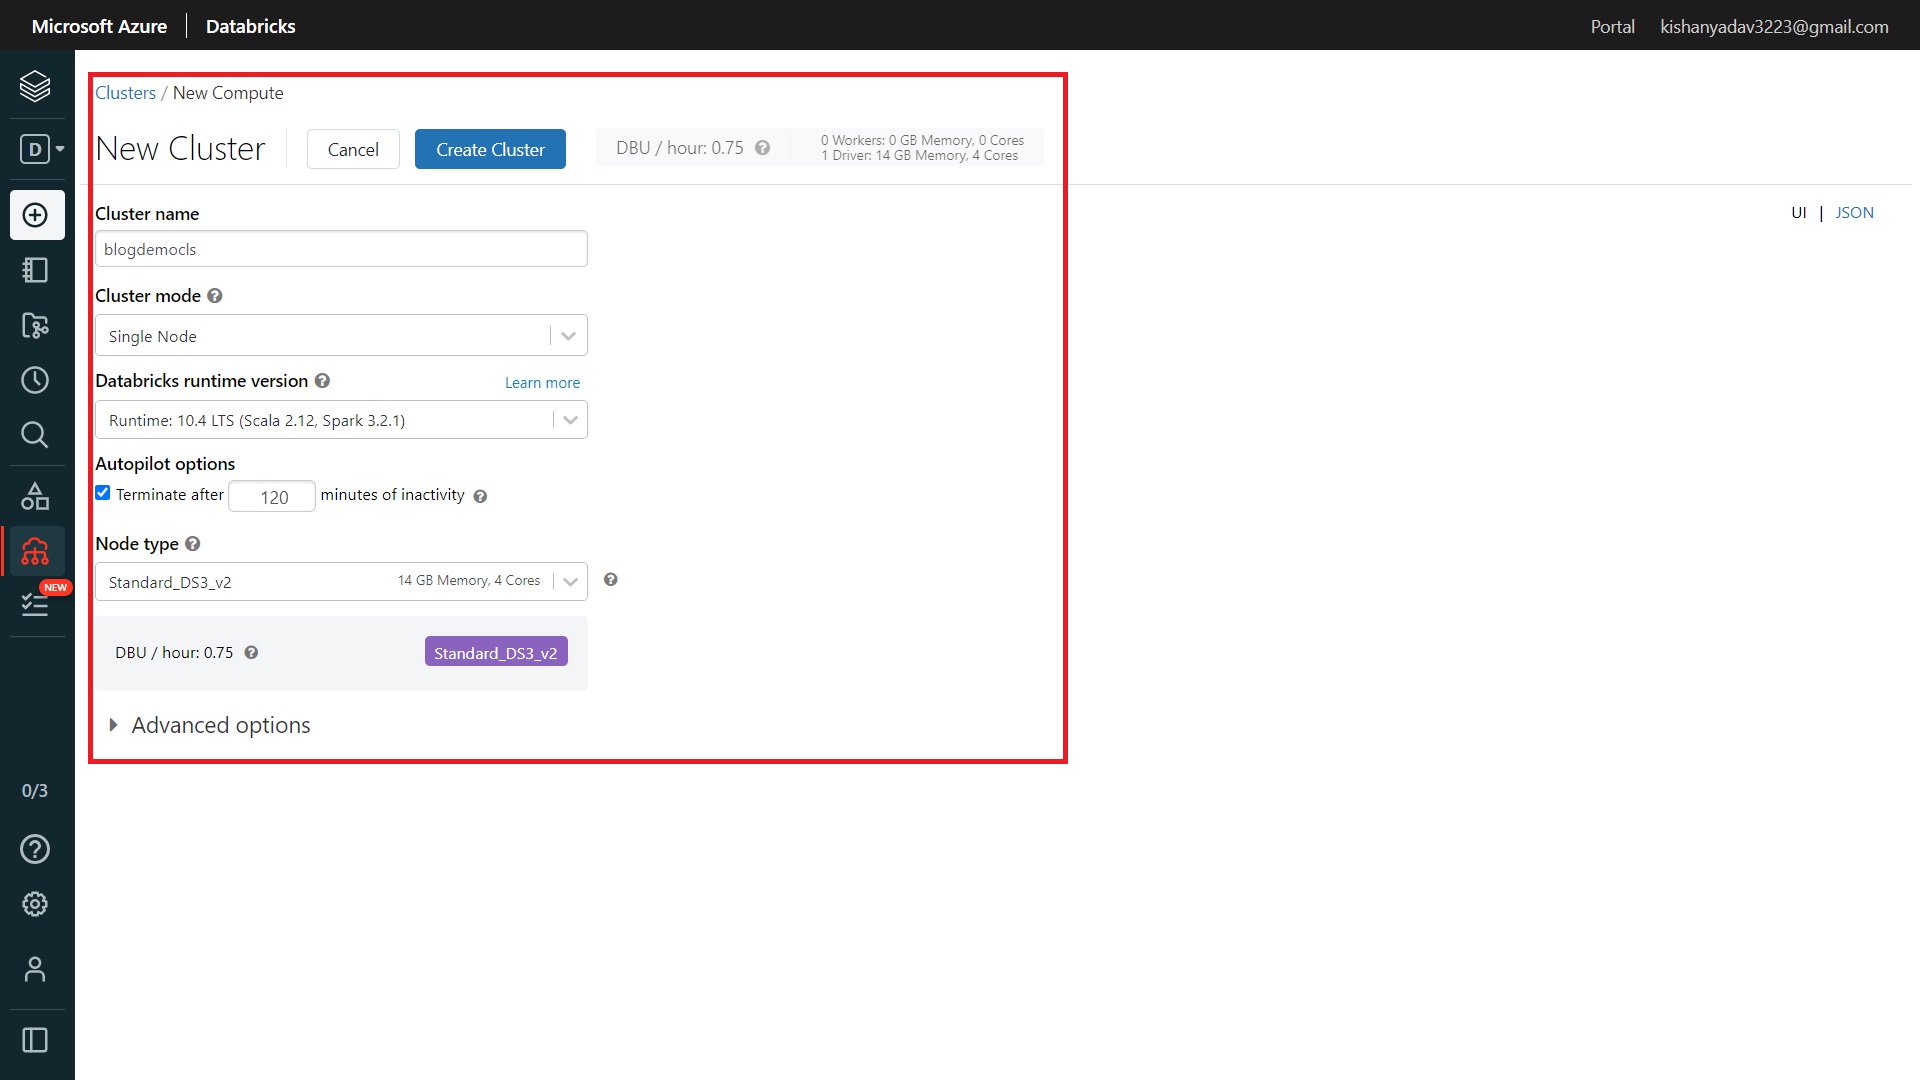
Step-3:- Now you will be moved to the new cluster creation page. Here you will have to set the following details:-
Cluster name:- Choose the name you want to give your cluster. I have given “blogdemocls”.
Cluster mode:- Here you will get three options “High Concurrency”, “Standard” and “Single node”. Currently, I am at the free tier so I will choose “Single node”. You can choose other options as per your computing requirements.
Databricks Runtime version:- In this, you will be provided with different runtime versions of Scala and Spark. In this, I will choose the latest version with LTS(Long Term Support) option. You can choose as per your requirements.
Autopilot options:- In this, you can define the inactivity time. The cluster gets stopped if it becomes idle for the defined inactivity time.
Note:- If you choose another cluster mode you will get two other options “Worker type” and “Driver type”. But we are currently at the free tier so, these two options are disabled for us.
Node type:- Here you will define the configuration of your machine that you needed to process your data. Like how much the memory and the cores you needed. You will get lots of options, whether your need is for computation, memory, or storage purpose, you can choose from these ones. In this, we will choose a General purpose, Standard D4a_v4 machine with 16 GB Memory and 4 Cores. You can find this machine in the General purpose category and then click on more options.
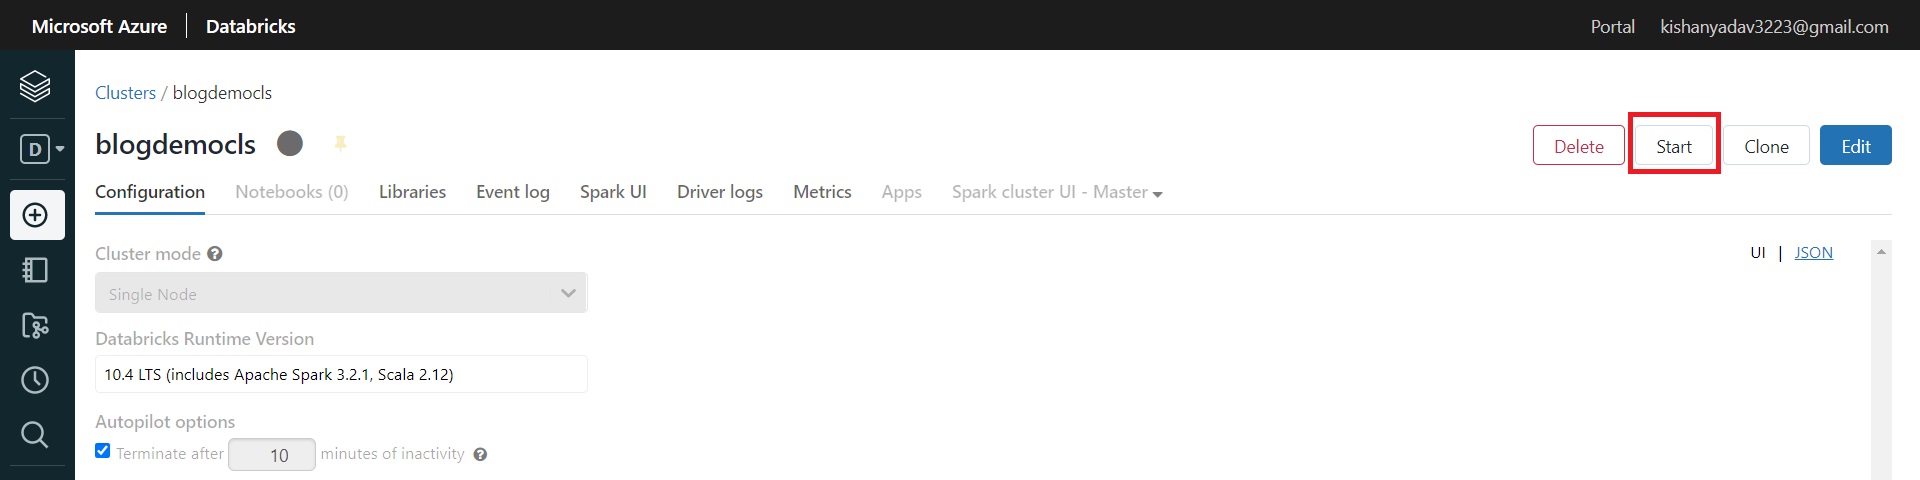
Now click on Create Cluster button and wait for its creation. Now when it’s get created now click on the start button and it will get started in 3 to 5 minutes.
Notebook Creation
Now our cluster is running and we are going to create our first databricks notebook.
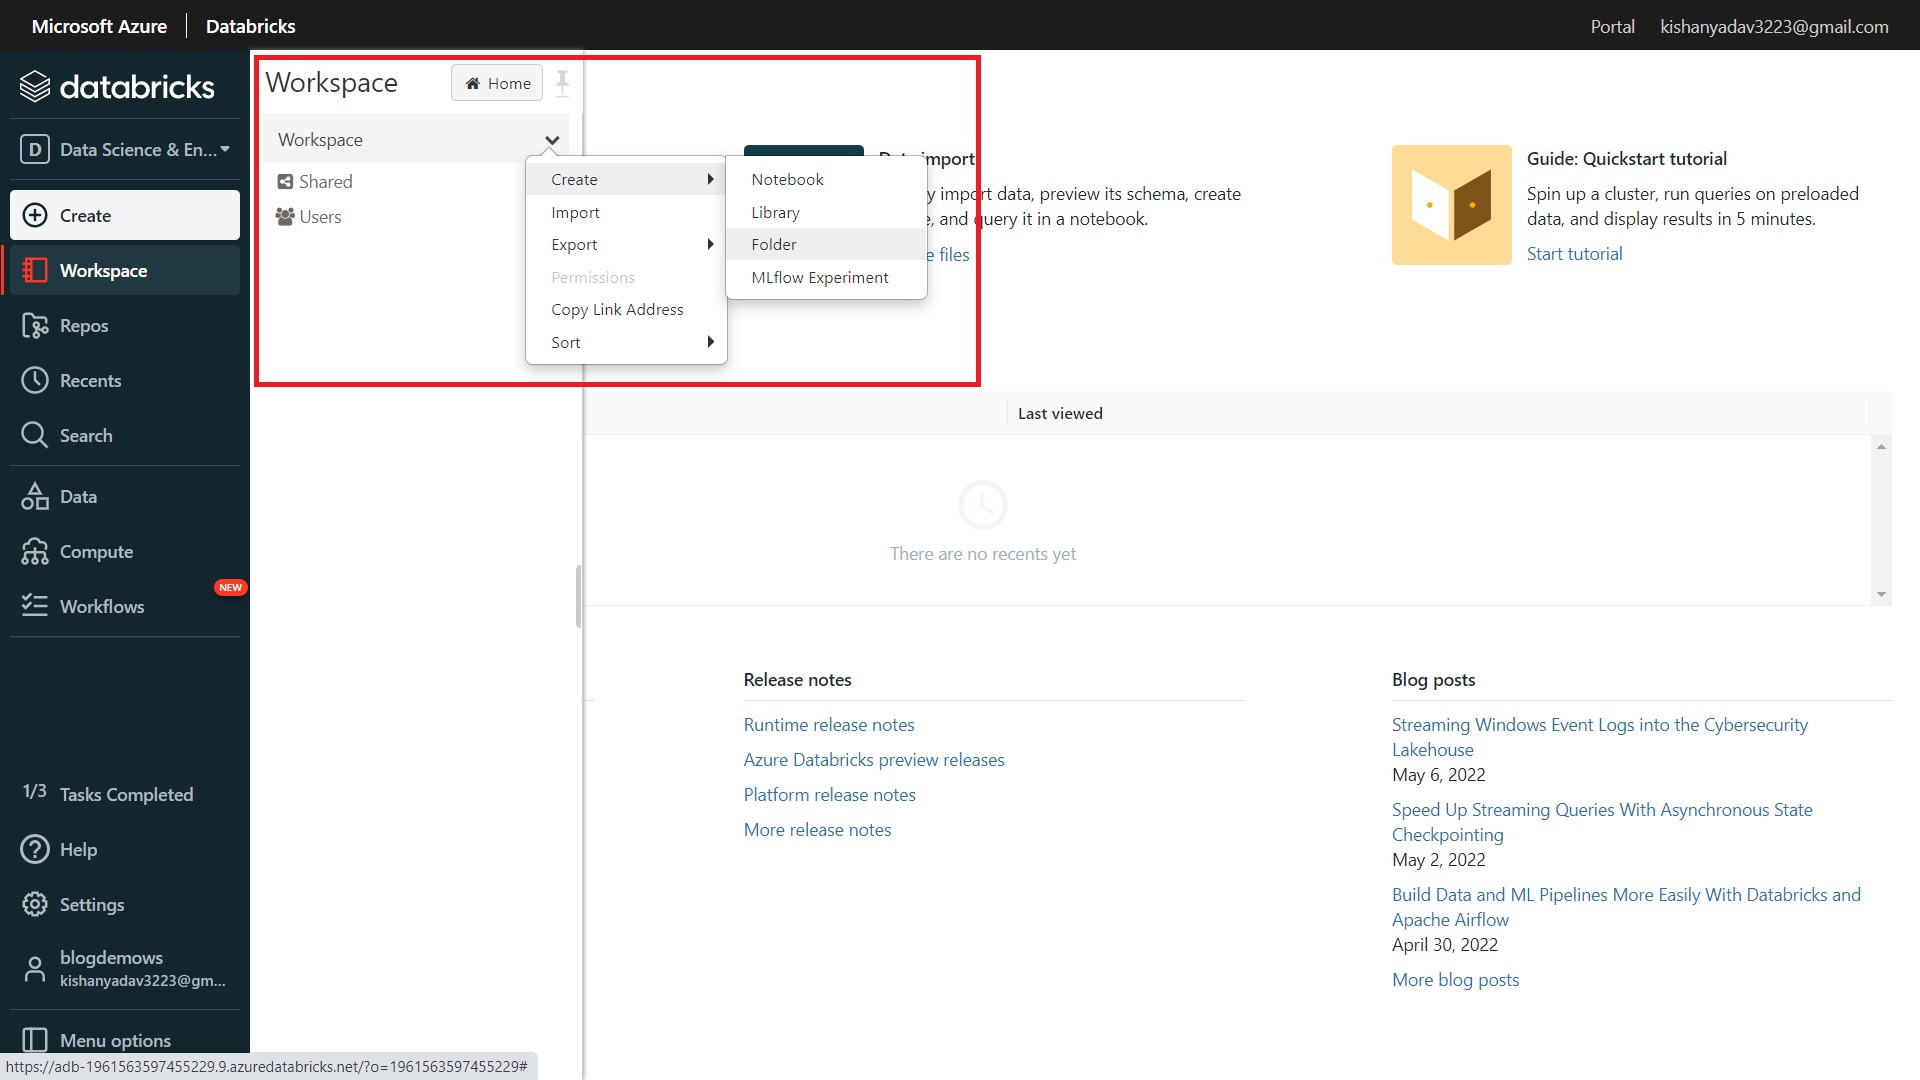
Step-1:- Go to workspace and click on it and then click on drop-down arrow on workspace and create a new folder to keep all notebooks inside it. We will name this folder “inshortsnews”.
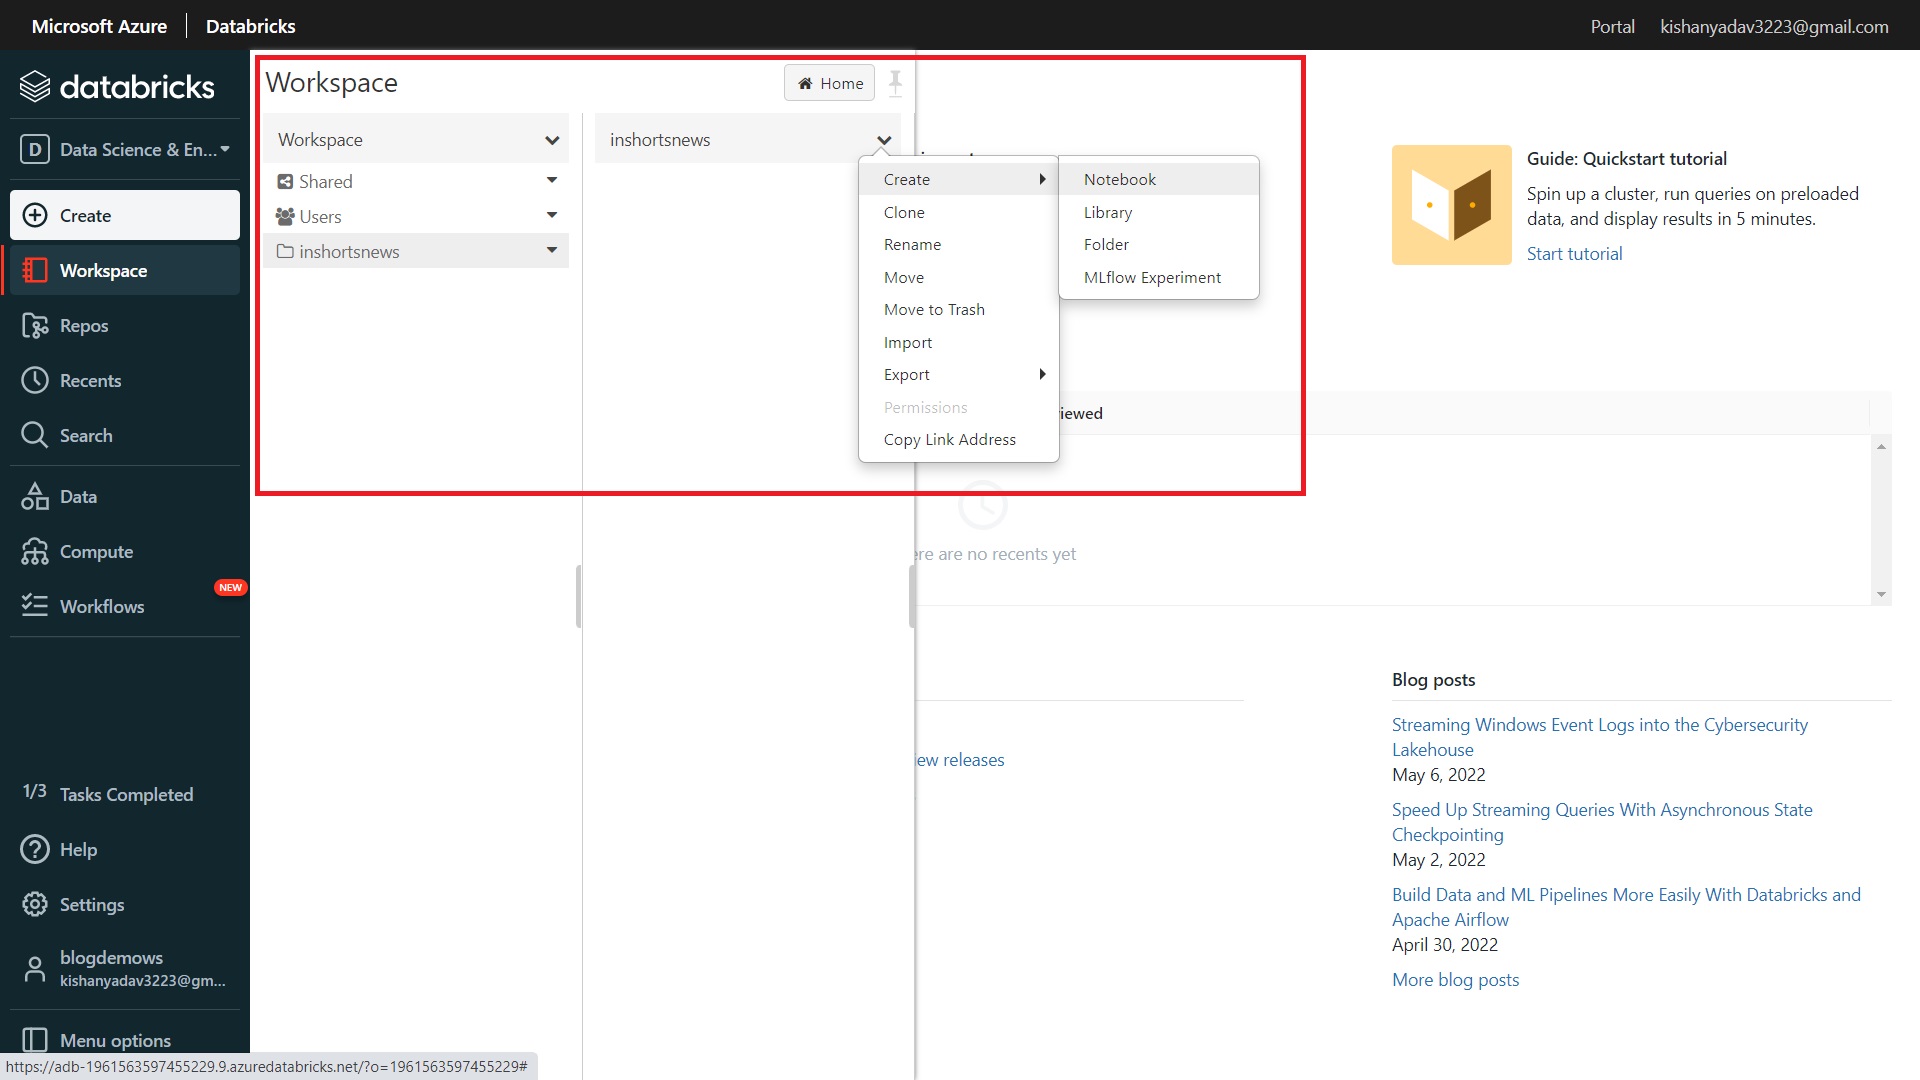
Step-2:- Now click on “inshortsnews” folder dropdown arrow and click on create and then click on the notebook.
Step-2.1:- Now provide all the details for notebook creation like name, I give “inshorts-news-data-scrapping” name to our notebook, default language, we will choose “Python”. If you want you can also choose between R, Scala, and SQL as a default language for your project.
Step-2.2:- Click on create and the notebook will get created with the provided language.
Inshorts News Scrapping
Now we are going to scrape the news data from the Inshorts news web app using python, pandas, and other libraries.
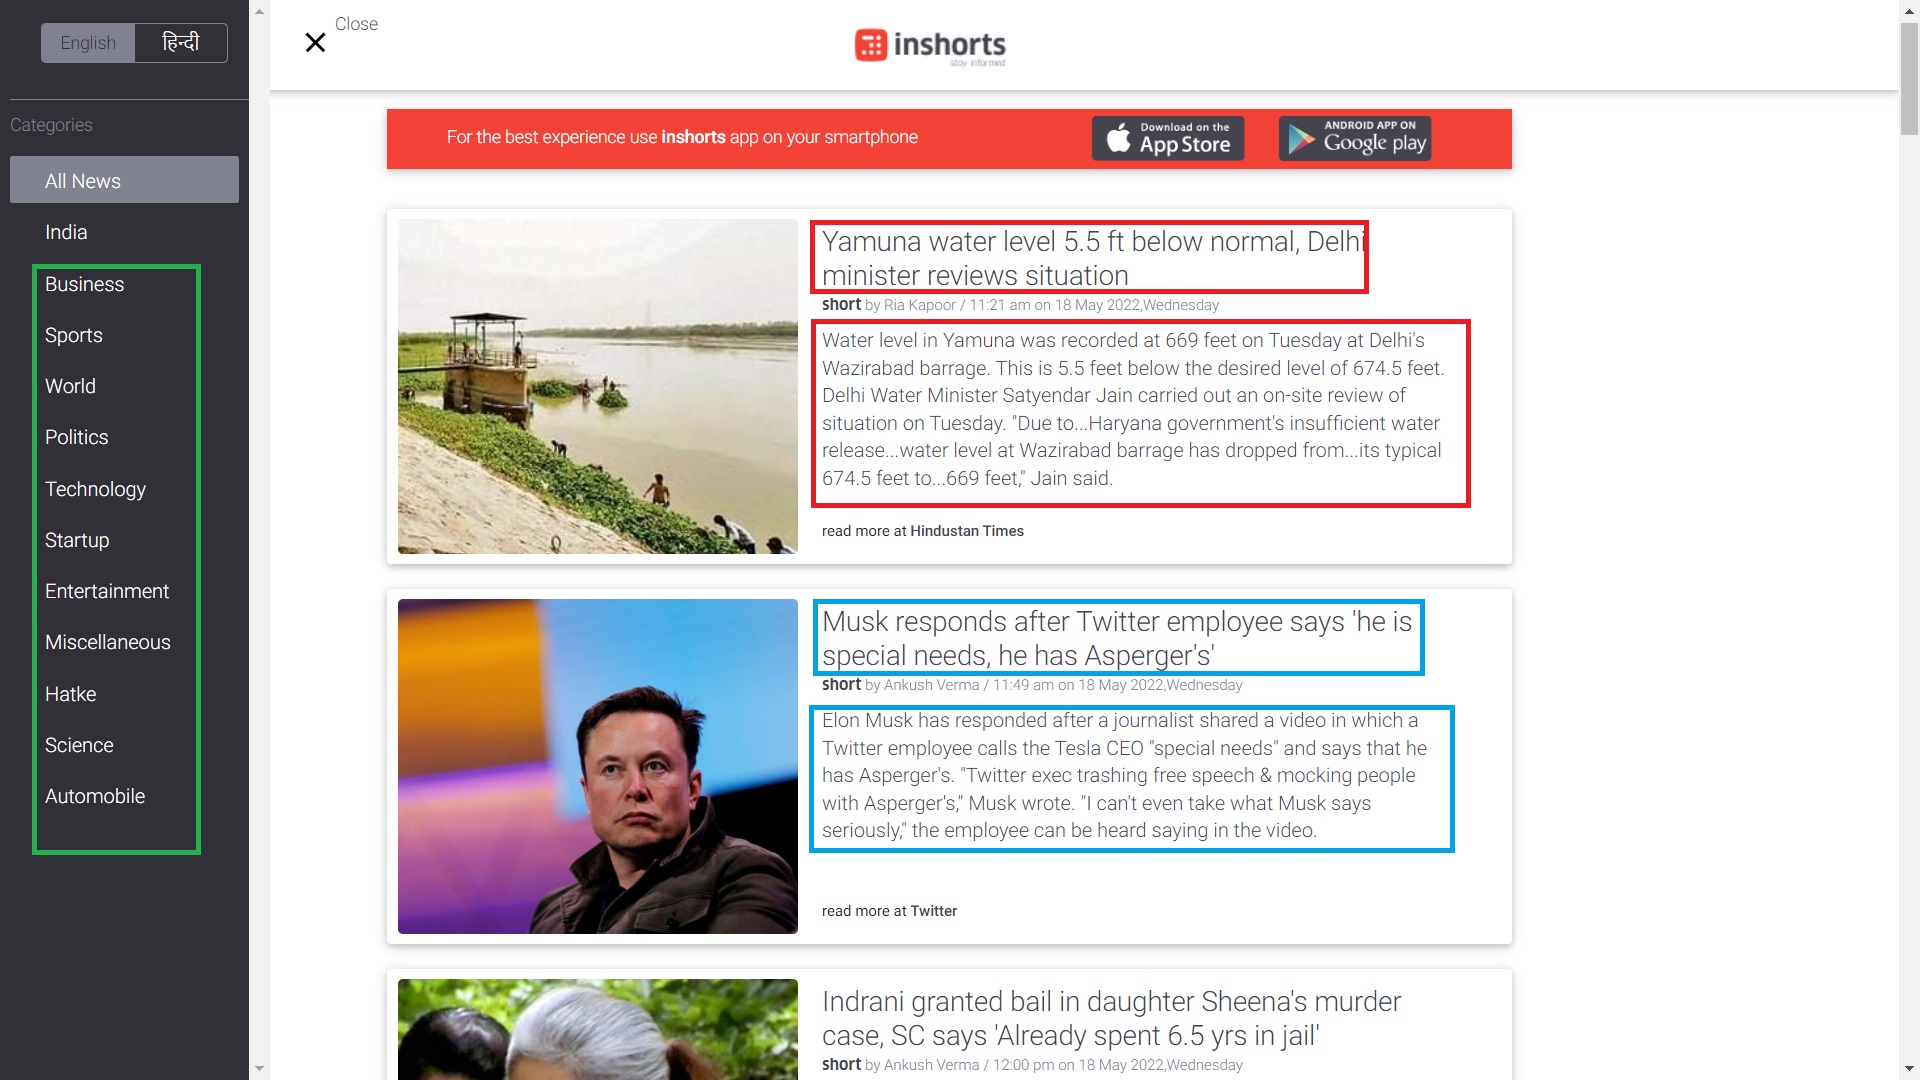
Inshorts is an aggregator app that summarizes news articles in 60 words and covers a wide range of topics, including tech, business, and other content such as videos, infographics, and blogs. In the below image we are going to scrape the data which are inside the rectangle boxes.
In this, we are going to scrape the article’s news headlines, news contents, and the category of the news articles.
News Headline:- It is one line sentence that contains an overview of the news article.
News Article:- It is a multiline sentence and it contains the whole information about the news in 60 words.
News Category:- It tells the category of the news article.
Example
news_headline:- Musk’s Boring Company shares a glimpse of the Las Vegas loop station.
news_article:- The Boring Company shared a short clip on Twitter showing one of the underground stations that the company is building as part of its Las Vegas Convention Center (LVCC) loop. In September, Founder Elon Musk said the first operational tunnel under Vegas was almost complete. “”Tunnels under cities with self-driving electric cars will feel like warp drive,”” he had added.
new_category:- Technology
The articles have been classified into many categories but we going to scrape only 7 different categories and they are as follow:- technology, sports, politics, entertainment, world, automobile and science.
Let’s Start Coding
To collect these data I used the following libraries requests, BeautifulSoup4, and pandas. So to use these libraries we have to first install them in our notebook. We only need to install BeautifulSoup lib and the rest two are already provided with our notebook.
Step-1:- To install libraries inside databricks notebooks we use the below method:-
Step-2:- Now import all the required libraries
Step-3:- Now define the endpoints for each category from where we want to scrape the data.
Step-04:- Now we will send requests for each of the “URLs” defined above and then beautify the response data. Then we used list comprehension to find all the news headlines and new content from the response data. We also split the URLs to get the news category.
Step-05:- Create the data frame from the dictionary of the data that we have scraped from the Inshorts news web app.
Step-06:– Now display the data that we have scraped.
Cheers!!! on reaching the end of the guide and learning pretty interesting kinds of stuff about Azure Databricks. From this guide, you successfully learned how to launch databricks services in azure cloud. Along with that you have also learn how to create clusters for notebook in databricks and basic of data scrapping using python and pandas.
Now in next article we are going to explore Azure Data Lake Storage Gen2 (ADLS Gen2), how to create ADLS gen2 storage services and along with that we are going to save our scraped data into this storage account by scheduling our notebook on hourly basis using the Azure Data Factory (ADF) methods. By doing this we create our own textual dataset for the NLP tasks.
Feel free to connect with me on LinkedIn and Github for more content on Data Engineering and Machine Learning!
Happy Learning!!!
The media shown in this article is not owned by Analytics Vidhya and is used at the Author’s discretion.
We use cookies on Analytics Vidhya websites to deliver our services, analyze web traffic, and improve your experience on the site. By using Analytics Vidhya, you agree to our Privacy Policy and Terms of Use.Accept
Privacy & Cookies Policy
Privacy Overview
This website uses cookies to improve your experience while you navigate through the website. Out of these, the cookies that are categorized as necessary are stored on your browser as they are essential for the working of basic functionalities of the website. We also use third-party cookies that help us analyze and understand how you use this website. These cookies will be stored in your browser only with your consent. You also have the option to opt-out of these cookies. But opting out of some of these cookies may affect your browsing experience.
Necessary cookies are absolutely essential for the website to function properly. This category only includes cookies that ensures basic functionalities and security features of the website. These cookies do not store any personal information.
Any cookies that may not be particularly necessary for the website to function and is used specifically to collect user personal data via analytics, ads, other embedded contents are termed as non-necessary cookies. It is mandatory to procure user consent prior to running these cookies on your website.
.png)
.png)


.jpg)
.png)
.png)
.png)
.png)
.png)
.png)


