This article was published as a part of the Data Science Blogathon.
Introduction
In this guide, we will discuss Apache Sqoop. We will discuss the Sqoop import and export processes with different modes and also cover Sqoop-hive integration. In this guide, I will go over Apache Sqoop in depth so that whenever you need to use external data sources, you can easily use sqoop and transfer data inside Hadoop for further processing.
What is Apache Sqoop?
Apache Sqoop is a command-line interface application for transferring data between relational databases and Hadoop. The Apache Sqoop project was retired in June 2021 and moved to the Apache Attic.
There are two main tasks performed by sqoop.
Sqoop Import: Import data from an external source (MySQL/DB2) to HDFS.
Sqoop Export: Export data from HDFS to an external destination (MySQL/DB2).
This guide will use MySQL as an external source and import data from MySQL table hdfs and vice versa for sqoop export.
Let’s look at how sqoop import and export work:
Apache Sqoop Import Architecture
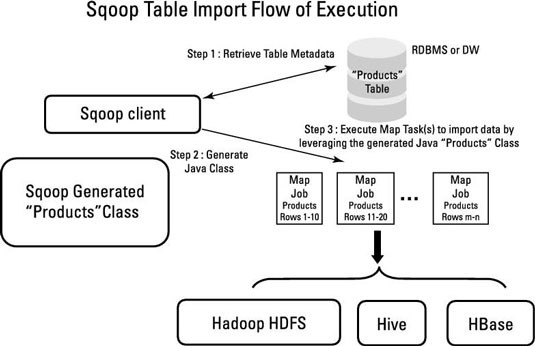
- Sqoop Import Job Reads data from MySQL (RDBMS) and Exports it at an HDFS Location.
The following task is performed before reading data from MySQL.
It generates MapReduce jobs. And the interesting thing here is that only mappers will execute since there is no aggregation, so the reducer will not execute.
Generate the Jar file by compiling the MapReduce Job Code.
Then, submit the jar file and run the import command. - In the meantime, Apache Sqoop will also perform some tasks.
It will decide how to split data among multiple mappers based on the primary key or split-by.
It divides the data among the mappers.
Then Based on sample data from an SQL query, it will take the metadata and, using this information, extract the metadata information of the columns, datatype, etc. - Write the Java code, compile it, and save it as a.jar file.
- Delete the target directory if it already exists.
- Import the data.
Apache Sqoop Export Architecture

The process of Sqoop export is more or less similar. Only the source and target will be changed. After connecting to the MySQL database to which the records need to be exported, it will execute a JDBC insert command to read data from HDFS and load it into the MySQL table.
Let’s set up a source (MySQL) for our sqoop import and a destination for sqoop export.
How to Connect From Mysql?
Let’s first connect to RDBMS (MySQL) and see what tables and databases are available, then use the sqoop import command to import data from MySQL to HDFS.
For all of the exercises, I’m using Cloudxlab.
On the terminal, enter your username and password.
Type the following command.
mysql -h cxln2.c.thelab-240901.internal -u sqoopuser -p
It will ask for a password. Enter the MySQL password (you can get it from the Cloudxlab home page).
The above command will connect Mysql.
Show Databases;
This command will show all the available databases in MySQL.
Use database_name;
This will redirect you to the mentioned database.
show tables;
This command will display all the tables that are available in this database.
So we can now see all of the MySQL tables and databases.
Let us now attempt to connect to this MySQL using Sqoop. The command below will connect Sqoop to MySQL, and we will be able to see all of MySQL’s databases and tables.
List all the databases of MySQL using the sqoop command.
sqoop list-databases
--connect "jdbc:mysql://cxln2.c.thelab-240901.internal:3306"
--username sqoopuser
-P
“Here, instead of-P, we can use password and can directly give our password, but giving password in command is not a secure way, so we are using-P, so it will ask to enter the password at run time.”
List all the tables of a MySQL database using the sqoop command.
sqoop list-tables
--connect "jdbc:mysql://cxln2.c.thelab-240901.internal:3306/retail_db"
--username sqoopuser
-P
The above command will display all the tables from the retail_db database.
Let’s check the data which we are going to import via Sqoop.
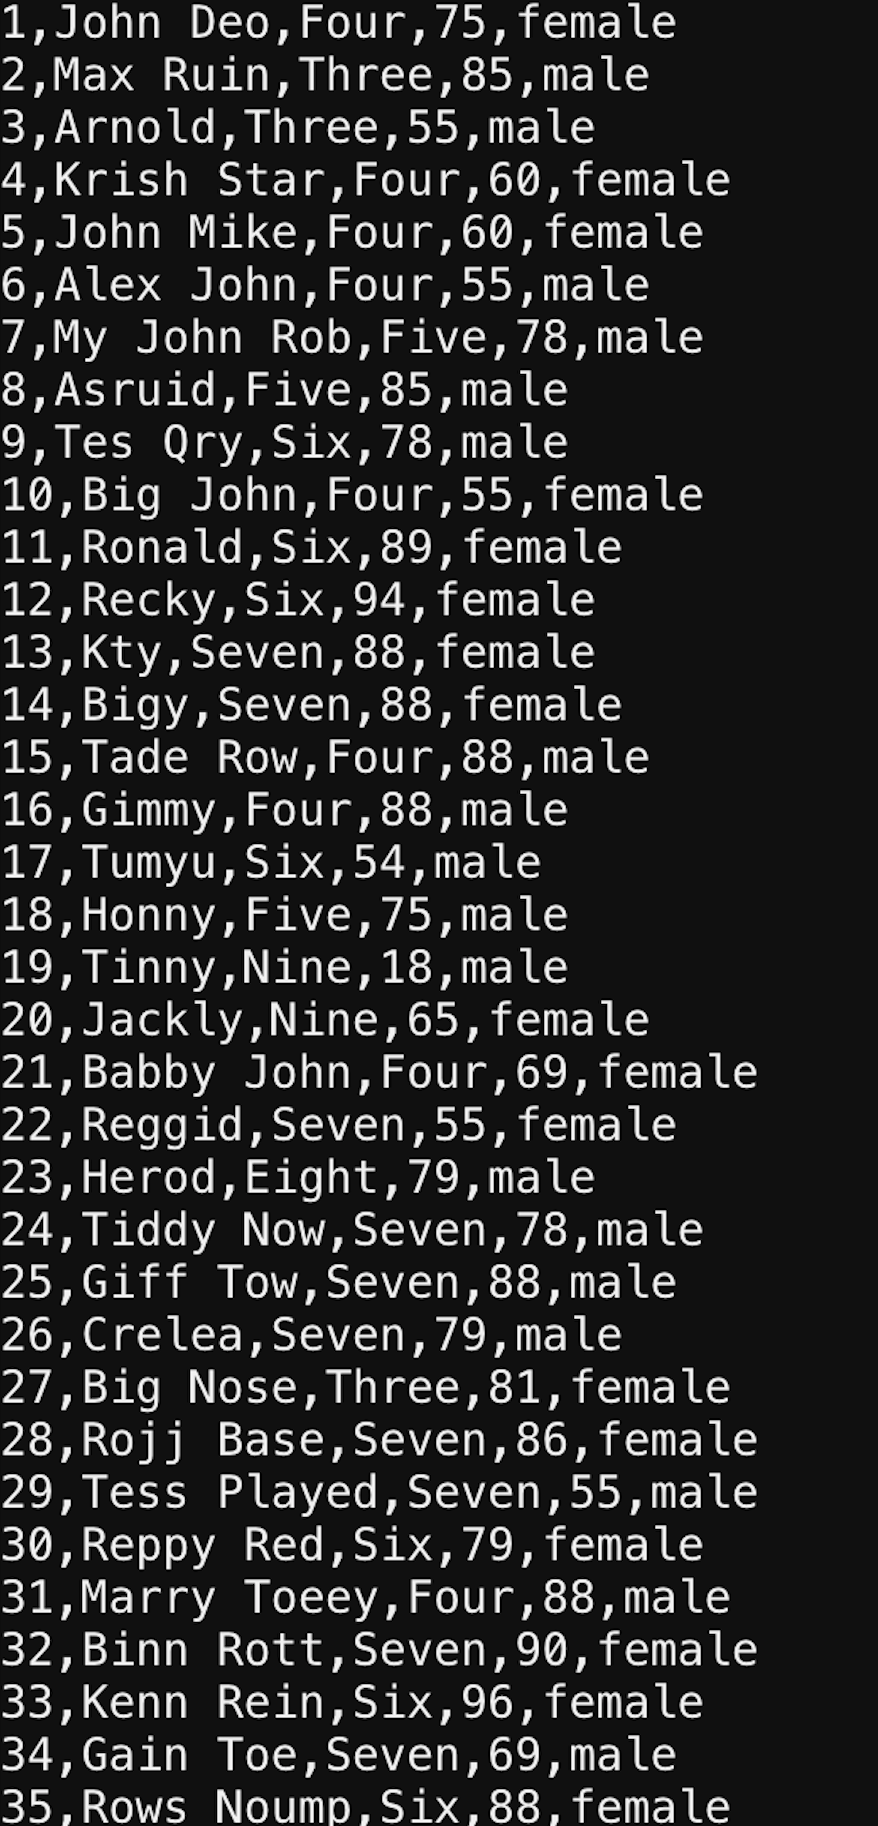
Show a sample of data from a MySQL table.
sqoop eval
--connect "jdbc:mysql://cxln2.c.thelab-240901.internal:3306/retail_db"
--username sqoopuser
-P
--query  "select * from student limit 10"
Okay, so now we are all set to import the data. We have an understanding of MySQL databases and tables, and we also have an understanding of the data we will ingest into HDFS.
Import Data by Apache Sqoop
The import tool imports tables from RDBMS to HDFS. Each record in a MySQL table is considered a record in HDFS. While importing, we can import all the tables or some tables from RDBMS. This data will be ingested as files at the HDFS location.
sqoop import
--connect "jdbc:mysql://cxln2.c.thelab-240901.internal:3306/retail_db"
--username sqoopuser
-P
--table student
--m 1
Here, m 1 means 1 mapper, which will work. We can define the number of mappers using the –m option. By default, four mappers will work in parallel. These 4 mappers will divide the data based on the primary key. If we don’t have PK, we can also use split-by, so instead of the primary key column, sqoop can divide the work among mappers based on the split-by column value.
In the above command, we have given only one mapper. We are not specifying where we want to import this data, so sqoop will, by default, import this data at the home location of HDFS. It will create a folder with table_name at the home location of HDFS and import this data.
We can check data using the below command.
hadoop fs -ls /user/rahulpatidaroth5186/student
hadoop fs -cat /user/rahulpatidaroth5186/student/part-m-00000
Sqoop Import with Extra Configurations.
-No of Mappers-> 5
-split-by -> It will divide 35 ids among 5 mappers, i.e., 7 ids in one mapper.
target-dir (Will now import data to the specified location).
sqoop import
--connect "jdbc:mysql://cxln2.c.thelab-240901.internal:3306/retail_db"
--username sqoopuser
-P
--table student
--m 5
--split-by id
--target-dir /user/rahulpatidaroth5186/SqoopImportTest_2
Let’s check the data at the HDFS location:
We can see the data has been divided among 5 mappers, and 7 records are there for each mapper.
We can use either the target-dir option or warehouse-dir option in the sqoop command to import the data. The only difference between these two is that whenever we define target-dir it will directly import data in the mentioned directory. Still, in the case of the warehouse, it will create a subfolder named with the table name and import the data.
Importing all the Tables Using Sqoop Import
Sqoop can also import tables from a particular database.
The below command will import all the tables in the /user/rahulpatidaroth5186/all_tables directory and will create subdirectories with table names in all_tables.
sqoop import-all-tables
--connect "jdbc:mysql://cxln2.c.thelab-240901.internal:3306/retail_db"
--username sqoopuser
-P
--as-sequencefile
--warehouse-dir /user/rahulpatidaroth5186/all_tables
Assume we require these logs to debug or to share with other teams. In that case, sqoop offers the option of storing logs in files rather than terminals.
sqoop import
--connect "jdbc:mysql://cxln2.c.thelab-240901.internal:3306/retail_db"
--username sqoopuser
-P
--table student
--m 1
--warehouse-dir /user/rahulpatidaroth5186/SqoopImportTest_log 1>sucess.txt 2>failure.txt
When we run the above command, it will create two files: failure.txt and success.txt. Instead of displaying all logs on the terminal, it will redirect them to failure.txt and all warnings to success.txt.
Filters In Apache Sqoop Import
Sqoop also provides the facility to import data based on some filter conditions. We can define the filter using the where clause and ingest only the required data.
sqoop import
--username sqoopuser
-P
--table student
--m 1
--where "class ='Three'"
--warehouse-dir /user/rahulpatidaroth5186/FilterResult
--connect "jdbc:mysql://cxln2.c.thelab-240901.internal:3306/retail_db"
Hadoop Command to Check the Data:
hadoop fs -ls /user/rahulpatidaroth5186/FilterResult
hadoop fs -cat /user/rahulpatidaroth5186/FilterResult/student/part-m-00000
Note: Sqoop also creates an empty file with the name _SUCCESS. Ignore this _SUCCESS file, as it will indicate the sqoop command has been completed successfully.
Apache Sqoop Import Compression Technique
While importing the sqoop data instead of importing data in a text file, we can also use various compression techniques and can save space.
sqoop import
--connect "jdbc:mysql://cxln2.c.thelab-240901.internal:3306/retail_db"
--username sqoopuser
-P
--table student
--m 1
--compress
--warehouse-dir /user/rahulpatidaroth5186/compressResult
hadoop fs -ls /user/rahulpatidaroth5186/compressResult/student/
/user/rahulpatidaroth5186/compressResult/student/part-00000.gz
By Default, Sqoop Import data with gz compression. We can define the compression technique using –compression-codec
sqoop import
--connect "jdbc:mysql://cxln2.c.thelab-240901.internal:3306/retail_db"
--username sqoopuser
-P
--table student
--m 1
--compression-codec BZip2Codec
--warehouse-dir /user/rahulpatidaroth5186/compressResult
Hadoop fs -ls /user/rahulpatidaroth5186/compressResult/student/
/user/rahulpatidaroth5186/compressResult/student/part-00000.bz2
Define ColumnNames While Importing Data Using Sqoop.
Let’s say I want to import only the Id, Name, and Class from a MySQL table.
sqoop import
--connect "jdbc:mysql://cxln2.c.thelab-240901.internal:3306/retail_db"
--username sqoopuser
-P
--table student
--columns id,name,class
--where "class in('Three')"
--m 1
--warehouse-dir /user/rahulpatidaroth5186/ColumnResults
Okay, now let’s see the data at HDFS Location.
hadoop fs -ls /user/rahulpatidaroth5186/ColumnResults
hadoop fs -cat /user/rahulpatidaroth5186/ColumnResults/student/part-m-00000
So as we discussed, if we define the number of mappers as more than one, then it divides the data based on the primary key or split by column, but let’s assume we don’t have a primary key and are not specifying split-by-column. In that case, if we specify the number of mappers as more than 1, it will throw an error as the primary key is not found. If you want to handle these scenarios, you should use the –auto-reset-to-one-mapper property, which means that if PK is available, it will take no mappers as specified by the –num-mappers property, and if PK is not available, it will –auto-reset-to-one-mapper.
sqoop import
--connect "jdbc:mysql://cxln2.c.thelab-240901.internal:3306/retail_db"
--username sqoopuser
-P
--table student
--m 1
--warehouse-dir /user/rahulpatidaroth5186/autoreset
--autoreset-to-one-mapper
--num-mappers 8
Apache Sqoop Import Delimiter
Let’s say we have data in a table with a column like “address,” and the value for the address is “Bhopal, MP, India.” In that case, when we import this data, it will import this data into a file. It will use the delimiter as ‘,’ so whenever we create a hive table from this file, it will consider Bhopal, MP, India to have 3 different columns of values instead of a single column(address).
We need to define a delimiter while importing the data to handle these kinds of cases. So Hive considers it as 1 column’s value.
sqoop import
--connect "jdbc:mysql://cxln2.c.thelab-240901.internal:3306/retail_db"
--username sqoopuser
-P
--table student
--fields-terminated-by '|'
--lines-terminated-by ';'
--warehouse-dir /user/rahulpatidaroth5186/SqoopImportDelimiter
--autoreset-to-one-mapper
--num-mappers 1
Let’s Check the Data in Hadoop
hadoop fs -ls /user/rahulpatidaroth5186/SqoopImportDelimiter/student
hadoop fs -cat /user/rahulpatidaroth5186/SqoopImportDelimiter/student/part-m-00000
Hive-Sqoop Integration
create a hive table from sqoop
sqoop create-hive-table
--username sqoopuser
-P
--table student
--hive-table student_sqoop
--fields-terminated-by ','
--connect "jdbc:mysql://cxln2.c.thelab-240901.internal:3306/retail_db"
Note: The above command will only create a table in the hive but will not load any data into the hive table.
Kay, so now we have created a Hive table from MySQL data. Let’s check the data in Hive.
Hive Connect:
hive
Set database:
use default;
By default, Hive will not print the column name. So we need to enable the print header property.
set hive.cli.print.header=true;
Select data from the table.
select * from student_sqoop;
Note: You can also use the below option while creating a hive table as and when required.
-escaped-by
--enclosed-by
--optionally-enclosed-by
--hive-drop-import-delims
--hive-partition-key
--hive-partition-value
Apache Sqoop Import With Append Mode
By default, Sqoop will import data into a new directory. If the directory already exists, then sqoop will not import any data and will show a directory already exists error if your use case has a requirement. You need to append data in the same directory and then use append mode while importing the data.
sqoop import
--connect "jdbc:mysql://cxln2.c.thelab-240901.internal:3306/retail_db"
--username sqoopuser
-P
--table student
--m 1
--compression-codec BZip2Codec
--warehouse-dir /user/rahulpatidaroth5186/compressResult
--append
Let’s Verify Data in Hadoop.
hadoop fs -ls /user/rahulpatidaroth5186/compressResult/student
In the above screenshot, we can see a new file is available at the same location. data has been appended at the same location.
We can also overwrite the data by using delete-target-dir. This option will delete the existing directory if it exists and will load new data.
sqoop import
--connect "jdbc:mysql://cxln2.c.thelab-240901.internal:3306/retail_db"
--username sqoopuser
-P
--table student
--m 1
--compression-codec BZip2Codec
--warehouse-dir /user/rahulpatidaroth5186/compressResult
--delete-target-dir
Let’s validate at the HDFS location.
hadoop fs -ls /user/rahulpatidaroth5186/compressResult/student
From the above screenshot, it’s clear that we have sqoop loaded new data and removed old directories.
Apache Sqoop Eval
Sqoop Eval Tools are used to execute SQL queries using sqoop quickly. We can use eval for insert as well as for selecting the data. Please see the below example.
sqoop eval
--connect "jdbc:mysql://cxln2.c.thelab-240901.internal:3306/retail_db"
--username sqoopuser
-P
-e "select * from student limit 5"
Okay, so that’s all about Sqoop Import when we want a full data load.
We have the below options.
1. We can ingest the data at different locations.
2. We can delete the existing directory and re-import the data.
Apache Sqoop Incremental Import(delta load)
However, you will not always ingest complete data in the Real-Time Use case.
Let’s say you have one MySQL table in which we have data for daily transactions. Let’s consider every day, we have 1 lakh transactions, so by the end of the month, we will have 30L records. If we execute a sqoop job every day, then on the 30th day, it will ingest all 30L transactions. Although we are interested only in 30th-day data, i.e., 1L, why should we ingest unnecessary 29L records? To handle these kinds of scenarios, Sqoop provides the option of incremental load, where we can define multiple options based on requirements and can only ingest required data.
Important Scoop Incremental Import Arguments/Properties:
–check-column (col) :
This is the column on which we need to apply the check conditions on whether we need to import or not.
–incremental (mode) :
This property applies when we need to define the strategy of sqoop import, i.e., whether we want only new records or new records as well as updated records. Legal values for mode include append and last modified.
–last-value (value) :
This property will check the last value of the check column; if the found value is greater than the last value in the check column, it will import the data.
1. Append Mode (Insert Only):
Append Mode is applicable where we know only new data will be inserted into MySQL and there is no update in existing data. So, using Append, we can only load the new data. In Append mode, we can use check-column (id) and based on that, every time we can ingest the data where the id is greater than the last value.
The below command will check the id column and then check the last-value as the last-value is 10. Then it will insert the data.
sqoop import
--connect "jdbc:mysql://cxln2.c.thelab-240901.internal:3306/retail_db"
--username sqoopuser
-P
--table student
--m 1
Let’s validate the data.
hadoop fs -ls /user/rahulpatidaroth5186/IncremantalAppend/student/
hadoop fs -cat /user/rahulpatidaroth5186/IncremantalAppend/student/part-m-00000
2. Using lastmodified (insert+Update) value:
In this case, if we observe any update in the existing value, then by using lastmodified we can fetch the rows and ingest them in hdfs.
sqoop import
--connect "jdbc:mysql://cxln2.c.thelab-240901.internal:3306/retail_db"
--username sqoopuser
-P
--table student
--m 1
--warehouse-dir /user/rahulpatidaroth5186/IncremantalAppend
--incremental lastmodified
--check-column enroll_date
--last-value '2022-01-01'
--append
The above command will ingest the data which has been updated or inserted after 2022-01-01.
Let’s consider one scenario where we have one id as 111 and the enroll_date is 2000-01-01. So this entry is already available in my hdfs. Now on 2022-01-02. I have updated some details for id 111, so the above sqoop command will ingest this id once again since we are using append, so both the entries will be available in hdfs, and will create a data duplicate issue. Instead of appending these scenarios, we need to update this key with the latest date, so there will be no duplicate in hdfs.
sqoop import
--connect "jdbc:mysql://cxln2.c.thelab-240901.internal:3306/retail_db"
--username sqoopuser
-P
--table student
--m 1
--warehouse-dir /user/rahulpatidaroth5186/IncremantalAppend
--incremental lastmodified
--check-column enroll_date
--last-value '2022-01-01'
--merge-key id
The above command will update the old entry with the latest changes and overwrite the values for id 111.
So this was all about sqoop import, both for the historical load(full load) and delta load(incremental load).
Now let’s discuss Sqoop Export.
Apache Sqoop Export
The sqoop export command is used to insert data from HDFS to MySQL (RDBMS). The table must be available in the RDBMS.
Create table Statement
CREATE TABLE retail_db.STUDENT_SQOOP_EXPORT
(ID INT NOT NULL PRIMARY KEY,
NAME VARCHAR(20), CLASS VARCHAR(20),MARK INT,
GENDER VARCHAR(10));
Sqoop Export Command
sqoop export
--connect "jdbc:mysql://cxln2.c.thelab-240901.internal:3306/retail_db"
--username sqoopuser
--P
--table STUDENT_SQOOP_EXPORT --export-dir /user/rahulpatidaroth5186/IncremantalAppend/student/part-m-00000
Create mysql Table
CREATE TABLE retail_db.STUDENT_SQOOP_EXPORT (
ID INT NOT NULL PRIMARY KEY, NAME VARCHAR(20), CLASS VARCHAR(20),MARK INT,
GENDER VARCHAR(10));
Execute Sqoop Export
Once Sqoop Export is completed, try to select data from the MySQL table again.
select * from retail_db.STUDENT_SQOOP_EXPORT;
Apache Sqoop Job
The Sqoop job creates and saves the import and export commands. We can create and save Sqoop jobs the same as our normal Java or any other programming job and reuse/execute them as and when required.
Important Sqoop Job Configurations
--create job-id>: create a new saved job with the job-id (name) specified.
--delete "job-id": Delete a saved job of given job-id.
--list: list all the saved jobs.
--exec : Execute a saved job.
--show job-id>: Displays the parameters for a previously saved job.
Let’s create a sqoop import job with the name sqoop_import_job_mysql, which will connect to MySQL and import data from MySQL, and ingest it at the HDFS location.
Create Sqoop Job:
sqoop job
--create
sqoop_import_job_mysql
-- import
--connect "jdbc:mysql://cxln2.c.thelab-240901.internal:3306/retail_db"
--username sqoopuser
-P
--table STUDENT_SQOOP_EXPORT
--m 1
--warehouse-dir /user/rahulpatidaroth5186/STUDENT_SQOOP_EXPORT
Display List Of Jobs:
The below command will display all the jobs that we have created.
sqoop job --list
Execute Sqoop Job:
sqoop job --exec
sqoop job --exec sqoop_import_job_mysql
Delete a Sqoop Job:
sqoop job --delete
sqoop job --delete sqoop_import_job
Sqoop Password File:
We can also create a password file and store the password in the file. We can also pass the password file location in the sqoop command, so instead of entering the password in the terminal, sqoop will fetch the password from the file and execute the job.
echo -n "password" pass_file
sqoop job
--create
sqoop_import_job_mysql
-- import
--connect "jdbc:mysql://cxln2.c.thelab-240901.internal:3306/retail_db"
--username sqoopuser
-password-file file:///home/rahulpatidaroth5186/pass_file
--table STUDENT_SQOOP_EXPORT
--m 1
--warehouse-dir /user/rahulpatidaroth5186/STUDENT_SQOOP_EXPORT1
Let’s discuss a few more important concepts:
Insert query
The retail db database’s student table will receive a new row when the following command is executed.sqoop eval
--connect "jdbc:mysql://cxln2.c.thelab-240901.internal:3306/retail_db"
--username sqoopuser  -P -e "INSERT INTO student VALUES(1000,'RAHULP','BTECH',90,'MALE')"
Check the data in Mysql.
select * from student where id='1000';
Free-form Query Imports
Sqoop has the ability to import the output of any SQL query. You can specify a SQL statement with the —query parameter instead of the —table, —columns, and —where arguments.
sqoop import
--connect "jdbc:mysql://cxln2.c.thelab-240901.internal:3306/retail_db"
--username sqoopuser -P
--query "SELECT * FROM retail_db.student WHERE student.id='35' AND $CONDITIONS"
--m 1
--target-dir /user/rahulpatidaroth5186/queryresult
Check the data in the Target Directory:
hadoop fs -ls /user/rahulpatidaroth5186/queryresult/
hadoop fs -cat /user/rahulpatidaroth5186/queryresult/part-m-00000
sqoop help
The Sqoop help tool will display all the tools which are available in Sqoop.
sqoop version
The sqoop version will display the version of sqoop that we are using.
Execute a Apache Sqoop Script From a File
Additionally, Sqoop offers the ability to run a command from a file. The sqoop command can be written in a single txt file, and whenever it is needed, it can simply be called with the —options-file argument.
1. Create an import.txt file locally and add the following content.
sqoop import
--connect "jdbc:mysql://cxln2.c.thelab-240901.internal:3306/retail_db"
--username sqoopuser
-P
--table student
--m 1
--warehouse-dir /user/rahulpatidaroth5186/ReadCommandfromfile
2. Now execute the sqoop command by calling this import.txt file.
Sqoop --options-file /home/rahulpatidaroth5186/import.txt
Conclusion
Apache Sqoop is data ingestion and migration technology for exporting and importing data from external sources. In this article, we covered all of the essential Apache Sqoop concepts. The following are the article’s key takeaways:
-
We talked about the export and import commands for Sqoop.
- Sqoop Architecture With Import and Export Flow was covered.
- We discovered the many Sqoop Import Command modes.
- Hive-Sqoop Integration was covered.
- In Sqoop, we talked about building reusable jobs.
- On the sqoop task, we ran various processes.
- We learned about the password management procedure in Sqoop.
- We talked about Sqoop Eval.
- We discovered various Sqoop data filtering techniques.
- We spoke about several sqoop delimiters.
- We studied the ideas of free-form query import and insert queries.
That’s all there is to say about Apache Sqoop to get you going on your data migration and ingestion adventure. I hope the guide was helpful. You can click the clap to let people know you liked reading this instruction.
The media shown in this article is not owned by Analytics Vidhya and is used at the Author’s discretion.
Rahul Patidar
10 Oct, 2022


