Introduction
“Let’s containerize your code to ship worldwide!” If you read the above quote, you must think, what does this all mean? Well, my friend, this is what Docker is. Let me explain it with an example.
Say Harish and Lisa are two people working on the same project but on two different systems(say windows and mac). Often, they have to share the same code for fixes. But, due to dependency mismatch, they need to use Virtual Machines/VMs. VMs are slow and resource intensive, which leads to heavy debugging experiences. So what’s the solution for them?
The answer is that they can pack/containerize their code with all the dependencies and share them. Once the file is received, they need to build it from the source. Since everything runs at the top of the application layer, cross-platforming can be established.
The tool used to perform the above operation is Docker, a must-know for any developer. This article will teach you all the essentials needed to use Docker. Here is what to expect:
Learning Objectives
1. You will learn about the basics of docker, how it works, and its essential components.
2. Installing it on multiple operating systems.
3. Learn all Docker CLI commands to get started as a beginner.
3. Apply the knowledge learned to run your 1st docker image.
3. Replicate a real case scenario to understand how to use it in real life as a developer.
4. Tips and tricks to make your docker usage seamless and error-free.
This article was published as a part of the Data Science Blogathon.
Table Of Contents
- What do you mean by Docker?
- How to Install Docker to Your PC?
2.1 Windows
2.2 Mac
2.3 Linux - Understanding the Basics of Using Docker
3.1 Pre-requires
3.2 Pulling Images
3.3 Running Containers
3.4 Starting & Stopping Containers - Building A Custom Image (Intermediate)
4.1 Scenario To Use
4.2 Project Structure
4.3 Building Web App (entry-point & optional)
4.4 Writing Docker File
4.5 Building Custom Docker Image
4.6 Running Custom Docker Container
4.7 Verification - Conclusion
- Extra Resources
What do you Mean by Docker?
Docker is an open-source platform that helps build, run, and share applications. It is lightweight, fast, and efficient with local development features, which gives it an edge over competitors.
It makes development more manageable, predictable, and efficient by eliminating repetitive development tasks like installing dependencies, exposing ports, setting environment variables, and much more.
At its core, Docker consists of 3 components:
- Docker file – Written instructions to create a blueprint / Docker Image.
- Image – Immutable snapshot of the environment for running Docker Containers.
- Containers – Running process
Let’s see how it works.
You start by writing a docker file that contains coded instructions to rebuild the environment. These are called docker images.
Now, these images can be uploaded/ pushed to the public/private registries, and image details can be shared.
Finally, anyone can pull those images to start instances, also known as containers. The interesting fact is that one can run multiple containers across multiple machines.
Here is an image to understand the process better:
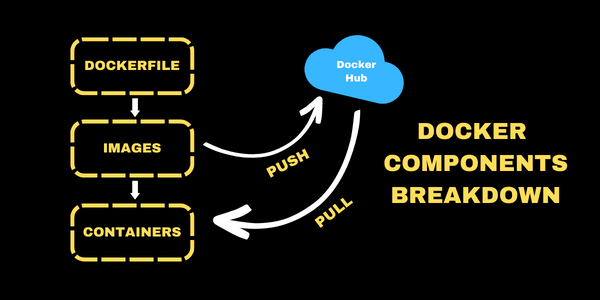
Breakdown Of Docker Components
Apart from this, Docker has two more components, Docker CLI and Docker desktop. Think of it as a way to interact with containers more granularly.
Docker CLI is a command line tool for developers to build, run, and stop images using docker daemon(Docker’s native request and API handler for ideas, networks, containers/processes, and volumes).
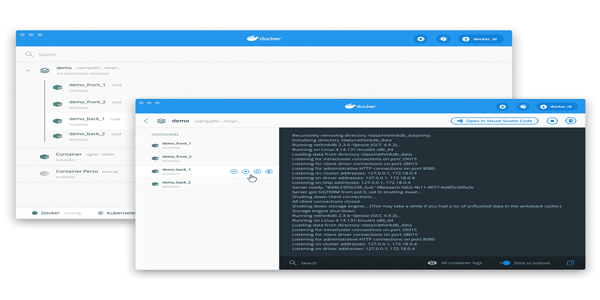
On the other hand, Docker desktop is a GUI that better visualizes all containers (processes) to imagine better what’s going under the hood. It gives you access to docker hub and docker-swarm CLI commands and allows you to run, pause or stop containers – Better for beginners.
How to Install Docker to your PC?
The easiest way to get started is installing docker desktop, which installs CLI and daemon in the backend, which is necessary to run docker commands. Here is how to do it.
Note: For a smooth process, kindly create an account. It’s free!
For Windows
- Head over to Docker Desktop For Windows website.
- Click on Docker For Windows button and download the setup file.
- Accept the terms and conditions. Follow through the rest installation guide, and you are done.
- Open the desktop application and go through the tutorial. They are highly suggested!
Note that you must meet the system requirements listed on the downloading page.
For Mac
- Head over to the Docker Desktop For Mac website.
- Depending upon the chip type, “Intel” or “Apple Silicon,” click on the download button.
- Accept the terms and conditions. Follow through the rest installation guide, and you are done.
- Open the desktop application and go through the tutorial. They are highly suggested!
For Linux
Unfortunately, the process could be more straightforward for Linux, but it isn’t. It uses a KVM (Kernel Virtual Machine) method to install Docker. This loads a custom docker VM (desktop-Linux), which leads to the non-availability of images and containers deployed on Docker Desktop for Linux.
Nevertheless, if you still want to install the Docker- Desktop for your machine, follow the tutorial guide on Install on Linux | Docker page.
Here is a snapshot of how the desktop will look like:
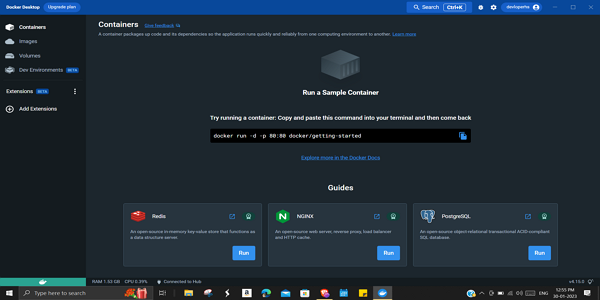
Having installed Docker, it’s time to use it; let’s get going!
Understanding the Basics of Using Docker
Before using Docker, a few things need to be fixed. Please do so to avoid errors during the workflow.
Prerequires (WSL & Docker Daemon)
For Windows users, the Windows Subsystem For Linux (WSL) is required to follow the tutorial. To install WSL, open your terminal with admin permission and run the following command:
will --install
This installs the latest ubuntu version of Linux.
Next, to use Docker Daemon, open your docker desktop and wait till the whale icon turns green. Now minimize the window and follow along:)
Pulling Images
The primary usage of Docker is to replicate the environment using images and containers. So let’s start by pulling some images (this case, Nginx).
To pull containers, you can use the following:
docker pull .
This pulls the latest container of the image name from the docker hub.
Now, as we are pulling the Nginx image, our code will be:
docker pull nginx
We need to specify the version as a flag to add a custom version. For example, this pulls the Nginx 1.23 version:
There are multiple flags, each corresponding to a specific image. You can access other version tags here.
To access tags for different containers, you can head to the Docker Hub website, select your desired image and look under Tags.
Here is a snapshot:

To check if everything worked fine, you can run the following:
docker images
The output will look something like this:
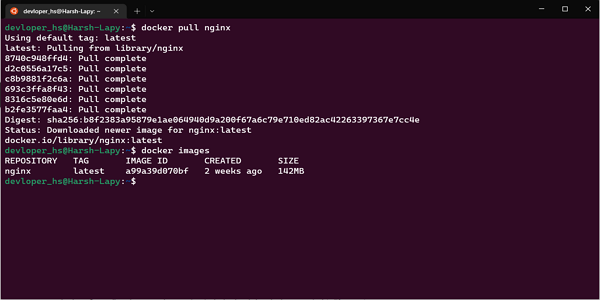
This gives all the images listed on your local storage (Yup, it stores your images locally and is called a container!)
Next, let’s run the container.
Run Container
To run the image (containers), type in the following command.
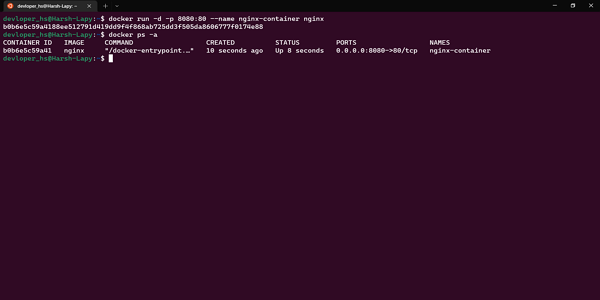
docker run -d -p 8080:80 --name container-name nginx
Here are a few things to know while executing:
- docker run :- default command to run containers & docker native
- -d:- This flag tells it to run the container in the backend, detached to a terminal (A life saver!)
- -p:- Means on which Docker can expose the port to use for the container. As you may recognize, 8080 is the default for the local host at port 80.
- –name:- This tag allows users to give a custom name to their containers for easy navigation. Make sure you add something relatable to the project, like an nginx-container.
- nginx:- service you want to run inside your container.
To check if everything ran according to plan, execute the following:
docker ps
This will list all the running containers – foreground and background. You can also check with Docker Desktop by checking STATUS as running.
OR
docker ps -a
This displays all the containers present on the local system, despite their status.
Output:
Stopping & Starting Containers
Sometimes you need to start or stop the containers at your disposal. You can enable the functionality using the following:
docker stop
docker start
E.g., To stop the nginx container, you will use the following:
docker stop nginx-container
You can verify the execution by checking the Exited status in Docker Desktop.
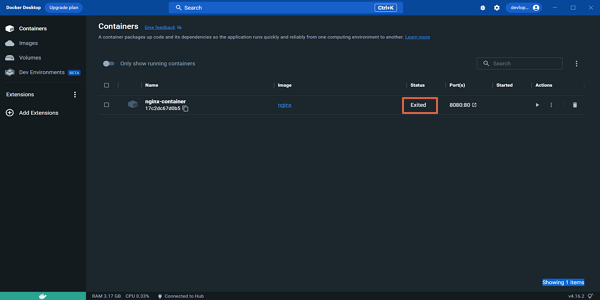
Tip: Make sure to stop the container permanently, else it will keep using your resource in the background leading to a slowing of your machine yourself
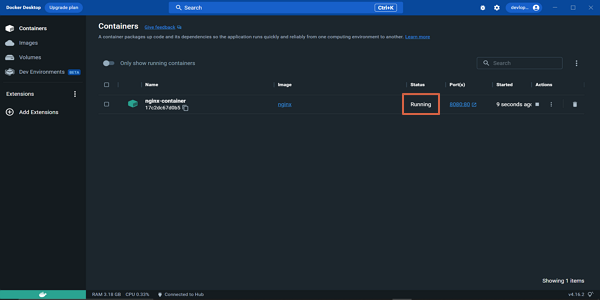
To restart the container, use the following:
docker start nginx-container
To verify again, check for the Running status beside the container name in Docker Desktop.
These are all the basic CLI commands needed to start using Docker. Let’s now look at the other side of the application usage – Containerizing.
Building A Custom Image
Remember, the whole point of Docker is to containerize your code to ship it around the globe. Let’s now look at how you can build your image and run it later.
Note: This section assumes you are good with Command Line Interface usage and have VS Code installed.
Also, the whole point here is to show you how to use Docker by replicating a real-case scenario. So this tutorial uses a basic HTML template for a web app starting point.
Defining Scenario
You(Harish) are working on a web app. Suddenly there is a bug, and you are unable to fix it. You contact your developer friend(Lisa), who says he can help you.
So you share the repo. But the fact that she is using the macOS and a different version of nginx(for web hosting), she faces dependency issues.
Knowing about Docker, she asks you to create a custom image and share it with him. Let’s see how you will handle the given task.
Structure
Here is what a typical process of building your image looks like in Docker terms:
- You start by creating a docker file that holds all the instructions to build the environment from the ground up.
- You build & push the image using the CLI commands and add a name/ tag to the image for easy searchability.
- Now you share the image tag, and your friend can pull the image and spin up a container in his system.
Let’s see this in action!
Building The Web App- Optional
In the actual case scenario, you may already have your app/project, but for the tutorial’s sake, let’s create one.
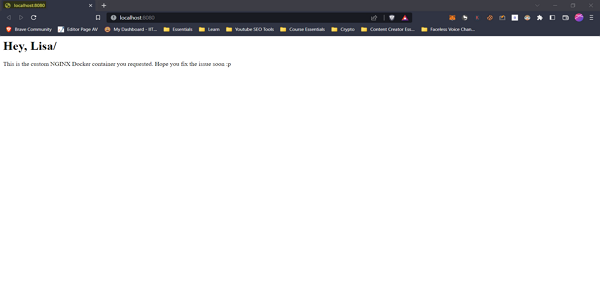
Open your vs. code, create a new file called index.html, and paste the below code:
Hey, Lisa/
This is the custom NGINX Docker container you requested. Hope you fix the issue soon :p
As mentioned above, this basic template will serve as our project.
The next step is to write the docker file itself.
Writing Docker File
This is a crucial process. It’s worth noting that the daemon treats each statement in a file in terms of steps. So to make sure everything goes smoothly, consider writing them in order. You can find all details here.
To start, create a new file called the docker file. Inside it, write the following instructions:
FROM nginx:latest
COPY ./index.html /usr/share/nginx/html/index.html
Let’s now look at the code.
In line 1 FROM command pulls the latest version of the nginx image from the hub, acting as a base to build the custom image. Think of it as running a custom nginx version at the top of the latest version for better reproducibility in case of fallback.
By default, nginx itself comes with an index.html file, so it’s essential to overwrite that with our web app. The same is done in line 2 using the COPY command, which takes the file to copy and copies the path. So read the commands as:
COPY file path/to/copy
That’s all you need to do. Now let’s build the image.
Building Docker Image (Custom)
To build the docker image, we will use its build command:
docker build -t image-name .
Here -t refers to the tag, and image-name refers to any name you define but make sure it’s meaningful. Also, the “.” at the end is necessary and not a mistake.
So to build the custom container you defined, code changes to:
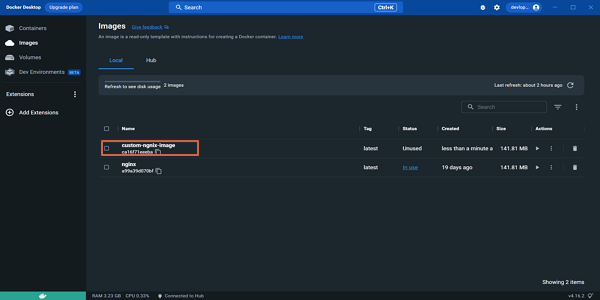
docker build -t custom-ngnix-image .
The building process may take a few minutes but be patient. Once it is successfully done, you will see the below as output.
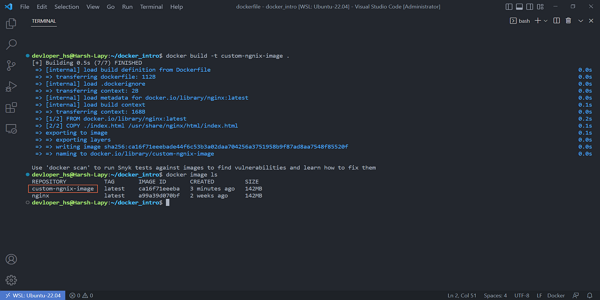
To verify if everything worked fine, check using desktop app or use :
docker image ls
This list out all the images available on your machine.
Output:
So you made the image with a custom-ngnix-image tag and shared it with a friend. Let’s now see how she can rebuild the environment using the same.
Running Container (Custom)
To run the container, she open’s the terminal and pastes the following command:
docker run -d -p 8080:80 --name custom-container custom-ngnix-image
docker ps
Well, if the above looks fancy. Here is a generic version:
docker run -d -p 8080:80 --name container-name image-name
If you see, everything looks familiar to the previously discussed run command, with two differences:
- –name:- This flag has the new container name (custom-container). This will be the name to distinguish this container/process from the rest of your system.
- image-name:- Observe the name of the custom image you defined while building the container. Make sure to use the same name as in the 1st line of code.
Finally, to check the image tag in case / check the status, they can run the following:
docker ps
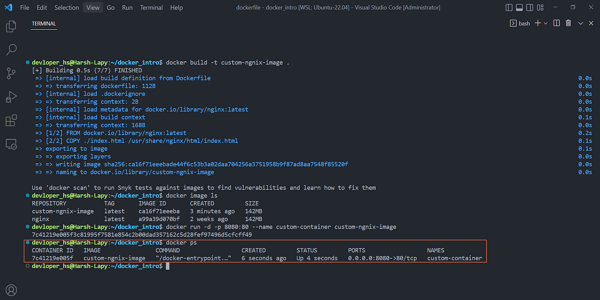
Again this will list all the running containers, but notice the NAMES column; it has the same tag she defined. Also, it’s worth knowing that despite the given name, it assigns a unique container ID to each process.
Verification
Remember, we overwrote the index.html(web app) file. It’s worth checking whether that web app is hosted on nginx.
To check it, visit the local host (why so?) and check if it displays a web app. In our case, it should display the text in the index.html file.
Output:
The above method can be used to host a full fledge app too. You first must build the image and open the port you defined for the daemon to listen to.
Note: Make sure you stop the container after use. Pretty important!
Conclusion
Suppose you have come this far; congrats! You know far more than your peers and can start using Docker. Here is what we have learned today:
- Why Docker – We started by seeing where it becomes necessary for development operations. I hope Harish and Lisa can now fix their app in no time.
- Fundamentals – We learned about Docker, the fundamentals of how it works, and understand the terminologies such as file, image, and containers. Apart from this, we also looked at CLI and Desktop.
- Installation – We learned different ways of installing it across multiple platforms.
- Running Containers – We ran containers/ process using pre-built images and saw a lot of CLI command in the process. Remember the usage of tags and what they do.
- Building Custom Containers – We took our understanding to the next level by creating our image (custom – image) and looking at how to run and verify it. Again, we learned a few more commands, usage, and syntax.
So I hope you are convinced why it is a must tool for devs and dev teams and how it can aid your development journey.
If you face any issue with any of the sections or commands, feel free to reach out to me on my socials: LinkedIn, Twitter, or Instagram.
The media shown in this article is not owned by Analytics Vidhya and is used at the Author’s discretion.
A dynamic and enthusiastic individual with a proven track record of delivering high-quality content around Data Science, Machine Learning, Deep Learning, Web 3.0, and Programming in general.
Here are a few of my notable achievements👇
🏆 3X times Analytics Vidhya Blogathon Winner under guides category.
🏆 Stackathon by Winner Under Circle API Usage Category - My Detailed Guide
🏆 Google TensorFlow Developer ( for deep learning) and Contributor to Open Source
🏆 A Part Time Youtuber - Programing Related content coming every week!
Feel free to contact me if you wanna have a conversation on Data Science, AI Ethics & Web 3 / share some opportunities.


