This article was published as a part of the Data Science Blogathon.
Introduction
Pytorch is a deep learning framework used extensively for various tasks like Image classification, segmentation, object Identification. In such cases, we’ll have to deal with various types of data. And it’s probable that most of the time, the data may not be in the desired format we need. That’s where transformations come to the rescue.
The torchvision.transforms module provides various image transformations you can use. . We use transforms to perform some manipulation of the data and make it suitable for training torchvision module of PyTorch provides transforms for common image transformations. These transformations can be chained together using Compose.
Let’s look at a few of them in this article! Ready?
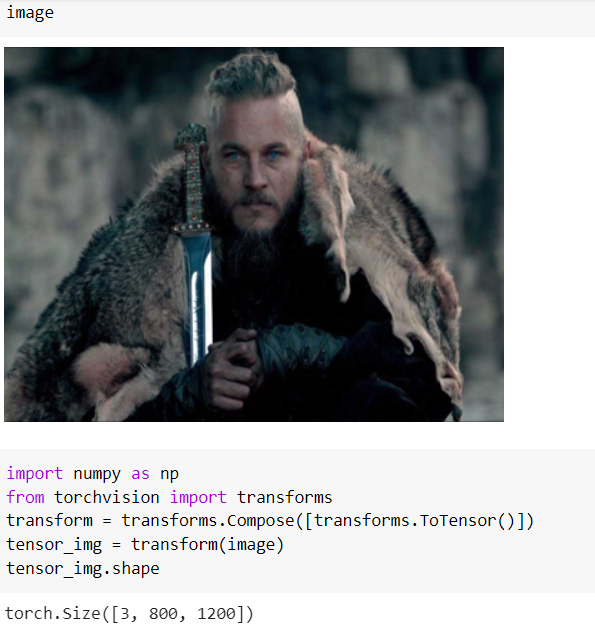
1.ToTensor
This is a very commonly used conversion transform. In PyTorch, we mostly work with data in the form of tensors. If the input data is in the form of a NumPy array or PIL image, we can convert it into a tensor format using ToTensor.
The final tensor will be of the form (C * H * W). Along with this, a scaling operation is also performed from the range of 0–255 to 0–1.
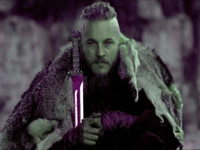
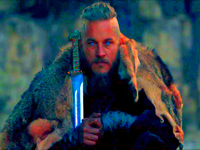
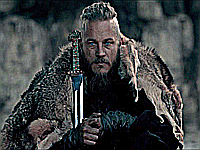
Let’s understand it better with an example. In this blog, I’ll be using an image of Ragnar (my favorite fictional character) to perform transforms.
2.Normalize
This operation will take a tensor image and normalize it with mean and standard deviation. It has 3 parameters: mean, std, inplace. We need to provide a sequence of means for the 3 channels as parameter ‘mean’ and similarly for ‘std’. If you make ‘inplace’ as True, the changes will be reflected in the current tensor.
torchvision.transforms.Normalize([meanOfChannel1, meanOfChannel2, meanOfChannel3], [stdOfChannel1, stdOfChannel2, stdOfChannel3])
#Example:
transforms.Normalize((0.5, 0.5, 0.5), (0.5, 0.5, 0.5))
3.CenterCrop
This will crop the given tensor image at the center. You can provide the size you want to crop as input in the form of (height, width) to transforms.CenterCrop(). Let’s implement this on our image and check.
transform = transforms.Compose([transforms.ToTensor(),transforms.CenterCrop((200,100))])
tensor_img = transform(image)
tensor_img.shape
Output: torch.Size([3, 200, 100])
What happens if you provide only one size dimension instead of two?
It’ll assume it as a square and a crop of (size, size) will be made.
What if the dimensions given for the crop turn out to be larger than the original dimensions?
Along such edges, the image will be padded with 0!
4. RandomHorizontalFlip
This transformation will flip the image horizontally (random) with a given probability. You can set this probability through the parameter ‘p’. The default value of p is 0.5.
Check my example below to understand.
transform = transforms.Compose([transforms.RandomHorizontalFlip(p=0.9)])
tensor_img = transform(image)
tensor_img
See the original and the flipped image!

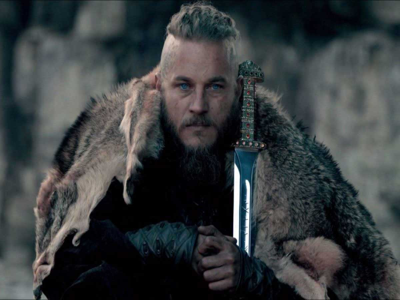
5. RandomRotation
This transformation rotates the image randomly by an angle. The angle in degrees can be provided as input to that parameter “degrees”.
transform = transforms.Compose([transforms.RandomRotation(degrees=180)])
tensor_img = transform(image)
tensor_img
Check out the transformation for the above code!
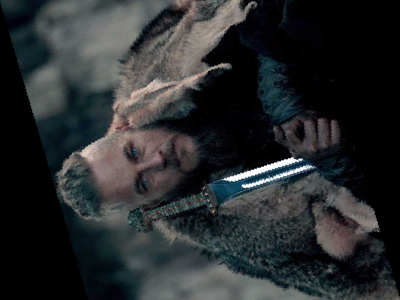
6. Grayscale
This transformation will change the original RGB image into grayscale (i.e Black and white). You can provide how many channels you want as input to the parameter “num_output_channels”.
transform = transforms.Compose([transforms.Grayscale(num_output_channels=1)])
tensor_img = transform(image)
tensor_img
The output is shown below.
7. GaussianBlur
Here, the image will be blurred with a randomly chosen Gaussian blur. It is compulsory to provide the kernel_size argument.
transform = transforms.Compose([transforms.GaussianBlur(kernel_size=501)])
tensor_img = transform(image)
tensor_img

8. RandomApply
This transformation will randomly apply a given list of transformations with probability.
transform = transforms.RandomApply([transforms.RandomSizedCrop(200),transforms.RandomHorizontalFlip()],p=0.6)
tensor_img = transform(image)
9. Compose
We have been using Compose() throughout this article. To define it clearly, it composes several transforms together.
transforms.Compose([transforms.Grayscale(1),transforms.CenterCrop(10), transforms.ToTensor()])
Some of the transforms are to manipulate the data in the required format. Whereas, transforms like Grayscale, RandomHorizontalFlip, and RandomRotation are required for Image data Augmentation.
10. Functional Transforms
In all the transformations we learned till now, you can notice that the parameters are generated randomly. This usually is sufficient for data augmentation. But, sometimes you may require a more fine-grained control of the transformation pipeline. In this case, functional transforms can be used. Here, you get to specify or generate all the parameters. An added advantage is that a particular defined functional transform can be applied to multiple images.
All the functional transforms can be accessed from torchvision.transforms.functional.
Now let’s dive in-depth into the different functional transformations PyTorch provides.
A) adjust_brightness:
This focuses on adjusting the brightness of an image. It takes the image as input in the form of a PyTorch tensor. It also has an important parameter “brightness_factor”. This will denote how to actually change the brightness. For example, if the value is 1, you’ll get the same image you gave as input. If the value is more than 1, you’ll get a brighter image. If it’s less than 1, you’ll get a darker image. You can pass a float value accordingly. The image returned will be in a tensor or PIL image.
new_img = transforms.functional.adjust_brightness(image,brightness_factor=2)
new_img

B) adjust_contrast:
Above we saw how to adjust brightness, here we have another transform for adjusting the contrast of the image. It takes two input parameters: the image in the tensor form and “contrast_factor”. The second parameter will input a float value that will tell how the contrast has to be adjusted. But it cannot be negative.
new_img = transforms.functional.adjust_contrast(image,contrast_factor=3.8)
new_img
C) adjust_hue
Hue is an important property of an image. Pytorch allows you to adjust it through the transforms.functional.adjust_hue .
Wonder how it works?
First, the image will get converted into HSV (Hue, saturation, value) form. The changes will be made in the H channel as per our parameters. After changes, the image will be converted to its original form. The important parameter for this is “hue_factor” . It can be a float value in the range of [-0.5.0.5]. Try implementing the below example.
new_img = transforms.functional.adjust_hue(image,hue_factor=0.3)
new_img
D)adjust_saturation
This is to adjust the color saturation of the input image. Similar to the above cases, we have a “saturation_factor” parameter that decides how saturation is to be varied. This inputs a float value. If you set it as 0, you’ll get a black and white image.
new_img = transforms.functional.adjust_saturation(image,saturation_factor=6)
Output is the image given below!
E) adjust_sharpness:
You can adjust the sharpness of the image through this transform. It takes a float value as input for the “sharpness_factor” parameter. This value can be anything except negative. In the below code, I have used a sharpness factor of 10, which means the transformed image will be 10 times sharp as the original.
new_img = transforms.functional.adjust_sharpness(image,sharpness_factor=10)
Check out the output!
F) equalize:
This transform will equalize the histogram of an image.
How does that happen?
It will apply a non-linear mapping to the input, which shall create a uniform distribution of grayscale values in the output.
new_img = transforms.functional.equalize(image)
These are a few important functional transformations that will help in the image pre-processing stage. They can be used together in a combined way also.
I hope you liked the read!
Connect with me on LinkedIn: https://www.linkedin.com/in/shri-varsheni/
Connect over email: [email protected]
The media shown in this article on Pytorch transformations are not owned by Analytics Vidhya and is used at the Author’s discretion.


