This article was published as a part of the Data Science Blogathon
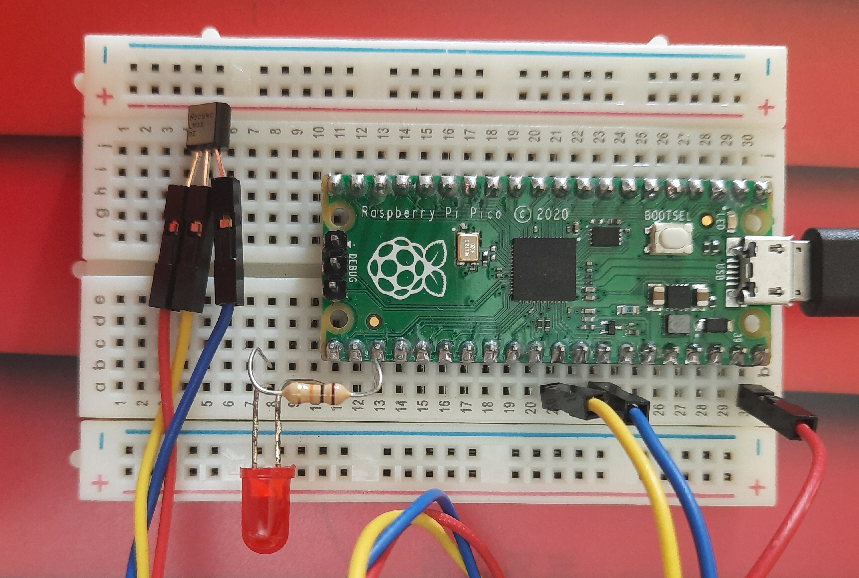
This article describes an approach to using machine learning modules on Microcontroller devices (or MCUs). Some time back I published an article Meet your first Microcontroller about creating home-automation systems (like the prototype seen in the figure below) using MCUs, and that article provides the background for this description.
Note: A different approach called TensorFlow Lite supports TensorFlow inference functions on certain MCUs, but that is not the subject of this article. This article aims to highlight the power and flexibility of MCUs (despite their limitations) so the do-it-yourself, from-scratch spirit is the essence.
But what is a Microcontroller (or MCU)?
MCUs are computers in very small packages without the usual peripherals (speakers, display, keyboard, mouse, etc.) but including something new: I/O points that can be connected to other devices to monitor and manage those external devices. MCUs form the core of smart gadgets like washing machines, car fuel injection systems, mobile phones, etc.
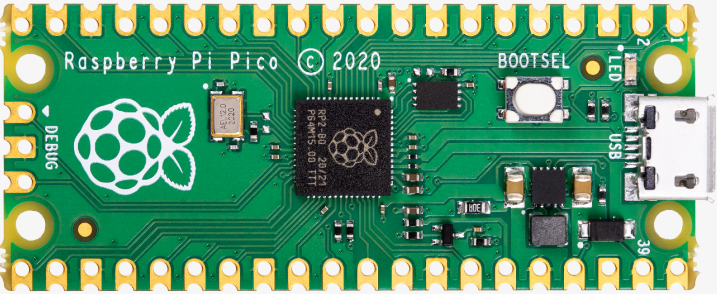
The Raspberry Pi Pico
The image seen below is the Raspberry Pi Pico (Pico for short), MCU on which we will implement an alarm system that includes a KNN classification algorithm. The entire board measures just 21 mm × 51 mm!
The Pico has limited processing power and memory, so (like most other MCUs), it has no OS and has very limited high-level programming capability. It supports a restricted form of Python known as MicroPython, which unfortunately does not support many essential packages like NumPy, pandas, Scikit-learn, etc. So we must develop our KNN algorithm from scratch.
The Problem to Solve
If you have already read Meet your first Microcontroller you will know that it uses two temperature measurements to deduce whether your fridge door has been left open by mistake. The Pico acquires both temperatures every 5 seconds, evaluates the difference, and lights up the red LED if the temperature below the fridge door is more than 5 C below the ambient temperature. You can see the Python code that runs on the Pico in the GitHub repository.
In machine learning terms, we have two features Tamb and Tbfd (ambient and below-fridge-door temperatures respectively). The result we seek (y) is easily obtained from the following formula:
y = Tbfd <= Tamb - 5
Which is really, really simple. Why would anyone want to use machine learning for this? As I said before, this article is an exercise to investigate the technological limits of MCUs and to be prepared with a few tricks to use when push comes to shove. Our KNN algorithm in MicroPython will not be limited to 2 features only but can handle more complex problems (subject to Pico’s computational limitations of course). So while this KNN algorithm is an overkill for this application, it would be entirely appropriate for a problem with a more complex decision boundary.
A Machine Learning Algorithm for the Pico
I chose to use KNN as it is easy to understand (hence also debug) and because several versions written from scratch are available on the net.
Training the KNN Algorithm
While a KNN does not require prior training, it does need training data. Typical ML datasets (e.g. the Iris Data Set) are based on empirical observations, but my training data for this application is completely synthetic. You can see the code used to generate the data below.
train_data = []

def generate_training_data():
  global train_data
  train_data = []
  for temp_amb in [10 + 2.5 * n for n in range(13)]:
    for temp_door in [10 + 2.5 * n for n in range(13)]:
      if temp_door  temp_amb + 2.5:
        train_data.append([temp_amb, temp_door, 'FAULT'])
      else:
        train_data.append([temp_amb, temp_door, 'NORMAL'])

generate_training_data()
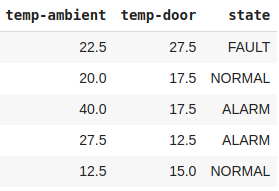
The training data has 169 samples (or instances), each containing two features (the temperatures) and one class (one of the strings NORMAL, ALARM, or FAULT). A few sample rows are shown below.
But the entire data-set is best understood when viewed as a scatter plot in the figure below. The two axes represent the range of the features (from 10 to 40 C), and the dots in the diagram are the training data instances. The orange dots represent samples of ALARM data (fridge door left open). The green dots represent samples of NORMAL data (fridge door closed, and the two temperatures are within a permitted error range of +/- 2 C). The blue dots represent a FAULT in the system (software bug or poorly calibrated temperature sensors).

The code for producing this visualization can be seen below.
import pandas as pd

df = pd.DataFrame(train_data, columns=['temp-ambient', 'temp-door', 'state'])
print(len(df))
print(df['state'].value_counts())

colormap = {'FAULT': 'royalblue', 'ALARM': 'coral', 'FIRE': 'maroon', 'NORMAL': 'limegreen'}
colors = df['state'].map(colormap)
ax = df.plot(kind='scatter', x='temp-ambient', y='temp-door', grid=True, figsize=(8, 8), c=colors, s=96)
ax.set_xlabel('Ambient Temperature (C)', fontsize=14)
ax.set_xlim([8, 42])
ax.set_ylabel('Door Temperature (C)', fontsize=14)
ax.set_ylim([8, 42])
None
The KNN Algorithm for the Pico
Since Pico’s MicroPython does not support NumPy, the usual ML libraries like Scikit-learn (virtually all of which depend on NumPy) are automatically forbidden. The use of a from-scratch version of KNN for this application is therefore non-negotiable. The following code is the KNN algorithm we will use.
from math import sqrt

def encode_class_names(dataset):
  class_names = [row[-1] for row in dataset]
  class_names_set = set(class_names)
  index_lookup = {name: i for i, name in enumerate(class_names_set)}
  for row in dataset:
    row[-1] = index_lookup[row[-1]]
  return {i: name for i, name in enumerate(class_names_set)}


def distance(row1, row2):
  feature_pairs = zip(row1, row2)
  deltas = [(a - b) for a, b in feature_pairs]
  sum_diagonals_squared = sum([delta ** 2 for delta in deltas])
  return sqrt(sum_diagonals_squared)

def nearest_neighbors(dataset, test_row, num_neighbors):
  distances = [distance(test_row, train_row) for train_row in dataset]
  row_distance_pairs = list(zip(dataset, distances))
  row_distance_pairs.sort(key=lambda tup: tup[1])
  neighbor_rows = [pair[0] for pair in row_distance_pairs[:num_neighbors]]
  return neighbor_rows

def predict(dataset, test_row, num_neighbors):
  neighbors = nearest_neighbors(dataset, test_row, num_neighbors)
  neighbor_class_names = [row[-1] for row in neighbors]
  prediction = max(set(neighbor_class_names), key=neighbor_class_names.count)
  return prediction
The code shown above is loosely based on (but not the same as) a tutorial by Jason Brownlee, titled “Develop k-Nearest Neighbors in Python From Scratch“, accessed July 26th, 2021. That article provides a great explanation of how KNN works.
The choice of a home-grown from-scratch version of KNN will obviously slow down the prediction code, but the response time is still very adequate for an application that only needs a prediction every few seconds.
Testing the Algorithm
The following code validates the algorithm by varying each temperature across the full range (10 – 40 C) in steps of 0.5 C.
dataset_copy = [e[:] for e in train_data[:]]
predictions = []
for temp_amb in [t / 2 for t in range(20, 81)]:
    for temp_door in [t / 2 for t in range(20, 81)]:
      label = predict(dataset_copy, [temp_amb, temp_door], num_neighbors)
      #class_name = class_name_table[label]
      predictions.append([temp_amb, temp_door, label])

df2 = pd.DataFrame(predictions, columns=['temp-ambient', 'temp-door', 'state'])
print(len(df2))
print(df2['state'].value_counts())
colormap = {'FAULT': 'royalblue', 'ALARM': 'coral', 'FIRE': 'maroon', 'NORMAL': 'limegreen'}
colors = df2['state'].map(colormap)
ax = df2.plot(kind='scatter', x='temp-ambient', y='temp-door', grid=True, figsize=(8, 8), c=colors, s=96)
ax.set_xlabel('Ambient Temperature (C)', fontsize=14)
ax.set_xlim([8, 42])
ax.set_ylabel('Door Temperature (C)', fontsize=14)
ax.set_ylim([8, 42])
None
The following figure depicts those predictions. The colors are the same as those used in the previous scatter plot above.
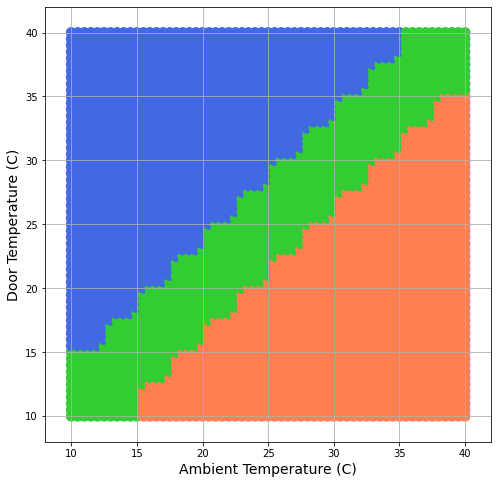
The green band represents the NORMAL area (where the two temperatures are approximately equal). The decision boundary between the 3 regions (FAULT, NORMAL, and ALARM) is irregular, but that is typical for KNN prediction systems.
Observe that this test was run directly on colaboratory, not on the Pico. The visualization too could not have been run on the Pico as it does not support pandas.
Integration with Prior Code
The code for generating the training data and the code for making a KNN prediction have to be integrated with the existing code (in the GitHub Repository), and the revised Python file has to be uploaded onto the Pico board using a Thonny IDE (as described in Chapter-2 of the Get Started with MicroPython on Raspberry Pi Pico book). Since these steps are only of interest to those who have a Raspberry Pi Pico board, I will not go into those details any further.
Readers interested in starting with the Pico should read my article Meet your first Microcontroller.
You can connect with me on LinkedIn.
Conclusions
The idea of this article was to highlight the problems and possibilities we meet when implementing machine learning solutions on Microcontroller devices. Though the example solution is trivial, readers may use this approach to explore the uses and applications of Microcontroller devices.


Just for your information, uPython for ESP32 can support both subset of NumPy and SciPy through the ulab project.